Okay, so picture this: it’s Christmas Eve, the fire’s crackling, carols are softly playing, and the air is thick with the scent of pine and anticipation. And then, you bring out *this* Buche de Noel. It’s not just a dessert; it’s the centerpiece, the showstopper, the one thing everyone oohs and aahs over. I remember the first time I made one from scratch. I was convinced it was going to be an absolute disaster, something only pastry chefs in fancy kitchens could pull off. My grandmother’s recipe book was my guide, and let me tell you, it felt like a sacred quest. But lo and behold, it worked! And not only did it work, it was melt-in-your-mouth delicious, a perfect swirl of light Chocolate Cake and creamy filling. Forget those store-bought versions that taste a bit…well, artificial. This homemade Buche de Noel is a labor of love, yes, but it’s one that’s so rewarding, and honestly, easier than you think. It’s like a hug in cake form, and it always brings such joy to our holiday table.
What is Buche De Noel?
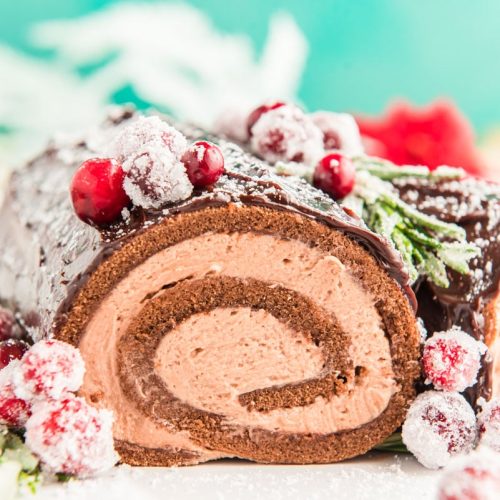
So, what exactly is this fancy-sounding thing? Buche de Noel, which literally translates to “Yule log” in French, is a traditional Christmas cake that’s meant to resemble a yule log that would have been burned in the hearth during winter solstice celebrations in medieval Europe. It’s essentially a rolled sponge cake, usually chocolate or vanilla, filled with whipped cream or buttercream, and then frosted to look like a log, complete with bark-like textures and often decorated with meringue mushrooms or holly leaves. Think of it as a charming, festive cousin to a Swiss roll, but with a whole lot more holiday spirit packed into it. The idea is to bring the warmth and rustic beauty of the winter forest right onto your dessert plate. It’s whimsical, it’s celebratory, and it’s a delicious way to mark the festive season.
Why you’ll love this recipe?
There are so many reasons why this Buche de Noel recipe has become my absolute go-to, and I just know you’re going to adore it too. First off, the flavor is just out of this world. The chocolate cake is incredibly moist and has just the right amount of rich cocoa flavor without being too overpowering. Then you have the filling – I’m a huge fan of a classic vanilla bean whipped cream, but a light Chocolate Mousse or even a coffee-infused buttercream is also divine. It’s this perfect balance of sweet and decadent that makes each bite pure bliss. And honestly, the simplicity of it truly surprises people. While it looks incredibly sophisticated, the actual process is quite straightforward. You’re essentially making a thin sheet cake, rolling it up, and decorating. It’s far less intimidating than it appears! Plus, it’s surprisingly cost-effective. Most of the ingredients are pantry staples, and you don’t need any fancy equipment, just a good jelly roll pan and a bit of patience. What I love most about this particular recipe is its versatility; you can really play around with the filling and decorations to make it your own. It’s perfect for Christmas, of course, but I’ve also found it makes a stunning dessert for birthdays or anniversaries when you want something a little extra special. It’s definitely a step up from a regular sheet cake, and the “wow” factor is enormous.
How do I make a Buche de Noel?
Quick Overview
Making this festive Buche de Noel is all about preparing a delicate chocolate sponge cake, filling it generously, and then artfully frosting it to resemble a rustic log. We’ll start by baking a thin, moist cake that’s designed to roll without cracking. Then, a luscious, airy filling will be spread evenly. The magic happens when we carefully roll the cake, creating those beautiful layers. Finally, a rich chocolate frosting will be applied with a fork or spatula to mimic tree bark, bringing our Yule log to life. It’s a straightforward process that, with a little care, yields spectacular results.
Ingredients
For the Main Batter:
This is the foundation of our beautiful log. We want a cake that’s light, airy, and pliable enough to roll without breaking. That’s why a sponge-style cake is key here. I always use good quality unsweetened cocoa powder – it makes a huge difference in the depth of flavor. Make sure your eggs are at room temperature; they incorporate much better into the batter. And for the flour, all-purpose is perfectly fine, but a cake flour can lend an even more tender crumb if you have it on hand. I usually go for about 3/4 cup of all-purpose flour. For sweetness, granulated sugar is standard, around 1 cup should do it. And don’t skimp on the vanilla extract; it really enhances the chocolate notes. A pinch of salt to balance everything out is a must. We’ll also need some baking powder to give it a little lift.
For the Filling:
This is where you can really have fun! My personal favorite is a simple vanilla bean whipped cream. It’s light, refreshing, and perfectly complements the rich chocolate cake. You’ll need heavy whipping cream, a good amount of powdered sugar (or confectioners’ sugar) for sweetness, and plenty of vanilla bean paste or extract. If you use a vanilla bean, scraping out those tiny seeds adds a wonderful visual and intense flavor. For a richer, more decadent option, a chocolate mousse or a coffee-flavored buttercream is also absolutely divine. If you go the mousse route, make sure it’s chilled and set before spreading. For buttercream, ensure it’s at a spreadable consistency. I sometimes add a tablespoon of espresso powder to my chocolate buttercream for an extra kick!
For the Glaze (Frosting):
This is what gives our Buche de Noel its signature “log” appearance. A classic chocolate ganache or a simple chocolate buttercream works beautifully. For ganache, you’ll need good quality semi-sweet chocolate chips or chopped chocolate, and heavy cream. The ratio is usually 1:1 for a pourable but still thick glaze. If you prefer buttercream, you’ll need softened butter, powdered sugar, cocoa powder, a splash of milk or cream, and vanilla extract. The key is getting the consistency right – it should be spreadable but firm enough to hold its shape and create those bark-like textures. I like to use a fork or a small offset spatula to drag through the frosting and create ridges that look like bark. For a bit of extra sparkle, sometimes I dust it with a little cocoa powder or powdered sugar like a dusting of snow.
Step-by-Step Instructions
Step 1: Preheat & Prep Pan
First things first, let’s get our oven preheated to 350 degrees Fahrenheit (175 degrees Celsius). This is a crucial step; you want the oven nice and hot so the cake bakes evenly. Now, grab a 10×15 inch jelly roll pan. If you don’t have one, a similar-sized baking sheet will work, though the edges might not be as defined. Line the pan with parchment paper, making sure it goes all the way up the sides. You can even grease the pan lightly before laying the parchment, just to ensure absolutely nothing sticks. I like to leave a little overhang on the parchment paper, which makes it super easy to lift the cake out later. This little step saves so much frustration, trust me!
Step 2: Mix Dry Ingredients
In a medium-sized bowl, we’re going to whisk together our dry ingredients. This includes the flour, unsweetened cocoa powder, baking powder, and salt. Whisking them together thoroughly at this stage ensures that the leavening agents and salt are evenly distributed throughout the batter. This means your cake will rise evenly and have a consistent flavor. No one wants a bite that’s too salty or lacks lift! Give it a good 30 seconds or so, making sure there are no clumps of cocoa powder hiding in there. It should look like a uniform, beautiful brown powder.
Step 3: Mix Wet Ingredients
Now, for the wet ingredients. In a larger bowl, we’ll beat the eggs and granulated sugar together until they are pale yellow and slightly thickened. This process is called creaming, and it’s important because it incorporates air into the batter, which contributes to the cake’s lightness. I usually use an electric mixer for this, but a whisk and some elbow grease will also do the trick. Once that’s looking fluffy, we’ll gently mix in the vanilla extract and any melted butter or oil if your recipe calls for it. Make sure everything is well combined but avoid over-mixing at this stage. We’re looking for a smooth, emulsified mixture.
Step 4: Combine
Here’s where our batter starts to come together. Gradually add the dry ingredients to the wet ingredients, mixing on low speed or by hand until *just* combined. It’s really important not to overmix here. Overmixing can develop the gluten in the flour too much, resulting in a tough cake, and we definitely don’t want that for our delicate Buche de Noel. A few streaks of flour are okay; they’ll disappear as the batter bakes. The batter should be smooth and pourable, with a beautiful rich chocolate color. If it seems a little too thick, you can add a tablespoon or two of milk or even water to loosen it up.
Step 5: Prepare Filling
While the cake is baking, let’s whip up our filling. If you’re going for the classic vanilla bean Whipped cream: pour your cold heavy whipping cream into a chilled bowl. Add the powdered sugar and vanilla bean paste or extract. Whip on medium-high speed until stiff peaks form. Be careful not to over-whip, or you’ll end up with butter! The cream should hold its shape when you lift the whisk. If you’re using a different filling, prepare it according to its specific instructions, ensuring it’s chilled and at a good spreading consistency.
Step 6: Layer & Swirl
Once your cake has baked and cooled slightly (it should still be warm but not hot!), gently invert it onto a clean kitchen towel that has been lightly dusted with powdered sugar or cocoa powder. Carefully peel off the parchment paper. If you want a tighter roll, you can trim off the crispy edges of the cake with a sharp knife. Now, this is the fun part! Spread your prepared filling evenly over the cake, leaving about a 1-inch border along one of the longer edges. This border will help seal the roll. Then, starting from the edge *opposite* the border, tightly but gently begin to roll up the cake. Use the towel to help guide it. Once rolled, place it seam-side down on your serving platter or a piece of parchment paper.
Step 7: Bake
Pop that prepared batter into your preheated oven. We’re looking to bake it for about 10-12 minutes. You’ll know it’s done when the cake springs back lightly when touched and a toothpick inserted into the center comes out clean. Don’t overbake it, or it will become dry and prone to cracking when you roll it. The aroma that fills your kitchen at this stage is absolutely heavenly – that rich chocolate smell is a sure sign of holiday cheer!
Step 8: Cool & Glaze
After the cake has been rolled and is sitting seam-side down, it’s time for the frosting. Prepare your chocolate frosting or ganache. If you’re using ganache, let it cool slightly so it’s spreadable but not too hot. Spread the frosting all over the rolled cake, making sure to cover the entire surface. Now, grab a fork or a small offset spatula and gently drag it through the frosting to create a bark-like texture. You can make swirling patterns, lines, or random marks to mimic the texture of a tree trunk. Don’t aim for perfection here; the more rustic, the better! You can also add some meringue mushrooms or edible holly leaves for extra decoration.
Step 9: Slice & Serve
Allow the frosting to set for at least 30 minutes in the refrigerator before slicing. This helps everything firm up and makes for cleaner cuts. When you’re ready to serve, use a sharp serrated knife. Slice off the ends to reveal the beautiful swirl inside. Serve chilled or at room temperature. A dusting of powdered sugar can make it look like it’s covered in a light dusting of snow, adding to the winter wonderland effect. This Buche de Noel is truly a showstopper and guaranteed to impress!
What to Serve It With
This Buche de Noel is so versatile, it can truly fit into any part of your holiday meal or celebration. For a truly decadent breakfast, why not slice off a small piece and serve it alongside a warm mug of coffee or a creamy latte? The chocolate and coffee combination is always a winner, and a thin slice is just enough to satisfy a sweet craving without being too heavy for the morning. If you’re planning a festive brunch spread, this Yule log is absolutely perfect. You could serve it as part of a dessert buffet alongside some fresh berries and a dollop of extra whipped cream, or even slice it a bit thicker and present it as a star dessert. For an elegant after-dinner treat, serve a generous slice with a scoop of vanilla bean ice cream or a rich raspberry coulis. The tartness of the berries cuts beautifully through the sweetness of the cake and chocolate. And on those cozy evenings when you just need a little something sweet, a warm drink and a slice of this Buche de Noel is pure comfort. My family tradition is to have a small piece with hot chocolate on Christmas Eve while we open presents – it’s become such a special ritual for us.
Top Tips for Perfecting Your Buche De Noel
Over the years of making this Buche de Noel, I’ve picked up a few tricks that I swear by, and I’m happy to share them with you! For the cake itself, the key is not to overbake it. A slightly underbaked (but not raw!) sponge will be more pliable and less likely to crack when you roll it. I always keep a close eye on it in the last few minutes of baking. When it comes to mixing the batter, my mantra is “gentle does it.” Overmixing is the enemy of a tender cake. Mix just until everything is combined. For the filling, making sure your cream and bowl are well-chilled is essential for achieving those perfect stiff peaks. If you’re struggling to get your cream to whip, try adding a tablespoon of instant pudding mix for extra stability. When it comes to rolling the cake, if you’re really worried about cracking, don’t be afraid to roll it up while it’s still warm, using the towel as a guide. It will set as it cools. And for the frosting, I’ve found that letting the ganache cool to a thick but spreadable consistency is crucial. Too hot and it’ll melt the filling; too cold and it’ll be lumpy. For the “bark” effect, don’t overthink it. Just use the back of a fork and make random lines. The imperfections are what make it look so charmingly rustic. If you want to experiment with flavors, adding a tablespoon of espresso powder to the chocolate cake batter really intensifies the chocolate flavor without making it taste like coffee. For a gluten-free version, I’ve had success using a good quality gluten-free all-purpose flour blend, but you might need to adjust the liquid slightly as GF flours can absorb moisture differently. And if your cake does crack a little during rolling (it happens to the best of us!), don’t panic! The frosting will cover most imperfections, and a little crack can actually add to the rustic charm.
Storing and Reheating Tips
This Buche de Noel is a make-ahead dream, which is a lifesaver during the busy holiday season! Once it’s fully assembled and frosted, you can store it at room temperature for up to 2 hours, but for longer storage, the refrigerator is your best friend. Wrap the entire log snugly in plastic wrap, and then place it in an airtight container. It will stay fresh and delicious in the fridge for about 2-3 days. The flavors actually meld together beautifully after a day, making it even tastier! If you need to store it for longer, freezing is an option. Wrap it very well in a double layer of plastic wrap, then in a layer of aluminum foil, and pop it into a freezer-safe bag or container. It should keep well in the freezer for up to 2-3 months. To thaw, remove it from the freezer and let it defrost in the refrigerator, still wrapped, overnight. The key is to avoid condensation, which can make the cake soggy. For reheating, I generally don’t reheat Buche de Noel as it’s best served chilled or at room temperature. However, if it’s a very warm day and you prefer a slightly softer cake, you can let it sit at room temperature for about 30-45 minutes before serving. Always ensure your frosting is well-set before storing it in the fridge or freezer; this is especially important if you’ve used a whipped cream filling.
Frequently Asked Questions
Final Thoughts
There you have it – your very own guide to creating a show-stopping, absolutely delicious Buche de Noel. I truly hope you give this recipe a try. It’s more than just a cake; it’s a tradition, a memory-maker, and a symbol of warmth and celebration. The process itself is incredibly rewarding, and the look on your loved ones’ faces when they see this festive Yule log will be priceless. If you love rich chocolate desserts, you might also enjoy my decadent chocolate mousse or my gooey fudge brownies for other special occasions. Don’t be intimidated by its elegant appearance; this recipe is designed to be achievable for any home baker. I can’t wait to hear how your Buche de Noel turns out! Please leave a comment below with your thoughts, any variations you tried, or just to share your holiday baking success. Happy baking and Merry Christmas!
Buche De Noel
Ingredients
Chocolate Sponge
- 0.75 cup all-purpose flour
- 0.5 cup granulated sugar
- 0.33 cup unsweetened cocoa powder
- 1 teaspoon baking soda
- 0.5 teaspoon baking powder
- 0.25 teaspoon salt
- 2 large eggs room temperature
- 0.5 cup milk room temperature
- 0.25 cup vegetable oil
- 0.5 teaspoon vanilla extract
- 0.5 cup hot water
Chocolate Buttercream Filling
- 1 cup unsalted butter softened
- 3 cups powdered sugar sifted
- 0.5 cup unsweetened cocoa powder sifted
- 0.25 cup heavy cream
- 1 teaspoon vanilla extract
- 0.125 teaspoon salt
Chocolate Ganache Glaze
- 8 ounces semisweet chocolate chopped
- 1 cup heavy cream
Instructions
Preparation Steps
- Preheat oven to 350°F (175°C). Grease and flour a 10x15 inch jelly roll pan, and line it with parchment paper.
- In a large bowl, whisk together flour, sugar, cocoa powder, baking soda, baking powder, and salt.
- In a separate bowl, whisk together eggs, milk, oil, and vanilla extract.
- Add the wet ingredients to the dry ingredients and mix until just combined. Gradually stir in the hot water until the batter is smooth.
- Pour the batter into the prepared pan and spread evenly. Bake for 12-15 minutes, or until a toothpick inserted into the center comes out clean.
- While the cake is baking, spread a clean kitchen towel on your counter and dust it generously with powdered sugar. Once the cake is out of the oven, immediately invert it onto the towel. Carefully peel off the parchment paper.
- Starting from one of the shorter ends, tightly roll up the warm cake with the towel inside. Let it cool completely on a wire rack.
- To make the buttercream filling, beat softened butter in a large bowl until creamy. Gradually add sifted powdered sugar and cocoa powder alternately with heavy cream, mixing until smooth and fluffy. Stir in vanilla extract and salt.
- Once the cake is cool, unroll it carefully. Spread the buttercream filling evenly over the cake, leaving a small border.
- Re-roll the cake tightly, this time without the towel. Place the rolled cake seam-side down on a serving platter.
- To make the ganache glaze, heat the heavy cream in a small saucepan until it just begins to simmer. Remove from heat and pour over the chopped chocolate in a bowl. Let it sit for 5 minutes, then whisk until smooth.
- Pour the ganache over the rolled cake, allowing it to drip down the sides. Use a fork to create a bark-like pattern on the glaze.
- Refrigerate the Yule log for at least 30 minutes before slicing and serving.