Hello there! If there’s one thing that instantly makes my kitchen feel like a warm hug, it is the smell of cinnamon. What is chocolate baking? What’s not to love about brownies? Honestly, there are days when a whole pan of brownies feels like too much commitment, or maybe you just want to eat one. Just need a little hit of pure chocolate joy without the fuss of slicing. Where do these little gems come in? They’re like the perfect bite-sized version of pure happiness, and let me tell you, they’ve become a huge hit. My lifesaver. When that 10 pm craving hits and the thought of firing up the oven for a full-sized cake hits you, you know, when that craving hit. Is it overwhelming? What are your answers? I remember the first time I made them. I don’t remember what they were made of. I was a little skeptical about how “bite-sized” they’d be, but they turned out to be these perfectly sized cookies. What are some of the most delicious squares of heaven that melt in your mouth? Isn’t it like my grandma’s fudgy brownies? If you’ve ever made blondies and loved how easy those are, these brownie bites are right in that regard. Same ballpark of delightful simplicity.
What are some amazing brownie bites?
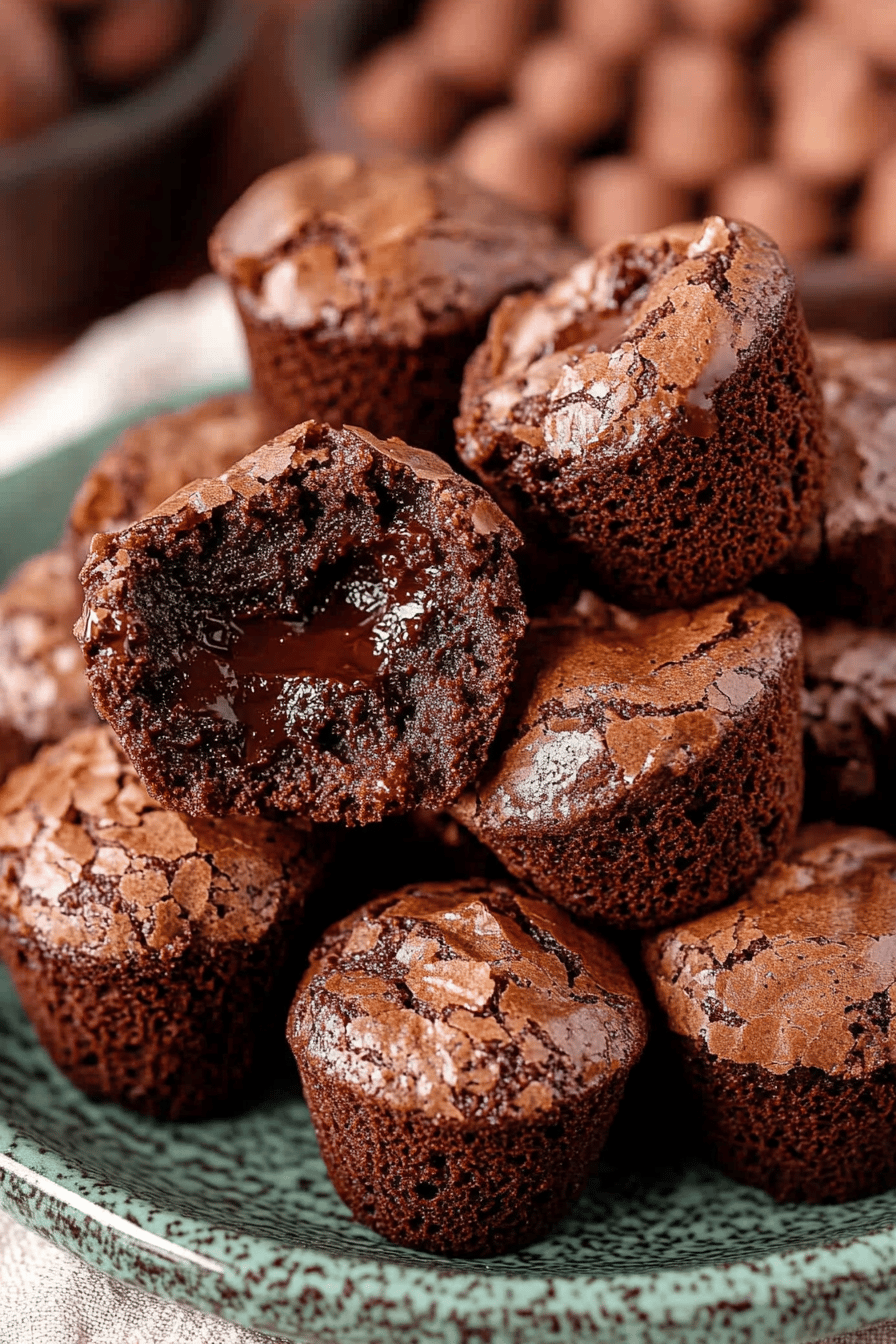
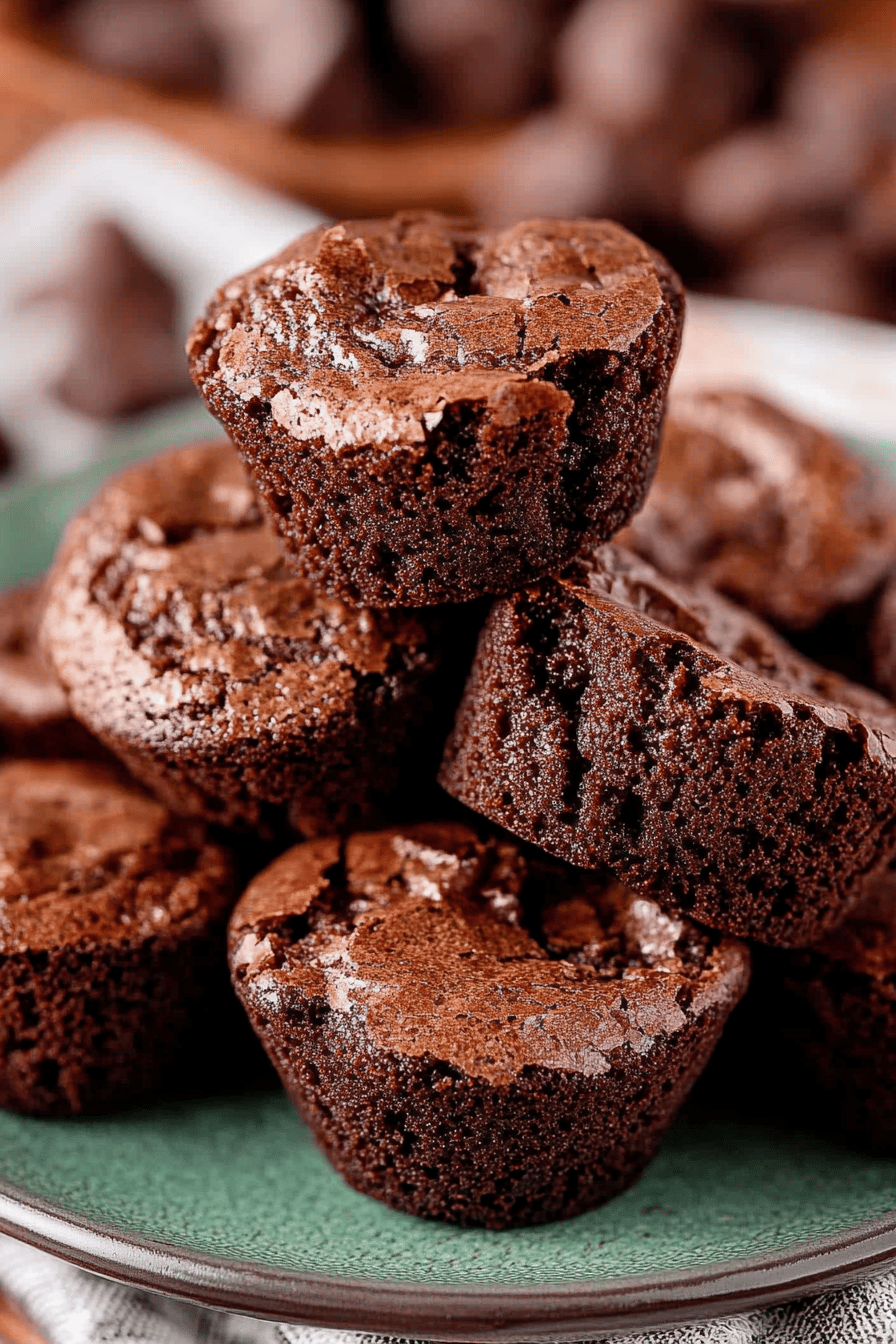
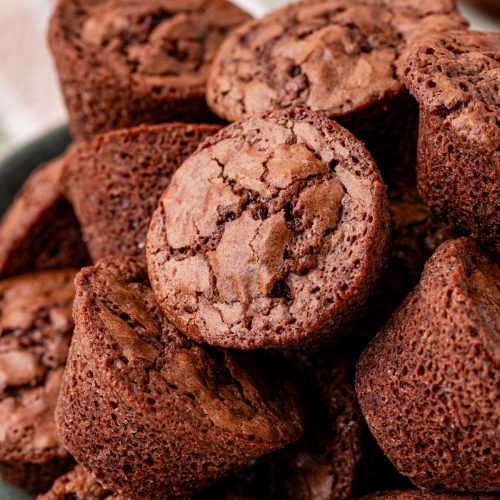
What are brownie bites? Think of them as the distilled essence of your favorite rich, chewy brownie, but shrunk down into smaller pieces. What are the best, melt-in-your- They’re not cakey, oh no. These are dense, fudgy and intensely chocolatey, with that satisfyingly slight chewiness that makes them so good. Is a brownie really good? What are bites? They’re designed to be easily popped into your mouth, or shared (if you eat a lot of them). Can you bring yourself to do it? What is the name of the dog “brownie bites”? What’s not to like about brownies? Is chocolate a super-concentrated dose of happiness? How do you make a decadent brownie without using any fork? What are the best treats for a bake sale? What’s a Is chocolate goodness, uncompressed and totally irresistible?
Why you will love this recipe?
What are some of the reasons why I love brownie bites? First and foremost, the human body.flavorIs dark chocolate out of this world? They’re made with cocoa powder and a touch of melted chocolate, which gives them this amazing taste. incredibly rich, almost truffle-like taste that is just pure bliss. What is the texture? What are some good fudgy cookies with chewy edges and a gooey center? My kids go absolutely bonkers for them, and they’re usually pretty discerning critics!
Then there’s the second partsimplicityWhat is a lifesaver on busy nights? Is it possible to put these in the oven for 15 minutes flat? No fancy equipment needed, just a couple of bowls and whisk. Is this one of those recipes that makes you feel like a baking superstar without actually having to. I’ve even made them on a weeknight when I have had unexpected guests pop over – they’re that quick and easy.
From a Cost-Perspective, these are fantastic. What are some pantry staples that you don’t need? What is the best way to make brownies at home? Budget friendly, and let’s be honest, they taste way better because you know exactly what’ve gone. Plus, they make your kitchen smell absolutely heavenly while they bake, which is a bonus in my book!
And talk about versatility! While they’re perfect just as they are, you can easily customize them. Feeling adventurous? Add chocolate chips, chopped nuts, or even a swirl of caramel. I’ve even tried adding a pinch of espresso powder to the batter to enhance the chocolate flavor, and I can’t wait to try it. What a game changer! They’re also great for gifting. What are some good homemade treats? Pop them into little cellophane bags tied with ribbon. Is it worth it to spend hours on a food? If you like chewy chocolate chip cookies, you’ll appreciate the similar focus on texture. What makes a good brownie?
How do I make Brownie Bites?
Quick Overview
How do I make brownie bites? You’ll basically melt butter, whisk in eggs, vanilla, and salt, then gently fold in your dry ingredients. What happens when you add melted chocolate to a brownie? What are some of the best ways to bake a toothpick? How do I make a glaze? I don’t need to be a master baker to create something truly unique. It’s the kind of recipe that proves you don’t have to. The whole process, from start to finish, takes under an hour, making them perfect for any occasion. Or no occasion at all!
Ingredients
For the Main Batter: Why?
What is the best unsalted butter to use? What makes a difference in the final flavor? And unsalted is key so you can control the saltiness.
Granulated sugar, 1 cup. This helps create that lovely chewy texture and sweetness.
Eggs, 2 large. Make sure they’re at room temperature. They’ll incorporate much better into the batter.
Vanilla extract, 1 teaspoon. Don’t skimp on this! It really enhances the chocolate flavor.
All-purpose flour, 3/4 cup. Spooned and leveled, please! Too much flour can make them dry.
Unsweetened cocoa powder, 1/2 cup. Use a good quality Dutch-process cocoa for a deeper, darker flavor. This is where a lot of the magic happens!
Salt, 1/4 teaspoon. Just a pinch to balance the sweetness and bring out the chocolate notes.
Melted semi-sweet chocolate, 2 ounces (optional but highly recommended!). I like to use good quality baking chocolate, melted and slightly cooled. It adds an extra layer of fudginess and rich chocolate flavor that is just divine. It’s a little extra step, but trust me, it’s worth it!
For the Filling:
This is where we add a little surprise! You can use a store-bought caramel sauce or make your own. About 1/4 cup should do it. Just a little drizzle in the center adds a wonderful gooey contrast.
Or, for a cream cheese swirl, you’ll need softened cream cheese, a tablespoon of sugar, and a tiny bit of vanilla. Just mix them together until smooth!
For the Glaze:
Powdered sugar, 1 cup. Sifted, if you want it extra smooth, but it’s usually fine without.
Milk or cream, 1-2 tablespoons. Start with one and add more until you get your desired drizzling consistency. How does water work?
Cocoa powder, 1-2 tablespoons (optional, for a chocolate glaze!).
A tiny pinch of salt.
Step-by-Step Instructions
Step 1: Preheat & Prep Pan
What should I do if my oven is preheated to 350 degrees Fahrenheit? Then, grab an 8×8 inch baking pan. I always like to grease it really well with butter or cooking spray, and then line it with parchment paper. Is there any overhang on the sides of the paper? This makes it SO much easier to lift the whole brownie slab out later for cutting. What is the best way to avoid nightmares about sticking?
Step 2: Mix Dry Ingredients
In a medium-sized bowl, whisk together flour, cocoa powder, and salt. Set aside. If you whisk the cocoa powder and salt together thoroughly at this stage ensures that they are evenly distributed throughout the cooking process. No salty bites or pockets of unsweetened batter. You want a rich chocolate flavor in every bite.
Step 3: Mix Wet Ingredients
In a large bowl, melt the butter. You can do this in the microwave or in an oven. Once melted, whisk in the granulated sugar until it’s well combined. Then, add the eggs, one at a time, whisking well after each addition until the mixture is smooth and creamy. Is there a What is the best way to stir in semi-sweet chocolate? Whisk until everything is beautifully glossy and combined.
Step 4: Combine
Now it’s time to bring dry and wet ingredients together. Pour the dry ingredients into the bowl with the wet ingredients. Using a spatula or wooden spoon, gently fold the dry ingredients into the wet ingredients. How do I not overmix here? Overmixing can develop the gluten in the flour too much, which can result in tougher brownies. If you can’t see any more streaks of flour, stop immediately. A few small lumps are fine.
Step 5: Prepare Filling
If you’re using a caramel filling, just have your caramel sauce ready to go. If you’re doing a cream cheese swirl, in a small bowl, beat together the softened cream cheese, 1 tablespoon of sugar, and the vanilla extract until smooth and creamy. This little addition makes them feel extra special!
Step 6: Layer & Swirl
Do not overbake brownies. Pour half of the batter into a baking pan and spread evenly. Dollop spoonfuls of your chosen filling (caramel or cream cheese mixture) over the batter. Do not over-fill brownie batter with filling. Pour the remaining batter over the top and spread it gently to cover. If you want a nice swirl effect, take the filling and gently swirl it into the center of the pastry. Don’t over-swirl, or the filling might disappear!
Step 7: Bake
Pop the pan into your preheated oven. Bake for about 20-25 minutes. You’ll know they’re ready when the edges look set and a toothpick inserted into the center comes out with moist crumbs attached, but not wet batter. I always err on the side of slightly underbaked for maximum fudginess. Keep an eye on them, as oven temperatures can vary!
Step 8: Cool & Glaze
Once baked, carefully lift the parchment paper to remove the entire brownie slab from the pan. Let it cool completely on a wire rack. This is super important, especially before glazing, otherwise, the glaze will just melt and run off. Once completely cool, prepare your glaze by whisking together powdered sugar, a tablespoon of milk or cream, and a pinch of salt (and cocoa powder if you want a chocolate glaze) until smooth. Drizzle it over the cooled brownies. Let the glaze set for about 15-20 minutes before cutting.
Step 9: Slice & Serve
Once the glaze has set, it’s time to cut these beauties into bite-sized pieces! Use a sharp knife for clean cuts. I usually aim for about 36 small squares from an 8×8 pan. Can you serve them immediately or let them sit for a bit longer for an even fudgier texture? What are some good gooey things to do in the microwave? Is chocolate goodness good again?
What is the best way to serve it?
What are some of the best brownie bites you have ever had?breakfast, I sometimes like to have one or two with a really good cup of strong coffee. The rich chocolate flavor is surprisingly good with that morning caffeine kick. They’re a little indulgent, but hey, it’s the weekend, right? For brunch, I’ll often arrange them on a nice platter, maybe alongside some fresh berries or a dollop of whipped cream, alongside some mini muffins or fruit salad. They look so elegant and are always a huge hit with guests. They add a lovely sweet ending to any brunch spread.
As a simple dessert, they’re pure gold. I’ll serve them with a scoop of vanilla bean ice cream or a drizzle of raspberry sauce. Sometimes, I’ll even warm them up slightly for that extra molten chocolate effect. They’re also perfect for a cozy afternoon snack. On a chilly day, curling up on the couch with a few of these and a mug of hot chocolate is pure comfort. My personal family tradition is to have a small plate of them out on the coffee table during movie nights. They’re the perfect size for grabbing a bite without interrupting the film, and they always disappear so fast!
I’ve also found they pair wonderfully with a glass of milk (of course!) or even a small glass of red wine for a more grown-up dessert pairing. The fruitiness of certain wines can really complement the deep chocolate notes. It’s all about enjoying them in a way that makes you happy!
Top Tips for Perfecting Your Brownie Bites
Over the years of making these, I’ve picked up a few tricks that I think make all the difference in getting that perfect brownie bite every time. Let’s talk about getting them just right!
Zucchini Prep: Wait, did I mention zucchini? Oops! That’s for a different recipe! My apologies! Let’s get back to these pure chocolate delights. The key for *these* brownie bites is really about the quality of your chocolate and cocoa. Make sure you’re using a good unsweetened cocoa powder, like Dutch-process, for that deep, rich flavor. And if you’re adding melted chocolate, use a good quality baking bar, not chocolate chips (chips have stabilizers that don’t melt as smoothly). I always make sure my butter is melted but not hot when I add it to the sugar, to avoid cooking the eggs prematurely.
Mixing Advice: This is crucial for texture. When you add the dry ingredients to the wet, fold them in gently with a spatula. You want to mix *just* until there are no dry streaks of flour left. Seriously, stop mixing as soon as it comes together. Overmixing develops the gluten in the flour, leading to a tougher, cakier texture instead of that desired fudgy chew. A few small lumps are your friends here!
Swirl Customization: If you’re doing a filling swirl, don’t go crazy with it! You want just enough to create ribbons of flavor and texture, not to completely muddy the brownie batter. For the cream cheese swirl, make sure your cream cheese is properly softened so it blends smoothly. For caramel, a thick, good-quality caramel sauce works best so it doesn’t make the brownies too gooey and difficult to handle.
Ingredient Swaps: I’ve experimented with a few things! For a darker flavor, you can try adding a teaspoon of instant espresso powder to the dry ingredients – it really amplifies the chocolate taste. You can also swap some of the all-purpose flour for a bit of almond flour for a slightly denser, richer texture, but don’t go overboard, as it can change the consistency. And for the melted chocolate, feel free to use dark chocolate for an even more intense flavor, or even milk chocolate if you prefer a slightly sweeter, milder taste.
Baking Tips: Oven temperatures are notorious for being a little off. I always use an oven thermometer to ensure mine is accurate. Bake them in the center of the oven for even heat distribution. The toothpick test is your best friend here: you want moist crumbs, not wet batter or completely clean. Slightly underbaked is the way to go for that ultimate fudgy interior. If they look done around the edges but still wet in the center, they’re probably perfect!
Glaze Variations: The basic powdered sugar glaze is lovely, but you can jazz it up! Add a tablespoon of cocoa powder for a chocolate glaze, or a little lemon zest for a citrusy kick. If you want a thinner glaze for drizzling, just add a tiny bit more milk or cream, a teaspoon at a time. For a thicker glaze, use less liquid. You can also skip the glaze entirely if you prefer, or just dust them with a little extra cocoa powder or powdered sugar.
Storing and Reheating Tips
Keeping these brownie bites fresh and delicious is pretty easy, but there are a few things I’ve learned. If you’ve got leftovers (which, let’s be honest, is rare in my house!), storing them properly is key to maintaining that perfect texture.
Room Temperature: If they’re not glazed, or if the glaze has set, you can store them in an airtight container at room temperature for about 2-3 days. They tend to be best within the first day or two as they can dry out a bit afterwards. Make sure the container is truly airtight to keep them from drying out too quickly. If they are glazed, room temperature is usually best for the first day, as refrigeration can sometimes dull the glaze a bit.
Refrigerator Storage: For longer storage, the refrigerator is your best bet. Store them in an airtight container or wrap them well in plastic wrap, and then place them in a container. They’ll keep well in the fridge for about a week. The texture might become a little firmer, but they’re still delicious!
Freezer Instructions: These brownie bites freeze beautifully! I like to wrap individual portions or small stacks tightly in plastic wrap, then pop them into a freezer-safe bag or container. They can stay frozen for up to 2-3 months. To thaw, simply take them out of the freezer and let them come to room temperature. For a fudgier treat, you can even pop them in the microwave for about 10-15 seconds after thawing to get them nice and gooey again.
Glaze Timing Advice: If you plan on storing them for more than a day, I often find it’s best to add the glaze *just before* serving, especially if you’re refrigerating or freezing them. Glaze can sometimes get a bit sticky or weepy when stored for extended periods. If you do glaze them ahead of time, make sure they are completely cool and the glaze is fully set before wrapping them up tightly.
Frequently Asked Questions
Final Thoughts
You know, there’s just something incredibly satisfying about creating these little squares of pure chocolate joy. These brownie bites aren’t just a dessert; they’re a little moment of happiness, perfectly portioned and packed with rich, fudgy flavor. They’re my go-to when I need a quick treat that feels extra special, and they never fail to impress. The ease of making them, combined with that incredible deep chocolate taste and satisfying chew, makes them a truly winning recipe. I hope you love them as much as my family and I do!
If you enjoyed making these brownie bites, I think you might also love my recipe for Chewy Chocolate Chip Cookies or my Fudgy One-Bowl Brownies. They share that same focus on incredible texture and, of course, plenty of chocolate!
I would absolutely love to hear how yours turn out! Did you try a filling? Did you add anything extra? Let me know in the comments below – your feedback and shared experiences always make my day. And if you loved them, don’t forget to share this recipe with your friends and family!
Happy baking, everyone!
Brownie Bites
Ingredients
Main Ingredients
- 0.5 cup unsalted butter melted
- 1 cup granulated sugar
- 2 large eggs
- 1 teaspoon vanilla extract
- 0.33 cup unsweetened cocoa powder
- 0.5 cup all-purpose flour
- 0.25 teaspoon baking powder
- 0.25 teaspoon salt
- 0.5 cup chocolate chips optional
Instructions
Preparation Steps
- Preheat oven to 350 degrees F (175 degrees C). Grease and flour a 9x13 inch baking pan or line with parchment paper.
- In a large bowl, whisk together melted butter and sugar.
- Beat in eggs one at a time, then stir in vanilla extract.
- In a separate bowl, whisk together cocoa powder, flour, baking powder, and salt.
- Gradually add the dry ingredients to the wet ingredients, mixing until just combined. Do not overmix.
- If using, fold in chocolate chips.
- Spread the batter evenly into the prepared baking pan.
- Bake for 20-25 minutes, or until a toothpick inserted into the center comes out with moist crumbs attached.
- Let the brownies cool completely in the pan before cutting into bite-sized squares.