Oh, blueberry pie. Just hearing the words makes me feel all warm and fuzzy inside. It’s not just a dessert for me; it’s a ticket straight back to my grandma’s kitchen, the air thick with the sweet, slightly tart scent of bubbling berries and warm pastry. There’s something so incredibly comforting about a homemade blueberry pie, a true classic that never, ever goes out of style. When I’m craving something that feels like a hug in edible form, this is my absolute go-to. It’s like the perfect sweet symphony, much more satisfying than, say, a fancy layered cake that takes all day to frost. This blueberry pie is the real deal, the kind that makes you want to gather everyone around the table and share a slice (or two!).
What is this dreamy blueberry pie?
So, what makes this blueberry Pie Recipe so special? Well, at its heart, it’s a classic fruit pie, but with a few little tweaks that I’ve picked up over the years that just elevate it. Think of it as your quintessential blueberry pie – a flaky, buttery crust holding a generous, luscious filling of juicy blueberries. The “secret” isn’t really a secret at all; it’s all about the balance. We’re talking about getting that perfect sweet-tart ratio in the filling, ensuring the berries are tender but not mushy, and achieving a crust that’s golden brown and shatteringly crisp. It’s essentially a love letter to fresh blueberries, captured in a pie dish, ready to bring smiles to anyone who takes a bite.
Why do people love this recipe?
Let me tell you, there are a million blueberry pie recipes out there, but this one? It’s a keeper. The first thing that hits you is the flavor, of course. It’s intensely blueberry, with just the right amount of sweetness to complement the natural tang of the fruit, and a hint of lemon zest that really makes everything sing. It’s not overly sweet, which I really appreciate, so you can truly taste the berries. And the crust! Oh, the crust is everything. It’s tender, flaky, and has that perfect buttery richness that just melts in your mouth. What I love most about this recipe is its surprising simplicity. Even if you’re new to pie-making, you’ll find this incredibly approachable. I’ve had friends who swore they couldn’t bake a pie make this, and they’ve totally nailed it! Plus, blueberries are usually pretty budget-friendly, especially when they’re in season, making this a wonderfully cost-effective way to impress your guests or treat your family. It’s also surprisingly versatile. I love it warm, straight from the oven, but it’s also fantastic the next day, cold from the fridge. You can serve it with a dollop of whipped cream, a scoop of vanilla ice cream, or even a drizzle of crème fraîche. It’s the kind of pie that works for a casual weeknight dessert just as well as it does for a holiday feast. If you’re a fan of my [apple crumble Pie Recipe](YOUR-APPLE-CRUMBLE-PIE-URL-HERE) or my [pecan pie recipe](YOUR-PECAN-PIE-URL-HERE), you’re going to fall head over heels for this blueberry beauty.
How do I make blueberry pie?
Quick Overview
This recipe is all about building layers of deliciousness. We start with a beautiful, homemade crust, then fill it generously with plump blueberries tossed with just the right amount of thickening agents and flavor enhancers. The magic happens in the oven as everything bakes together into a bubbling, fragrant masterpiece. It might sound involved, but trust me, the steps are straightforward, and the results are SO worth it. It’s the kind of pie that fills your home with an incredible aroma and promises pure joy with every single bite.
Ingredients
For the perfect Pie crust: For the perfect pie crust: For the perfect pie crust: For the perfect pie crust: For the perfect pie crust: For
2 ½ cups all-purpose flour, plus more for dusting
1 teaspoon salt
1 cup (2 sticks) unsalted butter, very cold, cut into cubes
½ cup ice water, plus a little more if needed
A good pie crust is foundational! Make sure your butter is COLD – that’s the secret to flakiness. I always cut mine into small cubes and pop them back in the freezer for a few minutes before I start mixing. And using ice water helps keep everything cold throughout the process. Don’t be tempted to use a food processor for the whole thing; a little bit of butter chunkiness is what creates those lovely layers.
For the Luscious Blueberry Filling:
6 cups fresh or frozen blueberries (if using frozen, don’t thaw)
¾ cup granulated sugar (adjust to your sweetness preference)
¼ cup cornstarch (or 1/3 cup tapioca starch)
1 tablespoon fresh lemon juice
1 teaspoon lemon zest
½ teaspoon ground cinnamon (optional, but I love it!)
Pinch of salt
Using a mix of fresh and frozen blueberries can sometimes give you the best of both worlds – great flavor and good texture. If you’re using all frozen, make sure you don’t thaw them completely, or you’ll end up with a watery mess. Cornstarch is my go-to thickener here because it creates a nice, clear gel. Tapioca starch is another great option for a beautiful, glossy filling. And don’t skip the lemon zest; it brightens everything up beautifully!
For the Egg Wash and Finishing Touches:
1 large egg, beaten with 1 tablespoon milk or water
1 tablespoon coarse sugar (like turbinado or sanding sugar), for sprinkling
This egg wash is your ticket to a gorgeous, golden-brown crust that looks like it came straight from a bakery. The coarse sugar adds a lovely sparkle and a delightful little crunch.
Step-by-Step Instructions
Step 1: Preheat & Prep Pan
First things first, preheat your oven to 400°F (200°C). I like to place a baking sheet on the lower rack while the oven heats up. This catches any rogue blueberry drips and helps ensure a nicely baked bottom crust. If you’re using a glass pie dish, the baking sheet is especially helpful to prevent over-browning on the bottom.
Step 2: Mix Dry Ingredients
In a large bowl, whisk together the flour and salt for your pie crust. This ensures the salt is evenly distributed. You want a light, fluffy flour base to start with.
Step 3: Mix Wet Ingredients (for the crust)**
Cut in the cold, cubed butter using a pastry blender, two forks, or your fingertips until the mixture resembles coarse crumbs with some pea-sized pieces of butter still visible. This is key for flakiness! Then, gradually add the ice water, one tablespoon at a time, mixing gently with a fork until the dough just comes together. Don’t overmix! You want to see those little bits of butter; they’ll melt and create steam during baking, giving you those amazing flaky layers.
Step 4: Combine (Crust Dough)**
Turn the dough out onto a lightly floured surface and gently bring it together into a ball. Divide the dough in half, flatten each half into a disc, wrap them tightly in plastic wrap, and refrigerate for at least 30 minutes. This chilling time is crucial for making the dough easier to roll out and preventing it from shrinking too much in the oven.
Step 5: Prepare Filling
In a separate large bowl, gently toss the blueberries with the granulated sugar, cornstarch, lemon juice, lemon zest, cinnamon (if using), and pinch of salt. Stir until everything is evenly coated. Be gentle so you don’t crush too many berries. If you’re using frozen blueberries, you might notice the mixture looks a bit wetter initially; that’s okay! The cornstarch will work its magic.
Step 6: Layer & Swirl
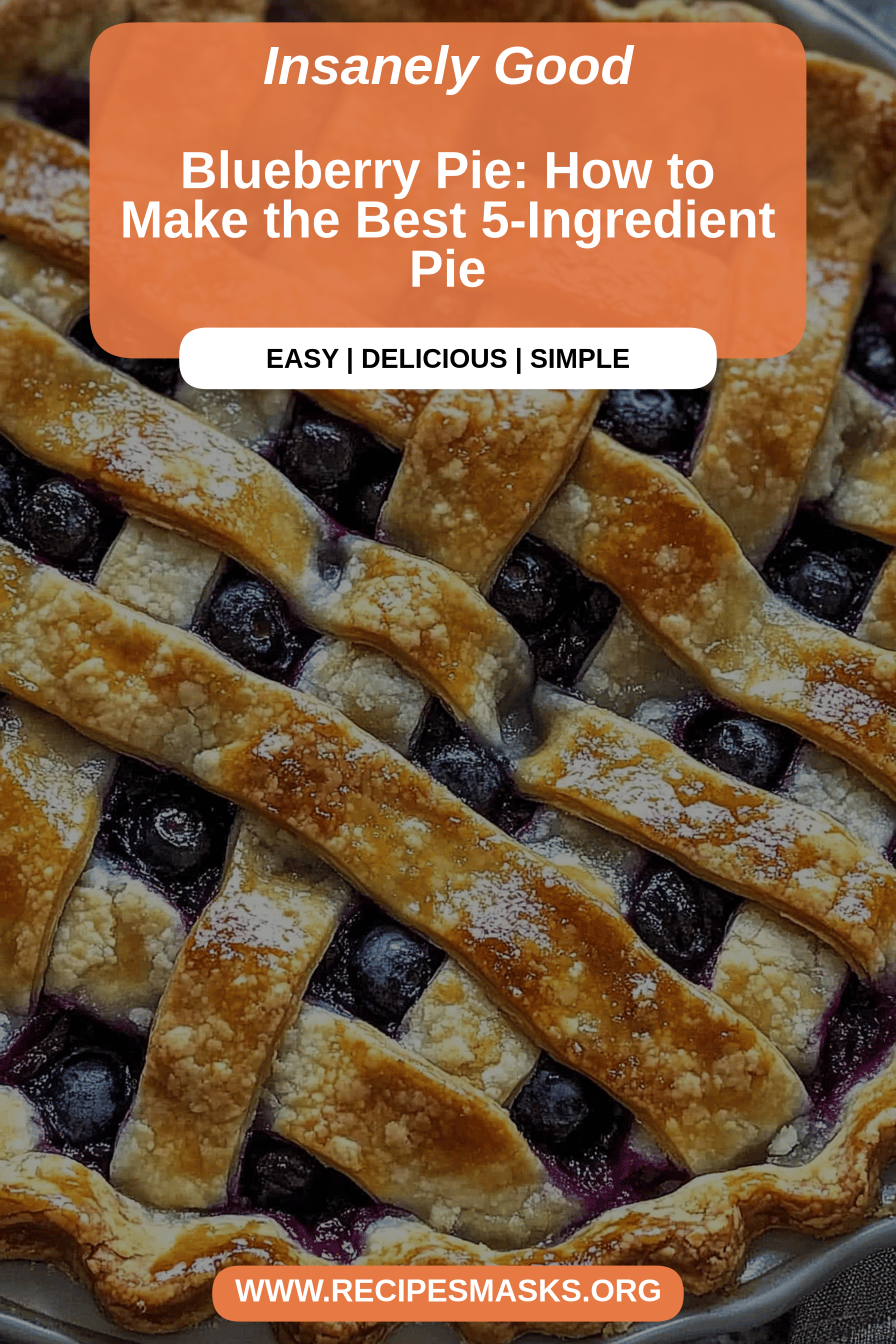
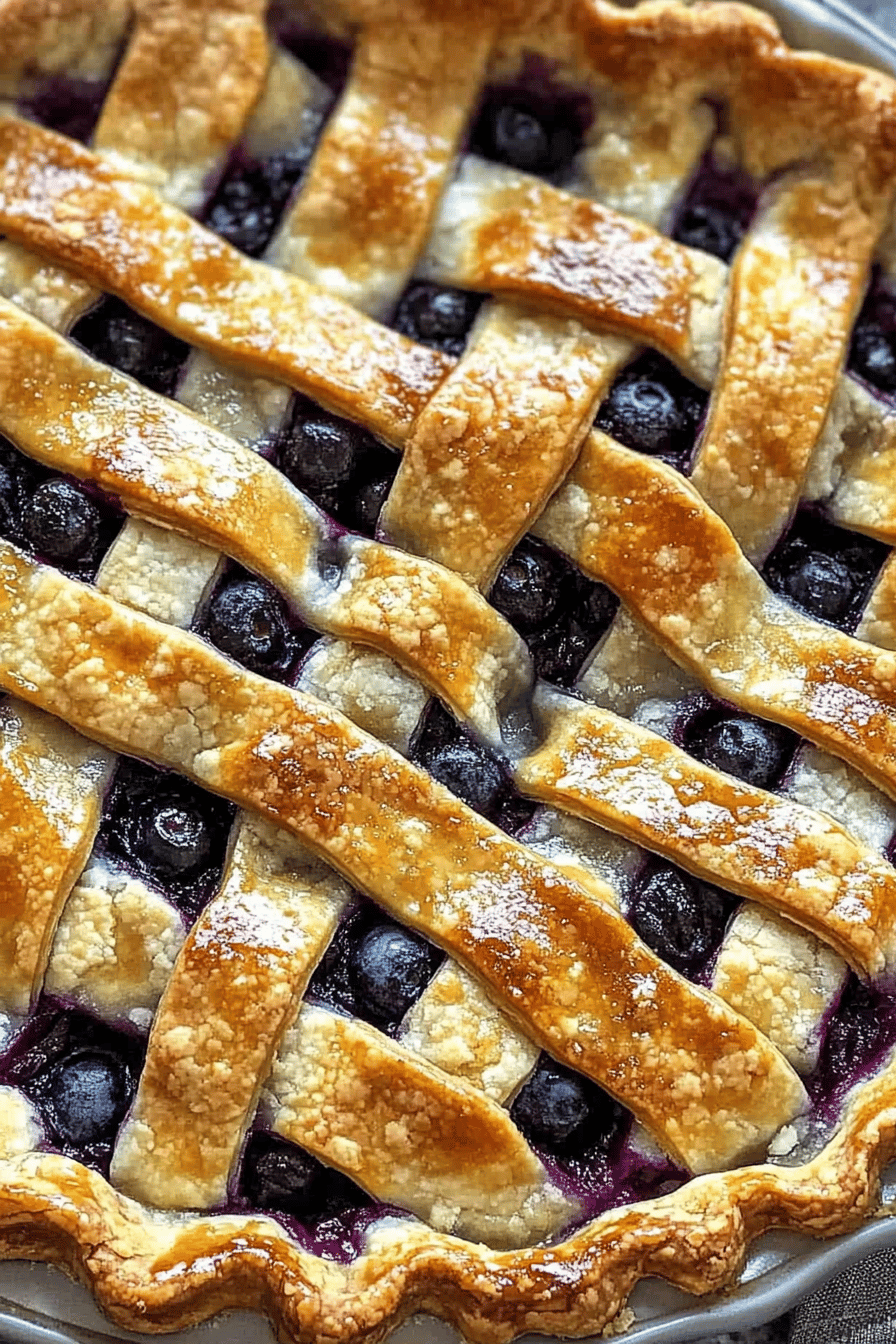
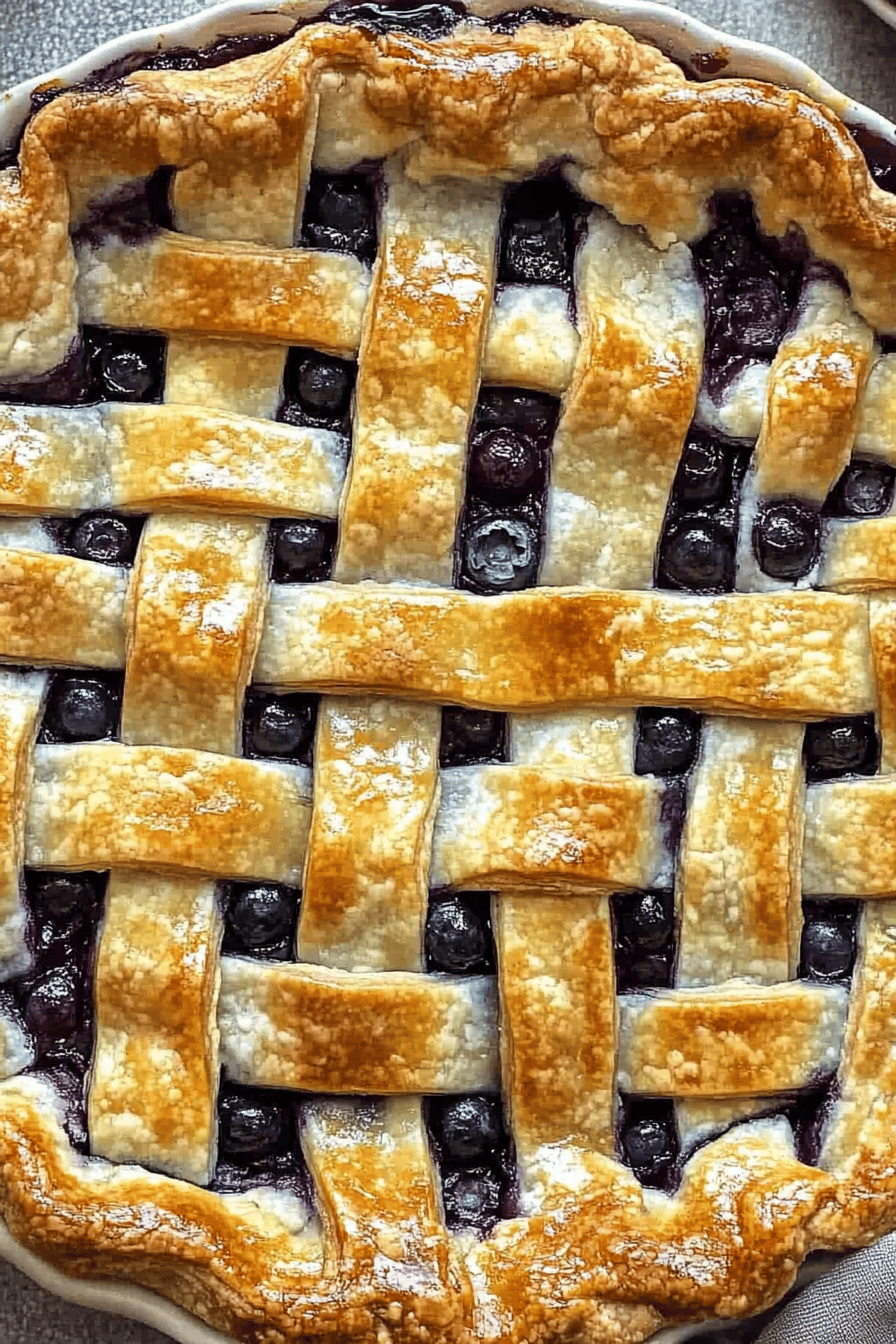
On a lightly floured surface, roll out one disc of chilled pie dough into a 12-inch circle. Carefully transfer it to your 9-inch pie plate, pressing it gently into the bottom and up the sides. Trim any excess dough, leaving about a 1-inch overhang. Pour the prepared blueberry filling into the crust. Roll out the second disc of dough. You can either place it over the filling as a solid top crust (cutting vents!), or cut it into strips for a lattice top. If you’re doing a solid top, brush it with the egg wash and sprinkle with coarse sugar. If you’re doing a lattice, weave the strips over the filling, then brush the lattice with the egg wash and sprinkle with sugar.
Step 7: Bake
Place the pie on the preheated baking sheet. Bake at 400°F (200°C) for 20 minutes. Then, reduce the oven temperature to 375°F (190°C) and continue baking for another 30-40 minutes, or until the crust is golden brown and the filling is bubbling thickly. If the edges of the crust start to brown too quickly, you can cover them with foil or a pie crust shield. You want to see that filling really bubbling – it means the cornstarch has activated and will thicken properly as it cools.
Step 8: Cool & Glaze
This is perhaps the hardest part: letting the pie cool! Transfer the baked pie to a wire rack and let it cool completely, for at least 3-4 hours. I know, I know, it’s torture! But this step is essential for the filling to set up properly. Trying to slice a hot pie often results in a soupy mess, no matter how well you thickened it. Once cooled, if you didn’t add sugar to the top crust, you can gently brush on a simple glaze made from powdered sugar and a tiny bit of milk or lemon juice for extra shine and sweetness. This is optional, but it looks so pretty!
Step 9: Slice & Serve
Once the pie is fully cooled, use a sharp knife to slice it into wedges. Serve as is, or with your favorite accompaniments. I love it just plain, but a little bit of vanilla ice cream or a dollop of whipped cream is always a welcome addition.
What to Serve It With
This blueberry pie is a star all on its own, but here are a few ideas for how to make it even more special:
For Breakfast: Honestly, a slice of this blueberry pie is a fantastic breakfast treat! Pair it with a strong cup of coffee or a glass of freshly squeezed orange juice. It’s a more decadent start to the day, but sometimes you just need that! You could even serve it with a side of plain Greek Yogurt for some protein.
For Brunch: Make it a centerpiece! Serve slices alongside other brunch favorites like scrambled eggs, crispy bacon, or fresh fruit salad. A mimosa or a light sparkling cider would be a lovely beverage pairing.
As Dessert: This is its natural habitat! Serve it warm or at room temperature with a scoop of high-quality vanilla bean ice cream – the contrast of hot pie and cold ice cream is pure bliss. A dollop of lightly sweetened whipped cream is also classic. For something a little more sophisticated, a drizzle of crème anglaise or a scattering of toasted slivered almonds works wonders.
For Cozy Snacks: On a rainy afternoon or a chilly evening, this pie is the ultimate comfort. Enjoy a slice with a warm mug of tea or hot chocolate. My kids sometimes like to have a small slice before bed when they’re craving something sweet, and it never fails to satisfy them.
My family tradition is to have this pie after a Sunday roast. The sweet, slightly tart berries cut through the richness of the meal beautifully. It’s the perfect way to end a satisfying meal together.
Top Tips for Perfecting Your Blueberry Pie
I’ve made this blueberry pie more times than I can count, and along the way, I’ve picked up a few tricks that really make a difference. Here are my top tips:
Blueberry Prep: If you’re using fresh blueberries, give them a gentle rinse and pat them thoroughly dry. Excess moisture can make your filling runny. If using frozen, as mentioned, don’t thaw them completely. This helps them hold their shape better during baking. Sometimes, I even like to toss them with a tablespoon of lemon juice and let them sit for about 15 minutes before mixing with the other filling ingredients; it seems to intensify their flavor.
Mixing Advice: For the crust, the key is to work quickly and keep everything cold. Overworking the dough develops the gluten too much, leading to a tough crust instead of a tender, flaky one. You want to see those little bits of butter – they’re the architects of flakiness! When mixing the filling, be gentle. You don’t want to mash all the blueberries; a mix of whole and slightly broken berries gives the best texture.
Swirl Customization: While this recipe focuses on a classic fruit pie, if you’re feeling adventurous, you can certainly get creative! For a lattice top, try weaving the strips in different patterns for visual interest. You can also use cookie cutters to make fun shapes to add around the edges or as decorative cutouts on a solid top crust. For an extra flavor boost, you can add a teaspoon of almond extract to the filling, or a pinch of cardamom for a warm, aromatic twist.
Ingredient Swaps: While I swear by cornstarch for thickening, if you’re out, you can use all-purpose flour (about twice the amount of cornstarch, so 1/2 cup) or tapioca starch (about 1/3 cup). For the sugar, you can experiment with brown sugar for a deeper, caramel note, but it will alter the color slightly. If you’re aiming for a dairy-free pie, ensure your crust butter is a high-quality vegan butter substitute that’s solid when cold, and use a plant-based milk for the egg wash.
Baking Tips: Always use a baking sheet under your pie. It’s a lifesaver! If you notice your crust browning too quickly, especially around the edges, don’t hesitate to loosely tent the pie with aluminum foil or use a silicone pie crust shield. For an extra crispy bottom crust, try pre-baking it slightly (blind baking) for about 10-15 minutes before adding the filling. Make sure you bake until the filling is truly bubbling in the center; this ensures the thickener has done its job. Every oven is different, so keep an eye on your pie and adjust the time as needed.
Glaze Variations: The egg wash and sugar are fantastic for a classic look. But if you’re going for a more rustic vibe, you can skip the egg wash and just lightly brush the crust with a bit of melted butter after baking for a subtle sheen. For a sweeter, more dessert-like finish, a simple powdered sugar glaze (powdered sugar mixed with a touch of milk or lemon juice) drizzled over a cooled pie is lovely. Or, for a truly decadent experience, a sprinkle of cinnamon-sugar mixture on top before baking adds an extra layer of flavor and crunch.
Storing and Reheating Tips
Proper storage is key to enjoying this blueberry pie for days to come. Here’s what I’ve learned:
Room Temperature: Once the pie has completely cooled (and I mean *completely* cooled, at least 4 hours), it can be stored at room temperature, loosely covered with plastic wrap or aluminum foil, for up to 2 days. The crust might soften slightly over time, but it’s still delicious. Just be sure it’s in a cool spot, away from direct sunlight or heat.
Refrigerator Storage: For longer storage, once cooled, wrap the pie tightly in plastic wrap or place it in an airtight container. It will keep well in the refrigerator for up to 4-5 days. The crust will maintain its texture better when refrigerated, and the flavors meld beautifully. You can also pop it back on a baking sheet and warm it slightly in a 350°F (175°C) oven for about 10-15 minutes to bring back some of that fresh-baked crispness.
Freezer Instructions: Blueberry pie freezes beautifully! Let it cool completely, then wrap it very tightly in a double layer of plastic wrap, followed by a layer of aluminum foil. It can be stored in the freezer for up to 2-3 months. To thaw, remove the foil and plastic wrap and let it thaw overnight in the refrigerator. For the best results, bake it in a preheated oven at 350°F (175°C) for 15-20 minutes to re-crisp the crust.
Glaze Timing Advice: If you’re planning on storing the pie for more than a day, I recommend waiting to add any glaze (like a powdered sugar drizzle) until just before serving, especially if it’s at room temperature or refrigerated. Glazes can become sticky or melt when stored, so applying them fresh ensures the prettiest presentation.
Frequently Asked Questions
Final Thoughts
There you have it – my absolute favorite blueberry pie recipe! It’s a recipe that’s stood the test of time in my kitchen, bringing joy and deliciousness to countless family gatherings and casual weeknight desserts. The combination of a perfectly flaky crust and a bursting-with-flavor blueberry filling is simply unbeatable. It’s the kind of recipe that makes you feel like a baking pro, even if you’re just starting out. If you loved this recipe, you might also enjoy my [strawberry rhubarb pie](YOUR-STRAWBERRY-RHUBARB-PIE-URL-HERE) for another classic fruit pie experience, or perhaps my [lemon meringue pie](YOUR-LEMON-MERINGUE-PIE-URL-HERE) for a delightful citrus twist. I truly hope you give this blueberry pie a try. I can’t wait to hear how it turns out for you! Don’t forget to leave a comment below with your thoughts or any fun variations you discover. Happy baking!

Classic Blueberry Pie
Ingredients
Pie Crust
- 2.5 cups all-purpose flour
- 1 teaspoon salt
- 1 cup unsalted butter, cold and cubed
- 0.5 cup ice water
Blueberry Filling
- 6 cups fresh or frozen blueberries if using frozen, do not thaw
- 0.75 cup granulated sugar
- 0.25 cup cornstarch
- 1 tablespoon lemon juice
- 0.5 teaspoon cinnamon
- 0.25 teaspoon nutmeg
Egg Wash (Optional)
- 1 egg beaten
- 1 tablespoon milk or cream
Instructions
Preparation Steps
- In a large bowl, whisk together the flour and salt. Cut in the cold butter using a pastry blender or your fingertips until the mixture resembles coarse crumbs with some pea-sized pieces of butter remaining.
- Gradually add the ice water, one tablespoon at a time, mixing until the dough just comes together. Be careful not to overmix. Divide the dough in half, flatten each half into a disc, wrap in plastic wrap, and refrigerate for at least 30 minutes.
- In a separate bowl, gently combine the blueberries, sugar, cornstarch, lemon juice, cinnamon, and nutmeg. Let it sit for about 10 minutes to allow the flavors to meld and the juices to release.
- Preheat your oven to 400°F (200°C).
- On a lightly floured surface, roll out one disc of dough into a 12-inch circle. Carefully transfer it to a 9-inch pie plate. Trim any excess dough, leaving about a 1-inch overhang.
- Pour the blueberry filling into the pie crust. Dot with a few small pieces of butter if desired.
- Roll out the second disc of dough. You can either place it as a solid top crust (cutting vents for steam) or cut it into strips for a lattice top.
- If using a solid top crust, place it over the filling and crimp the edges to seal. If making a lattice, arrange the strips over the filling and crimp the edges.
- If desired, brush the top crust with the egg wash (beaten egg mixed with milk or cream) for a golden finish.
- Bake for 20 minutes at 400°F (200°C). Then, reduce the oven temperature to 375°F (190°C) and continue baking for another 25-30 minutes, or until the crust is golden brown and the filling is bubbling.
- If the crust starts to brown too quickly, you can loosely tent the pie with aluminum foil.
- Let the pie cool completely on a wire rack for at least 3-4 hours before slicing and serving. This allows the filling to set properly.