You know those nights? The ones where you’re staring into the fridge, desperately craving something warm, cheesy, and utterly comforting, but the thought of actually *cooking* feels like climbing Mount Everest? Yeah, I’ve been there a thousand times. And in those moments, my absolute go-to, the recipe that never fails to bring smiles and silence hungry tummies, is this ridiculously good beer cheese dip. It’s not just a dip; it’s a hug in a bowl, a little bit of magic that transforms a regular Tuesday into something special. Forget those bland, store-bought versions; this is the real deal, the kind that makes your taste buds sing and your friends ask for the recipe before they’ve even finished their first scoop. Honestly, I’ve tried my fair share of cheesy concoctions over the years, and while a good queso is amazing, there’s something about the depth of flavor and the smooth, luscious texture of a homemade beer cheese dip that just hits different. It’s the perfect balance of savory, tangy, and just a hint of malty goodness from the beer, making it incredibly addictive.
What is a beer cheese dip?
So, what exactly *is* this magical beer cheese dip? At its heart, it’s exactly what it sounds like: a warm, creamy, and gloriously cheesy dip infused with the delightful flavor of beer. Think of it as the ultimate comfort food cousin to fondue, but way more laid-back and, dare I say, even more delicious. It’s typically made with a base of cream cheese and other cheeses, melted together with a splash of your favorite beer and some seasonings. The beer isn’t just for show; it adds a unique depth and a subtle tang that you just can’t get from milk or cream alone. It cuts through the richness of the cheese beautifully, making each bite surprisingly light despite all that cheesy goodness. It’s the kind of dish that feels a little bit fancy but is so incredibly simple to whip up. It’s essentially a melted cheese dream, elevated by the subtle, wonderful magic of beer. It’s the perfect antidote to a chilly evening, a potluck hero, or just a delightful reason to gather around the coffee table with good company.
Why you’ll love this recipe?
There are so many reasons why this beer cheese dip has earned a permanent spot in my recipe rotation, and I just know you’re going to fall in love with it too. First and foremost, the FLAVOR is out of this world. It’s rich, cheesy, and has this wonderfully complex savory profile with a hint of malty warmth from the beer. It’s not just one-note cheesy; it has layers. Then there’s the SIMPLICITY. Seriously, you can whip this up in about 15 minutes, and most of that is just waiting for the cheese to melt! It’s a lifesaver on busy nights when you need a crowd-pleasing appetizer without a ton of fuss. And let’s talk COST-EFFICIENCY. The ingredients are pretty standard pantry staples, and even if you need to grab a bottle of beer specifically for this, it’s still way more budget-friendly than many other appetizer options. My kids actually ask for this all the time, and they’re pretty picky! What I love most, though, is its VERSATILITY. This isn’t a dip that’s confined to one type of cracker or one occasion. It’s perfect for game day, movie nights, holiday parties, or even just a cozy afternoon snack. It pairs beautifully with sturdy pretzels, crusty bread, or even some raw veggies if you’re feeling a little virtuous. Compared to, say, a simple Cheese Ball, this has a much more dynamic flavor profile. And unlike a fussy baked brie, it’s wonderfully forgiving and always a hit. It truly is one of those recipes that just makes everyone happy.
How do you make a beer cheese dip?
Quick Overview
This beer cheese dip is all about simple steps that lead to maximum flavor. You’ll start by melting some cream cheese as a base, then stir in shredded cheeses, your chosen beer, and a few key seasonings. The magic happens as it all melds together into a smooth, luscious dip. It’s designed to be quick, requiring minimal active cooking time, and results in a dip that’s both incredibly satisfying and surprisingly easy to achieve. You’ll be amazed at how quickly this comes together, making it perfect for impromptu gatherings or when that cheesy craving strikes!
Ingredients
What is the creamy base?
– 1 (8 ounce) package cream cheese, softened: This is crucial for a smooth, lump-free dip. Make sure it’s truly softened to room temperature. Trust me, trying to melt cold cream cheese is a recipe for frustration!
– 1/2 cup (1 stick) unsalted butter: Adds richness and helps create that luscious texture.
– 1/4 cup milk (whole milk or half-and-half for extra creaminess): Helps thin it out just enough to the perfect dipping consistency.
For the Cheesy Goodness:
– 2 cups shredded sharp cheddar cheese: Sharp cheddar provides a fantastic tangy flavor. I always recommend shredding your own cheese from a block; pre-shredded cheese has anti-caking agents that can make your dip a bit grainy.
– 1 cup shredded Monterey Jack cheese: This cheese melts like a dream and adds a mild, creamy counterpoint to the cheddar.
– 1/2 cup shredded Gruyère cheese (optional, but highly recommended!): This is my secret weapon for adding a nutty, slightly sweet depth. It really elevates the whole dip.
For the Beer Flavor:
– 1/2 cup lager or amber ale: The type of beer can really influence the flavor. A lager is mild and lets the cheese shine, while an amber ale adds a bit more malty character. Avoid hoppy IPAs, as they can make the dip bitter. I’ve tried this with a nice, crisp pilsner too, and it was lovely!
For the Seasoning Kick:
– 1 teaspoon Worcestershire sauce: Adds a savory, umami depth.
– 1/2 teaspoon garlic powder: Because is there anything garlic doesn’t make better?
– 1/4 teaspoon onion powder: For a subtle savory note.
– Pinch of cayenne pepper (optional): Just a little whisper of heat to keep things interesting.
– Salt and freshly ground black pepper to taste: Start with a little and add more if needed, especially after tasting.
Step-by-Step Instructions
Step 1: Preheat & Prep Pan
First things first, let’s get our oven preheated to 350°F (175°C). While the oven is warming up, grab a medium-sized oven-safe skillet or a casserole dish. I like to use my cast-iron skillet for this because it heats so evenly and looks gorgeous sitting on the table. Give it a quick spray of cooking spray or a light brush of butter, just to make sure nothing sticks. This simple step saves so much heartache later!
Step 2: Mix Dry Ingredients
This step is super simple because most of our “dry” ingredients are actually cheese! Get your shredded cheddar, Monterey Jack, and Gruyère (if you’re using it) ready. If you haven’t shredded them yet, now’s the time. Make sure they are all in one bowl, ready to be tossed into the melty goodness later. I find it’s best to have all your cheeses pre-shredded and measured out before you even start melting things. It just makes the whole process flow so much smoother.
Step 3: Mix Wet Ingredients
In your oven-safe skillet or a saucepan (if you plan to transfer it later), add the softened cream cheese, butter, and milk. Place this over low to medium-low heat. You want to melt these ingredients gently. Stir them constantly with a whisk or a spatula until everything is smooth and creamy. Don’t rush this; we don’t want any scorched cream cheese at the bottom of our pan. This forms the luxurious, smooth foundation of our dip.
Step 4: Combine
Once the cream cheese mixture is smooth and melted, it’s time to add the beer. Pour in your 1/2 cup of lager or amber ale. Whisk it in until it’s fully incorporated. Now, this is where the magic starts to happen. Let this mixture bubble gently for about a minute, stirring occasionally. This little simmer helps cook off some of the raw alcohol taste from the beer, leaving behind just its wonderful malty notes. Next, gradually add your shredded cheeses, a handful at a time, stirring constantly after each addition. Keep stirring until all the cheese is melted and the dip is wonderfully smooth and gooey. If it seems a little too thick, you can add another tablespoon or two of milk or beer until it reaches your desired consistency. Remember, it will thicken slightly as it bakes.
Step 5: Prepare Filling
This step is more about preparing your seasonings! Stir in the Worcestershire sauce, garlic powder, onion powder, and cayenne pepper (if using). Give it all a good stir to distribute the flavors evenly. Now, taste it! This is your chance to adjust the seasoning. Add salt and freshly ground black pepper as needed. Since the cheese is salty, you might not need much salt, but always taste and adjust. Don’t be afraid to add a tiny bit more garlic powder if you’re a garlic lover like me!
Step 6: Layer & Swirl
Since we’ve combined everything in the oven-safe skillet, we’re already at the “layering” stage! All the cheesy goodness is in the pan, ready for its final bake. This step is more about getting it ready to go into the oven. If you used a separate saucepan, now is the time to transfer your glorious cheese mixture into your prepped casserole dish.
Step 7: Bake
Pop that skillet or dish into your preheated oven. Let it bake for about 10-15 minutes, or until it’s hot, bubbly around the edges, and wonderfully golden on top. You want to see those delicious little bubbles telling you everything is perfectly melted and heated through. Keep an eye on it; ovens can be so finicky!
Step 8: Cool & Glaze
Once it’s out of the oven, let it sit for about 5 minutes before serving. This allows it to cool just enough so no one burns their tongue on molten cheese (a lesson I learned the hard way!). There isn’t really a “glaze” in this recipe in the traditional sense; the beautiful melted cheese is the star! However, sometimes I like to sprinkle a little extra shredded cheddar or a pinch of smoked paprika on top right after it comes out of the oven for a little extra visual appeal.
Step 9: Slice & Serve
This dip is best served warm, so keep it in its skillet or dish right on the table. Provide plenty of dippers! Warm pretzel bites, crusty baguette slices, sturdy tortilla chips, or even some colorful vegetable sticks like carrots, celery, and bell peppers are perfect. Just dive in and enjoy the cheesy, beer-infused goodness!
What to Serve It With
This beer cheese dip is honestly so versatile, it’s become my secret weapon for feeding a crowd or just treating myself. For BREAKFAST, I know it sounds a bit unconventional, but a small dollop on top of some scrambled eggs or alongside some crispy bacon is surprisingly delicious! The savory, cheesy notes just complement breakfast beautifully. For BRUNCH, it’s a definite crowd-pleaser. Imagine serving it in a small cast-iron skillet alongside mini quiches, fresh fruit salad, and maybe some mimosas. It adds a warm, inviting element to the spread. As a DESSERT, again, hear me out! If you serve it with some lightly sweetened apple slices or pear slices, it becomes a fantastic sweet and savory treat. It’s unexpected but works so well, especially if you use a slightly sweeter amber ale. For COZY SNACKS, this is its natural habitat. Think game nights, movie marathons, or just a chilly evening curled up on the couch. Serve it with a big bowl of warm, soft pretzels, some hearty sourdough bread, or even some potato chips for ultimate comfort. My family’s favorite tradition is to have this on Super Bowl Sunday with all the fixings – wings, sliders, and this glorious dip, of course!
Top Tips for Perfecting Your Beer Cheese Dip
I’ve made this beer cheese dip more times than I can count, and over the years, I’ve picked up a few tricks that I think really make a difference. For the CHEESES, I cannot stress enough the importance of shredding your own from a block. Pre-shredded cheese has that powdery coating to prevent clumping, but it also prevents perfect, smooth melting. It’s a small extra step that yields a noticeably better texture. When it comes to the BEER, choose something you’d enjoy drinking on its own. A light lager or a mild amber ale works best. Avoid anything too hoppy or bitter, as that flavor can become concentrated and unpleasantly dominant in the dip. My personal favorite is a good, solid amber ale for that hint of maltiness. For MIXING ADVICE, remember to add your shredded cheese gradually and stir until each batch is melted before adding more. This prevents clumping and ensures a silky-smooth consistency. If your dip seems a little too thick after all the cheese is melted, don’t panic! Just stir in another tablespoon or two of milk or beer until it’s just right. Some people like to add a touch of Dijon mustard for an extra tang; I’ve tried it, and it’s lovely, especially if you’re using a milder beer. It’s a small addition that adds a nice zesty note. For BAKING TIPS, keep an eye on it in the oven. Ovens vary, and you’re just looking for it to get hot and bubbly around the edges, not to actually brown too much. If it starts looking too dark on top before it’s heated through, you can always loosely tent it with foil. And finally, for SERVING, remember that this dip is best enjoyed warm. If you’re serving it at a party and it needs to stay warm for a while, a small slow cooker set on the ‘warm’ setting is perfect for this. Just transfer the dip and let it do its thing!
Storing and Reheating Tips
One of the best things about this beer cheese dip is that it’s pretty forgiving when it comes to storage. If you happen to have any leftovers (which is rare in my house!), let the dip cool down completely before storing. For ROOM TEMPERATURE storage, it’s really best to avoid leaving it out for more than two hours, as with any dairy-based dish. REFRIGERATOR STORAGE is your best bet for longer freshness. Store any cooled leftovers in an airtight container in the fridge for up to 3-4 days. The texture might change slightly once it’s chilled, but don’t worry, it’s easily fixable! For FREEZER INSTRUCTIONS, you can freeze this dip too, though I find the texture can sometimes be a little less smooth after thawing. If you do freeze it, wrap it well in plastic wrap and then a layer of aluminum foil, or store it in a freezer-safe container. It should keep well for about 2-3 months. When it comes to GLAZE TIMING ADVICE, since there’s no specific glaze on this dip, you don’t have to worry about that. However, if you’re planning to freeze it, I’d recommend reheating it and then adding any fresh garnishes like a sprinkle of chives or extra cheese right before serving to ensure they stay vibrant.
Frequently Asked Questions
Final Thoughts
So there you have it, my friends – the recipe for the ultimate beer cheese dip. It’s one of those dishes that just brings people together, whether it’s around a coffee table for a casual night in or at a big holiday gathering. I love how it proves that you don’t need complicated techniques or a long ingredient list to create something truly spectacular. The simple combination of good cheese and a splash of beer is pure magic. It’s satisfying, incredibly flavorful, and ridiculously easy to make. I really hope you give this a try. It’s a recipe that’s brought so much joy to my kitchen, and I can’t wait to hear how it turns out in yours! If you loved this, you might also enjoy my recipe for my “Foolproof Nacho Cheese Sauce” or my “Spicy Artichoke Dip,” which are also perfect for entertaining. Happy dipping, and don’t forget to let me know in the comments how it turned out!
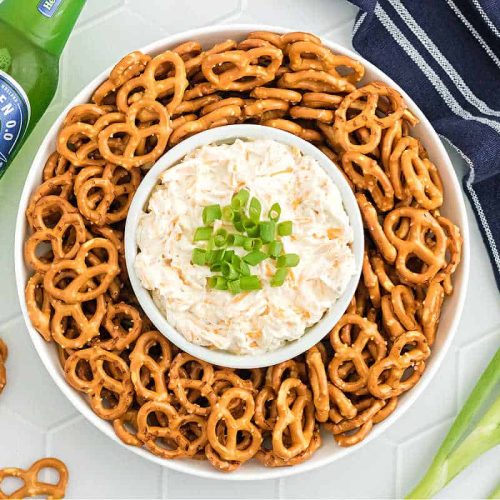
beer cheese dip
Ingredients
Main Ingredients
- 16 ounces Cream Cheese, softened two 8-ounce packages
- 0.33 cup Beer
- 1 envelope Ranch Dressing Mix
- 2 cups Shredded Cheddar Cheese
- Fresh Chopped Scallions for garnish (optional)
Instructions
Preparation Steps
- In a large bowl, combine the softened cream cheese with the beer and ranch dressing mix. Use a mixer to combine until smooth.
- Fold in the shredded cheddar cheese. Combine well until all ingredients are incorporated.
- Pour the dip into a serving bowl and top with fresh chopped scallions, if desired. Serve immediately with pretzels or chips, or chill for later.