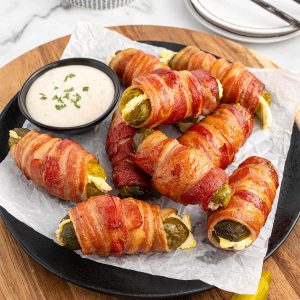
Oh, you guys. I’ve been meaning to share this with you for *ages*. You know how sometimes you stumble upon a recipe that just completely blows your mind, and you have to tell everyone you know about it? This is one of those. It’s called bacon wrapped pickles, and before you even ask, no, it’s not some weird, out-there concoction. It’s actually genius. Think about it: that perfect salty crunch of bacon meeting the tangy, vinegary bite of a pickle. It’s pure magic. My mom used to make a version of this for holiday appetizers, and it was always the first thing to disappear from the buffet table. I’ve tinkered with it over the years, and I think I’ve finally perfected it. If you’ve ever had pigs in a blanket and thought, “I wish this had more zest,” then honey, this is your answer. It’s surprisingly simple, incredibly addictive, and I swear, once you try these bacon wrapped pickles, you’ll be hooked.
What are Bacon Wrapped Pickles?
So, what exactly are these little flavor powerhouses? At their heart, bacon wrapped pickles are exactly what they sound like: pickles, lovingly wrapped in bacon. But oh, there’s so much more to it than that simple description! It’s that delightful combination of sweet, savory, salty, and tangy all rolled into one bite. The concept is rooted in the popular “devils on horseback” idea, where dates or prunes are wrapped in bacon, but we’re swapping out the fruit for that irresistible pickle punch. It’s essentially taking two universally loved comfort foods – bacon and pickles – and doing the most glorious thing possible with them. You get the smoky, crispy, rendered fat from the bacon beautifully complementing the crisp, briny flavor of the pickle. It’s a snack that hits all the right notes, a true culinary hug in every bite. I like to think of it as a grown-up, slightly more sophisticated version of a simple snack, but honestly, my kids devour them just as much as the adults!
Why you’ll love this recipe?
There are so many reasons why I keep coming back to this bacon wrapped pickle recipe, and I just know you’re going to fall head over heels for it too. First and foremost, the flavor is just out of this world. We’re talking that incredible savory, smoky depth from the bacon, which then cuts through that sharp, tangy brine of the pickle. It’s a flavor explosion in your mouth, and it’s surprisingly addictive. What I love most is how incredibly *simple* it is to make. You don’t need fancy equipment or a culinary degree. It’s the kind of recipe that’s perfect for when you need a quick appetizer for unexpected guests, or just a little something special to munch on during a movie night. And let’s talk about cost-efficiency, because who doesn’t love that? You’re using common ingredients, and the payoff in terms of deliciousness is huge. Plus, these are SO versatile. They’re fantastic on their own, but they’re also a killer addition to a charcuterie board. They’re so much more exciting than just a bowl of chips! Honestly, the biggest reason I adore this recipe is the pure joy it brings. It’s a crowd-pleaser, it’s unique, and it always gets rave reviews. It’s the kind of recipe that makes you feel like a kitchen rockstar without breaking a sweat.
How do you make Bacon Wrapped Pickles?
Quick Overview
This is honestly one of the most straightforward recipes you’ll ever whip up. We’re talking about minimal prep for maximum flavor impact. The whole process is about wrapping delicious pickles in savory bacon and baking them until they’re perfectly crispy and golden. You’ll be surprised at how quickly this comes together, making it a lifesaver on busy nights when you need a tasty bite without a lot of fuss. The beauty lies in the simplicity of combining just a few key ingredients and letting the oven do the rest of the magic.
Ingredients
For the Pickles:
You’ll want to use whole dill pickles for this. Not the small gherkins, but the larger, classic dill pickles. You can often find them in the deli section of your grocery store, or just the regular pickle aisle. I always look for pickles that have a nice, firm crunch. If you like a little heat, you can even go for a spicy Dill pickle! You’ll need about 2-3 large dill pickles, which you’ll then cut into bite-sized pieces. My favorite trick is to buy an extra jar just in case of accidental snacking while you’re prepping!
For the Bacon:
This is where the magic happens! I always opt for regular-cut bacon. The thin-cut stuff tends to get a little too crispy, and the thick-cut can be a bit much. Regular cut gives you that perfect balance of crispy edges and chewy center. You’ll need about 12-16 slices, depending on the size of your pickle pieces. If you’re feeling adventurous, you could even try maple-cured bacon for an extra hint of sweetness, but classic pork bacon is my go-to. Make sure it’s good quality bacon; it really makes a difference.
For the Seasoning (Optional but Recommended!):
A little bit of Brown Sugar and some paprika are my secret weapons. The brown sugar caramelizes beautifully in the oven, adding a lovely sweetness that balances the saltiness of the bacon and the tang of the pickle. The paprika adds a hint of smokiness and a beautiful color. You’ll just need about 2 tablespoons of brown sugar and 1 teaspoon of paprika. You can also add a pinch of cayenne pepper if you like a little kick!
Step-by-Step Instructions
Step 1: Preheat & Prep Pan
First things first, get that oven preheating to 400 degrees Fahrenheit (200 degrees Celsius). While that’s warming up, grab a baking sheet and line it with parchment paper or foil. This is a lifesaver for easy cleanup, trust me! I always say that good prep makes for a happy cook, and lining the pan is one of those small steps that makes a big difference.
Step 2: Prepare the Pickles
Now, grab those dill pickles. You want to slice them into bite-sized pieces, about 1/2 inch thick. Pat them *really* dry with paper towels. This is a crucial step! If they’re too wet, the bacon won’t crisp up nicely, and you might end up with soggy bottoms, which is a culinary crime in my book. So, take your time here and get them as dry as you can. I usually cut each pickle into about 4-6 pieces, depending on the size of the pickle.
Step 3: Prepare the Bacon
Take your bacon slices and cut them in half crosswise. This makes them the perfect size to wrap around each pickle piece. If your bacon slices are particularly long, you might even need to cut them into thirds. We want a good bacon-to-pickle ratio, you know?
Step 4: Wrap ‘Em Up
Now for the fun part! Take a pickle piece and wrap one half-slice of bacon around it, tucking the end underneath. You want the bacon to hug the pickle snugly. Don’t worry if it’s not perfectly neat; rustic charm is part of the appeal! Place each wrapped pickle, seam-side down, onto your prepared baking sheet. Try to give them a little space so they can cook evenly and get crispy all around.
Step 5: Season (Optional but Recommended!)
If you’re using the brown sugar and paprika, now’s the time! In a small bowl, mix together the brown sugar and paprika. Sprinkle this mixture evenly over the bacon-wrapped pickles. This adds a wonderful caramelized sweetness and a touch of color. You can also add a pinch of cayenne here if you like things a bit spicy. I’ve tried it without, and while it’s still good, this little sprinkle just takes it to the next level. My kids love the slight sweetness it adds!
Step 6: Bake to Perfection
Pop that baking sheet into your preheated oven. You’re going to bake these for about 20-25 minutes. The exact time will depend on your oven and the thickness of your bacon. What you’re looking for is the bacon to be golden brown and crispy, and for the fat to have rendered out nicely. You might want to flip them halfway through to ensure even crisping, but I often find they get beautifully done just as they are. Keep an eye on them towards the end so they don’t burn.
Step 7: Drain and Cool Slightly
Once they look perfectly cooked – all golden and bubbly – carefully remove the baking sheet from the oven. The bacon fat will be hot, so be cautious! I like to transfer the bacon wrapped pickles to a plate lined with paper towels to drain off any excess grease. This step helps keep them from being too greasy and allows them to get even crispier. Let them cool for just a few minutes. They’re best served warm, but not scalding hot.
Step 8: Serve and Enjoy!
And that’s it! Your absolutely divine bacon wrapped pickles are ready to be devoured. Arrange them on a platter and watch them disappear in minutes. Seriously, I’ve made these for parties, potlucks, and even just a random Tuesday night craving, and they are *always* a massive hit. People are always asking me for the recipe because that combination of salty, sweet, savory, and tangy is just irresistible.
What to Serve It With
These bacon wrapped pickles are so versatile, they can really go with almost anything! For breakfast or brunch, they’re a surprisingly delightful addition. Imagine them alongside a classic scrambled egg breakfast or as a savory element in a brunch spread. They add a pop of unexpected flavor that’s just… fun! I love serving them on a small platter with a little toothpicks for easy grabbing. For dessert, they might sound a bit unusual, but hear me out! The salty-sweet combination can be a fantastic palate cleanser after a rich meal, especially if you’ve served something a bit on the sweeter side. Think of them as a savory amuse-bouche that wakes up your taste buds. For cozy snacks, they’re pure perfection. I’ll often make a batch when my kids are home from school, and they disappear in minutes. They’re amazing with a cold soda or even a craft beer if you’re feeling adult-ish. My family’s favorite way to serve them is simply piled high on a serving tray with a little bowl of extra napkins nearby, because you’re definitely going to want more than one!
Top Tips for Perfecting Your Bacon Wrapped Pickles
Over the years of making these, I’ve picked up a few tricks that I think really elevate them from good to absolutely phenomenal. First, when it comes to the pickles, dryness is key. I cannot stress this enough! Really take the time to pat those pickle slices dry. If you’re in a real hurry, you can even give them a quick pat with a paper towel, then lay them on another paper towel for a few minutes while you prepare the bacon. Another thing is the bacon itself. Make sure you’re using good quality, regular-cut bacon. The thin stuff can burn too quickly, and the extra-thick can take ages to cook through. For the wrapping, don’t stress about perfection. A slightly messy wrap often means more crispy bits, which is a win-win in my book! If you’re using the brown sugar and paprika, don’t overdo it. Just a light dusting is all you need to enhance, not overpower, the core flavors. I learned that the hard way after one batch that was a little *too* sweet. For baking, keep an eye on them. Ovens can be tricky, and you want that beautiful golden-brown crispness, not burnt edges. If you notice some are cooking faster than others, you can always rotate the pan. And for ingredient swaps, while dill pickles are classic, have you ever tried bread and butter pickles? They offer a completely different sweet and tangy profile that’s surprisingly delicious! You can also experiment with different types of bacon – maple, or even a peppered bacon can add a nice twist. Just remember to adjust baking times if your bacon is thicker or thinner than usual.
Storing and Reheating Tips
These bacon wrapped pickles are honestly best enjoyed fresh out of the oven when they’re warm and crispy. However, I know life happens, and sometimes you have leftovers! If you find yourself with a few stragglers, store them in an airtight container in the refrigerator for up to 2-3 days. The texture might change slightly – they won’t be quite as crisp – but they’ll still be incredibly tasty. I usually find that any leftovers get eaten pretty quickly, though! When it comes to reheating, the best way to get some of that crispiness back is in the oven or an Air Fryer. Pop them on a baking sheet in a preheated oven at around 350 degrees Fahrenheit (175 degrees Celsius) for about 5-8 minutes, or until heated through and slightly crisped up. An air fryer works wonders too – just a few minutes at a similar temperature. I usually don’t bother with the microwave for these; it tends to make them a bit soggy. If you are planning to serve them later in the day, you can certainly bake them and let them sit at room temperature for an hour or so, but for longer storage, the fridge is your friend. I wouldn’t recommend freezing these, as the texture of the pickle and bacon would likely suffer significantly after thawing.
Frequently Asked Questions
Final Thoughts
So there you have it – the simple yet sensational bacon wrapped pickle recipe that I promise will become a staple in your entertaining or snacking repertoire. It’s proof that sometimes the most incredibly delicious things come from combining just a few humble ingredients in the most delightful way. The balance of salty, savory bacon with that tangy, crisp pickle is something truly special, and I just love how it always brings a smile to people’s faces. It’s the kind of recipe that makes you feel like you’ve discovered a secret weapon in the kitchen. If you’re a fan of bold flavors and easy-to-make appetizers, you absolutely *must* give these a try. They’re perfect for game days, holiday gatherings, or honestly, just for satisfying that irresistible craving for something uniquely tasty. I can’t wait to hear what you think, and I’d love to see your creations! If you try them out, please leave a comment below and let me know how they turned out, or if you’ve found any fun variations. Happy cooking, everyone!
bacon wrapped pickles
Ingredients
Main Ingredients
- 14 spears dill pickle spears Vlasic brand recommended. The number may vary.
- 6 ounces cream cheese softened
- 14 slices smoked bacon Great Value brand recommended.
Instructions
Preparation Steps
- Preheat the oven to 375°F. Line a baking sheet with parchment paper or heavy-duty aluminum foil. Lay a wire cooling rack over the lined baking sheet. Spray the rack with nonstick cooking spray.
- Use a small spoon to carefully scrape out the center of each of the dill pickle spears.
- Line a plate with paper towels.
- Lay the hollowed pickle spears soft side down. Pat the pickles dry with another layer of paper towels. This will ensure the cream cheese adheres properly and the bacon crisps up without being steamed by the extra moisture.
- Use a butter knife to gently fill the hollowed out part of the pickle with 1 tablespoon of the cream cheese. Be sure to smooth the cream cheese flat.14 spears dill pickle spears
- Next sandwich 2 filled pickle spears cream cheese sides together.
- Wrap 1 slice of bacon around each pickle “sandwich”, be sure to overlap the slice of bacon to the middle of the spear sandwich. Wrap the 2nd slice of bacon the same way to the end of the spear. Place each bacon wrapped pickle onto the sprayed rack. Repeat for remaining pickles.14 spears dill pickle spears
- Bake for 25-30 minutes, or until golden brown. (Please remember that all ovens cook differently, so begin checking on the bacon wrapped pickles at the 22 minute mark) Remove from the oven and serve with your choice of dipping sauce.