You know those days when the air gets that crisp, cool bite and all you want is something warm, comforting, and packed with flavor? That’s exactly when this autumn punch recipe becomes my absolute go-to. It’s not quite a cake, not quite a cookie, but this delightful treat bridges that gap perfectly, filling your home with the most incredible scent of cinnamon and spice. I remember the first time I made this for a fall gathering; people kept asking, “What IS that amazing smell?” and then, “Can I have the recipe?” It’s become a staple ever since, especially when the holiday season kicks into high gear and I need something that screams autumn without requiring hours in the kitchen. It’s way more forgiving than a delicate Pie crust and honestly, it tastes even better! My family devours it, and frankly, I have to hide a slice for myself sometimes because it’s just that good.

What is an Autumn Punch?
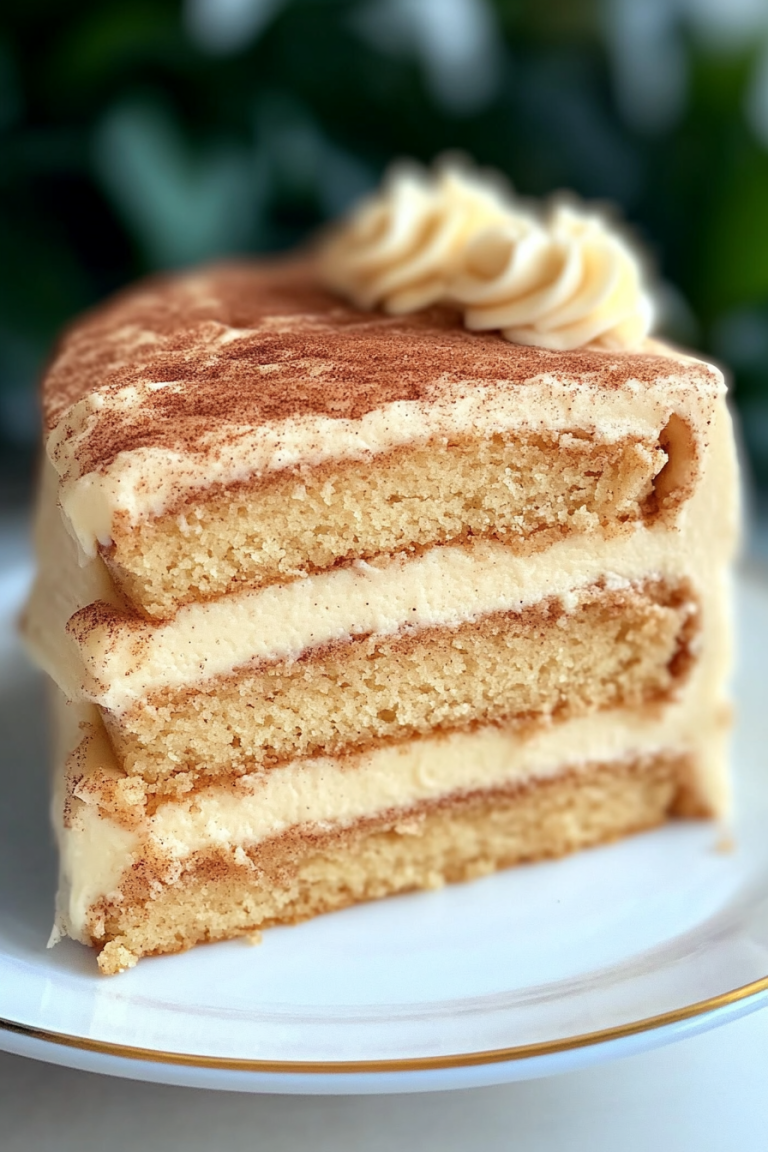
So, what exactly *is* this magical autumn punch? Well, the name itself conjures up images of cozy evenings and festive gatherings, right? At its heart, it’s a wonderfully moist, spiced cake-like confection, but with a delightful, almost cookie-like texture on the edges that gives it a fantastic contrast. Think of it as the ultimate hug in a baking dish. It’s built on simple pantry staples, enhanced by the warm, aromatic spices that are synonymous with fall – cinnamon, nutmeg, cloves, and a hint of ginger. It’s not overly sweet on its own, which is why the luscious glaze is such an important part of the experience. It’s essentially a baked dream, designed to be shared and savored when the weather starts to turn. It’s the kind of recipe that feels special enough for guests but is also incredibly comforting for a quiet afternoon with a cup of tea.
Why you’ll love this recipe?
Oh, where do I even begin with why you’ll adore this autumn punch? First off, the flavor is absolutely phenomenal. It’s like a warm spice explosion in your mouth – perfectly balanced between sweet and spiced, with a subtle tang that keeps it from being cloying. The texture is also a huge win. You get that tender, moist interior, almost like a perfectly baked loaf, but with those slightly crisp edges that are just divine. It’s incredibly simple to make, too. Seriously, you can whip this up on a weeknight without breaking a sweat. I’ve made it on nights when I’ve only had about 30 minutes before wanting to sit down, and it’s still totally manageable. Plus, the ingredients are super budget-friendly. You probably have most of them in your pantry right now! And the versatility? Fantastic. It’s wonderful as a breakfast treat, a brunch centerpiece, or the perfect ending to any dinner. What I love most about this autumn punch, though, is that it’s so adaptable. You can easily tweak the spices, add nuts, or change up the glaze to make it your own. It’s a true crowd-pleaser that never disappoints and always feels like home.
How do you make an autumn punch?
Quick Overview
Making this autumn punch is a breeze. You’ll basically combine your dry ingredients, then your wet ingredients, mix them together until just combined, and then pour it all into a prepared pan. The real magic happens with the simple topping that bakes right into the cake, creating pockets of spiced goodness. It’s a one-bowl wonder for the batter, really, which means less cleanup – always a win in my book! The whole process from start to finish, including baking and cooling, takes just over an hour, making it perfect for those spontaneous baking cravings or when you need a last-minute dessert.
Ingredients
For the Main Batter:
You’ll need all-purpose flour – about 2 cups should do it. Make sure it’s spooned and leveled, not scooped directly from the bag, otherwise, you might end up with a denser cake. Granulated sugar, about 1 ½ cups for that perfect sweetness. A teaspoon of baking soda and ½ teaspoon of baking powder for lift. And of course, our star players: 2 teaspoons of ground cinnamon, ½ teaspoon of ground nutmeg, ¼ teaspoon of ground cloves, and a pinch of ground ginger. I always whisk these dry ingredients together really well in a big bowl first. It ensures all those spices are evenly distributed, so you don’t get a bite that’s just cinnamon or just clove. Trust me on this one – it makes a difference!
For the Filling:
This is where the moisture and rich flavor really come in. You’ll need about 1 cup of unsweetened applesauce. This is a lifesaver for keeping things moist without adding extra fat, and it adds a lovely subtle apple note. Then, we have 2 large eggs, lightly beaten. Melted unsalted butter, about ½ cup – this adds that lovely richness. And vanilla extract, 2 teaspoons, to round out all those flavors. Some people like to add a tablespoon of molasses here for an even deeper, darker flavor, and I’ve tried it! It’s great, but I find the applesauce alone gives it that perfect tender crumb.
For the Glaze:
This is the crowning glory! It’s a simple powdered sugar glaze. Start with about 1 ½ cups of powdered sugar. You’ll gradually add liquid until you reach your desired consistency. I usually start with 2 tablespoons of milk (any kind works – whole milk makes it richer, but almond or oat milk are great too!). You can also use fresh orange juice or even a bit of the applesauce if you have some leftover. I like to add a little more cinnamon to the glaze, maybe ½ teaspoon, and a tiny splash of vanilla extract. The key is to whisk it until it’s smooth and pourable but not too thin. You want it to coat the back of a spoon nicely.

Step-by-Step Instructions
Step 1: Preheat & Prep Pan
First things first, preheat your oven to 350 degrees Fahrenheit (175 degrees Celsius). This is pretty standard for most cakes and ensures even baking. Now, grab an 8×8 inch baking pan. You’ll want to grease it really well. I usually use butter or cooking spray. For extra insurance against sticking, and to make removal super easy, I like to line it with parchment paper, leaving some overhang on the sides. This way, you can just lift the whole thing out once it’s cooled.
Step 2: Mix Dry Ingredients
In a large mixing bowl, whisk together your flour, sugar, baking soda, baking powder, cinnamon, nutmeg, cloves, and ginger. Whisking really thoroughly is important here to make sure all those lovely spices are evenly distributed throughout the batter. You don’t want any surprises of just plain flour or a concentrated clump of cinnamon. Give it a good minute or two of whisking until it all looks like one uniform, fragrant blend.
Step 3: Mix Wet Ingredients
In a separate medium-sized bowl, whisk together the unsweetened applesauce, lightly beaten eggs, melted butter, and vanilla extract. Make sure the butter isn’t too hot when you add it to the eggs, or it might scramble them slightly. Just a gentle whisk until everything is nicely combined and smooth. If you’re adding molasses, whisk it in here too.
Step 4: Combine
Now, pour the wet ingredients into the bowl with the dry ingredients. Using a spatula or a wooden spoon, mix everything together until *just* combined. Seriously, don’t overmix! A few streaks of flour remaining are perfectly fine. Overmixing develops the gluten too much, which can lead to a tough cake. You want a tender crumb, so stop as soon as you don’t see any large dry patches. The batter will be thick, which is exactly what we want.
Step 5: Prepare Filling
Wait! I think I might have confused you with calling it “filling.” My apologies! In this recipe, we don’t really have a separate “filling” in the traditional sense. The applesauce, eggs, butter, and vanilla are all incorporated directly into the main batter to create that moist, delicious cake. So, you’ve actually already done this step when you mixed the wet ingredients and combined them with the dry!
Step 6: Layer & Swirl
This is where the “punch” aspect might come into play if you choose to add something extra, but for the basic recipe, you simply spread the batter evenly into your prepared baking pan. Make sure it goes right to the edges. If you *were* making a marbled version (which I sometimes do!), this is where you’d dollop spoonfuls of a spiced mixture or jam on top and swirl it in gently. But for the classic autumn punch, it’s just a smooth layer of batter.
Step 7: Bake
Place the pan in your preheated oven. Bake for about 30-35 minutes, or until a wooden skewer or toothpick inserted into the center comes out clean. The edges might start to pull away slightly from the sides of the pan. Ovens can be finicky, so start checking around the 30-minute mark. If it seems like the top is browning too quickly before the center is cooked, you can always loosely tent it with foil for the last 10 minutes.
Step 8: Cool & Glaze
Once it’s baked, carefully remove the pan from the oven and let it cool in the pan on a wire rack for about 15-20 minutes. This allows it to set up properly. While it’s cooling, whip up your glaze. Whisk together the powdered sugar, your chosen liquid (milk, juice, etc.), a little extra cinnamon, and vanilla until it’s smooth and pourable. Once the autumn punch has cooled slightly in the pan, you can either lift it out using the parchment paper overhang to cool completely on the rack, or you can glaze it right in the pan. I usually let it cool just enough so it’s not piping hot, then drizzle the glaze all over the top. It will set up as it cools completely.
Step 9: Slice & Serve
Once the glaze is set (or mostly set), you can slice it into squares. I usually cut mine into 9 or 12 pieces, depending on how generous I’m feeling! It’s delicious served warm or at room temperature. The glaze will have a slightly chewy texture when warm and will firm up nicely as it cools completely. Slice it up and enjoy that incredible aroma filling your kitchen!
What to Serve It With
This autumn punch is so wonderfully versatile, it fits into almost any meal or occasion! For a cozy breakfast, I love pairing a warm slice with a strong cup of coffee. The spices in the punch complement the coffee beautifully. It’s also delightful with a glass of cold milk for the kids – my little ones ask for this all the time on school mornings when we need a quick treat. For brunch, it’s a showstopper. I’ll arrange slices on a pretty platter, maybe with some fresh berries like raspberries or sliced apples on the side for a pop of color and freshness. A mimosa or a sparkling cider pairs perfectly. As a dessert, it’s pure comfort. Serve it slightly warmed with a scoop of vanilla bean ice cream or a dollop of whipped cream. The contrast of the warm spice and cool cream is heavenly. And for those impromptu cozy snacks, it’s just perfect on its own with a cup of herbal tea or mulled cider. It truly is a treat for any time of day!
Top Tips for Perfecting Your Autumn Punch
Over the years, I’ve picked up a few tricks to make sure this autumn punch turns out perfectly every single time. When it comes to the applesauce, make sure you’re using unsweetened. If you use sweetened, your punch might end up too sweet, and you won’t have as much control over the flavor. Also, don’t pack your flour; spoon it into the measuring cup and level it off. This is a common mistake that can lead to a dry cake. For the mixing stage, I can’t stress enough: do NOT overmix. As soon as the dry and wet ingredients are *almost* combined, stop. A few streaks of flour are better than a tough cake. When it comes to the glaze, consistency is key. If it’s too thick, add a tiny bit more liquid, a teaspoon at a time. If it’s too thin, whisk in a tablespoon or two more of powdered sugar. I’ve learned this through trial and error – the hard way! If you want to get fancy with the swirl, and I do this when I have a bit more time, you can mix a tablespoon of pumpkin puree with a little extra cinnamon and a touch of brown sugar, dollop it on top of the batter, and then use a knife to swirl it in. It looks beautiful and adds another layer of fall flavor. For ingredient swaps, I’ve tested using half whole wheat flour with all-purpose, and it works, making it a bit heartier. You could also try swapping some of the applesauce for mashed banana if you have some ripe ones going begging – it adds a lovely depth, though it changes the flavor profile slightly. For baking, always trust the toothpick test. Every oven is different, so don’t just rely on the time. And if your oven runs hot, use that foil tent I mentioned earlier to prevent the top from burning before the inside is cooked.
Storing and Reheating Tips
This autumn punch is wonderfully forgiving when it comes to storage. If you have any leftovers (which is rare in my house!), you can keep it at room temperature, covered tightly with plastic wrap or aluminum foil, for up to two days. It stays remarkably moist. If you need it to last longer, or if your kitchen is particularly warm, I’d recommend refrigerating it. Store it in an airtight container in the fridge for up to 5 days. It tastes just as good, if not better, the next day as the flavors meld. When you want to reheat it, you have a few options. You can pop a slice in the microwave for about 15-20 seconds for a quick warm-up – it brings back that lovely gooeyness. Or, for a more gentle reheat, you can warm it in a toaster oven at a low temperature for a few minutes. I usually avoid reheating it if the glaze is still very soft, as it can melt off. If I’m freezing it, I usually do so *without* the glaze. Bake, cool completely, wrap it tightly in plastic wrap, then foil, and freeze for up to 2-3 months. Thaw it overnight in the refrigerator, then bring it to room temperature or gently warm it before adding a fresh glaze. This makes it feel brand new!
Frequently Asked Questions
Final Thoughts
I really hope you give this autumn punch a try. It’s more than just a recipe to me; it’s a little slice of cozy comfort that always brings a smile to my face. The aroma alone as it bakes is enough to make any day feel brighter and more festive. It’s the kind of treat that feels both nostalgic and brand new every time you make it. If you love this recipe, you might also enjoy my Spiced Pear Cake or my Easy Apple Crumble Bars – they have that same warm, comforting vibe! I can’t wait to hear what you think of this autumn punch. Please leave a comment below to let me know how yours turned out, or if you’ve tried any fun variations! Happy baking, and enjoy every delicious bite!

Autumn Punch
Ingredients
Main Ingredients
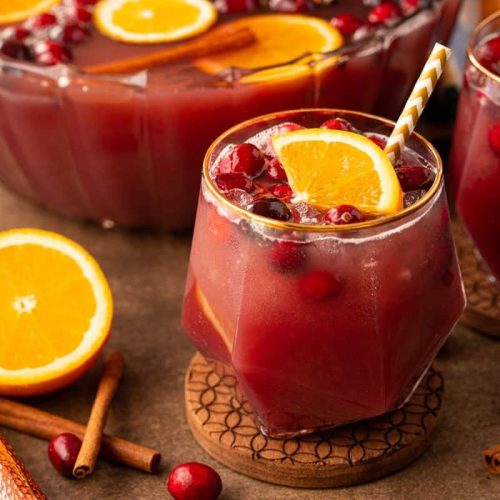
- 4 cups Cranberry juice
- 2 cups Apple cider
- 1 cup Orange juice
- 0.5 cup Lemon juice
- 0.25 cup Maple syrup (optional, to taste)
- 1 cup Sliced oranges
- 0.5 cup Cinnamon sticks
- 0.5 cup Star anise
Instructions
Preparation Steps
- In a large pitcher or punch bowl, combine the cranberry juice, apple cider, orange juice, and lemon juice.
- If desired, stir in the maple syrup to sweeten. Taste and adjust sweetness as needed.
- Add the sliced oranges, cinnamon sticks, and star anise to the punch.
- Chill for at least 1 hour to allow the flavors to meld. Serve cold over ice.