Oh, you know those days. The ones where the world feels a little too much, and all you crave is a little bit of pure, unadulterated joy in edible form? For me, that joy comes in the form of homemade almond toffee. Forget those fancy, complicated desserts; this is the real deal, the kind of treat that makes your eyes roll back in your head with the first bite. I’ve been making this almond toffee for what feels like forever, and every single time, it brings back that cozy feeling of being in my grandmother’s kitchen. It’s not just candy; it’s a memory. It’s that perfect balance of buttery richness, the satisfying crunch of toasted almonds, and that addictive sweet glaze that just melts in your mouth. Honestly, if you’ve ever loved a good chocolate chip cookie or a slice of decadent fudge, you are going to fall head over heels for this almond toffee. It’s so much simpler than you might think, and the results? Absolutely phenomenal. It’s the kind of thing that makes a regular Tuesday feel like a special occasion.
What is almond toffee?
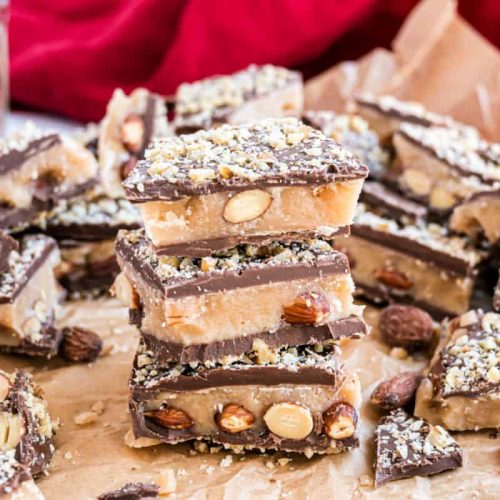
So, what exactly is this magical creation we call almond toffee? Think of it as a delightful dance between crunchy, toasted almonds and a rich, buttery caramel. It’s essentially a hard caramel candy that’s generously studded with nuts and often finished with a drizzle of chocolate. The “toffee” part usually refers to the cooking process of the sugar and butter, creating that signature brittle texture. This isn’t your average candy bar; it’s a step above, a little more refined but still wonderfully approachable. My version focuses on that incredible depth of flavor you get from really toasting the almonds and achieving that perfect caramel consistency. It’s the kind of thing you can’t stop thinking about once you’ve had a taste, and thankfully, it’s pretty straightforward to whip up a batch right in your own kitchen. It’s essentially happiness you can break apart and share… or hoard, I won’t judge!
Why you’ll love this recipe?
Let me tell you, there are a million reasons why this almond toffee recipe has become a staple in my home, and I’m convinced it’ll become one in yours too. First off, the flavor is just out of this world. That deep, nutty toasted almond flavor perfectly complements the sweet, buttery caramel base. When you bite into it, you get that satisfying crackle, followed by the melt-in-your-mouth goodness. It’s pure bliss. And the best part? It’s surprisingly simple to make. I know, I know, caramel can sound intimidating, but this recipe breaks it down so you can nail it every time. It uses basic pantry staples, so you likely won’t even need to make a special trip to the store. Plus, it’s incredibly cost-effective compared to buying similar quality toffee from a specialty shop. What I truly adore about this almond toffee is its versatility. It’s perfect for gifting during the holidays, fantastic for dessert platters, and honestly, a lifesaver when you need a quick, impressive treat for unexpected guests. My kids ask for this all the time, and they’re usually pretty picky! It’s that comforting, familiar sweetness that just makes everyone happy. It’s also a wonderful alternative to more time-consuming baked goods when you’re short on time but still want to make something special.
How do you make almond toffee?
Quick Overview
This recipe is all about patience and a good candy thermometer, but don’t let that scare you! We’ll be melting butter and sugar, cooking it to a specific temperature to get that perfect brittle consistency, stirring in toasted almonds, and then letting it set. The whole process, from start to finish, is surprisingly quick once you get going, and the hardest part is waiting for it to cool so you can finally dive in. The end result is a batch of beautiful, homemade almond toffee that tastes like you spent hours on it.
Ingredients
For the Main Toffee Base: For the Toffee Base: For the Toffee Base: For the Toffee Base: For
1 cup (2 sticks) unsalted butter: Always use unsalted so you have control over the saltiness. Make sure it’s good quality butter; it really makes a difference in the final flavor. I usually opt for a European-style butter if I can find it for that extra richness.
2 cups granulated sugar: Standard white sugar is perfect here. It’s what gives us that beautiful amber color and crisp texture.
1 cup light corn syrup: This is your secret weapon for preventing crystallization and ensuring a smooth, crackly toffee. Don’t skip it!
1 teaspoon vanilla extract: For that warm, aromatic finish that rounds out the sweetness.
1/2 teaspoon salt: Even though we’re using unsalted butter, a little salt is crucial to balance the sweetness and enhance the flavors.
2 cups slivered or chopped almonds, toasted: Toasted almonds are non-negotiable! They bring so much more depth and flavor. I like to toast mine in a dry skillet over medium heat until they’re golden brown and fragrant, about 5-7 minutes.
For the Chocolate Drizzle (Optional but highly recommended!):
1 cup semi-sweet chocolate chips or finely chopped chocolate: Good quality chocolate makes a noticeable difference. You can use milk chocolate or dark chocolate too, depending on your preference!
Step-by-Step Instructions
Step 1: Preheat & Prep Pan
First things first, grab a sturdy baking sheet, the kind that won’t warp in the oven. Line it generously with parchment paper or a silicone baking mat. You want a surface that the toffee won’t stick to, and parchment paper is my go-to for easy cleanup. Make sure the paper covers the entire surface so there are no sticky surprises. I like to lightly grease the parchment paper with a tiny bit of butter or cooking spray, just for extra insurance, though it’s often not strictly necessary if you’ve got good quality parchment.
Step 2: Mix Dry Ingredients
This step is more about preparing your workspace. Ensure your toasted almonds are ready to go and have your vanilla extract and salt measured out and within easy reach of the stovetop. This is crucial because once the caramel mixture hits the right temperature, you need to move quickly.
Step 3: Mix Wet Ingredients
In a heavy-bottomed saucepan (this is important for even heating and preventing scorching!), combine the butter, granulated sugar, and corn syrup. Place the saucepan over medium heat. Stir constantly with a wooden spoon or heatproof spatula until the butter has melted and the sugar has dissolved. Don’t rush this part; you want to make sure everything is fully incorporated before you start cooking the caramel.
Step 4: Combine
This is where the magic happens. Once the butter and sugar mixture is smooth and the sugar is dissolved, stop stirring and attach your candy thermometer to the side of the pan, making sure the bulb is submerged in the liquid but not touching the bottom. Let the mixture come to a boil over medium-high heat. You’ll want to cook it, WITHOUT STIRRING (this is key to preventing crystallization!), until it reaches 300°F (150°C) on your candy thermometer. This is the “hard crack” stage, which is what gives you that perfect brittle texture. This usually takes about 10-20 minutes, depending on your stove. Keep a close eye on it; it can go from perfect to burnt in seconds!
Step 5: Prepare Filling
As the caramel is approaching its final temperature, have your toasted almonds ready. This is your moment to work quickly! Once the caramel reaches 300°F, immediately remove the pan from the heat. Carefully stir in the vanilla extract and salt. Be cautious, as it will bubble up quite a bit!
Step 6: Layer & Swirl
Pour the hot caramel mixture evenly over your prepared baking sheet. Immediately sprinkle the toasted almonds evenly over the hot caramel. If you’re adding chocolate, you can sprinkle chocolate chips over the hot toffee and let them melt for a minute, then spread them into an even layer, or you can melt the chocolate separately and drizzle it over the cooled toffee. My personal preference is to melt chocolate chips gently in the microwave (in 30-second intervals, stirring in between) until smooth, then drizzle it over the set toffee using a fork or a piping bag for a pretty pattern. It’s a bit of extra flair that everyone raves about!
Step 7: Bake
This step isn’t baking in the oven, but rather allowing the toffee to cool and harden. Let the toffee sit at room temperature undisturbed until it’s completely set and hard. This can take anywhere from 1 to 2 hours. Resist the urge to touch it or try to break it apart too soon!
Step 8: Cool & Glaze
Once the toffee is fully cooled and firm, you can break it into pieces. If you’ve added the chocolate drizzle, make sure the chocolate is set before breaking. You can do this by hand, or if you want neater pieces, you can gently tap the underside of the baking sheet or score it with a sharp knife while it’s still slightly warm (but not sticky!). The breaking process itself is quite satisfying – it’s a true toffee moment!
Step 9: Slice & Serve
Break the toffee into your desired pieces. Some people like large shards, others prefer bite-sized bits. Arrange them on a festive platter or package them up in treat bags. This almond toffee is best enjoyed at room temperature, where you can really appreciate the texture and flavor. It’s perfect for sharing with loved ones, or for a little solo indulgence.
What to Serve It With
Honestly, almond toffee is a star all on its own, but it also plays wonderfully with other things! For a leisurely weekend breakfast or brunch, I love setting out a platter of these alongside some fresh fruit salad and maybe a batch of my famous blueberry muffins. The sweetness of the toffee is a lovely contrast to the tartness of the berries. As a dessert, it’s divine served with a rich cup of coffee or a steaming mug of hot chocolate. The warmth of the drink and the crisp sweetness of the toffee are a match made in heaven. My kids absolutely adore it as a special after-school snack, often paired with a glass of cold milk. And for cozy movie nights or when you just need a little pick-me-up, a few pieces of this almond toffee with a cup of herbal tea are just perfect. It’s that little sweet something that makes any moment feel more special and comforting. I’ve even been known to crumble some over a scoop of vanilla ice cream for an impromptu sundae – talk about decadent!
Top Tips for Perfecting Your Almond Toffee
Making perfect almond toffee is totally achievable, and a few little tricks I’ve picked up over the years can make all the difference. First, regarding the almonds: toasting them is key. Don’t just toss them in raw. Toast them in a dry skillet over medium heat, stirring often, until they are fragrant and a beautiful golden brown. This deepens their flavor immensely. I’ve sometimes added them too early, and they can burn in the hot caramel, so make sure they’re toasted and ready to go right when the caramel hits temperature. When you’re making the caramel itself, a heavy-bottomed saucepan is your best friend. It distributes heat evenly, which is crucial for preventing hot spots and scorching. Seriously, avoid thin-bottomed pans; they’re a recipe for disaster here. And the candy thermometer! It’s not optional for this recipe. Getting that exact temperature of 300°F (150°C) is what gives you that perfect brittle texture. Go a few degrees over, and it can become too hard or bitter; a few degrees under, and it might be too chewy. Trust me, I’ve learned this the hard way!
Don’t stir the caramel mixture once it starts boiling until you reach the target temperature. Stirring can encourage sugar crystals to form, resulting in a grainy toffee instead of a smooth, brittle one. When you add the vanilla and salt at the end, do so *off the heat*. It will bubble up vigorously, so stand back and stir quickly to incorporate them. If you’re adding chocolate, let the toffee cool completely before drizzling. If it’s too warm, the chocolate will just melt into a sad, oily mess. For a beautiful drizzle, melt your chocolate chips gently in the microwave in 30-second increments, stirring between each, until smooth. Then, use a fork to flick it across the toffee in thin lines. For ingredient swaps, I’ve experimented with different nuts, and while almonds are classic, pecans or walnuts work beautifully too. Just be sure to toast them! If you’re trying to avoid corn syrup, it’s tricky for toffee because it really helps prevent crystallization, but some folks have had success using a combination of honey and Brown Sugar, though the texture might be slightly different. Always use a silicone baking mat or well-greased parchment paper; a sticky toffee is the worst! Lastly, when it comes to breaking the toffee, I find scoring it with a knife while it’s still slightly warm (but fully set) gives you cleaner edges, but there’s also a certain charm to rustic, broken pieces!
Storing and Reheating Tips
Once you’ve mastered this delicious almond toffee, you’ll want to know how to keep it fresh and ready to enjoy. Storing it properly is key to maintaining that wonderful crisp texture. At room temperature, it does best in an airtight container. I usually place parchment paper between layers if I’m stacking pieces, to prevent them from sticking together, especially if there’s chocolate involved. It will stay deliciously crisp at room temperature for a good week to 10 days. If your kitchen is particularly warm or humid, you might want to consider refrigerator storage. In the fridge, it can last even longer, up to 2-3 weeks. Just make sure it’s in a good airtight container. The only downside to refrigeration is that it can sometimes make the toffee a little harder to break initially, but it softens up quickly once you bring it back to room temperature. I’ve never personally frozen my toffee because it’s usually gone before I have a chance, but I imagine if you wrapped it very well in plastic wrap and then an airtight container or freezer bag, it could last for a couple of months. Thawing would be best done slowly in the refrigerator overnight.
For the glaze, if you choose to add chocolate, it’s best to add that *after* the toffee has fully cooled and set. If you plan to store it for longer periods or freeze it, I would recommend adding the chocolate drizzle just before serving for the best appearance. Otherwise, the chocolate can sometimes bloom or get a bit patchy. If you’re making it as a gift and want it to look pristine, storing it without the chocolate drizzle and adding it just before gifting is a great strategy. For both room temperature and refrigerated storage, ensure your container is truly airtight. Any exposure to air can start to soften the toffee, and nobody wants soft toffee!
Frequently Asked Questions
Final Thoughts
So there you have it – my absolute favorite, tried-and-true recipe for homemade almond toffee. It’s a sweet little package of joy that never fails to impress, whether you’re sharing it with family, gifting it to friends, or just treating yourself. What I love most about this recipe is that it brings a little bit of old-fashioned magic into my kitchen, and I hope it does the same for yours. It’s proof that sometimes, the simplest ingredients can create the most extraordinary flavors and textures. If you’re looking for other delightful confections that are just as satisfying to make and eat, you might also enjoy my Salted Caramel Brownies recipe or my incredibly easy Fudge Recipe. They’re all about bringing a little homemade happiness to your table. I can’t wait to hear how your almond toffee turns out! Please share your experiences, any fun variations you tried, or even just how quickly it disappeared from your kitchen in the comments below. Happy baking (and toffee-making)!
almond toffee
Ingredients
Toffee Base
- 0.5 cup unsalted butter
- 0.5 cup margarine
- 1 cup granulated sugar
- 0.25 teaspoon kosher salt
- 0.5 teaspoon vanilla extract
- 1 cup unblanched whole almonds
Topping
- 12 ounce milk chocolate melted
- 1 cup finely ground walnuts
Instructions
Preparation Steps
- On a foil-lined baking dish (11x7 inches) or in a silicone brownie bite pan (with 24 bites), arrange the almonds in a single layer. Set aside.
- In a heavy-bottomed pan, combine the butter, margarine, sugar, salt, and vanilla extract. Cook over medium-high heat with a wooden spoon until the butter melts, stirring constantly. Continue stirring constantly and bring the mixture to a rolling boil.
- Continue boiling and stirring for an additional 5-7 minutes until the candy turns the color of almonds (about 300 degrees F on a candy thermometer). Pour the hot toffee mixture evenly over the prepared almonds. If using a brownie bite pan, use a small metal scoop to quickly fill each bite.
- Allow the toffee to cool completely and set, which will take approximately 2 hours.
- Once the toffee is cooled and firm, spread the melted milk chocolate over the top. Sprinkle generously with the finely ground walnuts. If you wish to coat both sides, use half the chocolate and walnuts for the first side, allow it to set, then flip and repeat for the other side.
- When the chocolate and walnuts are set, pop the toffee out of the silicone pan or cut it into pieces if using a baking dish. Store in an airtight container. Enjoy your homemade almond toffee!