There’s something about the smell of caramel mingling with warm apples fresh out of the oven that instantly takes me back to my childhood kitchen. I still remember the first time my mom made a caramel apple cake for a family gathering — the house smelled like autumn itself, cozy and inviting. Unlike a typical apple pie or a straightforward spice cake, this caramel apple cake balances tender cake crumbs with gooey swirls of caramel and chunks of tender apples that soften just right. It’s a sneaky dessert that’s both comforting and a little unexpected, perfect for when you want something rich but homey. Honestly, it’s like the lovechild of a caramel apple and a classic coffee cake — but way easier to make than you’d think. Whenever I serve this, it disappears in minutes, and my kids actually request seconds before the glaze even fully sets.
What is caramel apple cake?
Think of caramel apple cake as a celebration of all things fall, wrapped up in a single, scrumptious dessert. It’s essentially a moist, spiced cake studded with tender apple pieces and generously swirled with luscious caramel sauce — all baked to golden perfection. The name might give the impression it’s a complicated layered masterpiece, but it’s really more of a cozy, rustic cake that anyone can bake at home. The magic is in the way the caramel and apple mingle throughout the batter, creating pockets of sweet, sticky surprise with every bite. If you’re picturing an over-the-top fancy cake, think again — this one’s like the comforting hug of fresh apple pie, but way simpler and a little bit stickier in the best way. It’s just pure, unpretentious fall goodness in cake form.
Why you’ll love this recipe?
What I love most about this caramel apple cake is how it hits all the sweet spots without requiring a ton of fuss. First off, the flavor combo is unbeatable — tart apples, warm cinnamon, and buttery caramel all tangled up inside a tender, moist cake. It’s like your favorite apple caramel treat but in cake form, with all those irresistible textures working together. Plus, it’s so straightforward: no complicated layering or precision piping, just mix and swirl. The ingredient list reads like pantry staples too, so you’re not dropping a fortune at the store. I’ve made this cake on busy weeknights more times than I can count because it’s a total lifesaver when your sweet tooth calls but time’s tight. And if you’re a fan of other spiced cakes or apple desserts, like my Cinnamon Spice Cake or classic Apple Crisp, you’ll notice this is a more playful, moist twist that’s equally satisfying but much quicker to whip up. Honestly, it’s become a family staple here — I’ve learned it’s also great warmed up with a scoop of vanilla ice cream when you need a little extra cozy comfort.
How do I make caramel apple cake?
Quick Overview
This recipe is all about layering flavors rather than complicated steps. First, you’ll prep a simple spiced cake batter with fresh apples folded right inside. The secret sauce? Swirling ribbons of caramel right into the batter before baking — this creates those delightful caramel pockets that make every bite a surprise. It’s a one-pan bake that needs a bit of patience while it cools, but the hands-on time is minimal. If you’ve ever made a quick coffee cake or a basic apple bread, you’re basically halfway there already!
Ingredients
For the Main Batter:
- 2 cups all-purpose flour – sifted for lightness, or substitute half for whole wheat for added texture
- 1 ½ teaspoons baking powder – for that perfect rise
- ½ teaspoon baking soda – balances the acidity of apples
- 1 teaspoon ground cinnamon – adds warm spice
- ½ teaspoon ground nutmeg – optional but highly recommended for depth
- ½ teaspoon salt – to bring all flavors to life
- ½ cup unsalted butter, softened – for rich, buttery crumb
- ¾ cup granulated sugar – you can tweak this if you want it less sweet
- 2 large eggs – room temperature is best for mixing
- 1 teaspoon vanilla extract – gives a homey aroma
- 1 cup sour cream or Greek yogurt – adds moisture and tender crumb
- 2 medium apples, peeled and diced – I like Gala or Fuji for sweetness and texture
For the Filling:
- ½ cup caramel sauce – homemade or store-bought, thick and pourable
- Optional: a pinch of sea salt – if you want to create that salted caramel effect
For the Glaze:
- ½ cup powdered sugar – sifted for smoothness
- 2 tablespoons milk or cream – add more or less to get your desired thickness
- 1 teaspoon vanilla extract – for a sweet finish
- Optional: pinch of cinnamon or a drizzle of caramel on top for extra flair
Step-by-Step Instructions
Step 1: Preheat & Prep Pan
Start by heating your oven to 350°F (175°C). I always line my 9×13-inch cake pan with parchment paper for easy cleanup and to keep the cake from sticking — a little butter and flour works too. Preparing your pan well makes removing the cake an absolute breeze, which is a gift after the timer goes off and the kitchen smells divine.
Step 2: Mix Dry Ingredients
Whisk the flour, baking powder, baking soda, salt, cinnamon, and nutmeg together in a medium bowl. Mixing these separately first helps distribute the leavening agents and spices evenly so you don’t end up with bitter pockets or lumpy bites. The dry ingredients should look well combined and light, like a soft sand texture.
Step 3: Mix Wet Ingredients
In a larger bowl, beat the butter and sugar until they’re fluffy and pale — this aerates the batter, giving you that tender crumb we all love. Then add the eggs one at a time, mixing each until fully incorporated. Stir in the vanilla and sour cream (or Greek yogurt). If you let your eggs and dairy sit on the counter for a bit beforehand, everything will come together faster and look smoother.
Step 4: Combine
Slowly fold the dry ingredients into the wet mixture in batches, using a spatula or wooden spoon. Don’t go nuts here — just mix until you no longer see flour streaks. Overmixing makes the cake tough, and I’ve definitely learned that the hard way after baking it too long once; it still tasted good, just a bit denser than I’d hoped!
Step 5: Prepare Filling
Take your caramel sauce and if it’s super thick, warm it gently to make it easy to drizzle and swirl. A splash of milk can loosen it up, but be careful not to make it too runny or it’ll sink completely to the bottom. If you want the salted caramel vibe, sprinkle a little sea salt into the sauce now.
Step 6: Layer & Swirl
Pour half of the cake batter into the prepared pan, spreading it gently. Dollop half the caramel sauce randomly over the surface, then add the remaining batter on top. Use a butter knife or skewer to gently swirl the caramel through the batter in a figure-eight or random pattern. This step is what gives the cake its beautiful marbled look and those little caramel pockets — so don’t skip it and don’t over swirl.
Step 7: Bake
Bake in the preheated oven for about 45-55 minutes or until a toothpick poked in the center comes out mostly clean but might have a few moist crumbs — that’s perfect. Every oven’s a bit different though, so start checking at 40 minutes. The smell during baking will make it almost impossible to wait!
Step 8: Cool & Glaze
Let the cake cool in the pan for about 20 minutes, then transfer it to a wire rack to cool completely before glazing. If the cake’s still too warm, the glaze will melt off, and I learned that the hard way with one batch — the glaze pooled to the plate, and while tasty, the look wasn’t quite right! Mix your powdered sugar, vanilla, and milk until smooth and pourable, then drizzle liberally across the top. A little flick of cinnamon or a caramel drizzle finishes it off beautifully.
Step 9: Slice & Serve
When it’s time to cut, use a sharp knife and wipe it clean between slices for neat, pretty pieces. This cake tastes incredible warm or at room temperature — if you’re like me, you might secretly prefer it chilled the next day when the caramel firms up a bit. Serve it with a big mug of coffee or a dollop of whipped cream for extra indulgence.
What to Serve It With
For Breakfast: Nothing beats this cake with a sturdy cup of black coffee or a creamy latte. Sometimes I warm a slice for just 10 seconds in the microwave and add a light smear of butter — pure breakfast bliss. It’s perfect when you want a cozy, sweet morning treat that’s a little more special than toast but not over the top.
For Brunch: Cut into squares and plated alongside fresh fruit and a sharp cheddar cheese platter, this cake shines at brunch. A crisp apple cider mimosa or a spiced herbal tea complements the flavors beautifully. When I’ve done this for friends, it always sparks compliments and requests for the recipe.
As Dessert: After dinner, serve a warm slice with vanilla ice cream or whipped cream. A drizzle of extra caramel or a sprinkle of toasted pecans takes things to the next level. This cake’s richness pairs especially well with a cup of strong black tea or a buttery caramel latte.
For Cozy Snacks: On those slow afternoons when you just want to curl up with a good book, this cake alongside a simple chai tea or hot apple cider feels like a little slice of comfort. My kids often grab pieces straight from the pan on snack time because it’s that irresistible.
Our family has a ritual where on chilly evenings, we bake this and everyone gathers in the kitchen while it cools. It’s amazing how such a humble yet rich dessert can bring everyone around the table, sharing stories and smiles. Definitely one to keep in your back pocket for making moments special.
Top Tips for Perfecting Your Caramel Apple Cake
Zucchini Prep: Actually, this recipe is all about apples, but I once experimented with adding grated zucchini for moisture and it turned out surprisingly good — just make sure to squeeze out excess moisture or your cake might turn soggy. Freshness of your apples matters too; firmer, crisp apples hold their shape better, giving those little bursts of apple chunkiness.
Mixing Advice: Resist the urge to beat the batter too much once you combine wet and dry ingredients — I’ve made the mistake of mixing it till perfectly smooth and ended with a slightly dense crumb. You want some lumps; they give the cake that tender, foolproof texture. Folding gently is your friend here.
Swirl Customization: The swirling step is what makes this cake so visually exciting. To get the most dramatic marbling, don’t over-swirl — just a few figure eights or random zigzags. The thicker your caramel, the more distinct the swirls will be, so consider warming caramel just enough to pour but not so much that it runs all the way through the batter.
Ingredient Swaps: I’ve swapped butter for coconut oil once, and while the flavor shifted a bit (a subtle coconut note), it came out moist and tender. For a dairy-free twist, almond or oat milk replace the sour cream nicely, though you might want to add a teaspoon of apple cider vinegar to help with tang and texture. Brown sugar in place of granulated sugar gives the cake a lovely molasses undertone too.
Baking Tips: Oven temperatures can be tricky. If your cake starts browning too fast on top, tent it loosely with foil after 30 minutes of baking. Check for doneness with a toothpick but expect a few moist crumbs near the caramel areas. Center positioning in the oven helps with even baking.
Glaze Variations: If you don’t want a sugary glaze, try a simple dusting of cinnamon sugar for a rustic finish or swipe the top with softened cream cheese sweetened lightly with honey for tangy contrast. You can even drizzle extra warm caramel over the glaze for a glossy, decadent look. Whatever you choose, add the glaze once the cake is cooled completely to avoid sinking or melting off.
Storing and Reheating Tips
Room Temperature: Store your caramel apple cake tightly covered with plastic wrap or an airtight container on the counter for up to 2 days. It keeps moist and fresh, but after that, it may start condensing and get sticky.
Refrigerator Storage: Wrapped well, this cake will keep for about 4-5 days in the fridge. Because of the caramel, it firms up and tastes just as good chilled; I actually prefer leftovers cold with a cup of tea. Just make sure it’s in an air-tight container to prevent the cake from drying out or absorbing other fridge odors.
Freezer Instructions: This cake freezes beautifully — wrap individual slices tightly in plastic wrap and place in a freezer-safe bag. Frozen cake can last up to 2 months. Thaw overnight in the fridge and warm slightly before serving for best texture and flavor. If you’re freezing the whole cake, keep the glaze separate and add it fresh after thawing.
Glaze Timing Advice: Always wait until the cake is completely cool before glazing to prevent melting and sliding off. If you plan to freeze the cake, glaze after thawing to keep that pretty finish intact.
Frequently Asked Questions
Final Thoughts
Honestly, this caramel apple cake has become one of those recipes I turn to when I want to impress with minimal effort, or when I just want a slice of something sweet that transports me to cozy, happy memories. It’s got all the nostalgia of a homemade apple dessert but with the playful twist of caramel swirls woven through every bite. If you’re a fan of easy-to-love, homemade treats — especially those with that perfect balance of sweet and spice — this one’s going to sneak its way into your rotation too. Don’t just take my word for it though, try it with your favorite apple variety and maybe even add a dash of your own magic. I really can’t wait to hear how yours turns out! And please let me know if you add anything fun or find your own favorite tweaks — I’m always up for swapping kitchen stories.
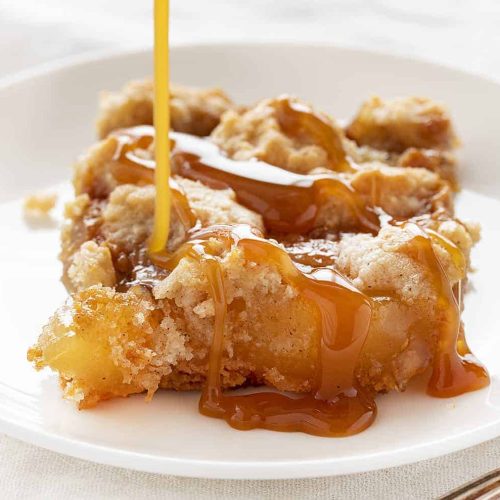
Caramel Apple Cake
Ingredients
Main Ingredients
- 15.25 oz white cake mix
- 1 tsp homemade apple pie spice
- 0.67 cup evaporated milk divided
- 1 tbsp vanilla extract
- 0.75 cup unsalted butter melted
- 11 oz caramel bits
- 20 oz apple pie filling
Instructions
Preparation Steps
- Preheat oven to 350°F.
- In a medium bowl, whisk together cake mix, apple pie spice, 0.33 cup of evaporated milk, vanilla extract, and melted butter until smooth.
- Pour half of the batter into a greased 9x13 inch pan and smooth to create an even layer.
- Bake for 10 minutes or until golden brown.
- In a saucepan over medium heat, mix together caramel bits and remaining 0.33 cup evaporated milk until melted and smooth.
- Remove cake from oven, top with apple pie filling, then pour caramel mixture over the filling reserving some for topping later.
- Crumble remaining batter evenly over the top of caramel and apple filling.
- Bake an additional 30 minutes or until golden brown and bubbly.