
It’s like this — there’s something magical about s’mores that just takes me right back to warm summer nights around a campfire, marshmallows toasted to perfection, gooey chocolate melting in between graham crackers, and sticky fingers all around. That’s exactly why this s’mores pie stole my heart the first time I made it. Imagine all those cozy summer campfire flavors wrapped up into a slice of pie you can bake anytime, no fire pit required. And honestly? It’s a total game changer if you love the idea of a classic s’more but want something a little more festive and easier to share with a crowd. I’ve made this pie countless times, and it always disappears in minutes at my house — my kids even sneak back for seconds when they think I’m not looking! This s’mores pie is just the right combo of crunchy, melty, and sweet — and I can’t wait for you to try it.
What is a S’mores Pie?
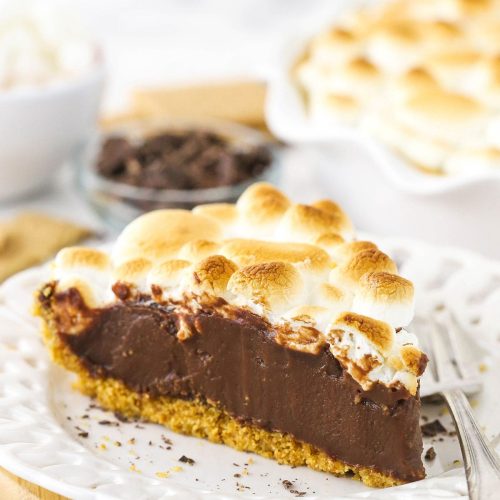
Think of s’mores pie as a dessert tribute to the perfect campfire treat, but in pie form. Instead of individual s’mores, you have this luscious pie packed with layers of graham cracker crust, melted chocolate filling, and toasted marshmallows right on top. It’s essentially the nostalgic flavors of s’mores—graham crackers, chocolate, and marshmallows—built into an easy-to-slice pie that’s perfect for gatherings, dessert, or a cozy snack. The name ‘s’mores’ actually comes from the phrase “some more,” because let’s be real, no one can stop at just one bite. What’s fun is that you get all the taste of a campfire classic without having to light any flames or deal with sticky hands all over your couch. It’s approachable and friendly for any home cook who wants that familiar, gooey, melty experience with zero fuss.
Why you’ll love this recipe?
What I love most about this s’mores pie is how it nails that perfect balance of comfort and simplicity — seriously, it’s like a hug in dessert form. First off, the flavor is out of this world. The combination of crumbly, buttery graham cracker crust paired with rich chocolate and fluffy toasted marshmallows hits all the nostalgic marks that remind me of camping trips and late-night kitchen experiments alike. It’s sweet without being overpowering, and there’s that delightful textural contrast: crunchy edges, smooth, melty middle, and nicely toasted marshmallow peaks on top.
But here’s the kicker — it’s incredibly simple to throw together. I always say, if you have 30 minutes and a handful of pantry staples, you’re already halfway there. No complicated layers or fancy techniques; it’s straightforward, forgiving, and absolutely kid-approved (mine ask for it at every party). Plus, it’s budget-friendly; the ingredients are either what you already have or easy to grab without busting your grocery budget. Versatility-wise, you can tweak the chocolate type or add mix-ins like nuts or a little sea salt to make it your own. I even swapped in almond milk once for the filling and the pie turned out surprisingly creamier.
If you love other nostalgic desserts like s’mores bars or can’t get enough of classic chocolate pies, you’ll find this s’mores pie is right up your alley. It’s just the right twist on familiar flavors to make you feel both nostalgic and excited all at once.
How do I make a S’mores Pie?
Quick Overview
At its heart, this s’mores pie comes together in a few easy steps: prepare a buttery graham cracker crust, whip up a luscious chocolate filling, layer it all into your pie dish, then top it off with marshmallows that get toasted to a golden perfection right in the oven. What makes this method special is that there’s no need for a double boiler or tempering chocolate — just simple mixing and layering. The crust bakes a little first to lock in that crunch, then everything bakes together for that ooey-gooey magic. Honestly, it’s one of those recipes that feels fancy but really just works on repeat, whether it’s a weeknight sweet treat or a bonfire substitute. No campfire necessary!
Ingredients
For the Graham Cracker Crust:
- 1 ½ cups graham cracker crumbs (look for finely crushed for the best texture)
- ⅓ cup granulated sugar (balances the buttery crust)
- 7 tablespoons unsalted butter, melted (use real butter – it makes all the difference!)
- A pinch of salt (helps enhance all the flavors)
For the Chocolate Filling:
- 1 cup semi-sweet or milk chocolate chips (I always go with semi-sweet for that perfect balance)
- ½ cup heavy cream (don’t skip this — it makes the filling silky smooth)
- 1 teaspoon vanilla extract (a little aroma boost!)
- Optional: a tablespoon of espresso powder (trust me on this, it intensifies the chocolate flavor)
For the Marshmallow Topping:
- 2 cups mini marshmallows (feel free to use large marshmallows cut in halves, but mini are easiest to toast evenly)
- Optional: a pinch of cinnamon or sea salt to sprinkle on top for a little extra zing
Step-by-Step Instructions
Step 1: Preheat & Prep Pan
Start by preheating your oven to 350°F (175°C). Grab a 9-inch pie dish and lightly grease it with butter or non-stick spray — I always rub on some softened butter with my fingers so the crust sticks beautifully. It’s small touches like this that help get those perfectly crisp edges instead of any crust sticking to the pan.
Step 2: Mix Dry Ingredients
In a medium bowl, stir together the graham cracker crumbs, sugar, and a pinch of salt until everything is evenly combined. The sugar adds a little crunch and subtle sweetness to the crumbs, so don’t skip it.
Step 3: Mix Wet Ingredients
Pour the melted butter into the dry crumb mix. Use a fork or your hands to toss everything until the crumbs are evenly coated and have the texture of damp sand. This step is where your crust starts coming together, so it should feel like it will hold when pressed.
Step 4: Combine & Press
Press the crust mixture evenly into the pie dish, making sure to push it firmly against the sides and bottom. I like to pack it down tightly with the back of a spoon or my fingers—this helps it hold up when baking and prevents crumbling later. Then, pop it into the oven for about 8 minutes to give it a chance to set and get that golden-buttery aroma going. You’ll want to keep an eye on it to make sure it doesn’t burn.
Step 5: Prepare Chocolate Filling
While the crust is baking, heat the heavy cream gently in a small saucepan until it just starts to simmer — not boiling! Pour it over the chocolate chips in a heatproof bowl and let it sit for a few minutes to soften. Then stir until smooth and glossy. Add the vanilla extract, and if using, stir in that espresso powder. The texture should be rich and creamy, like melted chocolate ganache.
Step 6: Assemble & Layer
Pour the chocolate filling over the warm graham cracker crust and smooth it out evenly with a spatula. Then, pile the mini marshmallows generously on top. If you want a little aesthetic swirl or design, try layering part of the filling first, then the marshmallows, and a drizzle of chocolate on top — it looks gorgeous with a caramelized swirl after baking!
Step 7: Bake & Toast Marshmallows
Pop the assembled pie back into the oven at 350°F for about 10 minutes, or until the marshmallows are golden and toasted on top. Keep a close watch because marshmallows can go from perfect to burnt really fast — that toasty smell in the kitchen will tell you you’re almost there.
Step 8: Cool & Add Final Touches
Once out of the oven, let the pie cool for at least 30 minutes. This cooling helps the filling set so you won’t have a chocolate river when slicing. If you’re feeling fancy, sprinkle a tiny pinch of sea salt or cinnamon on top to balance the sweetness and give that extra depth. It’s my little secret that makes every bite pop.
Step 9: Slice & Serve
When slicing, use a sharp knife dipped briefly in hot water for clean cuts that won’t drag the filling. Serve at room temp or gently warm it in the oven for 5 minutes before serving if you need that fresh-out-of-oven vibe. Either way, expect ooey-gooey, smoky-sweet bites every time.
What to Serve It With
For Breakfast: This might sound crazy, but a warm slice of s’mores pie alongside a rich, dark coffee or a creamy chai latte is such a treat. It’s a fun alternative for weekend brunch when you’re feeling a little indulgent but want that cozy comfort of morning drinks and buttery sweetness.
For Brunch: Plate it with fresh berries on the side and a dollop of lightly whipped cream or mascarpone. The fruit cuts through the richness and adds a pop of freshness, while a sparkling mimosa or fresh-squeezed orange juice keeps the mood light and celebratory.
As Dessert: Serve your s’mores pie warm, with a scoop of vanilla bean ice cream or a drizzle of caramel sauce. I like to add a sprinkle of toasted nuts or a few fresh mint leaves for a grown-up zoom on this nostalgic favorite. It’s perfect for after-dinner treats that spark conversation and smiles.
For Cozy Snacks: This pie makes an unbeatable afternoon pick-me-up with a steaming cup of hot chocolate or a warm cup of tea. It’s the kind of treat that turns a cold day around and brings everyone into the kitchen, asking for “just one more bite.”
In my family, it’s tradition to make this on busy weekends when time’s tight, but everyone still wants that homemade warmth. It has a habit of bringing out all the sweet-tooth smiles, and I swear, no one leaves the table hungry.
Top Tips for Perfecting Your S’mores Pie
Graham Cracker Crust Prep: Make sure your graham crackers are finely crushed — if they’re chunky, your crust won’t hold as well and can be crumbly. Also, pressing firmly into your pie dish is key; I learned the hard way by having a pie crust that fell apart with every slice. A quick chill before baking can help keep it tight, especially if your kitchen is warm.
Mixing Advice: For the filling, heat the cream just until it simmers — any hotter and you risk seizing the chocolate. Stir gently and patiently after adding cream to get that shiny, smooth ganache. Overmixing the crust isn’t an issue, but be careful not to rush folding wet and dry ingredients if you tweak the recipe (like adding eggs or flour) to keep the pie tender, not tough.
Swirl Customization: If you play around with layering, try swirling some chocolate or caramel into the marshmallow layer before baking for those gorgeous marbled effects. It looks super impressive but is really just a casual swipe and swirl with a toothpick.
Ingredient Swaps: I’ve subbed almond milk for cream before, which makes the filling creamier but slightly less rich — great if you want a lighter version. Dark chocolate instead of semi-sweet works too, but it’s less sweet, so balance with a little extra marshmallow topping. For the crust, crushed digestive biscuits make a nice one-to-one substitute if you can’t get graham crackers.
Baking Tips: Oven temperatures vary wildly — if your top blazes too fast, tent with foil when marshmallows look almost done. For even baking, place your pie in the middle rack. When in doubt, a toothpick test near the crust edge will tell you if it’s set.
Glaze Variations: Sometimes I skip marshmallows and instead pour a drizzle of homemade marshmallow fluff glaze over cooled pie for a glossy finish that’s still decadently sweet. A dusting of cocoa powder or powdered sugar also works if you want less mess.
After so many tries, I’ve found it’s more fun—and less stressful—to embrace little imperfections in the swirl or toast level. This one’s about nostalgia and comfort, not perfection, so keep it joyful and taste-focused!
Storing and Reheating Tips
Room Temperature: You can keep your s’mores pie covered loosely on the counter for up to two days. Just make sure it’s in a spot away from direct sunlight or heat, or the marshmallow topping might get super sticky. I like using a glass dome or pie cover to keep it fresh and pretty.
Refrigerator Storage: For longer storage, wrap the whole pie tightly with plastic wrap or tuck it into an airtight container and store in the fridge for up to 4 days. The crust might soften a little, but warming slices gently in the oven or microwave brings the magic back. Let it come back to almost room temp before serving so the chocolate filling stays luscious.
Freezer Instructions: If you want to save leftovers longer, wrap individual slices tightly in plastic wrap and foil to avoid freezer burn. Store in the freezer up to 2 months. Thaw in the fridge overnight and warm slices in a low oven (around 300°F) for 10 minutes to revive that toasted marshmallow flavor.
Glaze Timing Advice: If you’re glazing instead of topping with marshmallows, add the glaze just before serving or after reheating for the best glossy finish. Marshmallow topping should always be fresh toasted for prime taste and texture.
From my experience, the key to keeping this pie tasting fresh is to enjoy it within a few days of baking, though the freezer is a great backup if you get carried away (which I definitely do!).
Frequently Asked Questions
Final Thoughts
Honestly, this s’mores pie has become one of my absolute favorites to make and share because it’s so comforting yet easy enough to whip up whenever the craving hits. It brings that nostalgic campfire treat to your kitchen without the hassle, and the smell alone is enough to get everyone gathering around the counter. Whether you’re making it for family dinners, birthday treats, or simply because you deserve something sweet with a story, it’s a trusted winner in my cookbook. If you love the idea of reinventing classic desserts, you might want to check out my recipes for chocolate chip cookie skillet pie or no-bake rocky road bars too — they’re crowd-pleasers just like this one. Can’t wait to hear how your s’mores pie turns out? Drop me a comment with your tweaks, and don’t be shy about sharing photos — happy baking!
smores pie
Ingredients
Main Ingredients
- 1.5 cups graham cracker crumbs about 11 full sheet graham crackers
- 3 tbsp sugar
- 0.125 tsp salt
- 10 tbsp unsalted butter melted
- 5 tbsp cornstarch
- 1.25 cups sugar
- 0.25 tsp salt
- 4 large egg yolks
- 2 cups whole milk
- 0.5 cup heavy cream
- 6 oz semi-sweet chocolate chopped, 70% cocoa
- 2 tbsp unsalted butter
- 1 tbsp vanilla extract
- 7 marshmallows regular sized, cut in half
- 2.5 cups mini marshmallows
Instructions
Preparation Steps
- Preheat oven to 325 degrees F.
- In a large bowl, combine graham cracker crumbs, sugar, and salt. Add melted butter and stir until mixture is crumbly and well combined.
- Press the crumb mixture evenly into the bottom and up the sides of a 9-inch deep dish pie pan.
- Bake crust for 8-10 minutes, then remove and set aside to cool.
- In a medium saucepan, whisk together cornstarch, sugar, and salt.
- Add egg yolks, whole milk, and heavy cream to the saucepan and whisk to combine.
- Heat over medium heat, whisking constantly, until mixture thickens and bubbles around edges like pudding.
- Remove from heat and stir in chopped chocolate, butter, and vanilla extract until smooth.
- Pour chocolate filling into cooled crust and smooth the top. Refrigerate for 5-6 hours until firm.
- Preheat oven to 350 degrees F for the topping.
- Arrange marshmallow halves around the pie top and fill remaining space with mini marshmallows.
- Bake for 3-4 minutes until marshmallows puff up, then broil on low for 2-4 minutes until toasted to desired browning.
- Serve warm or cooled. Store covered in refrigerator and reheat slices gently if desired.

This sounds so cozy and nostalgic! I’d love to try making this pie—s’mores flavor in dessert form? Perfect for summer nights.