I still remember the first time I tried a truly decadent, melt-in-your-mouth peanut butter pie. It wasn’t fancy; it was at a small diner on a family road trip, and honestly, I thought it was magic sealed in a graham cracker crust. Since then, I’ve spent years chasing that cloud-like texture and intense salty-sweet flavor. Forget the baked versions or the overly stiff, artificial tasting ones—this recipe, my friends, is the one. It’s the one that makes my kids ask for seconds before they’ve finished their first slice, and the one I whip up when I need a guaranteed crowd-pleaser without turning on the oven, even in the middle of a sweltering July afternoon. If you’ve ever doubted your ability to make a show-stopping dessert, this creamy, dreamy What is peanut butter pie?Is it about to change your mind?
What is peanut butter pie?
So, what exactly is this slice of heaven? Think of it as the ultimate indulgence distilled into a simple, chilled dessert. It’s essentially a rich, velvety smooth filling—packed with real peanut butter flavor, not just a hint—that sets up perfectly in the fridge, all nestled into a buttery, crisp crust. It’s not a cheesecake, and it’s definitely not a pudding; it’s a hybrid of creamy dessert perfection. We use a combination of cream cheese and whipped topping to get that signature fluffy yet stable structure that holds its shape when you slice it, but still dissolves beautifully on your tongue. It’s essentially the dessert equivalent of a warm hug on a tough Tuesday evening. The beauty of this specific What is peanut butter pie? is that it relies on high-quality, accessible ingredients you probably already have, and it comes together faster than ordering takeout. It’s truly foolproof, which is why it’s become my go-to when company unexpectedly drops by.
Why You’ll Love This Recipe
I’ve tested dozens of no-bake pie recipes over the years, and this one has stayed in heavy rotation for three very specific reasons. First and foremost, the flavor payoff is enormous compared to the effort involved. We’re talking deep, roasted peanut butter notes cut perfectly by the slight tang of cream cheese, balanced by just the right amount of powdered sugar. It never tastes overly sweet, which is a common pitfall with this kind of dessert. What I love most about this is that it’s incredibly stable. I’ve made this for potlucks where it sat out for an hour, and it never slumped or separated—the structure is just bombproof once chilled.
Second, it’s a lifesaver on busy nights. If I know I have a packed weekend coming up, I make this on Thursday, and by Saturday afternoon, it’s the star of the dessert table. It requires zero baking time, which, let’s be real, is a massive win during the summer months when I refuse to heat up the kitchen. It’s also surprisingly budget-friendly. Graham crackers, peanut butter, cream cheese—these are pantry staples. You’re getting that gourmet, bakery-quality experience without the premium price tag.
Finally, it’s customizable! While I adore the classic version, I’ve played around with the crust (hello, Oreo crust!), and sometimes I fold in mini peanut butter cups for an extra layer of chocolatey decadence. If you’re looking for something slightly lighter, you can check out my lighter fruit tart recipe, but honestly, when you need serious comfort food in pie form, nothing beats this classic peanut butter pie. It’s the dessert that makes people stop talking and just savor the first bite. Trust me, you’ll be getting requests for the recipe every single time you serve it.
How to Make This Peanut Butter Pie
Quick Overview
The process here is beautifully straightforward, which is why it’s my absolute favorite recipe to pull out when I’m feeling lazy but craving something incredible. We start with a quick, buttery graham cracker crust that just gets pressed into the pan—no rolling or chilling required beyond the final set time. The filling is mixed entirely in one bowl using an electric mixer (or a sturdy whisk if you need a quick arm workout!), achieving that luxurious, ribbon-like texture. Once layered, it chills until firm, usually overnight, but a minimum of four hours does the trick. It’s mostly assembly and waiting, making it perfect for beginners or seasoned bakers needing a reliable win. Don’t overthink the mixing; just go until it’s smooth, and you’re golden.
Ingredients
For the Graham Cracker Crust:
1 ½ cups finely crushed graham cracker crumbs (about 10-12 full crackers—I always pulse mine in the food processor until they are almost flour-like for the best texture)
¼ cup granulated sugar (This helps bind the crust nicely!)
6 tablespoons unsalted butter, melted (Make sure it’s fully melted, not just soft)
For the Creamy Filling:
8 ounces cream cheese, softened completely to room temperature (This is non-negotiable; cold cream cheese leads to lumps!)
1 cup creamy peanut butter (Use a standard processed brand like Jif or Skippy for the best set; natural peanut butter often separates)
1 ½ cups powdered sugar (Sifting this helps avoid gritty pockets)
1 teaspoon vanilla extract
1 cup heavy whipping cream, cold (We whip this separately for ultimate fluffiness)
For the Chocolate Ganache Topping:
4 ounces semi-sweet chocolate chips (I prefer using high-quality chips here because they melt so smoothly)
½ cup heavy whipping cream (This ratio gives us a rich, pourable glaze)
Step-by-Step Instructions
Step 1: Preheat & Prep Pan
You don’t need to preheat anything for the crust or filling, but get your 9-inch pie plate ready. Lightly grease the plate if you’re nervous about sticking, though usually, the butter in the crust is enough insurance. If you plan on serving slices cleanly, lining the bottom and sides with a single strip of parchment paper *before* pressing in the crust works wonders, but you have to do this before you mix the crust ingredients.
Step 2: Mix Dry Ingredients
In a medium bowl, combine your graham cracker crumbs and the ¼ cup of granulated sugar. Give them a good whisk or toss with a fork to ensure the sugar is evenly distributed throughout the crumbs. This simple step ensures every bite of the crust has that foundational sweetness.
Step 3: Mix Wet Ingredients
Add the 6 tablespoons of melted butter to the crumb mixture. Use a fork to blend until the mixture resembles wet sand and holds together when you squeeze a handful. Don’t add too much butter; you want it moist, not swimming in grease. Press this mixture firmly and evenly into the bottom and up the sides of your pie plate. I always use the bottom of a flat measuring cup to pack it down tightly—it keeps it from crumbling when slicing later.
Step 4: Prepare Filling Base
In a large mixing bowl (or the bowl of a stand mixer), beat the room-temperature cream cheese until it is completely smooth and fluffy—no lumps allowed! Slowly beat in the peanut butter until fully incorporated. Next, sift in the powdered sugar and vanilla, mixing slowly at first so you don’t create a sugar cloud, then increase speed until everything is light and creamy. Taste it here—this is your moment to decide if you need a pinch more salt or a drop more vanilla.
Step 5: Whip the Cream
In a separate, clean, cold bowl, whip the 1 cup of cold heavy whipping cream until stiff peaks form. You want firm peaks that hold their shape when you lift the whisk. Be careful not to overbeat into butter territory!
Step 6: Fold and Set
Gently fold the whipped cream into the peanut butter base using a rubber spatula. Use slow, deliberate folding motions—think of turning the batter over on itself—until no white streaks remain. You want to preserve all that air you whipped into the cream! Spoon the entire mixture into your prepared crust and smooth the top with the spatula. Cover loosely with plastic wrap and chill for at least four hours, but honestly, overnight is best for the firmest texture.
Step 7: Prepare the Ganache Topping
About 30 minutes before you plan to serve the pie, make the glaze. Place the chocolate chips in a heatproof bowl. Heat the ½ cup of heavy cream in a small saucepan or microwave until it is just simmering—watch it closely! Pour the hot cream over the chocolate chips and let it sit undisturbed for five full minutes. Then, gently whisk until you have a smooth, glossy, beautiful chocolate ganache. Let it cool for about 10 minutes so it’s warm but not hot.
Step 8: Glaze and Chill (Again!)
Pour the slightly cooled ganache over the chilled pie filling. Gently tilt the pie plate to let the ganache flow naturally across the top, creating an even, mirror-like layer. If you like a messy, rustic look, you can swirl some of the filling up into the ganache before chilling. Return the pie to the refrigerator for at least 30 minutes to allow the chocolate topping to firm up slightly before slicing.
Step 9: Slice & Serve
When ready to serve, run a thin knife under hot water, wipe it dry, and slice. Repeat this hot-water/wipe process between every single slice. This is my absolute best trick for getting clean cuts through that firm, creamy filling and chocolate topping. Serve cold, perhaps with a small dollop of extra whipped cream on the side if you’re feeling fancy. My family usually fights over the end pieces!
What to Serve It With
This magnificent peanut butter pie truly shines on its own, but I love dressing it up depending on the occasion. For breakfast—yes, I’ve done it!—a small sliver alongside a strong, hot cup of black coffee is pure heaven. The bitterness of the coffee cuts through the richness perfectly. For a weekend brunch spread, I plate it elegantly on small white saucers and dust the plate lightly with cocoa powder or finely crushed peanuts for visual texture.
As a proper dessert, the pairings are endless. My go-to is always a simple drizzle of salted caramel sauce over the top right before serving. That salty-sweet-nutty combo is just unbeatable. Another winner is a side of fresh raspberries; their tartness provides a wonderful contrast to the dense creaminess of the filling. If you’re serving it after a heavy meal, keep the portion small and pair it with a digestif like a small glass of bourbon or even a simple glass of cold whole milk—which, for some reason, just makes the peanut butter flavor pop even more.
I’ve also found that if you’re making this for a summer barbecue, a scoop of vanilla bean ice cream melts beautifully alongside a slightly firmer slice of pie, creating an instant, decadent peanut butter sundae experience. Don’t forget the optional peanut crumbs sprinkled on top of the ganache before it sets for that last bit of crunch. Every time I serve this, someone asks how long it took me to make, and I just smile and say, “Not long at all!”
Top Tips for Perfecting Your Peanut Butter Pie
I’ve made this recipe so many times I’ve lost count, and trust me, I’ve made every possible mistake along the way. Here are the hard-won lessons that will guarantee your pie is perfect every time.
Cream Cheese Readiness: This is the big one. If your cream cheese isn’t truly room temperature, you will get small, annoying lumps in your filling. I sometimes leave mine out for an hour, or I microwave it for exactly 10 seconds on 20% power, checking frequently. You want it soft enough to easily indent with a finger, but not melty.
The Peanut Butter Choice: Resist the urge to use your healthy, runny natural peanut butter. I learned this the hard way after a beautiful, fluffy filling turned into soup in the fridge! Standard, stabilized peanut butter (like Skippy or Peter Pan) contains stabilizers that help the pie set firm. If you absolutely must use natural, drain off any excess oil first and consider adding an extra half ounce of cream cheese.
Whipping the Cream Correctly: You need stiff peaks for the whipped cream. Soft peaks will deflate into the heavy cream cheese base, giving you a dense, heavy filling instead of that airy texture we’re aiming for. Use a cold bowl and cold heavy cream, and whip until you can turn the bowl upside down (carefully!) without anything moving.
Folding is Key: When incorporating the whipped cream into the peanut butter mixture, stop stirring once it’s just combined. Over-folding deflates the air, and you lose that incredible lightness. Use a gentle spatula motion, cutting down the middle and scooping up the mixture from the bottom. Stop when you see no major white pockets remaining.
Ganache Consistency: When making the chocolate topping, don’t let the heavy cream boil aggressively; just a slight simmer is enough to melt the chocolate gently. If the ganache seems too thick when you pour it, wait two more minutes—it thickens fast as it cools. If it seems too thin, let it sit on the counter for 15 minutes before pouring; this little bit of extra time makes a huge difference in achieving that perfect, sliceable shell.
Crust Compression: Really pack that crust in! If the crust is loose, your slices will fall apart the second you try to serve them. Use a flat-bottomed cup or glass to really compress those crumbs into the corners. This small effort pays huge dividends when it’s time for the payoff!
Storing and Reheating Tips
The great news about this chilled peanut butter pie is that it stores beautifully, which is why I always advise making it a day ahead if possible. Once the chocolate topping has fully set, we can talk storage.
Room Temperature: Because this pie contains dairy (cream cheese and heavy cream), I highly advise against leaving it out for more than two hours, especially if your kitchen runs warm. For short-term serving at a party, it’s fine, but don’t leave leftovers on the counter overnight.
Refrigerator Storage: This is the ideal spot. Cover the pie loosely with plastic wrap or use a dedicated pie carrier. Make sure the plastic wrap isn’t touching the chocolate topping directly, as it can stick and pull off the surface when unwrapped. Stored properly in the fridge, this pie stays fresh and creamy for up to four days. After day three, the crust might start to soften just a touch, but the filling flavor actually deepens, which I personally love.
Freezer Instructions: Yes, you can absolutely freeze this! It freezes exceptionally well. Before freezing, skip the chocolate ganache topping. Wrap the entire un-topped, chilled pie tightly in two layers of plastic wrap, followed by one layer of aluminum foil to prevent any freezer burn or odor absorption. Freeze for up to one month. When you’re ready to serve, remove it from the freezer, let it thaw in the refrigerator for about 8 to 10 hours (or on the counter for 2-3 hours), and *then* top it with your freshly made ganache before serving. If you top it before freezing, the texture of the glaze can change significantly upon thawing.
Glaze Timing Advice: Never top the pie with chocolate if you plan to freeze it. If you plan to eat it within 24 hours, you can top it right before it goes into the fridge to chill completely. For best results and the cleanest slice, always let the chilled pie sit out on the counter for about 15 minutes before slicing after its final chill.
Frequently Asked Questions
Final Thoughts
There you have it—the no-fuss, all-flavor recipe for the best peanut butter pie you’ll ever serve. It’s the kind of dessert that doesn’t just satisfy a sweet tooth; it hits that deep, nostalgic craving for something rich, comforting, and familiar. I promise you, the moment you pull that shiny, chocolate-covered beauty out of the fridge, everyone in the house will instantly stop what they’re doing. It proves you don’t need complicated techniques or fancy equipment to create a show-stopping dessert.
If you found yourself enjoying this simple, creamy magic, I think you’ll also adore my recipe for no-bake lemon cheesecake—it has a similar chilling process but offers a bright, zesty alternative. Don’t be shy; pull out that mixer, crush those crumbs, and get ready to impress yourself! Let me know in the comments below how your pie turned out, and if you tried any fun customizations with the crust or topping. Happy assembling, and enjoy every creamy bite!
peanut butter pie
Ingredients
Main Ingredients
- 1 cup peanut butter
- 1 cup granulated sugar
- 8 ounce whipped topping like Cool Whip
- 8 ounce cream cheese, softened
- 14 ounce Oreo cookies package
- 5 tablespoons butter, melted
Instructions
Preparation Steps
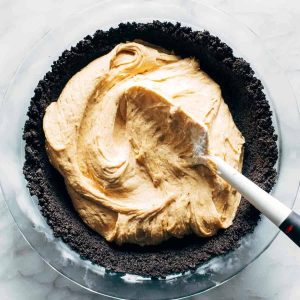
- Pulse Oreos in a food processor until crushed into fine crumbs. Add melted butter and stir to combine. Press mixture into a 10-inch pie plate to form crust. Freeze while preparing filling.
- In a mixing bowl, combine peanut butter, sugar, cream cheese, and whipped topping until smooth and fluffy. Pour the filling into the prepared crust and smooth the top.
- Freeze the pie for 3 to 4 hours or until firm. Slice and serve chilled.