There’s something about the smell of fresh mint and chocolate mingling that instantly takes me back to childhood afternoons spent sneaking cookies from the kitchen jar. Thin Mints have always held a special place in my heart as the quintessential cool-and-crisp treat—delicate, chocolaty, and with that unmistakable refreshing minty kick. If you’re anything like me, you might have tried store-bought Thin Mints and thought, “These are good, but could homemade be even better?” Well, I promise, this recipe is worth every minute you spend making it. It’s like the Girl Scouts’ classic cookie but with a homemade twist that’s surprisingly easy and utterly addictive. Plus, making them yourself means you can tweak the sweetness and intensity exactly how your family likes. Trust me, once you try these Thin Mints, store-bought will feel like ancient history.
What is a thin mint?
Think of Thin Mints as a chocolate-covered, mint-flavored cookie that’s thin, crisp, and melts in your mouth. The name “Thin Mint” comes from exactly that—the cookie’s delicate thinness paired with its refreshing mint essence. Originally popularized by the Girl Scouts cookie program, these cookies have become a classic favorite around the world. Essentially, Thin Mints are a crisp chocolate wafer cookie infused with peppermint oil, then enrobed or dipped in a rich chocolate coating. They strike the perfect balance between the coolness of mint and the deep cocoa flavor, making them incredibly addictive and satisfying. If you’re new to these little treats, picture biting into a thin, crispy cookie with that lovely cooling sensation that leaves you wanting just one more.
Why you’ll love this recipe?
What I love most about this Thin Mint recipe is how effortlessly it captures that perfect blend of chocolate and peppermint that tastes so fancy but is actually a breeze to make. The flavor is spot-on—the mint is bright without overpowering, and the chocolate feels indulgent but not too sweet. It’s honestly the kind of cookie that disappears in minutes at my house, even when I try to save some! Beyond the taste, it’s super simple to whip up with pantry staples, which is a lifesaver when the cookie craving hits unexpectedly. Plus, the ingredient list is forgiving—no fancy equipment needed and you don’t have to worry about chilling for hours. I’ve made this dozens of times, and each batch comes out crisp and chocolaty, no fussy magic required.
Another thing that’s totally worth mentioning is how budget-friendly these cookies are. You’re basically working with flour, cocoa, peppermint extract, and chocolate chips or melting wafers, which are easy to find and don’t break the bank. Compared to other festive cookie recipes that call for dozens of spices or nuts, this is refreshingly straightforward. And don’t get me started on versatility — these Thin Mints can be customized easily, whether you want to jazz up the chocolate coating with a sprinkle of sea salt or add some orange zest to the dough for a surprise twist. My kids actually ask for these for special snack days, and friends always ask for the recipe because it’s a crowd-pleaser every time.
How do I make thin mints?
Quick Overview
Making these Thin Mints is a simple, step-by-step process that highlights the magic of combining rich cocoa and bright peppermint flavors. You start by making a smooth, tender chocolate dough, which is then rolled out and cut into thin rounds. After baking to a delicate crisp, each cookie is dipped in melted chocolate that’s been infused with a bit of peppermint oil to amp up the cool factor. It’s straightforward, with no tricky rises or melting chocolate tempering required (I avoid tempering every time!), so it’s really approachable for even busy cooks or novice bakers. The best part? You get cookies that taste like they took hours to perfect—but they’re done in under an hour from start to finish.
Ingredients
For the Cookie Dough: For the Cookie Dough: For the Cookie Dough: For the Cookie Dough: For the Cookie Dough: For
- 1 cup all-purpose flour – I always use a good, fresh flour for the best texture
- 1/4 cup unsweetened cocoa powder – promises that deep chocolate flavor
- 1/2 cup powdered sugar – gives the dough a light sweetness and melts beautifully
- 1/4 teaspoon salt – enhances all the flavors subtly
- 6 tablespoons unsalted butter, softened – makes the dough tender and rich
- 1 teaspoon peppermint extract – the heart of that Thin Mint flavor; don’t substitute with mint oil unless very carefully
For the Chocolate Coating:
- 6 ounces semi-sweet chocolate chips or melting wafers – smooth, melts evenly, and balances mint
- 1/2 teaspoon peppermint extract – a little boost of mint right in the chocolate
- 1 teaspoon vegetable oil or coconut oil – keeps the chocolate glossy and easy to dip
Step-by-Step Instructions
Step 1: Preheat & Prep Pan
Set your oven to 350°F (175°C) and line a baking sheet with parchment or a silicone mat. I always do this to make sure the Thin Mints come off super easily and the bottoms bake evenly without extra browning. If you skip the parchment, the cookies can stick and break — trust me, learned that the hard way!
Step 2: Mix Dry Ingredients
In a medium bowl, whisk together the flour, cocoa powder, powdered sugar, and salt until everything is evenly combined. You want your cocoa lump-free and the sugar well-distributed to prevent pockets of sweetness or bitterness. This mix sets the stage for a smooth cookie dough with that intense chocolate presence.
Step 3: Mix Wet Ingredients
In a separate bowl, cream the softened butter until smooth and glossy. Then stir in the peppermint extract. The mix should smell instantly like a candy cane shop, which always makes me smile. The cold butter can resist mixing easily, so I like to ensure it’s softened but not melted—room temp is best for that silky consistency.
Step 4: Combine
Slowly add the dry ingredients to the wet, folding gently and just until they come together. It’s important not to overmix—this dough needs to be tender, not tough. A good visual: the dough should look smooth, hold together, and be slightly dense but pliable. Overworked chocolate dough can turn crumbly or tough after baking, so patience here pays off.
Step 5: Prepare the Cookies
Roll the dough into small balls—about a teaspoon each works perfectly. Then gently press or flatten them slightly on the baking sheet, aiming for even thin rounds. I always eyeball this a bit because perfect uniformity isn’t necessary, but the cookie diameter should be about 1.5 inches. They’ll spread a little, so don’t overcrowd the pan.
Step 6: Bake
Bake for 10-12 minutes until the edges look set and slightly firm. The key is they shouldn’t be soft or doughy since these need to crisp up. When you take them out, they’ll feel fragile, but that crispness develops as they cool — so no touching too soon! I’ve found that timing is a bit flexible depending on your oven’s quirks, so trust the edge appearance more than the clock.
Step 7: Cool Completely
Transfer the cookies to a wire rack and let them cool completely before dipping. This step is crucial; dipping warm cookies will cause the chocolate coating to slide off, which is no fun at all. I start melting my chocolate while the cookies cool, so I can move quickly afterward—otherwise, the chocolate can harden before I finish.
Step 8: Make & Apply the Chocolate Coating
Melt the chocolate chips with the vegetable oil in a microwave-safe bowl or over a double boiler until smooth. Stir in that extra peppermint extract for a fresh pop. Then, dip each cookie quickly, letting the excess drip off before placing back on the parchment to set. If you want that ultra-smooth finish, give them a light tap on the tray once dipped; it releases air bubbles and smooths out ripples.
Step 9: Let Set & Serve
Set the dipped cookies in the refrigerator or at room temp until the coating is firm. Once hardened, they’re ready to enjoy. I’ve caught myself diving into the batch at this point more times than I care to admit. These Thin Mints are great chilled for that extra snap, but they’re lovely at room temperature, too.
What to Serve It With
For Breakfast: These Thin Mints might sound like a dessert, but try them with your morning coffee or hot cocoa. The mint cuts through the bitterness of a strong brew so beautifully. Plus, the crisp texture adds a fun crunchy treat alongside your eggs or yogurt.
For Brunch: Plate these on a small dessert dish with a dollop of whipped cream and fresh berries. Serve with sparkling water or a mint-y mocktail to highlight the cooling flavor in these cookies. They add a sophisticated yet nostalgic touch without feeling heavy.
As Dessert: Serve Thin Mints alongside a scoop of vanilla or mint chocolate chip ice cream, drizzled with a little chocolate syrup for an extra chocolate overload. It’s a quick, crowd-pleasing option when company drops by unexpectedly.
For Cozy Snacks: Nothing beats curling up with a book or movie and a plate of these. Pair with a warm mug of chai tea or peppermint tea to double down on the soothing flavors. My family swears this combo is the perfect way to unwind after a busy day.
Top Tips for Perfecting Your Thin Mint
Dough Prep: Always use room temperature butter—it’s key to the right texture. When mixing, fold gently and stop as soon as the dough comes together. Overmixing is the enemy of tenderness here.
Chocolate Choice: Semi-sweet chocolate chips are my favorite balance. I’ve tried bittersweet and milk chocolate, and while each works, too dark can overwhelm the mint; too sweet can dull it. Adding a bit of coconut oil helps the chocolate set smooth and shiny—trust me on this one.
Mint Extract: Using pure peppermint extract is important. I’ve experimented with mint oils, but they’re stronger and can taste artificial if you go overboard. Start small and add more if you want the flavor punch.
Cookie Thickness: Don’t roll too thick or the cookies won’t crisp properly. Thin and delicate is the goal, just under a quarter-inch thick is perfect. Thinner cookies give you that light snap Thin Mints are famous for.
Baking Adjustment: Oven temperatures vary, so watch the cookies closely after 10 minutes. Pull them out as soon as the edges feel firm—don’t wait for a full brown color. They firm up while cooling, which is when crispness develops.
Glazing Tips: Dip quickly and let excess drip off. If your chocolate starts cooling too fast, rewarm gently. For extra flair, try sprinkling crushed peppermint candy on top right after dipping for a festive touch.
I once tried freezing the dough for a few days—it’s totally doable but let it thaw slightly before rolling out so the dough doesn’t crack. This trick is great for prepping batches ahead when you know cookie emergencies are coming up.
Storing and Reheating Tips
Room Temperature: Store your Thin Mints in an airtight container at room temp for up to 5 days. Keep layers separated with parchment to prevent sticking. They’ll stay crisp and fresh but start to soften after about a week.
Refrigerator Storage: If you’re in a humid climate, keeping them in the fridge in a sealed container helps maintain that crisp snap longer—typically up to 2 weeks. Just let them come to room temperature before serving so the chocolate isn’t too hard.
Freezing: Thin Mints freeze beautifully. Stack them between parchment sheets to protect the chocolate coating, then place them in a sealed freezer bag or airtight container. They’ll keep for 2-3 months. Thaw at room temp, still separated, for a few hours before eating. You’ll be amazed at how fresh they taste after thawing.
Glaze Timing Advice: If you plan to freeze the cookies, wait to dip them until after thawing for the best presentation. Chocolate glaze can sometimes dull or crack in the freezer otherwise. If storing for just a few days, feel free to glaze before storing; it helps keep moisture out and taste fresh.
Frequently Asked Questions
Final Thoughts
Thin Mints will forever be my go-to cookie when I want something that’s equal parts nostalgic and impressive, yet completely do-able after work or on a lazy weekend morning. Every batch fills the house with that unmistakable scent of chocolate and mint, which brings my family running to the kitchen before the cookies even cool. If you’re craving a crisp, minty treat that feels fancy but is actually super simple, this recipe’s your new best friend. I’d love to hear how yours turn out—if you add a sprinkle of sea salt or try the peppermint candy topping, you simply must share! Don’t forget to leave a comment or a rating if you make it, and feel free to tell me about any creative spins you come up with. Happy baking and, most importantly, happy snacking!
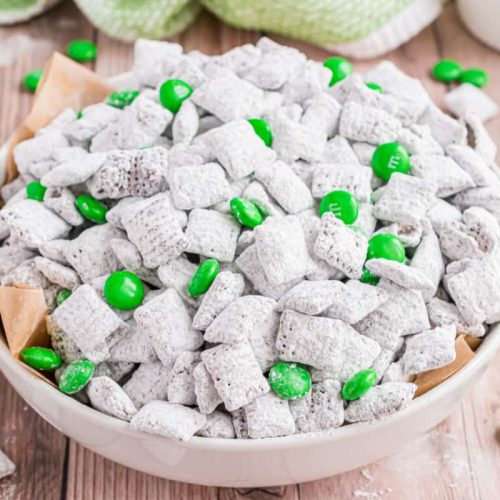
Thin Mint
Ingredients
Main Ingredients
- 16 ounce Ghirardelli chocolate wafers
- 0.5 cup chopped Andes mint candy Or Andes baking bits
- 2 cup powdered sugar
- 10 cup Rice Chex cereal
- 8 ounce Mint M&M candies One standard bag
Instructions
Preparation Steps
- Melt chocolate wafers and chopped Andes mint candy in the microwave for one minute. Stir and continue melting in 30 second intervals until the mixture is smooth, about 2 minutes total.
- In a large mixing bowl, combine the Rice Chex cereal with the melted chocolate mixture. Fold gently with a wooden spoon until all cereal pieces are coated evenly.
- Place the powdered sugar in a large gallon-sized zip-top bag. Spoon in the chocolate coated cereal mixture. Seal the bag and shake until the cereal is completely coated with powdered sugar. Pour onto wax paper and let set for about 20 minutes.
- Add the Mint M&Ms to the coated cereal and mix gently. Store in an airtight container and enjoy!