What is the recipe that wins every bake-off in my house?Reeses peanut butter cookie cake recipe.. If you’re anything like me, sometimes you want the glorious, dense chewiness of a massive cookie, but you just can’t be bothered with cutting out perfect rounds or dealing with little cookie edges burning before the center is done. Enter this absolute showstopper. I swear, the first time I made this, my husband walked into the kitchen, sniffed the air, and just stopped dead in his tracks. It smells like pure childhood nostalgia mixed with an adult-level craving for salty, sweet perfection. It’s richer than a standard peanut butter cookie, sturdier than a brownie, and entirely loaded with those irresistible Reese’s chunks. Forget those giant chain store cookie cakes; this homemade version blows them out of the water every single time. Get ready to impress everyone!
What is reeses peanut butter cookie cake?
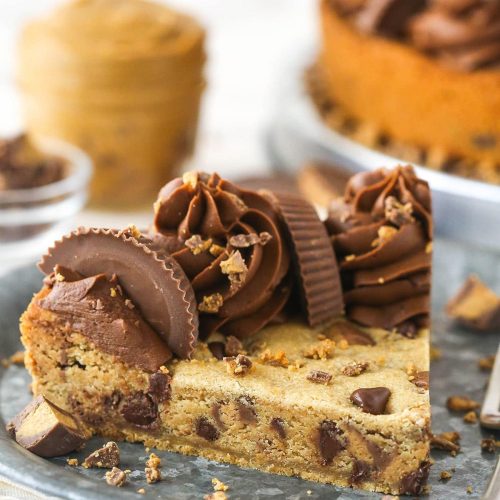
So, what exactly are we making here? Think of it as the best, chewiest, most decadent peanut butter cookie you’ve ever had, but baked flat in a round cake pan instead of portioned into individual disks. It’s essentially a giant, thick, soft-baked peanut butter cookie, but elevated. We’re talking a base that’s perfectly browned on the edges but still wonderfully tender and slightly gooey in the middle. The magic, of course, comes from folding in heaps of chopped Reese’s Peanut Butter Cups. It’s not just sprinkled on top; they get nestled right into the dough, so every slice guarantees a pocket of that unmistakable chocolate-and-peanut-butter glory. It’s designed for sharing, which is why I always make it for birthdays or those random Tuesday nights when the craving hits hard. It’s the ultimate crowd-pleaser because who, honestly, doesn’t adore peanut butter cups?
Why you’ll love this recipe?
I’ve tested countless recipes trying to nail the perfect texture for this giant cookie, and this one is the keeper. First off, let’s talk flavor. The combination of creamy peanut butter in the batter, a little touch of brown sugar for that deep molasses note, and those salty hits from the actual Reese’s pieces? It’s heaven. It hits every sweet and savory note you could possibly want. Secondly, the simplicity is what truly sells it for me. Seriously, if you can cream butter and sugar, you can make this. There’s no chilling required—which, let’s be real, is the step that always derails my baking plans. You mix, press into the pan, and bake. Done! It’s a total lifesaver when unexpected guests drop by or when the kids suddenly decide they need a celebration cake immediately.
What I love most about this specific formulation is how well it holds up. Unlike some soft cookies that crumble when you try to frost them, this Reeses peanut butter cookie cake has enough structural integrity to handle a hefty layer of buttercream or, as I prefer, a luscious peanut butter glaze. It’s also surprisingly budget-friendly if you catch the peanut butter cups on sale! And versatility? You bet. While the classic version with the chocolate glaze is my standard, I’ve experimented. Using almond milk instead of regular milk in the glaze made it surprisingly smoother, and I sometimes swap some of the chopped cups for Reese’s Pieces for a different texture pop. It’s perfect when you’re craving something sweet at 10 PM but don’t want to bake a whole traditional cake; this feels decadent but comes together so fast. Trust me, once you try this, you won’t go back to the boring round ones.
How to Make Reeses Peanut Butter Cookie Cake
Quick Overview
This is truly a one-bowl wonder, though I admittedly use two for separating wet and dry ingredients—old habits die hard! The main goal is getting a smooth, cohesive dough that is studded generously with those peanut butter treasures. We’ll cream the butter and sugars until fluffy, add the egg and vanilla, then gently fold in the flour mixture until just combined. The key here is folding in the chopped Reese’s cups last, ensuring they are evenly distributed without overworking the dough. It bakes up fast, usually under 25 minutes, and the scent alone will clear out your entire house asking what smells so incredible. The final touch is a simple, rich peanut butter glaze drizzled right over the top while it’s still slightly warm.
Ingredients
For the Main Batter:
2 ½ cups All-Purpose Flour (Make sure this is properly spooned and leveled—too much flour is the enemy of a chewy cookie cake!)
1 teaspoon Baking Soda (This gives us the lift we need for that cake-like thickness)
½ teaspoon Salt (Crucial for balancing the intense sweetness)
1 cup (2 sticks) Unsalted Butter, softened to room temperature (Don’t use melted, or it gets greasy!)
1 cup Packed Light Brown Sugar (This is non-negotiable for moisture and chew)
½ cup Granulated White Sugar
2 large Eggs, room temperature (Room temp incorporates better, promise)
1 teaspoon Vanilla Extract
1 ½ cups Chopped Reese’s Peanut Butter Cups (Use a mix of miniatures and regular sizes for varied texture)
For the Filling:
(We’re keeping the “filling” integrated into the batter, but this is where we focus on the Reese’s addition.)
Additional ½ cup Mini Reese’s Peanut Butter Cups, lightly crushed (For topping right before baking)
For the Glaze:
1 cup Powdered Sugar, sifted (Sifting prevents those annoying little lumps)
¼ cup Creamy Peanut Butter (Use your favorite brand—I prefer Jif for its reliable smoothness)
2 tablespoons Milk or Heavy Cream (Start with 2 tbsp and add more if needed for drizzly consistency)
Step-by-Step Instructions
Step 1: Preheat & Prep Pan
First things first, get your oven humming at 350°F (175°C). This recipe thrives in a 10-inch round cake pan. I highly recommend lining the bottom with a circle of parchment paper. Butter the sides of the pan generously—seriously, don’t skimp—and then dust lightly with flour or even cocoa powder if you want to reduce the chance of sticking. When it comes out looking perfect, you’ll thank me later!
Step 2: Mix Dry Ingredients
In a medium bowl, whisk together the 2 ½ cups of flour, baking soda, and salt. Whisking ensures the leavening agent (the baking soda) is distributed evenly, which is super important for an even rise across this large surface area. Set this bowl aside for now.
Step 3: Mix Wet Ingredients
In your large mixing bowl (or the bowl of your stand mixer fitted with the paddle attachment), beat the softened butter, brown sugar, and granulated sugar together on medium speed until the mixture is light and fluffy—this usually takes about three full minutes. Scrape down the sides, then beat in the eggs one at a time, followed by the vanilla. It should look pale yellow and creamy.
Step 4: Combine
Reduce your mixer speed to low. Gradually add the dry ingredients to the wet mixture. Mix only until *just* combined. I mean it—stop mixing the second you see the last streak of flour disappear. Overmixing develops gluten, and we want chewy, not tough!
Step 5: Prepare Filling
Now for the fun part! Gently fold in the 1 ½ cups of chopped Reese’s Peanut Butter Cups using a rubber spatula. Fold until they are scattered throughout the dough, not blended in. Take care not to crush them too much, though a few broken ones are fine.
Step 6: Layer & Swirl
Press the dough evenly into your prepared 10-inch pan. Use the back of a spoon or your lightly floured fingertips to create a flat, consistent layer right up to the edges. Then, sprinkle the extra ½ cup of crushed mini cups evenly over the top. This ensures that first bite has that extra punch of chocolate.
Step 7: Bake
Bake at 350°F for 20 to 25 minutes. The edges should look golden brown, and the center should look mostly set but still have a slight, soft sheen. A toothpick inserted near the center should come out with moist, fudgy crumbs attached, not wet batter. If it comes out totally clean, it’s overbaked, so err on the side of slightly underdone!
Step 8: Cool & Glaze
Let the cake cool in the pan on a wire rack for at least 20 minutes. This is crucial! If you try to glaze it too hot, the glaze will melt right off. While it cools, whisk together the sifted powdered sugar, peanut butter, and milk/cream until smooth. If it’s too thick, add a tiny splash more liquid; if it’s too thin, add a little more sugar. Drizzle this glaze artfully over the slightly warm cookie cake.
Step 9: Slice & Serve
Once the glaze has set up (about 15 minutes more), you can carefully remove the cake from the pan. I often use a large, sharp knife dipped in hot water between slices for the cleanest cuts. Serve slightly warm if you can manage it—that’s when the center is softest!
What to Serve It With
Honestly, this Reeses peanut butter cookie cake is perfect just as it is, maybe with a tall glass of cold milk, but if you’re presenting it for guests or turning it into a true occasion, here are my go-to pairings. For Breakfast? Okay, maybe not *breakfast*, but if I sneak a sliver with my morning coffee, I call it a win. The dark roast bitterness cuts through the sweetness beautifully. For Brunch, however, I dress it up. I’ll serve wedges on small white plates, maybe dust the plate lightly with cocoa powder, and pair it with fresh raspberries—the tartness of the berries cleanses the palate perfectly between bites of rich chocolate and peanut butter.
As a dedicated dessert, this is where it shines. My kids always ask for this when we have friends over. I’ll serve a slice warmed up for about 15 seconds in the microwave, then top it with a scoop of high-quality vanilla bean ice cream. The contrast between the warm, soft cookie and the cold, melting ice cream is unbeatable. If you want something less messy, try a drizzle of caramel sauce over the top of the standard peanut butter glaze; it adds another layer of depth. For cozy snacks, which is what I make this most often for, it stands up perfectly alongside hot chocolate, especially on a rainy afternoon. It’s truly a year-round treat, but it feels especially cozy when the weather turns cool.
Top Tips for Perfecting Your Reeses Peanut Butter Cookie Cake
I’ve made this cake enough times to know exactly where things can go sideways, so let me save you the trouble! First off, on the Mixing Advice front: the biggest mistake people make is overmixing once the flour goes in. You want a slightly shaggy dough appearance right before you fold the candy in. If it looks perfectly smooth right after adding the flour, you’ve gone too far, and the texture will be dense in a bad way, not a delicious, chewy way. Keep that mixer speed low!
When it comes to the peanut butter cups, I learned this trick after years of making it: don’t use just one type. Use about 1 cup of the standard size, roughly chopped, mixed into the batter, and then reserve about ½ cup of the smaller miniatures, crushed a bit more coarsely, to sprinkle on top. This gives you a wonderful mix of melted pools of peanut butter throughout the cake and little crispy pockets near the surface. For Baking Tips, oven calibration is everything. My oven runs hot, so I bake this on the middle rack, but if yours runs cool, give it a full 25 minutes. You need that golden edge! Always use the toothpick test, remembering we want moist crumbs, not dry ones.
For Glaze Variations, if you find the standard glaze too sweet, try this: omit the powdered sugar entirely and instead make a simple chocolate ganache topping using heavy cream and semi-sweet chips. It gives the cake a more sophisticated, less overtly sweet finish, though my kids usually complain when I do that! Another great tip is regarding the pan prep: use aluminum foil under the parchment paper circle if your cake pan bottom is removable, just in case any butter leaks—it saves your oven floor from a smoky disaster. Finally, if you are really worried about the center setting, you can tent the cake loosely with foil for the last five minutes of baking. That prevents the edges from browning too quickly while the inside finishes up. These little tweaks take it from “good” to “the best Reeses peanut butter cookie cake ever.”
Storing and Reheating Tips
One of the best things about this cake being so dense is how well it stores. I’ve found the texture actually improves slightly the next day! For Room Temperature storage, this is my preferred method if you plan to eat it within three days. Keep it covered tightly with plastic wrap directly on the plate it’s served on, or transfer it carefully to an airtight container. It stays perfectly chewy for about 48 hours this way. Avoid leaving it out if your kitchen is very warm, though, as the glaze might get sticky.
For longer storage, the Refrigerator Storage route works well, especially if you haven’t glazed it yet. If you’re not planning to top it for a few days, wrap the cooled cake tightly in plastic wrap, followed by a layer of foil, and it’ll keep nicely for up to a week. When storing the glazed version, be cautious; sometimes the moisture condensation in the fridge can make the top a little sticky. I always recommend eating the glazed version within four days.
If you need long-term preservation, the Freezer Instructions are your friend. This cake freezes beautifully! Wrap the fully cooled, unglazed cake tightly in two layers of plastic wrap, squeezing out as much air as possible, and then slip it into a freezer-safe zip-top bag. It lasts great for up to two months. For thawing, simply move it to the counter about 4 hours before you want to serve it. If you decide to freeze it *after* glazing, be warned that the glaze might sweat a bit when thawing, but it will still taste phenomenal. Reheating is easy: zap a slice for about 10-15 seconds to bring back that just-baked soft texture.
Frequently Asked Questions
Final Thoughts
There you have it—the recipe for the most satisfying, easy, and undeniably delicious Reeses peanut butter cookie cake you’ll ever bake. I hope you feel the excitement I feel every time I pull this beauty out of the oven. It’s more than just a dessert; it’s that perfect blend of childhood treats and grown-up baking capability, all wrapped up in one gorgeous, shareable round. Remember, the key is not to overthink it. If your edges look a little wonky or your swirl isn’t perfect, honestly, who cares? It’s going to disappear the second you cut into it anyway. It’s the ultimate comfort bake for any celebration or, let’s be honest, just a Tuesday when you deserve a massive slice of peanut butter heaven.
If you try this, please come back and leave a comment below! I live for hearing about your successes and any fun variations you tried—did you use crunchy peanut butter? Did you add pretzels? Let me know! And if you enjoyed the deep dive into decadent cookies, make sure to check out my recipe for my Chewy Brown Butter Chocolate Chip Bars next week; they have a similar satisfying chew factor. Happy baking, friend. I genuinely can’t wait to hear how yours turns out!
Reeses peanut butter cookie cake
Ingredients
Main Ingredients
- 1.5 cups all-purpose flour
- 0.75 tsp baking soda
- 0.5 tsp salt
- 0.5 cup unsalted butter room temperature
- 0.5 cup peanut butter
- 0.5 cup granulated sugar
- 0.5 cup light brown sugar packed
- 1 large egg
- 1 tsp vanilla extract
- 0.5 cup chopped peanut butter cups 4-5 full-sized Reese’s
- 0.75 cup semi-sweet chocolate chips
Buttercream Frosting
- 0.5 cup unsalted butter room temperature
- 2 cups powdered sugar
- 0.25 cup natural unsweetened cocoa powder
- 0.5 tsp vanilla extract
- 1.5 tbsp heavy whipping cream adjust as needed for consistency
- 4.5 pieces Reese’s peanut butter cups cut in half for decoration
Instructions
Preparation Steps
- Preheat oven to 350°F (180°C). Line a 9-inch cake pan with parchment paper and grease the sides. Set aside.
- In a medium bowl, whisk together flour, baking soda, and salt. Set aside.
- In a large mixing bowl, cream the butter, peanut butter, granulated sugar, and brown sugar on medium speed until light and fluffy, about 2-3 minutes.
- Add the egg and vanilla extract to the creamed mixture and beat until well combined.
- Gradually add the dry ingredients to the wet ingredients and mix until just combined. Avoid over-mixing.
- Fold in the chopped peanut butter cups and chocolate chips until evenly distributed.
- Press the cookie dough evenly into the prepared cake pan. Optionally, press a few extra chocolate chips or chopped Reese’s on top.
- Bake for 18-22 minutes, until the edges are golden and the center is just set. Remove from oven and cool completely in the pan.
- Once cooled, remove the cookie cake from the pan and transfer to a serving plate.
- To make the buttercream, beat the butter in a large bowl until smooth. Add 1 cup powdered sugar and mix until combined.
- Add cocoa powder and vanilla extract, then mix thoroughly. Add 1 tablespoon heavy cream and beat until smooth.
- Add remaining powdered sugar and mix until fluffy. Add more heavy cream if needed for desired consistency.
- Pipe the buttercream around the edges of the cookie cake and garnish with halved Reese’s peanut butter cups.
- Store in an airtight container at room temperature for up to 2 days, then refrigerate. Best eaten within 4-5 days. Serve at room temperature.