There’s nothing quite like the joy of biting into a little chocolatey ball packed full of crushed Oreos and creamy filling. I swear, the first time I made Oreo Balls, it felt like a little magic in my kitchen—the kind of magic that fills the air with sweet nostalgia and the hum of happy conversations. What really got me hooked was how incredibly easy these treats are, yet how mind-blowing the flavor hits. They’re kind of like little bites of nostalgia wrapped in chocolate, reminding me of school bake sales and family movie nights. Honestly, they’re a million times better than your average cookie because you get that perfect balance of rich creaminess and crunchy cookie bits without the hassle of baking. If you’ve ever wished for a dessert that’s both quick and crowd-pleasing, trust me—this recipe for Oreo Balls is your new best friend.
What are Oreo balls?
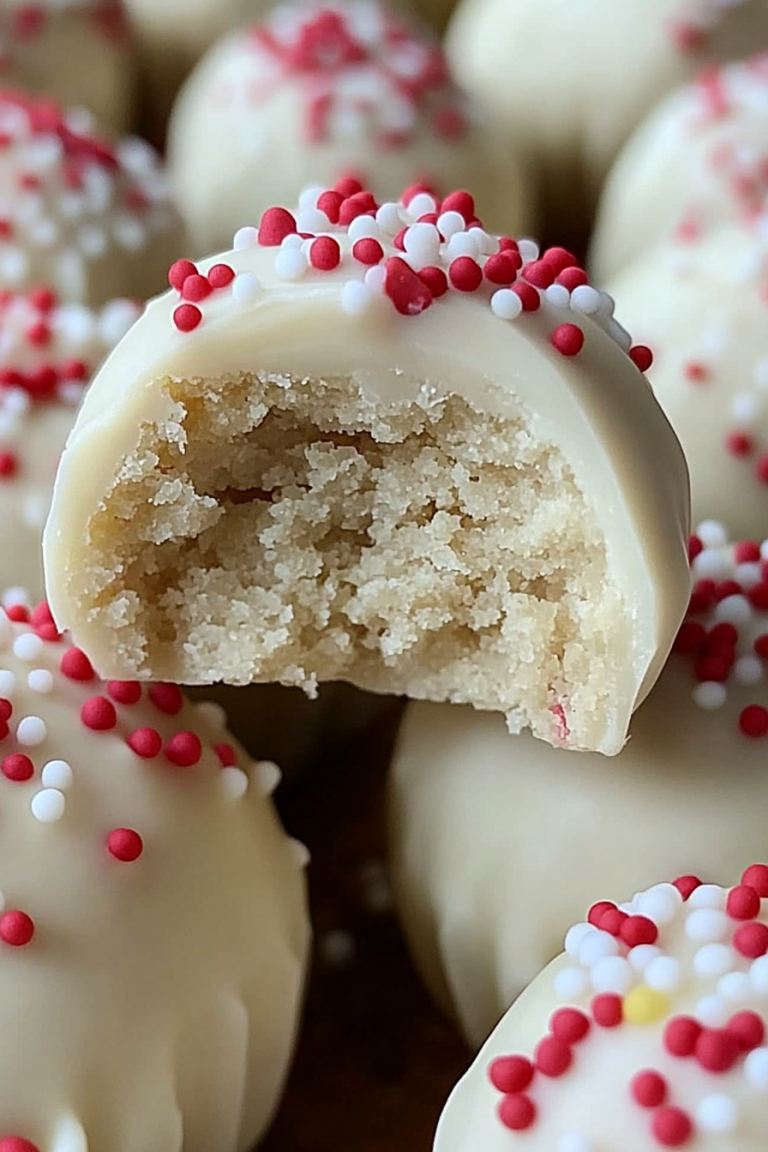
So, what exactly are Oreo Balls? Think of them as mini dessert bombs made from crushed Oreo cookies mixed with a dreamy creamy filling, then dipped in melted chocolate to give them that flawless glossy finish. It’s essentially a no-bake, bite-sized treat that packs the iconic flavor of Oreos into a party-friendly pop. The name “Oreo Balls” probably came from their round, bite-sized shape that makes them irresistibly snackable. If you’re picturing a truffle made with Oreos—yep, you’re totally on the right track. And it’s so approachable, whether you’re a seasoned dessert maker or someone who usually sticks to simpler snacks. I love that it feels fancy enough for holidays but is simple enough to whip up on a whim when those late-night sweet cravings hit.
Why you’ll love this recipe?
What I love most about Oreo Balls is how perfectly they balance indulgence with ease. The flavor is something special—the crunchy cookie pieces hug every bit of that sweet, smooth cream cheese base, making the whole thing feel like a hug in dessert form. Seriously, the tang of the cream cheese cuts through the sweetness in the best way, which stops these from becoming overly sugary or cloying.
Then there’s the simplicity factor; you don’t even have to turn the oven on, which is a total game changer for busy nights or when you just want to avoid heating up the house. All you do is crush, mix, roll, and dip. No fancy skills required. Plus, the ingredients—Oreos, cream cheese, and chocolate—are wallet-friendly and easy to keep stocked, so it’s super budget-friendly.
Flexibility is another big win here. I’ve stirred in nuts for some crunch, swapped out the chocolate for white or even peanut butter coating, and made mini versions for kids’ parties that vanish so fast, you’d think they were magic. If you like other no-bake treats—think peanut butter energy balls or Rice Krispie treats—Oreo Balls might just become your new classic because they hit that sweet spot between nostalgic and modern.
How do I make Oreo balls?
Quick Overview
Making Oreo Balls is about as straightforward as it gets, but here’s the secret that makes them so dependable: crushing the Oreos just right and using the cream cheese to create a smooth, moldable mixture. Then comes the fun part—rolling the mixture into perfect little spheres and dipping them into melted chocolate for that flawless, shiny finish. I always do this in a step-by-step rhythm that feels more like playtime than work, which is probably why making Oreo Balls has become such a happy ritual around here.
Ingredients
For the Main Batter:
- 24 Oreo cookies (original flavor, broken into chunks for best texture)
- 8 oz cream cheese, softened (room temp is key — it helps everything bind better)
For the Coating:
- 12 oz semi-sweet or milk chocolate chips (choose good-quality chocolate that melts smoothly)
- Optional: 1 tsp coconut oil or vegetable shortening (this helps thin the chocolate for easier dipping)
Step-by-Step Instructions
Step 1: Prep Your Workspace
Line a baking sheet with parchment paper because you’ll want a non-stick surface for your Oreo balls to chill without sticking. Also, make sure your cream cheese is softened to room temperature ahead of time — trust me, this little tip makes mixing so much smoother.
Step 2: Crush the Oreos
Dump the Oreos into a food processor and pulse until they’re fine crumbs with just a few small chunks—not powdery! If you don’t have a food processor, pop them in a ziplock and give them a good smash with a rolling pin. The texture matters because you want little bits to give the balls a bit of crunch.
Step 3: Mix Cream Cheese and Oreo Crumbs
Transfer your crumbs to a bowl and dollop in the cream cheese. Now, with clean hands (the best mixing tool for this), knead everything together until it’s fully combined. The mixture should be thick, smooth, and moldable but not sticky. If it feels too loose, a little more crushed Oreo can help.
Step 4: Roll into Balls
Pinch off small handfuls—about a tablespoon—then roll them between your palms to create smooth, even balls. I always make a batch of “tester” balls first—it lets me check they hold up and aren’t too crumbly.
Step 5: Chill
Pop the tray of balls into the fridge for at least 30 minutes to firm up. This step helps them keep their shape when you dip them into the chocolate.
Step 6: Melt Chocolate
Using a microwave or double boiler, gently melt the chocolate chips with the coconut oil or shortening. Stir often for a silky smooth consistency, perfect for dipping.
Step 7: Dip the Oreo Balls
Grab an Oreo ball with a fork, dip it in the melted chocolate, tapping off any excess. Place it back on your parchment-lined tray. If you want a smoother look, you can swirl the fork through the chocolate as you remove it.
Step 8: Chill Again
Refrigerate the dipped balls for at least 15 minutes, or until the chocolate is set and glossy.
Step 9: Serve and Enjoy
Once your Oreo Balls are beautifully set, serve at room temperature for the best melt-in-your-mouth experience. Watch how fast they disappear — and maybe make a double batch next time!
What to Serve It With
For Breakfast: Pair a couple of Oreo Balls with your morning coffee or a creamy latte — the bittersweet coffee tones really bring out the chocolate and cream cheese flavors. I like to line them up on a plate with fresh fruit for a little extra brightness.
For Brunch: Arrange Oreo Balls on a pretty platter alongside mimosas or sparkling water infused with citrus slices. They become little chocolate jewels that add fun and sweetness to your spread without overwhelming the table.
As Dessert: Serve Oreo Balls with a scoop of vanilla ice cream or drizzle some caramel sauce over the top for some decadent flair. I’ve also been known to crush a few more Oreos on top for extra texture and presentation points. It’s an instant crowd-pleaser that’s way easier than lugging out the mixer.
For Cozy Snacks: These little gems are my go-to for unexpected guests or when the kids want a treat during movie night. We often curl up together with a warm drink and pass around a bowl of Oreo Balls—little bites of happiness that feel comforting and indulgent all at once.
Top Tips for Perfecting Your Oreo Balls
Crushing Cookies: I’ve learned that getting the right texture when crushing Oreo cookies is everything. Too fine, and the mixture gets gummy; too chunky, and the balls fall apart. Aim for a blend — mostly fine with some little bits for texture.
Mixing Technique: Mixing by hand is the way to go here. You can feel when the dough just comes together. Don’t overwork it or add too much cream cheese, or you’ll end up with overly soft balls that are hard to dip.
Rolling the Balls: Wet your hands lightly if the dough sticks—but don’t overdo it, or the balls get soggy and won’t hold their shape. I always keep a wet paper towel nearby for quick hand wipes.
Dipping Tips: If your chocolate is too thick, it won’t coat smoothly. Adding a teaspoon of coconut oil helps thin it without compromising flavor. Also, have a fork ready to lift the Oreo balls out, then tap gently on the bowl’s edge to shake off excess chocolate.
Flavor Variations: I once swapped half the Oreos for Golden Oreos and dipped the balls in white chocolate — turned out surprisingly delicious! Don’t be afraid to play with flavors like peanut butter, mint extract, or crushed nuts mixed in.
Storage and Chill Times: Give yourself plenty of fridge time between rolling and dipping steps; it keeps everything stable. If you’re short on time, a quick blast in the freezer works too, but go easy—you don’t want frozen center surprises.
I’ve learned these little details through trial and error, and now making Oreo Balls feels like second nature. Trust me, once you nail these tricks, you’ll be making them over and over—just like I have!
Storing and Reheating Tips
Room Temperature: Oreo Balls will keep fresh for about a day or two on the counter, covered loosely with a bowl or cake dome. They’ll start becoming softer, so best eaten soon if you don’t refrigerate.
Refrigerator Storage: Store them in an airtight container, layering parchment paper between if stacking. They last about a week this way—perfect for prepping in advance of a gathering.
Freezer Instructions: For longer storage, pop Oreo Balls in a sealed freezer-safe container or bag with parchment between layers. They freeze beautifully for up to 3 months. Just thaw in the fridge overnight — the texture stays amazing, like they were freshly made.
Glaze Timing Advice: If freezing, I recommend glazing after thawing to avoid chocolate cracking. Or, freeze uncoated balls and dip after thaw. This keeps your chocolate coating shiny and smooth every time.
Frequently Asked Questions
Final Thoughts
Honestly, Oreo Balls hold a special place in my kitchen because they’re like quick bursts of joy wrapped in a chocolate shell. They’ve rescued many parties, comforted random sweet cravings after work, and even made school events more exciting with their simple charm. The incredible flavor combo paired with how straightforward they are keeps me coming back. If you love whipping up treats that feel luxurious without fuss, then give these Oreo Balls a go—you won’t regret it. And hey, once you master these, you might want to explore other no-bake treats or homemade truffles, adding your own twists. I’d love to hear your favorite variations or little tweaks that make your batch unique. Happy dipping and rolling—can’t wait to hear how yours turns out!
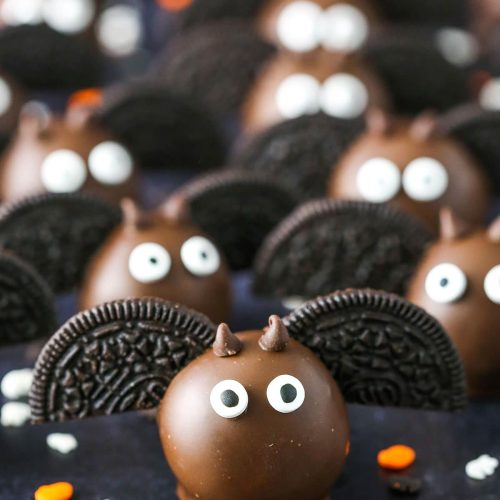
Oreo Balls
Ingredients
Main Ingredients
- 14.3 oz Oreos crushed into crumbs
- 8 oz cream cheese room temperature
- 10 oz chocolate candy coating melted
- 30 pieces Oreos for wings, cut in halves
- 56 pieces eyeball candies
- 56 pieces mini chocolate chips
Instructions
Preparation Steps
- Add chocolate sandwich cookies to a food processor or blender and crush into crumbs.
- Mix together the cream cheese and cookie crumbs in a bowl until well combined, forming a dough-like mixture.
- Form balls from the cookie mixture about 1 inch in size, using roughly 1 tablespoon of mixture per ball.
- Place the balls in the fridge for about 1 hour to firm up.
- Remove filling from Oreo cookies and cut cookies into halves to create wings, prepare about 30 pairs.
- Dip the chilled cookie balls into melted chocolate candy coating and place on parchment paper.
- Quickly attach Oreo wing halves to each dipped ball and hold in place until the chocolate sets.
- Attach eyeball candies and mini chocolate chips as eyes and ears using a little extra melted chocolate as glue.
- Store cookie balls in the fridge; they will keep for about 1 week.