Oh my gosh, you guys. If there is one recipe that lives rent-free in my dessert dreams, it’s this one. Remember those days when you just absolutely needed something sweet, something decadent, but the thought of preheating the oven felt like climbing Mount Everest? That’s where this absolute gem lives. I stumbled upon the concept years ago, but after tinkering with the ratios—because, let’s be honest, my family demands maximum peanut butter impact—I landed on this version. It’s unbelievably creamy, intensely flavored, and tastes exactly like the best, softest, most buttery peanut butter cookie you’ve ever eaten, except you don’t have to wait for it to bake! We call it the Peanut Butter Cookie Dip: What are some good recipes for this dip?, and trust me, it’s the stuff legends are made of. My kids seriously lose their minds when I whip this up for movie night; it’s been known to disappear in under ten minutes. Forget traditional cookie dough; this dip is faster, easier, and arguably hits that craving spot even better than a full batch of cookies.
What is peanut butter cookie dip?
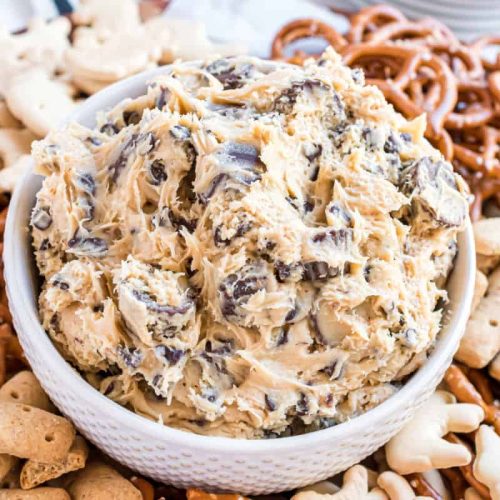
So, what exactly is this magical concoction? Think of it as the luscious, creamy heart of a peanut butter cookie—minus the flour and the baking time. It’s essentially a luxurious, spreadable frosting that’s firm enough to scoop but soft enough to melt in your mouth. It’s essentially the best parts of cookie dough, stabilized and made perfectly safe and decadent for immediate consumption. I’ve seen recipes that try to mimic it using cream cheese, but honestly, that changes the flavor profile completely. My version relies on a base of butter, powdered sugar, and, of course, an obscene amount of creamy peanut butter—the good stuff, the kind that needs stirring! It’s richer than a traditional sweet dip because we are going for that true, baked-cookie flavor, even though no baking is involved. It’s that perfect balance of salty, sweet, and gloriously dense. It’s essentially edible indulgence, packaged perfectly for dipping anything from apples to pretzels.
Why you’ll love this recipe?
Why is this so?Peanut Butter Cookie Dip has become a staple around here, but I’ll try to narrow it down. First, the flavor—and I’m not exaggerating—it tastes *exactly* like licking the beaters after making perfect peanut butter cookies. The slight saltiness from the peanut butter cuts through the sweetness of the powdered sugar so beautifully. It’s rich, comforting, and hits that nostalgic spot every single time.
Second, the simplicity is unbeatable. I’ve made this when I’ve had exactly seven minutes to pull something together for unexpected guests. No chilling dough, no waiting for cookies to cool; you mix it, and you serve it. It’s a lifesaver on busy weeknights when everyone suddenly decides they need a treat simultaneously. I’ve tested this with almond milk (as an aside, it actually made it even creamier than whole milk, maybe try that!), and it smooths out the texture perfectly.
Third, the versatility is fantastic. While it’s amazing with graham crackers, I’ve found that dipping crisp apple slices into this makes for a surprisingly balanced snack—the tartness of the Granny Smith really cuts the richness. And the cost? Minimal! These are staple pantry ingredients, so you’re getting massive flavor impact for very little outlay.
What I love most about this is how forgiving it is. If your peanut butter is stiffer than usual, just add a tiny splash more milk. If it feels too soft, whip in a bit more powdered sugar. I’ve made this dozens of times, and while the core recipe is solid, it always adapts to whatever I have on hand. Seriously, if you’re looking for the fastest route to dessert bliss, this is it. You won’t find a quicker, more satisfying peanut butter experience anywhere.
How to Make Peanut Butter Cookie Dip
Quick Overview
The process is almost comically simple: you’re just whipping the base ingredients—butter and peanut butter—until they are light and fluffy, then gradually incorporating the powdered sugar and liquid until you reach that perfect, scoopable consistency. The trick is patience when adding the dry ingredients so you don’t end up with a sugar cloud explosion across your kitchen! We mix everything cold-to-room temperature, which helps everything emulsify nicely without becoming grainy. It takes about ten minutes from start to finish, and then you can immediately start dipping. This method ensures maximum creaminess without needing any heat source whatsoever.
Ingredients
For the Main Batter:
1 cup Unsalted Butter, softened to true room temperature (this is critical! If it’s cold, it won’t incorporate well)
1 cup Creamy Peanut Butter (I prefer Jif or Skippy for texture; natural style can sometimes be too oily and make the dip separate)
3 ½ cups Powdered Sugar, sifted (sifting prevents those annoying little lumps)
1 teaspoon Vanilla Extract (Don’t skimp here, it boosts the cookie flavor)
2-4 tablespoons Milk (Dairy, almond, or even oat work—start with two and add as needed)
For the Filling (Optional Swirl, but highly recommended):
½ cup Chocolate Chips (Semi-sweet or milk, depending on your preference)
1 tablespoon Coconut Oil (This helps the chips melt smoothly for drizzling or swirling)
For the Glaze (For Presentation and Extra Shine):
½ cup Powdered Sugar
1 tablespoon Milk or Cream
Pinch of Salt
Step-by-Step Instructions
Step 1: Preheat & Prep Pan
Since this is a no-bake dip, there’s no oven preheating! Instead, you need to prep your serving vessel. Find a beautiful medium-sized bowl—something that looks nice on the coffee table. I usually line the bottom with a few chocolate chips so they melt slightly as the dip sits, creating little pockets of fudge. Make sure your butter is genuinely soft; press a finger into it—if it leaves a soft indent easily, it’s ready. If you rush this step, your dip will be chunky, and nobody wants chunky dip.
Step 2: Mix Dry Ingredients
Take that sifted powdered sugar and set it aside. I usually mix the vanilla extract with the milk first so it incorporates evenly later. The goal here is to have all your “soft” additions ready before you bring in the sugar.
Step 3: Mix Wet Ingredients
In your large mixing bowl (stand mixer preferred, but hand mixer works great), cream together the softened butter and the peanut butter on medium speed. You want this mixture to become noticeably lighter in color and really fluffy—about 3 to 4 minutes of beating. This step incorporates air, which is key to the light texture; otherwise, it will taste heavy.
Step 4: Combine
This is the dusty part. With the mixer running on the absolute lowest speed (I mean SLOWLY), add the sifted powdered sugar, one cup at a time. Once the first cup is mostly incorporated, splash in 2 tablespoons of milk. Continue adding the sugar slowly, alternating with small splashes of milk until the mixture comes together. You’re looking for a thick, scoopable consistency, almost like slightly softened cookie dough. If it seems too stiff to stir easily, add the remaining milk, one teaspoon at a time, until it’s perfect.
Step 5: Prepare Filling
While the mixer is running, melt your chocolate chips and coconut oil together in a small, microwave-safe bowl. Heat in 15-second intervals, stirring between each one, until smooth and glossy. We need this chocolate to be runny enough to swirl but thick enough not to immediately dissolve into the dip.
Step 6: Layer & Swirl
Spoon the peanut butter dip into your serving bowl. Drizzle about half of the melted chocolate over the top in random lines. Use a butter knife or a skewer to gently pull the chocolate through the dip, creating elegant swirls. Don’t over-swirl; you still want distinct ribbons of dark chocolate running through the creamy peanut butter base. If you want extra texture, reserve a tablespoon of chocolate for drizzling right before serving.
Step 7: Bake
Nope! No baking required for this beauty. Chill time is optional, but I find that 30 minutes in the fridge really lets the flavors meld and firms the dip up just slightly, which makes scooping easier.
Step 8: Cool & Glaze
If you opted to chill, take it out about 15 minutes before serving. While it chills, quickly whisk together the glaze ingredients: powdered sugar, milk, and salt. It should be thin enough to drizzle but opaque. Drizzle this thin glaze over the top of the chilled dip for a professional, shiny finish. If you waited to drizzle the reserved chocolate, do it now!
Step 9: Slice & Serve
Set out your favorite dipping vehicles! Serve immediately. This Peanut Butter Cookie Dip is best enjoyed when it’s slightly cool, but not rock hard from the fridge. It should yield easily to a cracker or a sturdy graham cracker.
What to Serve It With
This dip is surprisingly versatile; it moves seamlessly from casual snacking to slightly more elegant dessert presentations. My family has a few go-to accompaniments.
For Breakfast: Okay, hear me out—this isn’t traditional breakfast, but if you treat it like a decadent spread, it’s amazing. Toast a thick slice of brioche, let it cool slightly, and spread this on top like a rich peanut butter frosting. Pair it with a strong, black coffee. The slight bitterness of the coffee is the perfect foil to the richness of the dip.
For Brunch: For a beautiful brunch spread, I serve this right in the center of a large wooden board surrounded by fresh fruit. Think crisp apple wedges (Granny Smith is my favorite!), strawberries, and thin slices of firm pear. For a salty crunch, lay out pretzel sticks—seriously, the sweet/salty combo is addictive. For drinks, a mimosa or a light sparkling cider pairs nicely.
As Dessert: This is where it shines. Serve small bowls of the dip alongside homemade, slightly salty chocolate chip cookies (yes, we double down on cookies) or shortbread. A tiny scoop of vanilla bean ice cream sitting next to a dollop of the dip is sheer heaven. I like to garnish the top of the bowl with some chopped salted peanuts or crushed Oreos right before bringing it to the table.
For Cozy Snacks: My favorite cozy pairing is simply dipping Teddy Grahams or Nilla Wafers. It’s easy for little hands to manage, and it’s the ultimate cozy, rainy-day treat. Sometimes, on real lazy nights, I’ll even just eat it with a spoon straight from the fridge—don’t judge!
Top Tips for Perfecting Your Peanut Butter Cookie Dip
I’ve definitely made a few batches that ended up being too runny or too stiff over the years, so here are the hard-won lessons I’ve gathered to ensure your Peanut Butter Cookie Dip is flawless every time.
Butter Prep: I cannot stress this enough: your butter must be truly room temperature. If it’s cold, it won’t cream properly with the peanut butter, and you’ll end up with chunks of cold butter disrupting the smooth texture. If you forget to pull it out, cut it into small cubes and let it sit on the counter for 20 minutes, or microwave it *briefly*—like 5 seconds max—and test it. You want it pliable, not melty.
Mixing Advice: Always start slow when adding the powdered sugar. If you dump it all in on high speed, you create a dust storm, and you’ll end up coughing while the sugar coats your cabinets. Low and slow until it’s incorporated, then you can bump the speed up slightly to whip the air in.
Swirl Customization: If you’re using the chocolate swirl, don’t get fancy! Random drizzle and gentle tugs with a knife look the most rustic and appealing. If you try to make perfect waves, it tends to mix too much and just turns the whole thing a muddy brown color. Less is more with swirling.
Ingredient Swaps: While I champion creamy peanut butter, if you must use natural, very oily peanut butter, reduce the initial milk added by half a tablespoon. You might need to add more sugar later, but starting with less liquid prevents the dip from breaking. Also, if you want a slight tang reminiscent of browned butter, you can brown half of your butter first, let it cool completely, and then proceed with the recipe. It adds an incredible depth of flavor.
Baking Tips: Again, no baking, but chilling is your friend. If you’re serving this immediately and it feels too soft, chill it for 20 minutes. It firms up beautifully without becoming dense. If you’re using an electric mixer, scraping down the sides frequently is crucial to ensure everything is homogenous.
Glaze Variations: If you want a chocolate glaze instead of the vanilla one, use the chocolate chip recipe from Step 5, but thin it out a bit more with that coconut oil until it drizzles easily. For a fun twist, substitute the vanilla extract in the main dip with 1/4 teaspoon of almond extract—it mimics that classic almond-paste note you sometimes find in high-end bakery cookies.
Storing and Reheating Tips
The beauty of a no-bake dip is that it stores remarkably well, though I rarely have leftovers! Since it’s primarily fat and sugar, it keeps its texture better than most baked goods.
Room Temperature: If you are serving this at a party, it can safely sit out on the buffet table for about 2 hours, provided your kitchen isn’t scorching hot. After that, the butter starts to soften too much, and it loses its structure. Keep it covered with plastic wrap if it’s going to be sitting out for a while.
Refrigerator Storage: This is the best method for longevity. Store any leftovers in an airtight container. It will keep beautifully for up to one week. It will firm up significantly when refrigerated—it becomes almost fudge-like. If you plan to serve it cold, take it out about 30 minutes before serving to let it soften up again for optimal dipping texture.
Freezer Instructions: Yes, you can freeze this! It’s a great option if you are making it way ahead of time for a holiday party. Transfer the dip (without any drizzle or glaze) to a freezer-safe, airtight container. It freezes well for up to three months. To thaw, move it to the refrigerator overnight. It usually takes about 8-10 hours to fully soften back to a dippable consistency.
Glaze Timing Advice: Never freeze the dip with the final vanilla glaze or chocolate drizzle already applied. The moisture change during freezing and thawing often makes the glaze weep or look cracked when defrosted. Apply any decorative toppings *after* it has fully thawed and returned to its ideal serving temperature.
Frequently Asked Questions
Final Thoughts
Honestly, I hope you take five minutes out of your day to make this Peanut Butter Cookie Dip. It’s the definition of easy satisfaction. It brings back that pure, childlike joy of eating raw cookie dough, but without any of the worry. It’s rich, deeply flavorful, and ridiculously simple. Every time I bring this out, people look at it skeptically—”It’s just dip?”—and then within minutes, they are begging me for the recipe. That moment of surprising everyone with how good something so simple can be? That’s why I love sharing this one.
If you enjoyed the sheer speed and intense flavor of this dessert, you might also want to check out my recipe for No-Bake Chocolate Lasagna—it’s another one of those crowd-pleasers that requires zero oven time. But seriously, start here. This dip is a guaranteed hit for game nights, impromptu gatherings, or just when you need a little midweek treat.
I’m so excited for you to try this! Let me know in the comments below how yours turned out. Did you stick to the chocolate swirl, or did you try something wild? What did you dip into it first? Drop your ratings below—happy scooping!
Peanut Butter Cookie Dip
Ingredients
Main Ingredients
- 0.5 cup unsalted butter
- 0.5 cup light brown sugar (packed)
- 0.25 cup creamy peanut butter
- 8 oz cream cheese softened
- 0.75 cup powdered sugar
- 0.5 cup semi-sweet mini chocolate chips
- 8 oz Reese's peanut butter cup Minis or about 1.5 cups chopped Reese's cups
Instructions
Preparation Steps
- In a small saucepan over medium heat, melt butter and whisk in the brown sugar and peanut butter. Heat until sugar dissolves (about one minute). Remove from heat immediately and allow to cool to room temperature (very important).
- In a large mixing bowl, beat cream cheese with powdered sugar until creamy (about 3-4 minutes). On low speed, add in the cooled brown sugar mixture and mix until combined.
- Fold in mini chocolate chips and chopped mini Reese's cups. Serve immediately or store in refrigerator until ready to serve. Enjoy with pretzels, animal crackers, or graham crackers.