Oh my goodness, you guys. If there’s one side dish I make weekly, year-round, regardless of whether it’s a holiday feast or just a Tuesday night scramble to get dinner on the table, it’s this simple preparation of What are some good ways to roast asparagus?. I know, I know, “roasted vegetables,” groundbreaking, right? But seriously, stick with me. I spent years hacking away at this, ending up with soggy, limp spears that tasted like boiled grass. I almost gave up! Then, I figured out the golden ratio of oil to heat, and suddenly, I was serving up tender interiors with the crispiest, slightly caramelized tips you can imagine. It’s the kind of side that makes people actually stop talking when they take the first bite and go, “Wait, what did you do to this?” Forget steaming; forget sautéing if you want that real snap and char. This method transforms humble asparagus into something truly special, and I promise, it’s easier than making toast. This recipe is my go-to when I need something green, ridiculously flavorful, and done in under 15 minutes, oven time included. You’re going to want to ditch every other green vegetable recipe you currently rely on.
What is the best way to roast asparagus?
What is perfect?What are some good ways to roast asparagus?, you ask? Well, for me, it’s an exercise in contrast. Think about it: you have this delicate, slightly grassy vegetable, and you want to treat it right. It’s not about masking the flavor; it’s about amplifying it. When I talk about this preparation, I’m talking about spears that have been kissed by high heat just long enough so the exterior develops a deep, almost nutty char, while the inside remains perfectly tender-crisp—that slight resistance when you bite through it. It’s essentially the vegetable equivalent of perfectly grilled steak. It’s simply asparagus, tossed with good quality olive oil, coarse salt, maybe a crack of pepper, and roasted hot and fast. It’s essentially the purest expression of the vegetable itself, enhanced by that beautiful Maillard reaction that happens only when things get properly hot. It’s not mushy, it’s not steamed, and it’s certainly not drowning in butter (though we can add that later!). It’s the minimalist masterpiece of the vegetable world, and once you master the technique, you’ll never look back. It’s so simple, yet so profoundly delicious.
Why You’ll Love This Recipe
There are so many reasons this specific way of preparing roasted asparagus has earned a permanent spot in my weekly rotation, but I’ll try to narrow it down. First off, the flavor payoff versus the effort level is honestly criminal. You spend maybe five minutes prepping—snapping the ends off, drizzling oil, sprinkling salt—and then you let the oven do the heavy lifting. What I love most about this is the texture. I learned the hard way years ago that if you don’t use a high enough heat (425°F minimum, trust me!), you just steam the spears in their own moisture and end up with sad, floppy vegetables. We want char! We want those little browned bubbles on the tips! Flavor-wise, roasting brings out the natural sweetness of the asparagus, counterbalancing that slight bitterness beautifully. It tastes infinitely better than the bland, boiled versions I grew up eating.
It’s also incredibly budget-friendly. Asparagus can be inexpensive when it’s in season, and since you only need oil, salt, and pepper, the cost per serving is negligible. This versatility is another huge win. I serve it alongside everything from slow-cooked pot roast to quick baked salmon. When my kids were younger and utterly resistant to green things, cutting the roasted asparagus into tiny, crispy coins and tossing them with Parmesan cheese was the only way they’d eat them. That’s right, Parmesan transforms everything! Furthermore, if you’re having company and need a quick upgrade, a squeeze of fresh lemon juice right before serving or a dusting of smoked paprika completely changes the profile. It stands up beautifully next to richer dishes without turning heavy or oily itself. Unlike green beans, which sometimes need blanching, or broccoli, which can burn easily, asparagus seems perfectly engineered for the high-heat roasting method. This one’s a lifesaver on busy nights when I need a vibrant, healthy side dish ready almost as fast as the protein.
How to Make Perfectly Roasted Asparagus
Quick Overview
The secret here is high heat and making sure those spears aren’t crowded on the pan. We’re aiming for evaporation and caramelization, not steaming. We start by giving the asparagus a very rough snap to remove the woody ends—no tedious peeling necessary! Toss them liberally with high-quality olive oil and good flaky salt, spread them out in a single layer on a rimmed baking sheet (this is crucial, trust me on this one!), and blast them in a 425°F oven for about 10 to 14 minutes. You’ll know they’re done when the edges are deeply browned and they yield easily when pressed. The entire hands-on time is under five minutes, making this method a true weeknight champion. It’s almost foolproof, provided you respect the heat and the space on the pan.
Ingredients
For the Main Asparagus Prep:
1 large bunch fresh asparagus (about 1 pound) – Tip: Look for spears that are medium thickness; thick ones can take too long, and super skinny ones risk burning.
2 tablespoons good quality extra virgin olive oil – Don’t skimp here; it’s one of the main flavor carriers!
1 teaspoon coarse kosher salt – Flaky sea salt is even better for texture.
1/2 teaspoon freshly ground black pepper – Freshly ground makes a huge difference in aroma.
Optional Flavor Boosters (Add these with the oil):
2 cloves garlic, minced very finely or grated – Use sparingly; roasted garlic burns faster than the spears.
Zest of 1 small lemon – Add this right after they come out of the oven so the oils stay bright.
1/4 cup freshly grated Parmesan cheese – My family’s secret weapon. Add during the last 3 minutes of roasting.
For Serving:
Fresh lemon wedges – Essential for that final zing.
A drizzle of high-quality balsamic glaze (optional) – Adds a lovely sweet/tangy finish.
Step-by-Step Instructions
Step 1: Preheat & Prep Pan
First things first: crank that oven up! Set your oven to 425°F (220°C). While it’s heating, grab your sheet pan. I prefer a heavy-duty aluminum or stainless steel pan with a small rim. Do NOT line it with parchment paper unless you prefer steamed asparagus; the direct contact with the hot metal is what creates the char. If you absolutely must use parchment for easier cleanup, I recommend placing the spears directly on the bare metal for the final 5 minutes of cooking to maximize crisping, or use a silicone mat.
Step 2: Prepare the Asparagus
Wash the spears gently under cool water and pat them completely dry with a clean kitchen towel or paper towels. Seriously, dry them! Any excess moisture turns to steam, and we are avoiding steam. Next, snap off the woody ends. The easiest way is to hold a spear near the bottom, near the tough part, and gently bend it; it will naturally snap where the tender part begins and the woody part ends. Discard the bottoms (or save them for soup stock if you’re feeling thrifty!). Place the trimmed spears in a large bowl.
Step 3: Season Generously
Drizzle the olive oil over the asparagus in the bowl. Toss well with your hands—you want every spear lightly coated, but not swimming in oil. Add the kosher salt and black pepper. If you’re using minced garlic, add it now too. Toss again until everything is evenly distributed. Remember, this seasoning is what creates that beautiful crust, so don’t be shy with the salt.
Step 4: Arrange on Baking Sheet
This is arguably the most critical step for getting that desired crispiness. Dump the seasoned asparagus onto your prepared sheet pan. Now, spread them out so they form a single, loose layer. They should ideally be touching just barely, but there must be space between them. If you pile them up, they will steam and turn soggy. If you are doubling the recipe, use two separate sheet pans. We need airflow!
Step 5: Roast at High Heat
Slide the tray into your preheated 425°F oven. Set a timer for 10 minutes. Don’t walk away! After 10 minutes, check them. They should be bright green and starting to show little browned spots. If they look pale, give them another 2-4 minutes. If you are using Parmesan, sprinkle it evenly over the top now and return them to the oven for 2-3 more minutes until the cheese is melted and slightly golden.
Step 6: Check for Doneness
The spears are done when they are tender when pierced with a fork but still hold their shape. If you can easily bend the spear in half without it snapping cleanly, it’s likely overdone. I look for that deep, roasted color on at least half of the spears. Pull them out immediately when they hit the perfect spot!
Step 7: Finish and Serve
Immediately transfer the hot asparagus to a serving platter. If you held off on the lemon zest, sprinkle it over them now while they are steaming hot; the heat releases the oils. Squeeze a fresh lemon wedge over the entire dish right before you bring it to the table. A light drizzle of balsamic glaze, if you like that sweet counterpoint, goes on last. Serve right away!
What to Serve It With
This beautiful side dish plays well with just about everything, which is why I love it so much. For roasted asparagus that tastes like summer, think bright, simple pairings. For Breakfast: We often skip traditional breakfast sides and have this alongside savory scrambled eggs mixed with feta and chives. A strong, hot cup of black coffee complements the earthy flavor perfectly.
For Brunch: If I’m building an elaborate brunch spread, the asparagus looks stunning served vertically in a tall glass jar alongside smoked salmon, capers, and crusty bagels. It’s elegant without being fussy. Pair it with a crisp, dry Prosecco or a homemade cucumber mint agua fresca—something light to cut through the richness of the other brunch items.
As Dessert: Okay, this might sound odd, but hear me out! If I make a lighter dinner, like lemon herb chicken, I sometimes serve a tiny portion of the Parmesan-dusted asparagus as a savory palate cleanser before dessert. It keeps things interesting! For a true dessert scenario, the asparagus isn’t the star, but if you’re serving something rich like a dark chocolate torte, a very small, lightly salted side balances the sweetness beautifully.
For Cozy Snacks: This is my guilty pleasure. If I’m watching a movie late, and I want something savory that isn’t chips, I’ll roast a half bunch, toss it with smoked paprika and extra pepper, and eat it standing over the sink while I wait for the kettle to boil for tea. It’s surprisingly satisfying! My husband loves it paired with homemade sourdough bread toasted with goat cheese spread on top. The creaminess of the cheese mixed with the crisp char of the asparagus? Absolute perfection. Honestly, this side dish is so adaptable, you’ll find your own favorite pairing in no time.
Top Tips for Perfecting Your Roasted Asparagus
I’ve definitely made enough of these to earn my stripes, and trust me, every small adjustment makes a huge difference. Here are the hard-won lessons I’ve collected over the years.
Asparagus Prep: Always, always check the thickness. If you have a mix of skinny and fat spears, snap them separately, and roast the fat ones for 3-4 minutes longer, or just remove the skinny ones earlier. Also, make sure they are bone dry. I learned this the hard way when I threw spears straight from the rinse basin onto the hot pan—it sizzled violently and created steam, resulting in mushy spears. Pat them aggressively!
Mixing Advice: When tossing with oil and seasoning, use a large bowl. If the bowl is too small, you can’t ensure an even coating. You want every little nook and cranny hit by the oil, which acts as the heat conductor. Under-seasoning is a common mistake; the salt draws out moisture and creates flavor, so be generous with that coarse salt.
Swirl Customization: I’ve experimented with adding things halfway through. For instance, if you want a touch of heat, wait until the 8-minute mark, toss with a tiny pinch of red pepper flakes, and return to the oven. If you add spices like paprika too early, they can sometimes taste bitter because they burn, so time your add-ins carefully!
Ingredient Swaps: If you don’t have olive oil, avocado oil is a fantastic substitute because it has a very high smoke point, similar to what we need here. However, if you are out of oil entirely (how?!), you can briefly toss them with a touch of melted ghee instead, though the flavor profile changes significantly towards nutty/buttery. Do not substitute with butter unless you brown it first, or it will just burn on the bottom of the pan.
Baking Tips: Temperature stability is key. If your oven runs cold, 425°F might feel like 400°F to the food, leading to sad results. I always use an oven thermometer to verify the actual temperature. Also, position your rack in the middle or slightly lower third of the oven. If it’s too high, the top tips will burn before the stalk softens.
Glaze Variations: If you’re skipping the lemon/Parmesan route, try a Asian-inspired finish. After roasting, toss immediately with 1 teaspoon of soy sauce, 1 teaspoon of toasted sesame oil, and a sprinkle of sesame seeds. It gives the roasted asparagus an entirely different, umami-rich character that pairs wonderfully with Asian-inspired mains.
Storing and Reheating Tips
One of the best things about roasted vegetables is how well they travel and store, provided you nailed the initial cook. Getting the right crispness means they hold up better than softer cooked vegetables.
Room Temperature: If you’re serving these as part of a buffet or grazing board, they are actually best left at room temperature for up to about two hours after cooking. They will lose some of their initial snap but will remain pleasantly savory and tender. Just cover them loosely with a clean kitchen towel—never plastic wrap, which traps humidity and speeds up sogginess.
Refrigerator Storage: For leftovers, you want an airtight container, but here’s my trick: line the container with a dry paper towel before adding the asparagus. This absorbs any residual moisture overnight. They’ll keep beautifully for 3 to 4 days. They won’t be as crunchy as they were fresh out of the oven, but they are still fantastic.
Freezer Instructions: I rarely freeze roasted asparagus because the texture changes too much once thawed—it gets quite soft. However, if you must, make sure they are completely cooled before storing them in a heavy-duty zip-top bag, pressing out all the air. They will last about a month. When you reheat them, skip the microwave entirely! Microwave turns any roasted vegetable instantly rubbery.
Reheating for Best Results: To bring them back to life, spread the chilled spears in a single layer on a clean, dry baking sheet (no oil needed). Bake at 375°F for about 5 to 7 minutes. This reactivates the oils and crisps up those edges again. If you added Parmesan before, it might be a little hard, but the overall effect is wonderfully close to fresh. If you’re in a massive hurry, a quick toast in an air fryer at 350°F for 3 minutes works wonders too!
Frequently Asked Questions
Final Thoughts
There you have it—the method that finally unlocked the magic of roasted asparagus for me. It truly transformed this humble vegetable from a reluctant side dish into something my whole family actually anticipates eating. Remember the key players: high heat (425°F minimum!), ensuring those spears have space to breathe on the pan, and not being shy with the salt. That little bit of char and the slight nuttiness from the oil mingling with the crisp tips—that’s the moment where the magic happens. It smells incredible while it cooks, filling the whole house with that earthy, savory aroma that just screams ‘dinner is ready.’ If you’ve struggled with soggy asparagus in the past, I really hope you give this high-heat approach a shot. It’s changed my side dish game forever, and I think it’ll do the same for yours! Let me know down in the comments if you tried the Parmesan trick, or if you swapped in a different finishing touch! I’m always looking for new variations. Happy roasting, everyone!
roasted asparagus
Ingredients
Main Ingredients
- 1 pound asparagus spears washed, dried, and ends trimmed
- 2 tablespoons olive oil
- 3 cloves garlic minced
- salt and freshly ground black pepper to taste
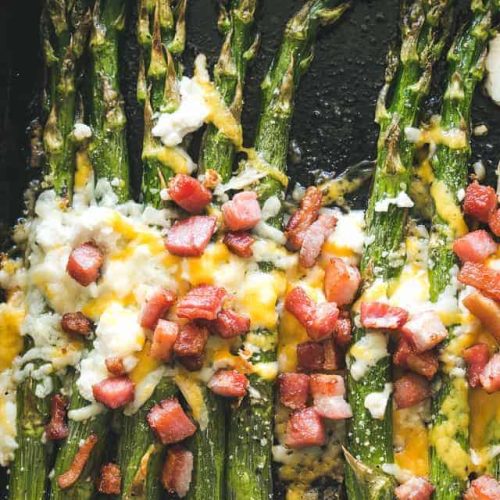
- 8 slices bacon
- 0.5 cup shredded cheddar cheese
- 0.5 cup shredded monterey jack cheese
- 1 cup crumbled feta cheese
Instructions
Preparation Steps
- Preheat oven to 450°F. Arrange asparagus on a foil-lined baking sheet. Drizzle olive oil over asparagus and sprinkle minced garlic, salt, and pepper. Toss to coat evenly.
- Roast asparagus in the oven for 10 to 12 minutes until crisp-tender.
- While asparagus roasts, cook bacon in a skillet until crispy. Drain on paper towels, crumble, and set aside.
- Remove asparagus from oven and sprinkle with cheddar, monterey jack, and feta cheese. Return to oven and cook 2 to 3 minutes until cheese melts.
- Top asparagus with crumbled bacon and serve immediately.