There’s this magical moment every time I pull a batch of rocky road fudge out of the fridge—it’s the smell, the look, the way that first bite hits your tongue with creamy chocolate, crunchy nuts, and sweet marshmallows all mingling perfectly. Growing up, rocky road fudge was *the* treat at every family gathering. It wasn’t just dessert; it was a little slice of nostalgia, a hug in candy form. If you’re like me and adore the rich decadence of homemade fudge but crave a bit more texture and zing, this recipe will be your new best friend. Unlike regular chocolate fudge that’s smooth and sweet, rocky road fudge surprises you with delightful chewiness and crunch in every bite—and the best part? It comes together faster than you’d think, no fancy equipment needed.
What is Rocky Road Fudge?
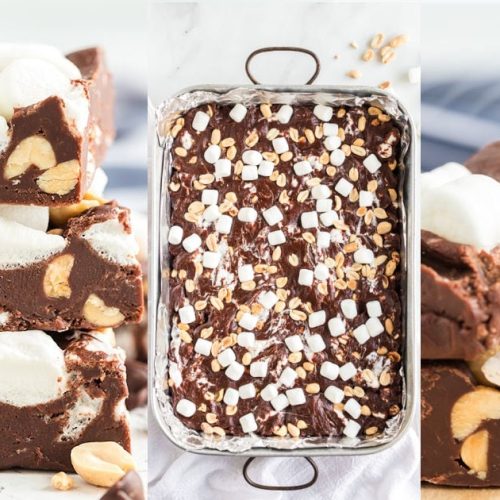
Think of rocky road fudge as a comforting chocolate bar that’s been sprinkled with all your favorite chewy and crunchy bits. The “rocky road” name actually comes from a classic chocolate dessert that famously combines chocolate with marshmallows and nuts—sort of like a rocky path made of yumminess! Essentially, it’s fudge studded with mini marshmallows and nuts, giving you those irresistible little pops of texture alongside silky chocolate. It’s the kind of treat that feels homey and indulgent all at once. If you’ve ever loved rocky road ice cream or candy bars, this fudge takes that combo and cranks it up, making it something extra special you’ll want handy in your freezer.
Why you’ll love this recipe?
Here’s the thing: I’ve tried a lot of fudge recipes, and this rocky road fudge has managed to snag a permanent spot in my go-to sweet treats. What I love most about this one is how well it balances taste and ease—rich, chocolatey but not sickly sweet, with those joyful little marshmallow bits and toasted nuts lending a perfect crunch. If you have a sweet tooth like mine, but also appreciate texture and a bit of a nutty vibe, this hits all the right notes.
Another win is how ridiculously simple this recipe is. It requires just a handful of ingredients you probably already have around (or can grab at your local store without breaking the bank). I love how budget-friendly it is—honestly, homemade fudge often feels like a luxury, but rocky road fudge proves you don’t have to spend a fortune to impress. Plus, it’s super versatile; you can swap the nuts for your favorites, add a pinch of sea salt, or even sneak in some dried fruit if you want a personal twist. This isn’t your average chocolate fudge—it’s a little adventure in every square, and I’ve shared it with friends who were instantly hooked.
How do you make Rocky Road Fudge?
Quick Overview
This rocky road fudge is delightfully straightforward to make: you melt your chocolate base, stir in your mix-ins, and pour it all into a pan to set. The secret is in gently melting the chocolate so it stays silky, then folding in the marshmallows and nuts without squishing them — you want those textures standing proud. The whole process takes less than 30 minutes, and then all you need is some patience while it chills. It’s the perfect weekend treat that feels fancy but almost makes itself.
Ingredients
For the Main Batter:
- 2 cups semi-sweet chocolate chips (I always use good quality, it really makes a difference here)
- 1 can (14 oz) sweetened condensed milk – this gives the fudge its creamy, rich base without that stovetop hassle
- 2 tbsp unsalted butter – for silky smoothness
- 1 tsp vanilla extract – a little warmth and depth
For the Filling:
- 1 cup miniature marshmallows – don’t substitute with large ones unless you cut them up
- 1 cup chopped nuts – I like walnuts, but pecans or almonds are great too. Toast them lightly first for extra flavor
For the Glaze (optional but recommended):
- ½ cup dark chocolate chips – for a nice finish
- 1 tbsp coconut oil or butter – helps the glaze set shiny and smooth
Step-by-Step Instructions
Step 1: Preheat & Prep Pan
Line an 8×8-inch square pan with parchment paper or foil, leaving an overhang on the sides to make lifting the fudge out a breeze when it’s ready. I always lightly grease the lining with butter so the fudge doesn’t stick unexpectedly. No oven needed—this is an easy stovetop (or microwave) recipe.
Step 2: Mix Dry Ingredients
Since this fudge is largely chocolate and condensed milk, there aren’t many dry ingredients, but make sure your nuts are chopped evenly and marshmallows are tiny so they incorporate nicely. Toasting nuts ahead helps release their oils, boosting flavor and crunch.
Step 3: Mix Wet Ingredients
In a medium saucepan, combine the chocolate chips, condensed milk, and butter over low heat. Stir constantly to melt everything evenly, keeping the heat low to avoid scorching. When things start coming together, add the vanilla extract for a cozy aromatic touch. It melts into a gloriously shiny, thick chocolate base that feels like liquid velvet.
Step 4: Combine
Remove the pan from heat and fold in your toasted nuts and mini marshmallows gently but thoroughly—trust me, take your time here to keep those marshmallows fluffy and the nuts crunchy. If you mix too vigorously, the marshmallows may melt or deflate, and we want those happy little puffs giving texture.
Step 5: Prepare Filling
Your filling is essentially those marshmallows and nuts, ready to provide tapestry-like texture amidst the smooth chocolate blanket. Feel free to swap in your favorite mix-ins—like dried cherries, shredded coconut, or even crushed candy pieces—to make it more “yours.”
Step 6: Layer & Swirl
Pour half your fudge mixture into the prepared pan, then sprinkle a few more marshmallows and nuts on top. Pour the remaining fudge gently over and use a butter knife or skewer to create soft swirling patterns in the top layer—this little swirl step isn’t mandatory, but it gives the fudge that classic rocky road look.
Step 7: Chill
Place the pan in the refrigerator for at least 3 hours to set firmly. This patience is key—rushing it will make cutting tricky. The wait is worth it; you’ll know it’s ready when the edges are firm and the fudge feels solid but still soft to the touch.
Step 8: Cool & Glaze
Once chilled, prepare your chocolate glaze by melting dark chocolate chips with coconut oil until smooth. Pour this over the set fudge and tilt the pan slightly to ensure an even coat. Pop it back into the fridge for another 30 minutes to let everything firm up perfectly.
Step 9: Slice & Serve
Lift the fudge out using the parchment overhang, place on a cutting board, and slice into small squares with a sharp knife warmed under hot water for clean edges. Serve slightly chilled or at room temperature—both ways are delightful. The marshmallows give a soft chew, the nuts add crunch, and the chocolate glaze finishes it all off like a dream.
What to Serve It With
For Breakfast: If you’re feeling a little indulgent, a small square of rocky road fudge paired with a robust black coffee or creamy latte is surprisingly delightful—like breakfast meets dessert in the best way.
For Brunch: Set out a plate of these fudge squares alongside fresh berries and light whipped cream, with sparkling rosé or fresh orange juice. It adds a sweet, nostalgic boost to a relaxed late-morning gathering.
As Dessert: Serve rocky road fudge after dinner with a dollop of vanilla bean ice cream or a drizzle of salted caramel sauce. It contrasts beautifully with warm flavors and creamy textures.
For Cozy Snacks: Nothing beats biting into a piece during a chilly afternoon while curled up with a good book and a cup of hot chocolate. It’s small comfort at its finest. My family and I have made it our official “home movie night treat” because it disappears in minutes—true story!
Top Tips for Perfecting Your Rocky Road Fudge
Chocolate Quality: Always go for the best chocolate chips or bars you can find—this seriously impacts the final taste. I once skimped and regretted the grainy result.
Gentle Melting: Keep your heat low and stir slowly to avoid seizing your chocolate. A double boiler or microwave in short bursts works wonders if you’re nervous about burning.
Marshmallow Care: Fold marshmallows in last, and gently! Don’t try to mix vigorously because you want their clouds of softness to stay intact—not turn into candy dust.
Nut Variations: Toasting your nuts first unlocks so much flavor. But if nut allergies are a concern, try sunflower seeds or pumpkin seeds instead—they bring nice crunch without overpowering.
Swirl Art: To nail that classic rocky road aesthetic, pour your fudge in layers, sprinkle fillings, then use a skewer or the tip of a butter knife to gently swirl. Don’t overdo it, or it’ll blend into a brown mush.
Chilling Time: Let your fudge chill long enough for clean cuts. I’ve learned from experience that trying to slice too early leads to crumbling or uneven squares. Overnight chilling is even better if you have the time.
Glaze Magic: Adding a shiny chocolate glaze is optional but so worth it. It gives a beautiful finish and extra richness. Want a twist? Mix orange zest or chili powder into your glaze for a grown-up riff.
Storing and Reheating Tips
Room Temperature: Rocky road fudge stays fresh at room temp for 3-4 days if stored in an airtight container, away from heat or sun. I always keep mine in a cool pantry spot to maintain that perfect texture.
Refrigerator Storage: In the fridge, fudge lasts up to 2 weeks wrapped well in parchment or foil inside an airtight container. It keeps it firm and extends shelf life, especially in warmer homes.
Freezer Instructions: For longer storage, wrap fudge tightly in plastic wrap, then foil, and store in a freezer-safe container or zipped bag. It freezes beautifully for up to 3 months. To thaw, leave it covered in the fridge overnight—they’ll be just as delicious after thawing!
Glaze Timing Advice: If planning to freeze fudge, wait to add the glaze after thawing for the nicest shine and texture. Otherwise, add the glaze before chilling if eating fresh.
Frequently Asked Questions
Final Thoughts
This rocky road fudge is genuinely one of those recipes I keep coming back to whenever I want a delicious, no-fuss treat that feels a bit special. It’s the cozy kind of indulgence that’s fun to make and impossible to resist—and sharing it with friends and family always sparks happy memories and big smiles. If you’re a sucker for chocolatey, nutty, marshmallow-filled goodies, give this a whirl—you won’t regret it. And hey, if you have your own spin on rocky road fudge, I’d love to hear about it! Leave a comment, rate the recipe, and share your favorite mix-ins. Happy fudging!
Rocky Road Fudge
Ingredients
Main Ingredients
- 3 cups semi-sweet chocolate chips
- 14 oz sweetened condensed milk
- 4 tablespoons butter (cubed)
- 1 teaspoon vanilla extract
- 3 cups mini marshmallows plus a few extra for topping
- 1 cup salted peanuts plus a few extra for topping
Instructions
Preparation Steps
- Line a 9x13 inch dish with foil and spray with nonstick cooking spray.
- In a medium saucepan, combine chocolate chips, sweetened condensed milk, and cubed butter. Melt over medium heat, stirring constantly until smooth.
- Remove from heat and stir in salted peanuts and vanilla extract.
- Place mini marshmallows in a large bowl.
- Pour the chocolate mixture over the marshmallows and mix well. For less melted marshmallows, let the chocolate cool slightly before pouring.
- Spread mixture evenly into the prepared pan.
- Sprinkle extra peanuts and marshmallows on top.
- Refrigerate until firm, about 2 to 3 hours or overnight.