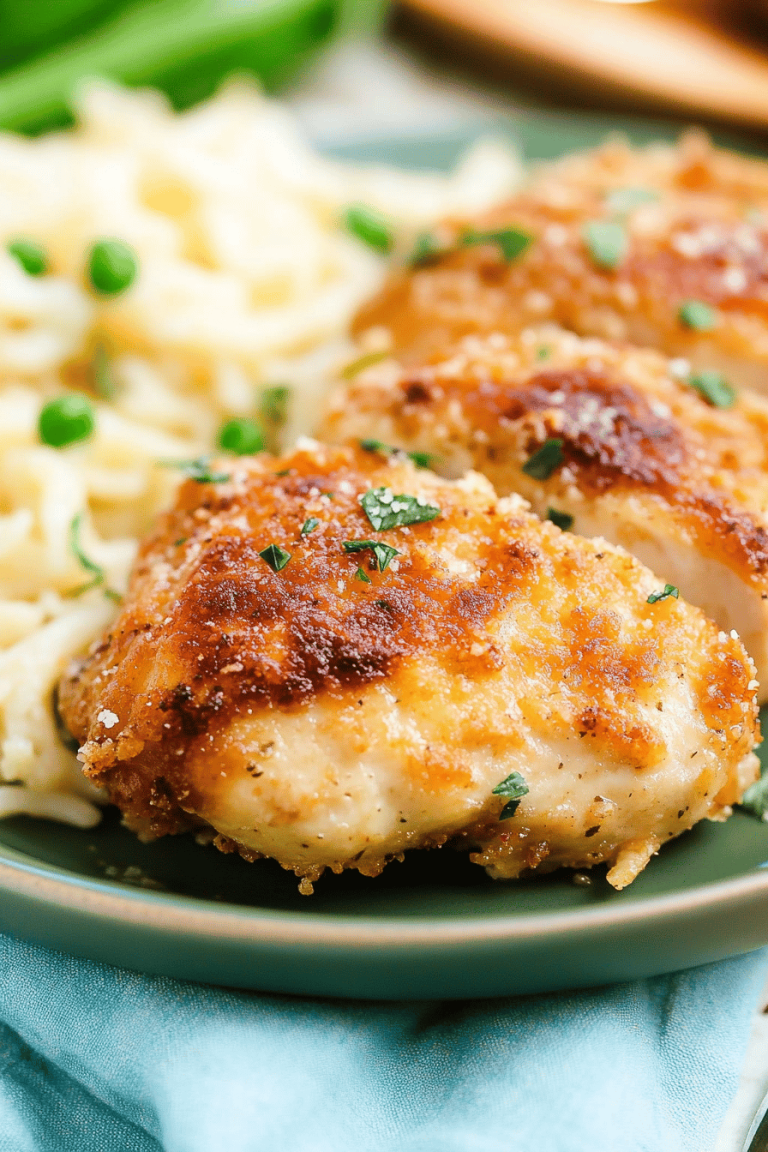
Oh, friends, let me tell you about these.What are some good baked pork chops?. If you’ve ever sworn off pork chops because yours always turn out dry, tough, or tasting like cardboard, stop right there. Seriously, put down the frying pan—we’re going in the oven, and we’re changing everything you thought you knew. I have a deep, dark secret: I used to dread making pork chops. They were always a weeknight gamble. Then, about five years ago, after a particularly tragic attempt where they came out resembling shoe leather, I stumbled upon this method. It involves a quick brine (don’t skip it, I promise it’s worth three minutes of your life!) and a slow, gentle bake. The result? They come out so unbelievably juicy, they practically melt on your tongue. This recipe is the one I turn to when I want something that feels fancy but takes almost zero active cooking time. My kids, who are usually suspicious of anything vaguely healthy, devour these, which, let’s be honest, is the ultimate seal of approval in my house. Forget dry, flavorless dinners; these perfectly What are some good baked pork chops?Are you about to become your new weeknight superhero?
What Is This Baked Pork Chop Magic?
So, what makes this recipe different from the million others out there promising the world? Think of it as the perfect middle ground between an over-night marinade and a last-minute dry rub. It’s essentially a quick, flavorful bath followed by a super-low-and-slow bake. It’s a technique that ensures every single fiber of that meat stays hydrated and happy while it cooks. We’re using bone-in chops because, honestly, the bone adds so much more flavor and helps insulate the meat, keeping it tender. It’s essentially an oven-roasted situation, but we treat it with the respect a good piece of meat deserves—which means seasoning it aggressively *before* it goes in. I call it my “Set It and Forget It Juicy Pork Chop” method. It’s not fried, which means less cleanup (a massive win for me), and it avoids that awkward stage where you’re trying to flip delicate chops in hot oil while simultaneously answering a child’s urgent question about why the dog is sleeping funny. It’s simple, it’s soulful, and it results in restaurant-quality tenderness.
Why You’ll Love This Recipe
Why should you ditch your current routine and give these baked pork chops a try? Let me count the ways. First and foremost: the *flavor*. We’re not just using salt and pepper here. We build layers. That initial quick soak in salted water isn’t just for moisture; it seasons the meat deep inside, not just on the surface. Then we hit it with a homemade rub—my favorite blend has smoked paprika and a tiny bit of brown sugar that caramelizes beautifully in the oven, giving you that gorgeous, savory-sweet crust. It’s incredible.
Second, the simplicity is unmatched. I’ve made this countless times after rolling home late from errands, feeling exhausted, and needing a substantial dinner on the table fast. The active prep time? Maybe 10 minutes, tops. While those chops are cozying up in the oven, you’re free to make your sides, help with homework, or just pour yourself a well-deserved glass of wine. This frees up your stovetop, which is a massive bonus if you’re serving multiple dishes.
Third, cost-efficiency. Pork chops are generally a much friendlier protein budget-wise than steak or chicken breasts, and this method maximizes every cent you spend by ensuring zero waste due to overcooking. You get a thick, satisfying centerpiece that truly tastes like you spent hours tending to it. What I love most about this is the versatility. If you’re feeling fancy, throw some fresh thyme in the pan during the last 15 minutes. If you’re making this for picky eaters, skip the cayenne pepper in the rub. It adapts beautifully. Seriously, I tested this with bone-in shoulder chops instead of the traditional loin chops once because that’s what was on sale, and they were somehow even juicier because they had more connective tissue to break down. This recipe is robust, forgiving, and the ultimate crowd-pleaser. It’s what I serve when people say they don’t like pork.
How to Make These Incredible Baked Pork Chops
Quick Overview
This whole process is really three easy parts: the quick brine (about 15 minutes of soaking, but you can do it longer if you remember), the flavorful dry rub application, and then the gentle bake. We’re going to start hot to get a nice sear on the outside texture, and then immediately drop the temperature down low to ensure the inside cooks evenly without losing all that precious moisture we locked in with the brine. The secret weapon here is using a reliable meat thermometer—doneness in pork is non-negotiable if you want tenderness. Don’t panic about the time; trust the temperature. It’s a lifesaver on busy nights when you want dinner ready around the same time as the kids.
Ingredients
For the Quick Brine:
4 bone-in, thick-cut (at least 1 inch thick) pork chops
4 cups warm water
2 tablespoons kosher salt (I like Diamond Crystal, use slightly less if using Morton’s)
1 tablespoon granulated sugar
For the Flavor Rub:
1 tablespoon smoked paprika (this is crucial for that deep color)
1 teaspoon garlic powder
1 teaspoon onion powder
1 teaspoon dried thyme
1 teaspoon black pepper, freshly ground
1/2 teaspoon brown sugar (packed)
1/4 teaspoon cayenne pepper (optional, but it adds a lovely background warmth)
For Baking:
2 tablespoons olive oil or avocado oil
2 sprigs fresh rosemary or 3 cloves smashed garlic (for aromatics in the pan)
Step-by-Step Instructions
Step 1: Preheat & Prep Pan
First things first, get your oven cranking to 400°F (200°C). While it’s heating up, grab a sturdy, oven-safe skillet—cast iron is my favorite here because it holds heat so well. If you don’t have one, a regular baking dish lined with foil will work, but you’ll miss out on that initial beautiful sear.
Step 2: Mix Dry Ingredients
In a small bowl, whisk together the smoked paprika, garlic powder, onion powder, thyme, black pepper, brown sugar, and cayenne (if using). You want this spice mix to be thoroughly combined so you don’t get a clump of paprika in one bite. Don’t skip the fresh grind on the pepper; it makes a huge difference in aroma.
Step 3: Mix Wet Ingredients (The Quick Brine)
In a medium bowl or even a large Ziploc bag, combine the warm water, kosher salt, and sugar. Stir until the salt and sugar are completely dissolved. It needs to be warm water so the salt dissolves quickly, but not hot enough to actually cook the pork. This takes about two minutes to dissolve fully.
Step 4: Combine (The Brining Process)
Gently place your pork chops into the brine solution, making sure they are fully submerged. Let them sit on the counter for 15 to 20 minutes. If you realize you need to let them sit longer (say, 45 minutes while running errands), that’s totally fine; just pop them in the fridge. When the time is up, pull them out, rinse them *very briefly* under cool water (you don’t want to wash all the seasoning off), and then pat them aggressively dry with paper towels. This drying step is key for getting a nice crust later!
Step 5: Prepare Filling (The Rub)
Take your dry spice mix from Step 2 and coat every surface of those patted-dry pork chops. Use your hands and press the seasoning in firmly. This is where the flavor really locks in. You want a thick, slightly reddish-brown coating all over. If you have time, let these seasoned chops rest on a wire rack for 10 minutes while the oven finishes heating—it allows the salt to work a little magic.
Step 6: Layer & Swirl (The Sear)
Heat the olive oil in your preheated cast-iron skillet over medium-high heat until it shimmers. Carefully lay the chops in the hot oil. Don’t overcrowd the pan; sear them in batches if needed. Sear for 2 to 3 minutes per side until a deep, gorgeous golden-brown crust forms. You aren’t cooking them through here, just building that beautiful exterior texture! Once seared, toss the rosemary sprigs and smashed garlic into the pan drippings around the chops. Immediately transfer the entire skillet to the 400°F oven.
Step 7: Bake
Bake for 15 to 25 minutes. Now, listen closely: the time is a suggestion. You MUST use a meat thermometer inserted into the thickest part of the chop, avoiding the bone. You are looking for an internal temperature of 140°F (60°C). I pull mine out right at 140°F because residual heat will carry them up to the safe 145°F (63°C) during resting. If you bake them past 150°F, you risk drying them out, and we’ve worked too hard for that!
Step 8: Cool & Glaze (Resting is Non-Negotiable)
Once they hit temperature, pull the skillet out of the oven. Transfer the chops to a clean cutting board and tent them loosely with foil. They need to rest for a solid 5 to 10 minutes. This resting period allows the juices, which have been forced toward the center during cooking, to redistribute throughout the meat. Do not skip this, or all that glorious moisture will run out onto your plate instead of staying in the pork. You can drizzle a tiny bit of maple syrup over them right before serving if you like an extra sweet sheen, but I usually skip the glaze entirely when making the main dish version.
Step 9: Slice & Serve
Serve these beauties whole! They are meant to be impressive centerpieces. If you must slice them (usually for very young children), cut them against the grain. The aroma when you cut into these is unbelievable—that smoky paprika mixed with the thyme and the rich pork scent just fills the kitchen. They are perfect served right out of the pan, garlic and rosemary still looking rustic on the side.
What to Serve It With
The beauty of these perfectly baked pork chops is that they are hearty enough to stand up to rich sides, yet clean enough to pair with something light. They’re my go-to for Sunday dinner when I want comfort without the fuss.
For Breakfast: Okay, hear me out—leftover pork chops are incredible thinly sliced and served alongside scrambled eggs and maybe some leftover roasted sweet potatoes. The spices complement the eggs perfectly. Pair it with a strong, dark roast coffee to cut through the richness.
For Brunch: This is where they shine if you want something substantial. I serve them with creamy, slightly tangy grits or a light, herby potato hash. For a green element, quickly sautéed mustard greens with a little splash of apple cider vinegar are fantastic because the acidity balances the pork. For beverages, a simple sparkling cider or even a dry rosé works beautifully.
As Dessert: Not typically a dessert item, obviously, but if you happen to be serving this for a very late dinner party, pair it with something warm and slightly tart. My favorite accompaniment is a rich, buttery spoonful of slow-cooked apples with cinnamon. It brings out the subtle sweetness of the brown sugar in the rub. This is perfect when you’re craving something savory but still need that comforting, cooked-fruit note.
For Cozy Snacks: If you end up with leftovers (which is rare in my house), I shred the meat a day later and toss it with a little BBQ sauce and serve it on soft brioche rolls with a side of crunchy coleslaw. It feels like a completely different, equally delicious meal. My family tradition, though, is serving these with creamy mashed potatoes—the kind where you melt a little cream cheese into the butter—so the potatoes soak up all those lovely pan juices. It’s pure, unadulterated comfort food.
Top Tips for Perfecting Your Baked Pork Chops
I’ve learned a few things the hard way over the years, so let me pass on the wisdom that will save you time and guarantee success.
Zucchini Prep: Whoops, wrong recipe! Let’s talk pork chops. First up: Bone-In is Best. If you can only find boneless chops, they will cook significantly faster, so you must reduce your baking time dramatically. I find they are much trickier to keep moist. Always opt for chops at least 1 inch thick; thin chops cook too fast for the brine to really penetrate properly, and they dry out before you can even get the crust you want.
Mixing Advice: When you apply the rub, don’t be timid! You want a visible coating. It might look like too much seasoning when you apply it, but remember, a lot of that seasoning is only on the surface, and the quick rinse after brining washes away some surface salt. Press it into the meat; don’t just sprinkle it on top.
Swirl Customization: We aren’t swirling here, but we are building layers! If you want a deeper, richer flavor profile without adding heat, try substituting half the smoked paprika with sweet Hungarian paprika and adding a half teaspoon of ground sage to the rub. Sage and pork are soulmates.
Baking Tips: The thermometer is your best friend. I learned this the hard way after trusting the clock: Oven temperatures fluctuate wildly. My oven runs hot, so sometimes I have to pull them closer to 135°F and let them coast up to 145°F during the rest. Always check two spots on the thickest chop. Don’t open the oven door repeatedly during the first 10 minutes of the bake, as that heat loss adds serious time to the cooking process.
Glaze Variations: Since I prefer a savory chop, I usually skip a heavy glaze, but if you want that restaurant-style sheen, mix 2 tablespoons of Dijon mustard with 1 tablespoon of maple syrup. Brush this lightly over the chops right when they hit 135°F in the oven. It will set up beautifully in the last five minutes without burning. Another trick I love is adding a tablespoon of softened butter mixed with fresh chopped parsley and garlic right over the top of the chops when they come out of the oven. Let it melt over them while they rest—it adds richness without adding a ton of sugar.
Resting is Non-Negotiable: I know it’s hard to wait, but 10 minutes of resting turns a good chop into a legendary chop. I sometimes cheat and put the resting board on a warm plate, but never tent them too tightly, or the crust will get soggy.
Storing and Reheating Tips
Handling leftovers properly means you get a delicious second meal, not a sad, dry piece of meat the next day. These chops fare surprisingly well because of the brine, but proper storage is key to maintaining that initial tenderness.
Room Temperature: Honestly, I try not to leave cooked meat out for more than two hours total. If you’re serving them buffet-style, keep them in a low-oven setting (around 180°F) if you absolutely must hold them, but it’s best to eat them fresh off the rest.
Refrigerator Storage: This is the sweet spot. Once completely cooled, wrap the chops tightly—I mean *tightly*—in plastic wrap, and then place them in an airtight container or a heavy-duty zip-top bag. They hold their texture beautifully for up to three days. If you plan on using them later in the week, I recommend waiting to glaze them until after you reheat them, as the glaze can sometimes get sticky or weep moisture in the fridge.
Freezer Instructions: If you made a double batch (which I highly recommend!), these freeze wonderfully. Wrap each chop individually in plastic wrap first, then wrap that bundle tightly in aluminum foil, and finally, place it all in a freezer bag, squeezing out as much air as possible. They keep quality for up to three months. Freezing them unglazed is definitely the way to go.
Reheating Tips: The secret to reheating is low and slow moisture. Never microwave pork chops unless you enjoy rubber bands. For best results, place the chilled chop in a small, oven-safe dish with just a splash (about 2 tablespoons) of chicken broth or apple juice. Cover the dish tightly with foil and bake in a 300°F oven for about 15 minutes, or until heated through. This steams the chop gently and rehydrates it. If you need to use the stovetop, a quick sear in a non-stick pan with a teaspoon of butter is also effective, keeping the heat low.
Frequently Asked Questions
Final Thoughts
Honestly, if you take one thing away from this, let it be this: dry pork chops are a choice, not an inevitability. With a quick 15-minute brine and the focus on hitting that magical 140°F internal temperature before resting, you are guaranteed success. These baked pork chops are the definition of low-effort, high-reward cooking. They look impressive, they smell incredible while baking (that paprika gets everywhere in the best way), and most importantly, they taste like you slaved over them all day. I keep this recipe pinned on my fridge because it’s the dependable dish I turn to when I need a fast, satisfying dinner that makes everyone at the table happy.
If you love deeply seasoned, tender meat cooked in the oven, you might also want to check out my recipe for Herb-Roasted Chicken Quarters—it uses a similar low-temp technique that locks in moisture. But for now, please give these chops a whirl. I truly can’t wait to hear how yours turn out! Snap a picture and tag me, or better yet, just drop a comment below and tell me what sides you paired them with. Happy baking, everyone!
baked pork chops
Ingredients
Main Ingredients
- 1 tablespoon garlic powder
- 1 tablespoon onion powder
- 1 tablespoon light brown sugar
- 1 teaspoon salt or to taste
- 0.5 teaspoon freshly ground black pepper or to taste
- 4 pork chops pork chops 3/4 to 1 inch thick, bone-in or boneless
- 1 tablespoon olive oil or as needed
- fresh herbs for garnish optional parsley, rosemary, thyme, oregano
Instructions
Preparation Steps
- Preheat oven to 400°F and spray a large baking dish with cooking spray; set aside.
- In a small bowl, mix garlic powder, onion powder, brown sugar, salt, and black pepper to create the dry rub.
- Pat pork chops dry with paper towels and place them in the baking dish.
- Drizzle olive oil evenly over the pork chops and rub it in lightly with your fingertips.
- Sprinkle the dry rub evenly on both sides of the pork chops, rubbing it in to coat well.
- Bake pork chops for 15-20 minutes or until an instant-read thermometer inserted into the thickest part reads 145°F. Let rest 5-10 minutes before serving.