There are some recipes that just feel like coming home, aren’t there? This cinnamon raisin bread recipe is absolutely one of those for me. It’s the kind of smell that fills your entire house, chasing away any lingering stress from the day and instantly making everything feel a little bit warmer, a little bit brighter. I can still remember my grandma pulling a loaf like this out of her oven when I was a kid – the sweet, spicy aroma mingling with the rich scent of yeast was pure magic. It’s not overly complicated, but the result? Oh, it’s pure bliss. Forget those dense, dry store-bought versions; this is the real deal. It’s soft, tender, bursting with plump raisins and that irresistible ribbon of cinnamon sugar. Honestly, it’s pretty much the perfect counterpoint to my sometimes-too-fluffy Angel Food Cake recipe. If you’re looking for a reliable, soul-warming bake that will have everyone begging for the secret, you’ve found it right here.
What Is Cinnamon Raisin Bread?
So, what exactly is this delightful creation? At its heart, cinnamon raisin bread is a sweet, yeast-leavened bread that’s infused with warm spices and studded with juicy raisins. Think of it as a comforting hug in bread form, with the sweet chewiness of raisins and the fragrant kick of cinnamon woven throughout every slice. It’s essentially a classic white bread dough that gets a delicious upgrade. We’re not talking about a quick bread here; this is a proper, risen, yeasty loaf that has that wonderful chewy texture and a slightly sweet crumb. The “raisin” part is pretty self-explanatory – plump, sweet raisins that rehydrate as the bread bakes, creating little pockets of fruity goodness. And the “cinnamon”? Well, that’s the magic dust that elevates it from simple bread to something truly special. It’s one of those baked goods that feels both humble and incredibly luxurious, perfect for any time of day.
Why you’ll
Let me tell you, there are so many reasons why this cinnamon raisin bread recipe has become a staple in my kitchen, and I just know you’re going to fall in love with it too. First off, the flavor is just out of this world. That perfect balance of sweet, warm cinnamon and plump, juicy raisins against the soft, tender bread is something you just can’t get from a loaf off the grocery store shelf. Every bite is a little celebration! And then there’s the simplicity. Now, I know baking with yeast can sometimes sound intimidating, but trust me, this recipe is surprisingly straightforward. I’ve simplified the steps so that even if you’re relatively new to bread making, you’ll find success. It’s genuinely achievable and so rewarding to pull this beauty out of your oven. Plus, it’s incredibly cost-effective. The ingredients are pantry staples, making it a budget-friendly way to treat yourself and your family to something truly special without breaking the bank. And the versatility! Oh my goodness, you can enjoy this bread in so many ways. It’s fantastic toasted with a smear of butter for breakfast, perfect as the base for a decadent French Toast on the weekend, and honestly, just straight from the loaf with a cup of tea is pure comfort. What I love most about this recipe is that it feels like a project, but it’s a *manageable* project that yields incredibly delicious results. It’s far more satisfying than just whipping up a batch of cookies, and the effort is truly rewarded. It’s the kind of bread that makes you feel like a baking rockstar!
How to Make Cinnamon Raisin Bread
Quick Overview
This recipe makes a wonderfully soft and flavorful cinnamon raisin bread. The process involves activating yeast, mixing a simple dough, letting it rise, incorporating a delicious cinnamon-sugar filling, a second rise, and then baking it to golden perfection. The key to its incredible texture lies in a gentle mixing technique and allowing ample rising time. Don’t be tempted to rush the process; patience is truly rewarded with this bread! It’s designed to be accessible, so don’t be shy, give it a whirl!
Ingredients
For the Main Batter:
You’ll need warm water – around 105-115°F (40-46°C). This is crucial for waking up the yeast without killing it. If it’s too hot, your yeast won’t activate, and if it’s too cool, it won’t get going. I always test it with my finger, it should feel comfortably warm, like a baby’s bath. Next up is granulated sugar; this feeds the yeast and adds a touch of sweetness to the dough itself. For the yeast, I prefer active dry yeast. You’ll need about 2 and 1/4 teaspoons, which is usually one standard packet. Make sure it’s not expired! Always check that date. Then, we’ve got the flour. All-purpose flour is perfectly fine here, but if you have bread flour, it can give you a slightly chewier texture. I usually use about 3 and 1/4 cups, plus a little extra for dusting your work surface. Salt is non-negotiable; it balances the sweetness and strengthens the gluten structure. And for that tender crumb, we’re adding a good amount of softened unsalted butter. Using butter instead of oil really adds a lovely richness. You’ll also need one large egg, at room temperature. An egg helps with the bread’s structure and adds a beautiful golden color.
For the Filling:
This is where the magic happens! You’ll need Brown Sugar – light or dark works, but dark brown sugar gives a deeper caramel flavor, which I adore. You’ll need a good amount of ground cinnamon, be generous! And, of course, the raisins. I like to use golden raisins for a slightly different, brighter sweetness, but classic dark raisins are fantastic too. Make sure they’re plump and soft; if they feel a bit dry, you can soak them in warm water for about 10 minutes, then drain them really well. Excess moisture can make your bread soggy. A little bit of melted butter is also key here to help the cinnamon sugar mixture stick and create those beautiful swirls.
For the Glaze:
This is completely optional but highly recommended! It adds a final touch of sweetness and shine. You’ll need powdered sugar (also known as confectioners’ sugar). Milk or cream is used to thin it out. I usually start with a tablespoon or two of milk and add more until I reach a drizzly consistency. For a little extra flavor boost, a tiny splash of vanilla extract is wonderful. Some people like to add a pinch of cinnamon to the glaze too, which I find lovely.
Step-by-Step Instructions
Step 1: Preheat & Prep Pan
First things first, let’s get our oven ready. Preheat it to 375°F (190°C). While the oven is warming up, you need to prepare your loaf pan. I use a standard 9×5 inch loaf pan. Grease it really well with butter or cooking spray. You can even lightly flour it after greasing to ensure the bread doesn’t stick. Some people like to line their pan with parchment paper, leaving an overhang on the sides, which makes lifting the bread out super easy. I usually just stick to greasing and flouring and it works like a charm.
Step 2: Mix Dry Ingredients
In a large mixing bowl, whisk together your flour, salt, and granulated sugar. I like to use a whisk because it aerates the flour a bit, which can help with a lighter crumb. Make sure the salt and sugar are evenly distributed. If you’re using active dry yeast, you’ll typically proof it separately in warm water with a pinch of sugar, but if you’re using instant yeast, you can often add it directly to the dry ingredients. For this recipe, we’re going to proof the yeast first, which is an extra step that gives me peace of mind knowing the yeast is active and ready to go. I’ll cover that in the next step!
Step 3: Mix Wet Ingredients
In a separate small bowl or a liquid measuring cup, combine the warm water (remember, 105-115°F/40-46°C) and the active dry yeast. Sprinkle about a teaspoon of the granulated sugar from your main sugar measurement over the top. Give it a gentle stir and then let it sit for about 5-10 minutes. You should see it get foamy and bubbly on the surface – that’s the yeast waking up and doing its thing! If it doesn’t get foamy, your yeast might be old, or the water was too hot or too cold, and you’ll need to start over with new yeast. Once it’s foamy, whisk in the softened butter and the room-temperature egg until well combined.
Step 4: Combine
Now, it’s time to bring everything together. Pour the wet ingredients (the foamy yeast mixture, butter, and egg) into the bowl with your dry ingredients. Using a wooden spoon or a stand mixer fitted with a dough hook, start mixing. Mix until a shaggy dough begins to form. Then, turn the dough out onto a lightly floured surface and knead it for about 6-8 minutes. If you’re using a stand mixer, knead for about 5-6 minutes. You’re looking for a smooth, elastic dough that springs back when you gently poke it. It shouldn’t be too sticky, but it should still be soft. If it’s too sticky, add a tablespoon of flour at a time. If it feels too dry, add a teaspoon of water at a time. Don’t overwork it at this stage; we want a tender crumb.
Step 5: Prepare Filling
While your dough is resting (or before you start kneading, if you prefer), let’s make that glorious filling. In a small bowl, combine the brown sugar, cinnamon, and your plumped and drained raisins. Mix them all together really well. This mixture will become the delicious ribbons that run through your bread. Make sure the raisins are coated evenly with the cinnamon sugar. It smells amazing even at this stage, doesn’t it?
Step 6: Layer & Swirl
Once your dough is kneaded and smooth, place it in a lightly greased bowl, turning to coat. Cover the bowl with plastic wrap or a clean kitchen towel and let it rise in a warm place for about 1 to 1.5 hours, or until it has doubled in size. Once it’s doubled, punch it down gently to release the air. Turn the dough out onto a lightly floured surface and roll it into a large rectangle, about 10×12 inches. Now, brush the surface of the dough evenly with the melted butter, leaving a small border along one of the long edges. Sprinkle the cinnamon-raisin sugar mixture evenly over the buttered surface. Starting from the long edge opposite the one you left bare, tightly roll up the dough like a jelly roll. Pinch the seam to seal it. Carefully place the rolled dough, seam-side down, into your prepared loaf pan. Cover loosely with plastic wrap or a towel and let it rise again in a warm place for another 45 minutes to 1 hour, or until it has risen about an inch over the rim of the pan. This second rise is important for that lovely height and texture.
Step 7: Bake
Now for the best part! Once the dough has finished its second rise, bake it in your preheated oven at 375°F (190°C) for about 30-35 minutes. You’ll know it’s done when the crust is a deep golden brown and it sounds hollow when you tap the bottom of the loaf. If the top is browning too quickly, you can loosely tent it with aluminum foil during the last 10-15 minutes of baking. Resist the urge to open the oven door too often; it can cause the temperature to drop and affect the bake. The smell that will waft from your oven is just incredible!
Step 8: Cool & Glaze
Once baked, carefully remove the loaf from the oven. Let it cool in the pan for about 10 minutes. This allows it to firm up slightly. Then, gently turn it out onto a wire rack to cool completely. If you put the glaze on while the bread is hot, it will melt right off. Wait until it’s mostly cooled, but still a little warm. While the bread is cooling, whisk together your powdered sugar, milk (add it a tablespoon at a time until you get the right consistency), and vanilla extract for the glaze. Once the bread has cooled for at least 30 minutes, you can drizzle or spread the glaze over the top. It’ll set up nicely as it continues to cool.
Step 9: Slice & Serve
The hardest part is waiting for it to cool enough to slice without squishing it! I usually try to wait until it’s only slightly warm, or completely cooled if I can manage it. Use a good serrated knife for clean slices. The warmth from the bread will slightly melt the glaze, making it extra delicious. Serve it as is, or with a dollop of butter. The soft, warm bread with the gooey cinnamon and plump raisins is just divine.
What to Serve It With
This cinnamon raisin bread is so versatile, it can truly be enjoyed at any meal or snack time. For breakfast, it’s an absolute dream toasted and served warm with a generous smear of butter. The sweetness of the bread is just enough to pair perfectly with a steaming mug of coffee or a glass of cold milk. For a more indulgent brunch spread, imagine thick slices transformed into French Toast! Soak them in a custard mixture and pan-fry until golden brown, then serve with fresh berries and a drizzle of maple syrup. It makes for a truly elegant centerpiece. As a dessert, it’s surprisingly satisfying. A warm slice served with a scoop of vanilla bean ice cream or a dollop of lightly sweetened whipped cream is pure heaven. The warm spices of the bread complement the cool creaminess of the ice cream beautifully. And for those times when you just need a little something to tide you over, it’s perfect for cozy snacks. It’s fantastic on its own, of course, but I also love it with a cup of hot tea or even a warm mug of apple cider. My family has a tradition of having this bread on lazy Sunday mornings, with everyone picking off their favorite bits of raisin as they toast their slices. It’s those simple moments that make it so special.
Top Tips for Perfecting Your Cinnamon Raisin Bread
I’ve made this cinnamon raisin bread more times than I can count, and over the years, I’ve picked up a few tricks that really help ensure a perfect loaf every single time. When it comes to the Zucchini Prep – oh wait, wrong recipe! Haha, just kidding! For this bread, I should focus on the raisins. Make sure your raisins are plump and not dried out. If they feel a bit hard, soaking them in warm water for about 10 minutes and then draining them thoroughly is a game-changer. Excess moisture is the enemy of good bread, so blot them dry really well. For Mixing Advice, the biggest thing is not to overwork the dough. Once the gluten is developed, continued kneading can make the bread tough. Mix until it’s smooth and elastic, and then let the yeast do its magic. Overmixing can lead to a dense, chewy bread rather than a light, tender one. When it comes to Swirl Customization, don’t be afraid to play with the filling! You can add a pinch of nutmeg or cardamom to the cinnamon sugar for an extra layer of flavor. For the best visual effect, make sure you spread the filling evenly and roll the dough up tightly. For Ingredient Swaps, I’ve experimented a bit. You can substitute some of the all-purpose flour with whole wheat flour for a slightly heartier bread, but start with about a quarter of the total flour. For the butter in the filling, if you’re in a pinch, you can use a neutral oil, but butter really gives it that classic flavor. For Baking Tips, always preheat your oven thoroughly. Oven temperature is key for yeast breads. Make sure you test for doneness; a thermometer is the most accurate way, aiming for an internal temperature of around 190-200°F (88-93°C). If your oven tends to run hot, you might need to reduce the temperature slightly in the last 10 minutes or use that foil tent. Lastly, for Glaze Variations, if you prefer a less sweet glaze, use less powdered sugar or more milk. You can also skip the glaze entirely and just dust the top with a little powdered sugar once it’s cooled. Another option is a simple egg wash before baking for a shiny, golden crust. I learned the hard way that putting the glaze on too early can make it soak into the bread too much, so waiting until it’s mostly cooled is best!
Storing and Reheating Tips
Keeping your delicious homemade cinnamon raisin bread fresh is surprisingly easy, and I’ve got a few methods that work best. For storing at Room Temperature, I always recommend keeping the loaf in an airtight container or a bread box. This will keep it fresh for about 2-3 days. If your kitchen is particularly warm or humid, you might want to wrap it well in plastic wrap before putting it in a container. The glaze can sometimes get a bit sticky in warm weather, so a well-sealed container is key. For Refrigerator Storage, I generally don’t recommend refrigerating bread because it can dry it out and make it stale faster. However, if you live in a very hot climate and need it to last a bit longer than 3 days, you can store it in the fridge. Wrap it tightly in plastic wrap, then place it in an airtight container. It should last about 5-7 days this way, but the texture will change. The best way to revive refrigerated bread is to toast it. For Freezer Instructions, this is where you can really stock up! Once the bread has completely cooled, wrap it very tightly, first in plastic wrap, and then in a layer of aluminum foil or a freezer-safe bag. It will keep well in the freezer for up to 3 months. When you’re ready to enjoy it, you can thaw it at room temperature for a few hours, or you can slice it directly from frozen and toast it. The flavor and texture hold up remarkably well. Regarding Glaze Timing Advice, if you plan to freeze the bread, I highly recommend glazing it *after* you’ve thawed and reheated it. Glaze applied before freezing can sometimes become gummy or absorb too much moisture. So, thaw, warm it up slightly if you like, and then add your fresh glaze for the best results!
Frequently Asked Questions
Final Thoughts
So there you have it – my go-to recipe for the most wonderful cinnamon raisin bread. It’s more than just a recipe; it’s a little bit of comfort, a whole lot of deliciousness, and a truly rewarding baking project. The aroma alone is worth the effort, and the taste of that soft, spiced bread with pockets of juicy raisins? It’s simply unbeatable. I really hope you give this cinnamon raisin bread recipe a try, especially if you’re looking for something that feels special but is totally achievable for any home baker. If you love this recipe, you might also enjoy my classic banana bread or my softest ever sugar cookie recipe for more baking adventures. I can’t wait to hear how yours turns out, and please, share any fun variations or tips you discover in the comments below! Happy baking!
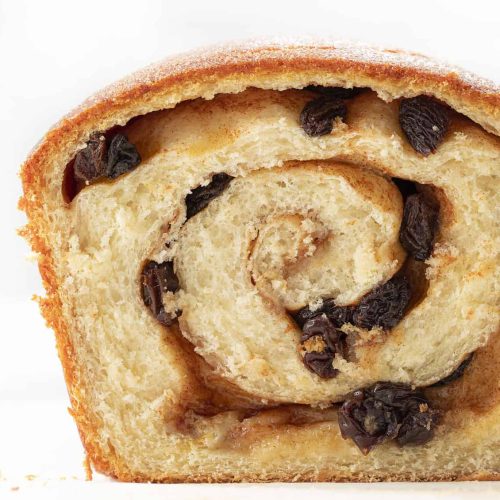
Homemade Cinnamon Raisin Bread
Ingredients
Dough Ingredients
- 3 cups all-purpose flour divided (375 g)
- 0.25 cup granulated sugar (50 g)
- 1.5 teaspoons kosher salt
- 2.25 teaspoons active dry yeast (1 packet)
- 1 cup warm water about 110°F (but no more than 120°F)
- 0.125 cup vegetable oil
- 1 large egg room temperature
- 3 tablespoons unsalted butter melted and divided
Filling Ingredients
- 0.5 cup granulated sugar (100 g)
- 1 tablespoon ground cinnamon
- 1 cup raisins
Instructions
Preparation Steps
- In a large bowl, mix 1.5 cups of the flour, granulated sugar, salt, and yeast.
- Add warm water, oil, and egg, and mix until smooth.
- Add remaining flour, 0.5 cup at a time, until the dough comes together.
- Place dough on a lightly floured surface and knead for 8 to 10 minutes, or until smooth and springy.
- Place dough into a large greased bowl and cover with a towel. Let it rise in a warm place until doubled in size (about 1 hour).
- Prepare a 9x5-inch loaf pan with nonstick cooking spray. Set aside.
- When ready, punch down dough. On a lightly floured surface, roll the dough into an 18x10-inch rectangle.
- Brush 1 tablespoon of melted butter over the top of the dough and spread it out to coat the entire surface.
- In a small bowl, combine sugar and cinnamon. Sprinkle over the top of the butter, reserving a little for the topping. Sprinkle the raisins evenly over the cinnamon-sugar.
- Starting on the short side, roll up the rectangle. Pinch the edge of the dough to seal it. Fold the open ends under to seal.
- Place loaf, seam side down into the prepared loaf pan.
- Brush another tablespoon of melted butter over the bread. Sprinkle with the reserved cinnamon-sugar mixture.
- Cover. Let rise in a warm place about 1 hour, or until the dough has doubled in size.
- Preheat oven to 375°F.
- When ready, bake 30 to 35 minutes, or until golden brown and sounds hollow when tapped.
- Remove from the oven and brush with remaining melted butter. Let bread cool a bit before serving.