There are nights, right? The kind where you walk in the door, kick off your shoes, and your brain just… checks out. The thought of actually *cooking* feels like climbing Mount Everest. On those evenings, my heart always sings a little song of gratitude for my stash of freezer meals. And this one? Oh, this one is the absolute champion. It’s not just easy, it’s a hug in a dish, a total lifesaver that smells like pure comfort the second it hits the oven. Think of it as my take on a classic pot pie, but without all the fuss of rolling out dough, and way more forgiving if you’re a bit late getting home. It’s the kind of meal that makes my kids ask for seconds (and sometimes thirds!) without even realizing they’re eating something that’s packed with good stuff. This recipe has saved me from countless takeout menus and last-minute grocery store runs. It’s truly a gem, and I can’t wait to share it with you!
What is the ultimate comfort casserole?
So, what exactly *is* this magical casserole? Well, at its heart, it’s a super creamy, savory chicken and vegetable bake, all nestled under a delicious, quick-prep biscuit topping. The name “Ultimate Comfort Casserole” just felt right because that’s exactly what it is. It’s the kind of dish that screams “home” and “warmth” and “everything’s going to be okay.” It’s essentially a deconstructed pot pie, if you will, but I’ve streamlined it so much that it’s honestly a fraction of the effort. You get all those comforting flavors – tender chicken, hearty vegetables in a rich sauce – but instead of a pastry crust, we’re doing a fluffy, almost dumpling-like biscuit topping that bakes right into the casserole. It’s so simple, so satisfying, and frankly, pretty fool-proof. Even if you’ve never cooked a thing in your life, you can totally nail this one.
Why you’ll love this recipe?
Honestly, where do I even begin with why I adore this recipe so much? Let’s break it down, because the reasons are plentiful and, in my humble opinion, totally compelling. First off, the FLAVOR is just out of this world. It’s rich, it’s savory, it’s got that deep, satisfying taste that makes you want to curl up on the couch with a good book. The creamy sauce coats every single bite of chicken and those tender veggies, and the biscuit topping? Oh, that topping is pure magic – slightly crispy on top, wonderfully soft and doughy underneath, soaking up all that delicious sauce.
What is the importance of simplicity?How do I make freezer meals easy?. You can have this prepped and ready to go in the freezer in about 20 minutes on a weekend, or even whip it up fresh on a slightly less chaotic weeknight. Seriously, the prep is minimal. No fancy knife skills needed, no multi-step sauces to worry about. It’s just… simple.
Cost-efficiency is another big win here. I almost always use Chicken Thighs because they’re budget-friendly and stay super moist, and frozen veggies are your best friend for keeping costs down and prep time minimal. You probably have most of the ingredients in your pantry and freezer already!
And the VERSATILITY! You can totally switch up the veggies based on what you have or what’s in season. Peas and carrots are classic, but I’ve tossed in corn, Green beans, even some broccoli florets. It’s also wonderful for using up leftover cooked chicken or turkey. What I love most about this recipe is that it’s so forgiving. If you don’t have exact measurements, it’s usually fine. It’s a true family pleaser, and the fact that it freezes so beautifully makes it an absolute staple in my home. It’s the kind of meal that makes you feel like a kitchen superhero, even when you’re utterly exhausted.
How to Make This Ultimate Comfort Casserole
Quick Overview
The beauty of this casserole lies in its straightforward assembly. We’ll create a luscious, creamy chicken and vegetable filling, then top it with a simple, quick biscuit dough that bakes to golden perfection right on top. It’s designed for maximum flavor with minimum effort, making it perfect for those busy nights when you need a wholesome meal without the stress. The best part? It’s freezer-friendly, so you can have a ready-to-bake meal anytime!
Ingredients
For the Filling:
2 tablespoons butter or Olive oil
1 medium onion, finely chopped (about 1 cup)
2 carrots, peeled and diced (about 1 cup)
2 celery stalks, diced (about 1 cup)
1.5 lbs boneless, skinless chicken thighs, cut into bite-sized pieces (or pre-cooked rotisserie chicken)
1 teaspoon dried thyme
½ teaspoon dried rosemary
Salt and freshly ground black pepper to taste
¼ cup all-purpose flour
3 cups chicken broth (low sodium is great)
½ cup milk (any kind works!)
1 cup frozen peas
1 cup frozen corn
(Optional: 1 tablespoon chopped fresh parsley for garnish)
For the Quick Biscuit Topping:
2 cups all-purpose flour
2 teaspoons baking powder
½ teaspoon salt
½ cup cold butter, cut into small cubes
¾ cup milk (you might need a little more or less)
Step-by-Step Instructions
Step 1: Preheat & Prep Pan
Preheat your oven to 400°F (200°C). Lightly grease a 9×13 inch baking dish. If you’re planning to freeze this before baking, you’ll skip the greasing until you’re ready to bake it. Just cover it tightly with plastic wrap and foil.
Step 2: Sauté Aromatics and Chicken
Melt the butter or heat the olive oil in a large oven-safe skillet or Dutch oven over medium heat. Add the chopped onion, carrots, and celery. Cook, stirring occasionally, until the vegetables start to soften, about 6-8 minutes. If using raw chicken thighs, add them to the skillet now. Season the chicken with salt, pepper, thyme, and rosemary. Cook, stirring, until the chicken is browned on all sides and mostly cooked through, about 5-7 minutes. If you’re using pre-cooked chicken, add it in Step 4.
Step 3: Thicken the Filling
Sprinkle the ¼ cup of flour over the chicken and vegetables. Stir well to coat everything and cook for about 1 minute, letting the flour get toasted slightly – this helps get rid of any raw flour taste. Gradually whisk in the chicken broth, stirring constantly to prevent lumps. Bring the mixture to a simmer, then reduce the heat and let it cook for about 5 minutes, stirring occasionally, until the sauce has thickened nicely. Stir in the milk. If you used pre-cooked chicken, add it now along with the peas and corn, and stir to combine. Cook for another 2-3 minutes until heated through.
Step 4: Prepare Biscuit Topping
While the filling is simmering, make the biscuit dough. In a medium bowl, whisk together the flour, baking powder, and salt. Cut in the cold butter using a pastry blender, two forks, or your fingertips until the mixture resembles coarse crumbs with some pea-sized pieces of butter still visible. This is key for flaky biscuits! Gradually add the milk, stirring with a fork until a shaggy dough forms. Don’t overmix; you want it just combined.
Step 5: Assemble the Casserole
If you cooked your filling in an oven-safe skillet, you’re already set! If not, carefully pour the chicken and vegetable mixture into your prepared 9×13 inch baking dish. Spoon dollops of the biscuit dough evenly over the top of the filling. It doesn’t need to be perfectly covered; gaps are good, as they let steam escape and create lovely little golden edges.
Step 6: Bake to Golden Perfection
Bake in the preheated oven for 25-30 minutes, or until the biscuit topping is golden brown and cooked through, and the filling is bubbly around the edges. You can test the biscuits by inserting a toothpick into the thickest part; it should come out clean.
Step 7: Rest and Serve
Let the casserole rest for about 5-10 minutes before serving. This allows the filling to set slightly, making it easier to serve. Garnish with fresh parsley if desired. The smell alone is enough to make your stomach rumble!
What to Serve It With
This Ultimate Comfort Casserole is practically a meal in itself, but if you’re looking to round out your plate or add a little something extra, I’ve got a few favorite pairings that work like a charm. For those early mornings when you’re craving something hearty, I love to serve a small portion with a perfectly brewed cup of coffee. It’s surprisingly satisfying and gets the day off to a good start without being too heavy.
When it comes to brunch, I often serve this alongside a simple green salad with a light vinaigrette. The freshness of the salad cuts beautifully through the richness of the casserole. A side of some lightly dressed cucumber and tomato salad is also a winner, adding a bright, cool contrast.
As a dessert, well, this *is* the dessert for me! But if you’re having a more formal gathering and want something alongside, I tend to go light. Maybe some fresh berries with a dollop of whipped cream or a simple lemon sorbet. The idea is to complement, not compete with, the comforting flavors of the casserole.
And for those super cozy snack occasions, sometimes a smaller bowl of this is just perfect. I’ll pair it with some crusty bread for dipping into any leftover sauce, or even a side of pickles for a tangy contrast. My family tradition is to serve this with a side of buttered noodles on particularly chilly evenings, just to double down on the comfort factor!
Top Tips for Perfecting Your Ultimate Comfort Casserole
Over the years, I’ve learned a few little tricks that really make this casserole sing. First off, for the veggies: if you’re using fresh, make sure they’re chopped relatively small and uniformly so they cook through nicely in the filling. Dicing the carrots and celery into about ½-inch pieces is usually perfect.
When it comes to mixing the filling, don’t be afraid of that flour step! Whisking it in and cooking it for a minute really helps to cook out any starchy taste and creates a smoother, thicker sauce. And when you add the chicken broth, stir vigorously at first to make sure there are no lumps. Gradually adding the milk at the end helps to make the sauce extra creamy and less likely to curdle.
For the biscuit topping, the key is cold butter. Seriously, cut your butter into small cubes and make sure it’s really cold. This creates little pockets of steam as it bakes, leading to tender, fluffy biscuits. And resist the urge to overmix the biscuit dough. A shaggy dough is exactly what you want. Overmixing develops the gluten too much, resulting in tough biscuits, and we definitely don’t want that!
When it comes to ingredient swaps, don’t stress too much! If you don’t have chicken thighs, chicken breasts work too, but they can dry out a bit more easily, so be mindful of cooking time. For the veggies, frozen peas, corn, and mixed vegetables are fantastic shortcuts. You can also add a can of drained mushrooms or some chopped bell peppers if you like. If you find your filling a bit too thick, a splash more chicken broth or milk will thin it out. If it’s too thin, let it simmer a little longer or sprinkle in a tiny bit more flour (but be careful not to add too much!).
Baking time can vary depending on your oven. Keep an eye on it after about 20 minutes. The filling should be bubbling, and the biscuits should be golden brown. If the biscuits are browning too quickly but the inside isn’t cooked, you can loosely tent the dish with foil for the last 10-15 minutes of baking. Trust me, the smell of this baking is one of my favorite things in the kitchen – it’s pure comfort!
Storing and Reheating Tips
This casserole is a champion for make-ahead meals, and that includes how well it stores and reheats. If you’ve baked it and have leftovers, let it cool completely before covering it tightly with plastic wrap or transferring it to an airtight container. It will keep well in the refrigerator for up to 3-4 days. The flavors actually meld and deepen overnight, which I find pretty delightful!
When it comes to reheating, the microwave is your quickest friend – just a minute or two until heated through. For a crisper topping, though, I love to reheat it in a moderate oven (around 350°F or 175°C) for about 15-20 minutes, or until heated through and the biscuit topping is warmed up. You can also pop individual slices into a toaster oven.
Now, for the freezing magic! You have two excellent options here. You can assemble the entire casserole, cover it tightly with a layer of plastic wrap followed by a layer of aluminum foil, and freeze it for up to 2-3 months. When you’re ready to bake, remove the foil and plastic wrap, cover the dish with foil, and bake from frozen at 375°F (190°C) for about 50-60 minutes, removing the foil for the last 15-20 minutes to brown the topping. Alternatively, you can bake it, let it cool completely, then wrap individual portions tightly and freeze those. Reheat from frozen as described above, or thaw overnight in the fridge and reheat as usual. The biscuit topping is best fresh, so if you freeze leftovers, it might not be quite as fluffy, but it’s still incredibly delicious!
Frequently Asked Questions
Final Thoughts
Honestly, this Ultimate Comfort Casserole is more than just a recipe; it’s a little bit of magic for those days when life feels a bit overwhelming. It’s proof that you don’t need hours in the kitchen to create something truly delicious and satisfying. The blend of savory chicken and veggies, enveloped in that creamy sauce, and crowned with those perfectly baked biscuits is just pure bliss. I’ve made this countless times, and it never fails to bring a smile to my family’s faces and a sense of calm to my evenings. It’s the kind of meal that reminds you why cooking at home is so special, even when you’re relying on freezer meals easy prep!
If you loved this recipe and are looking for more comforting, easy-to-make meals, I highly recommend checking out my [link to another recipe, e.g., Speedy Shepherd’s Pie] or my [link to another recipe, e.g., One-Pot Lemon Herb Chicken and Rice]. They’re in the same vein of deliciousness without the fuss!
I really hope you give this casserole a try. I can’t wait to hear how yours turns out and what your family thinks! Please leave a comment below with your thoughts, any variations you tried, or your own favorite freezer meal tips. Happy cooking!
Simple Chicken and Vegetable Freezer Meal
Ingredients
Main Ingredients
- 1.5 pounds Boneless, skinless chicken breasts Cut into 1-inch pieces
- 1 cup Chicken broth Can be added before or after freezing
- 2 cups Mixed frozen vegetables (carrots, peas, corn blend)
- 1 tablespoon Olive oil
- 1 teaspoon Garlic powder
- 0.5 teaspoon Dried Italian herbs
- 1 teaspoon Salt To taste
- 0.5 teaspoon Black pepper To taste
Instructions
Preparation Steps
- In a large bowl, toss the cut chicken pieces with olive oil, garlic powder, Italian herbs, salt, and pepper.
- Combine the seasoned chicken and frozen vegetables in a large, freezer-safe container or heavy-duty freezer bag. If adding liquid now, pour in the chicken broth.
- If using a container, press out as much air as possible before sealing. Label the container clearly with the contents and date.
- Freeze the meal flat for best storage until ready to use.
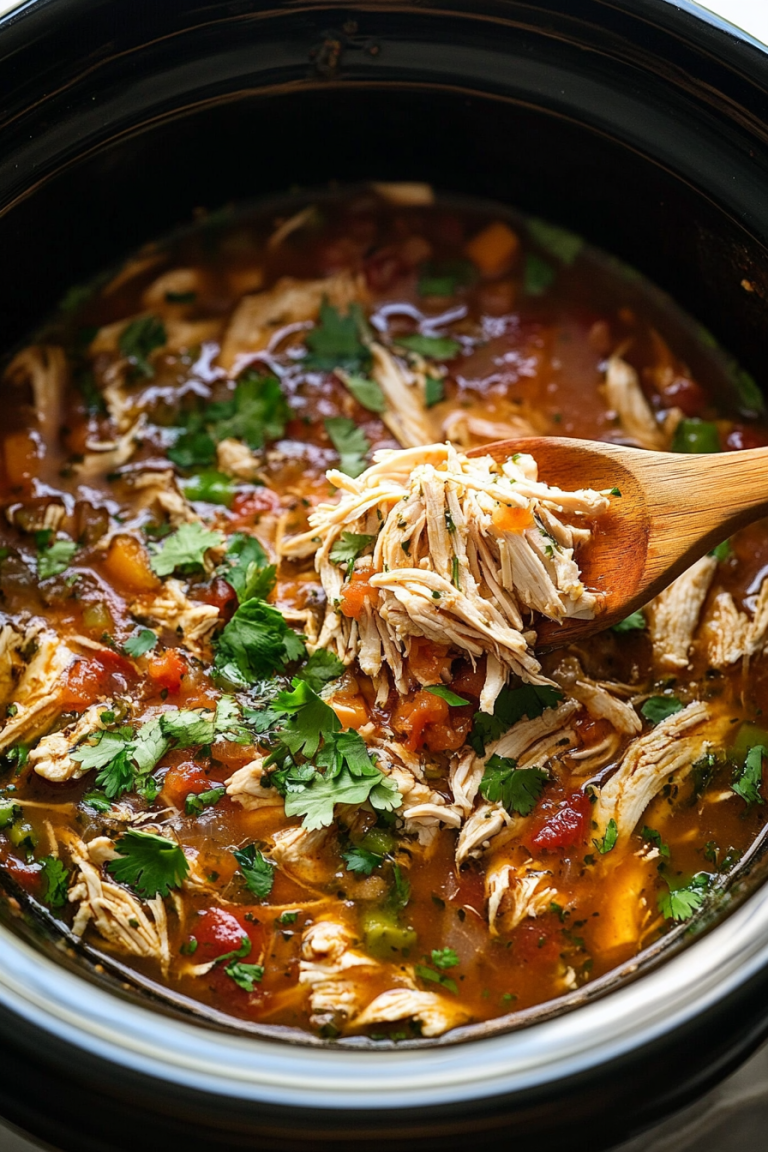
- When ready to cook (from frozen or thawed), transfer contents to an Instant Pot or slow cooker. If cooking from frozen, add an extra 1/2 cup of broth if using the Instant Pot, or cook on low for 6-8 hours in the slow cooker.
- If using the Instant Pot, cook on High Pressure for 8 minutes with a natural pressure release for 5 minutes, then quick release.
- Shred or dice the chicken and stir everything together before serving.