Oh, these chicken gyro rolls! They’re one of those recipes that I’ve made so many times, I can practically do it with my eyes closed. I remember the first time I whipped these up – it was a chaotic Tuesday evening, the kind where homework battles are raging and everyone’s hungry *now*. I needed something quick, relatively healthy, and that would get a chorus of “Mmm!” around the table. I was rummaging through the fridge, spotted some leftover grilled chicken, and a half-empty container of plain Greek Yogurt, and it just hit me: why not turn that classic gyro flavor into something fun and portable? It felt a little unconventional, but the result was so unexpectedly fantastic. It’s like a deconstructed gyro, but all wrapped up into these delicious, bite-sized rolls. Honestly, they’re a lifesaver on busy weeknights and have become a regular feature in our meal rotation. They’re SO much better than any sad, pre-packaged snack you might grab in a pinch, and way more exciting than just plain chicken.
What are Gyro Rolls?
So, what exactly are these magical chicken gyro rolls? Think of them as a delightful, savory twist on a cinnamon roll, but instead of sweet dough and cinnamon sugar, we’re working with a tender, slightly savory bread and packing it full of all those incredible flavors we love from a traditional chicken gyro. It’s essentially seasoned shredded chicken, a creamy yogurt-based sauce, and a hint of Mediterranean herbs, all rolled up in a soft dough and baked until golden. Then, we drizzle it with a little extra sauce to make it absolutely irresistible. It’s not a complicated process at all; it’s more about bringing together familiar, delicious tastes in a new and exciting way. They’re perfect for any meal, really, and they’re so much fun to eat. The name just felt right – it captures the essence of the gyro flavor profile in a delightful, roll-like format.
Why you’ll love this recipe?
There are so many reasons why I absolutely adore this chicken gyro roll recipe, and I just know you will too! First and foremost, the FLAVOR is out of this world. You get that savory, slightly tangy goodness of a gyro, but it’s all warm and comforting in a baked roll. The chicken is seasoned beautifully with a blend of classic gyro spices like oregano, cumin, and a touch of garlic, and then it’s mixed with a creamy, zesty sauce that’s so much better for you than the usual heavy mayo-based dressings. What I love most about this is its sheer SIMPLICITY. Once you’ve got your cooked chicken, the rest comes together in a flash. It’s the kind of dish that feels special enough for company but is easy enough for a weeknight dinner. Plus, it’s incredibly COST-EFFECTIVE. You can use leftover chicken, and the other ingredients are pantry staples. It’s a fantastic way to stretch your budget without sacrificing taste. And talk about VERSATILITY! These rolls are fantastic as a main course, but they’re also perfect for appetizers, for packing in lunches, or even for a hearty breakfast. If you enjoy my Lemon Herb Roasted Chicken: How do I make it taste good? recipe, you’ll definitely appreciate the flavor profile here. It’s that same comforting, wholesome goodness but in a completely different, fun form. They are seriously a game-changer when you need a flavorful meal that doesn’t take hours to prepare.
How do I make Gyro Rolls?
Quick Overview
Making these chicken gyro rolls is surprisingly straightforward. The basic idea is to mix seasoned shredded chicken with a creamy yogurt sauce, spread it onto a simple, soft dough, roll it up like a jelly roll, slice it into individual portions, and bake until golden brown. We’ll then finish it off with a little extra drizzle of that delicious sauce. It’s a wonderfully satisfying process that results in a truly delicious meal that everyone will love. Don’t be intimidated by the “rolling” part; it’s simpler than it sounds and makes for such a beautiful presentation.
Ingredients
For the Main Batter:
You’ll need about 2 ¼ cups of all-purpose flour. I always sift mine, it just makes for a lighter dough. Make sure it’s fresh! You’ll also need 2 teaspoons of granulated sugar to feed the yeast and give the dough a little tenderness. For lift, we’ll use 1 packet (or 2 ¼ teaspoons) of active dry yeast. ½ teaspoon of salt is crucial for flavor and dough structure. And for moisture and richness, about ¾ cup of warm milk (around 110°F – you want it warm enough to activate the yeast but not so hot it kills it) and 2 tablespoons of unsalted butter, melted and slightly cooled.
For the Filling:
This is where all that delicious gyro flavor comes in! You’ll need about 2 cups of cooked, shredded chicken. Rotisserie chicken is a lifesaver here, but leftover grilled or baked chicken works beautifully too. For the creamy sauce base, we’ll use 1 cup of plain Greek yogurt (full-fat is best for richness, but 2% works too). You’ll also need 2 tablespoons of finely chopped fresh dill, 1 tablespoon of fresh lemon juice for brightness, 1 teaspoon of dried oregano, ½ teaspoon of ground cumin, ¼ teaspoon of garlic powder, and a pinch of salt and black pepper to taste. If you like a little heat, a tiny pinch of cayenne pepper is also fantastic.
For the Glaze:
This is simple and adds an extra layer of deliciousness. You’ll need about ¼ cup of plain greek yogurt, 1 tablespoon of fresh lemon juice, and a tiny pinch of salt. If you want it a little thinner for drizzling, you can add a splash of milk or water until you get your desired consistency.
Step-by-Step Instructions
Step 1: Preheat & Prep Pan
First things first, get your oven preheating to 375°F (190°C). While the oven is doing its thing, lightly grease a 9×13 inch baking dish with butter or cooking spray. This will ensure our delicious rolls don’t stick and get a lovely golden crust.
Step 2: Mix Dry Ingredients
In a large mixing bowl, whisk together the sifted flour, sugar, yeast, and salt. Give it a good stir to make sure everything is evenly distributed. This ensures the yeast has all the good stuff it needs to get going and create a beautiful, airy dough.
Step 3: Mix Wet Ingredients
In a separate, smaller bowl or a liquid measuring cup, combine the warm milk and the melted butter. Stir it gently and let it sit for a minute to make sure it’s not too hot. We want it to feel comfortably warm to the touch, like a cozy bath for our yeast!
Step 4: Combine
Pour the wet ingredients into the bowl with the dry ingredients. Using a wooden spoon or a stand mixer with a dough hook, mix until a shaggy dough forms. Then, turn the dough out onto a lightly floured surface and knead for about 5-7 minutes, or until it’s smooth and elastic. If you’re using a stand mixer, knead for about 5 minutes on medium-low speed. You’re looking for a dough that’s soft but not sticky. If it’s too sticky, add a tablespoon of flour at a time; if it’s too dry, add a teaspoon of milk. Once it’s kneaded, place it in a lightly oiled bowl, cover it with a clean kitchen towel, and let it rise in a warm place for about 1 hour, or until it’s doubled in size. It’s always a good idea to place the bowl in a slightly warm oven (turned off, of course!) or near a sunny window for the best results.
Step 5: Prepare Filling
While the dough is rising, let’s get our filling ready. In a medium bowl, combine the shredded chicken, Greek yogurt, chopped dill, lemon juice, oregano, cumin, garlic powder, salt, and pepper. Stir everything together until the chicken is thoroughly coated in that creamy, herby sauce. Taste it and adjust seasonings if needed – this is your chance to make it perfect for your palate!
Step 6: Layer & Swirl
Once the dough has doubled, punch it down gently and turn it out onto a lightly floured surface. Roll it out into a rectangle, about 10×15 inches, aiming for an even thickness. Now, spread the chicken filling evenly over the dough, leaving about a ½-inch border along one of the long edges. This border will help seal the roll. Starting from the long edge that’s covered with filling, carefully and tightly roll up the dough, like you’re making a jelly roll. Pinch the seam where you left the border to seal it well. If it feels a bit uneven, that’s okay! Now, using a sharp knife or dental floss (which makes for super clean cuts!), slice the roll into 12 equal pieces, about 1-inch thick. Place the rolls cut-side up in your prepared baking dish. They should be snug but not squashed.
Step 7: Bake
Cover the baking dish loosely with plastic wrap or a kitchen towel and let the rolls rest for another 20-30 minutes. This second rise makes them extra fluffy. Uncover them and bake in the preheated oven for 20-25 minutes, or until the tops are golden brown and the rolls sound hollow when tapped lightly. The smell that fills your kitchen at this point is absolutely heavenly!
Step 8: Cool & Glaze
Once they’re baked to perfection, take the dish out of the oven. While the rolls are still warm, whisk together the ingredients for the glaze: Greek yogurt, lemon juice, and a pinch of salt. Drizzle this over the warm rolls. The warmth will help the glaze melt slightly and create a beautiful finish. Let the rolls cool in the dish for about 10-15 minutes before serving. This allows them to set up a bit and makes them easier to handle.
Step 9: Slice & Serve
Serve these delicious chicken gyro rolls warm, straight from the dish. You can scoop them out individually or let everyone pull them apart. They’re perfect on their own, but feel free to serve them with a side of extra tzatziki sauce or a fresh Greek salad for a complete meal.
What to Serve It With
These chicken gyro rolls are wonderfully versatile, and I love them for so many different occasions! For BREAKFAST, they’re surprisingly fantastic alongside a cup of strong coffee. The savory flavors are a nice change from traditional sweet breakfast pastries, and they really keep you full until lunchtime. For BRUNCH, they feel a bit more elegant. I love to arrange them on a platter with some fresh fruit, maybe some feta cheese and olives, and a small bowl of extra yogurt sauce for dipping. They always get rave reviews! As a DESSERT, yes, I know it sounds odd, but hear me out! If you’ve got a sweet craving but don’t want anything too heavy, a warm gyro roll with that tangy glaze can be surprisingly satisfying. It’s a completely different kind of “dessert” experience. And for COZY SNACKS, these are an absolute dream. They’re perfect for movie nights or just an afternoon pick-me-up. I love pairing them with a side of hummus and some crisp cucumber slices. My family also loves them packed in their lunchboxes – they’re a step up from a plain sandwich any day!
Top Tips for Perfecting Your Chicken Gyro Rolls
I’ve made these chicken gyro rolls more times than I can count, and over the years, I’ve picked up a few tricks that really make a difference. For the ZUCCHINI PREP (wait, did I say zucchini? My apologies, I think my brain is still in summer mode! I meant for the *chicken* preparation!), ensuring your chicken is finely shredded is key. If you’re shredding cooked Chicken Breast, a couple of forks work wonders. If it’s particularly moist, you might want to gently press out some excess liquid before mixing it with the sauce. For the MIXING ADVICE, don’t overwork the dough! Kneading until it’s smooth and elastic is perfect. Over-kneading can result in tough rolls. You want that lovely, soft texture that practically melts in your mouth. When it comes to SWIRL CUSTOMIZATION, feel free to get creative! I sometimes add a sprinkle of finely chopped sun-dried tomatoes or Kalamata olives into the chicken filling for an extra burst of flavor and color. For INGREDIENT SWAPS, if you don’t have Greek yogurt, sour cream can work in a pinch for the filling, though it will change the tanginess slightly. For the dough, you can experiment with a small amount of whole wheat flour mixed with all-purpose for a nuttier flavor, but I’d start with just 1/4 cup and see how you like it. For BAKING TIPS, pay attention to your oven. Every oven is different! Keep an eye on those rolls towards the end of the baking time. If they’re browning too quickly on top, you can loosely tent them with foil. For GLZE VARIATIONS, if you find the glaze a bit too thick, simply thin it out with a tiny splash of milk or water until it’s perfect for drizzling. Some people even add a little honey to the glaze for a touch of sweetness. I learned early on that letting the rolls rest after slicing is crucial for that second rise, giving them their signature pillowy texture.
Storing and Reheating Tips
These chicken gyro rolls are fantastic fresh out of the oven, but they store and reheat beautifully, which is why they’re such a go-to for meal prep. At ROOM TEMPERATURE, they’ll keep well in an airtight container for up to 2 days. Just make sure they’ve cooled completely before sealing them up. The glaze might make the tops a little sticky, but that’s part of their charm! For REFRIGERATOR STORAGE, they’re best kept in an airtight container or wrapped tightly with plastic wrap and foil. They’ll stay delicious for about 4-5 days. When you’re ready to reheat, I find the best way to bring them back to life is in a moderate oven (around 300°F or 150°C) for about 10-15 minutes, or until warmed through. This helps maintain their texture. You can also pop them in the microwave for about 30-60 seconds, but they might lose a bit of their crispness. For FREEZER INSTRUCTIONS, let the baked rolls cool completely. Then, wrap them individually in plastic wrap, followed by a layer of aluminum foil or place them in a freezer-safe bag. They’ll last in the freezer for up to 2-3 months. To thaw, transfer them to the refrigerator overnight and then reheat as directed. If you’re freezing them *without* the glaze, you can add it fresh after reheating for the best flavor and texture. Generally, I prefer to glaze them just before serving or after reheating if they’ve been stored.
Frequently Asked Questions
Final Thoughts
Honestly, these chicken gyro rolls are a recipe I’m so excited to share with you. They strike that perfect balance between being incredibly flavorful and surprisingly easy to make. They remind me that delicious, comforting meals don’t always need to be complicated. The way the tender dough encases that savory, herbaceous chicken filling, all finished with a tangy glaze – it’s just pure comfort food magic. If you love the flavors of a classic gyro but are looking for a fun new way to enjoy them, or if you’re just in need of a reliable, crowd-pleasing recipe for busy nights, this is it. I’ve found that when I make a double batch, they disappear in minutes! If you enjoy this recipe, you might also love my Greek Lemon Chicken Orzo for another taste of Mediterranean-inspired deliciousness. I truly hope you give these chicken gyro rolls a try. I can’t wait to hear how they turn out for you and what your favorite part is! Please leave a comment below and let me know what you think, or share your own creative twists on this recipe. Happy baking!
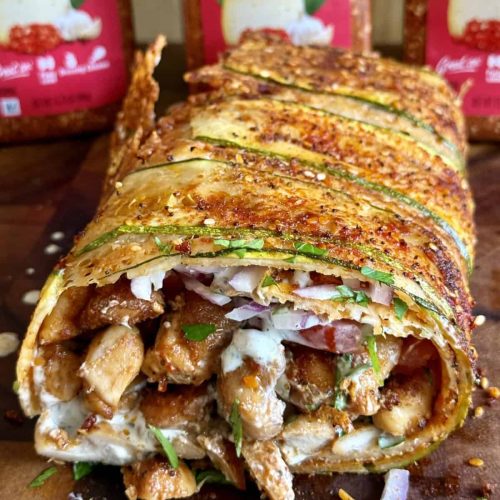
Easy Chicken Gyro Zucchini Rolls
Ingredients
Main Ingredients
- 1.5 lbs boneless skinless chicken thighs cut into bite sized pieces
- 0.75 tsp salt
- 0.75 tsp garlic powder
- 0.75 tsp onion powder
- 0.75 tsp paprika
- 1 tbs olive oil for chicken
- 1 large zucchini thin sliced + pat dry
- 7 oz shredded parmesan cheese
- 0.5 tbs olive oil for zucchini
Toppings & Filling
- 1 medium tomato sliced
- 0.5 small red onion thin sliced
- 2 tbs fresh chopped parsley
- lazy tzatziki Use your favorite recipe or store-bought
Instructions
Preparation Steps
- Preheat oven to 400°F (200°C). Line a 12x17 inch baking sheet with parchment paper.