There are some recipes that just *feel* like home, you know? The kind that, the moment you start making them, your entire kitchen fills with a scent that instantly transports you back to cozy afternoons and happy memories. For me, that’s my gingerbread Whoopie Pies. Forget those fancy layered cakes or fussy cookies; these little sandwiched delights are pure, unadulterated comfort. They’re like a warm hug from the inside out, especially when the weather outside is getting a bit chilly. My absolute favorite thing about them is how they perfectly capture that classic gingerbread flavor – that spicy, sweet warmth that just screams holidays and good times – but in a way that’s so wonderfully soft and chewy, almost cake-like. If you’ve ever loved a good old-fashioned gingerbread cookie, imagine that flavor intensified, then nestled between two pillowy, slightly chewy rounds of pure joy. That’s exactly what these Gingerbread whoopie pies: What are some examples? are. They’re honestly my go-to when I need a little pick-me-up or when I want to impress friends without spending hours in the kitchen. Plus, my kids absolutely adore them – they’re always the first thing to disappear from the cookie platter!
What are Gingerbread Whoopie Pies?
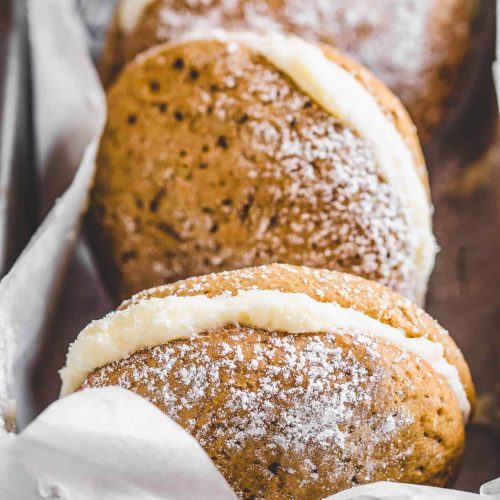
So, what exactly are these magical little treats? Think of a whoopie pie as the best of both worlds – half cake, half cookie, all delicious. They’re made by baking two soft, cake-like rounds, and then sandwiching them together with a luscious, creamy filling. My gingerbread version takes that classic whoopie pie concept and infuses it with all the wonderful spices you find in gingerbread: cinnamon, ginger, cloves, and a touch of nutmeg. It’s essentially a small, personal-sized gingerbread cake that’s been perfected into two tender discs, ready to be embraced by a dreamy frosting. The “whoopie” part comes from the delightful surprise you get when you bite into one – that burst of flavor and the perfect texture combination. They’re not overly sweet on their own, which is why the creamy filling is so crucial, creating this beautiful balance. They’re less about being fussy and more about delivering pure, unadulterated joy in every single bite. It’s the kind of treat that feels special without being complicated, making it a win-win in my book.
Why you
Why is there so many reasons for this article?gingerbread whoopie pie recipe has become such a staple in my home, and I just know you’re going to fall in love with it too. First and foremost, the flavor is just out of this world. It’s that quintessential gingerbread taste, warm and spicy from the molasses and spices, but it’s incredibly well-balanced. The cakey part is soft and moist, never dry, and the filling adds this creamy, sweet counterpoint that just sings. It’s like a symphony of deliciousness happening in your mouth! Then there’s the simplicity. I know, I know, baking can sometimes feel like a chore, but this recipe is surprisingly straightforward. You mix up a batter, dollop it onto baking sheets, bake them for a short while, and then whip up the filling. It’s genuinely easy, even if you’re not an experienced baker. My kids actually love helping with the dolloping part – it’s a fun activity for them! And let’s talk cost-efficiency. Most of the ingredients are pantry staples, things you likely already have on hand. There’s no need for exotic extracts or expensive specialty items, making this a budget-friendly way to create a show-stopping treat. What truly sets these apart for me, though, is their versatility. While they’re undeniably a holiday favorite, I find myself making them year-round! They’re perfect for a quick afternoon snack, a charming addition to a potluck, or even a fun dessert for a casual get-together. They also hold up really well, making them great for packing in lunches or taking on picnics. Compared to a traditional gingerbread cookie that can sometimes be a bit too crunchy or a whole cake that requires frosting and decorating, these whoopie pies hit that sweet spot of impressive presentation and effortless execution. They’re just pure happiness in a bite-sized package!
How to Make Gingerbread Whoopie Pies
Quick Overview
Making these gingerbread whoopie pies is a joy from start to finish. You’ll whisk together your dry ingredients, then cream your butter and sugar, add your wet ingredients, and finally combine it all with the molasses and spices. The batter is wonderfully thick and fragrant! You’ll simply spoon it onto baking sheets to form little mounds, bake them until they’re just set and lightly golden, and then let them cool completely. While they’re cooling, you’ll whip up a cloud-like cream cheese frosting. Once everything is cooled, you’ll pair up your cake rounds and generously fill them. The best part? It’s all done in under an hour of active time, making it incredibly manageable even on a busy weeknight when that sweet craving hits hard!
Ingredients
For the Main Batter:
2 ½ cups all-purpose flour – I always opt for a good quality all-purpose flour for these. If you’re going gluten-free, I’ve had success with a 1-to-1 baking blend, but you might need a touch more liquid.
1 teaspoon baking soda – This is what gives them their lift and chewiness. Make sure it’s fresh!
½ teaspoon baking powder – A little extra insurance for a tender crumb.
1 teaspoon ground ginger – The star spice! Use a fragrant, good-quality ground ginger.
1 teaspoon ground cinnamon – Another essential for that warm gingerbread hug.
½ teaspoon ground cloves – Just a pinch is enough to add depth, don’t go overboard!
¼ teaspoon ground nutmeg – For that extra layer of cozy spice.
½ teaspoon salt – Balances all the sweetness and spice.
½ cup unsalted butter, softened – Make sure it’s really soft but not melted. This is key for a smooth batter.
1 cup packed light Brown Sugar – For that lovely caramel note and chewiness.
1 large egg – At room temperature, if you can remember. It incorporates better!
1 teaspoon pure vanilla extract – Don’t skip this; it enhances all the other flavors.
⅔ cup unsulphured molasses – This is where the signature gingerbread flavor comes from. I love using unsulphured because it has a richer, less sharp taste.
½ cup milk – Whole milk works best for richness, but 2% or even almond milk works too!
For the Filling:
8 ounces cream cheese, softened – Again, soft is crucial here for a smooth, lump-free frosting.
½ cup unsalted butter, softened – You need both cream cheese and butter for that perfect tangy, rich frosting.
3 cups powdered sugar, sifted – Sifting is important to avoid any grainy texture in your frosting. You can add more or less depending on how sweet you like it.
1 teaspoon pure vanilla extract – For a hint of sweetness and depth.
1-2 tablespoons milk or heavy cream – To get the perfect creamy, spreadable consistency.
For the Glaze (Optional, but lovely!):
1 cup powdered sugar
2-3 tablespoons milk or water
½ teaspoon ground ginger (optional, for an extra ginger kick!)
A pinch of cinnamon (optional)
Step-by-Step Instructions
Step 1: Preheat & Prep Pan
First things first, get your oven preheated to 350°F (175°C). This is a pretty standard temperature for most baked goods, and it works perfectly here. Line your baking sheets with parchment paper. I swear by parchment paper – it’s a lifesaver for preventing sticking and makes cleanup a breeze. You can also use silicone baking mats if you have them. Leave a little space between where you’ll be spooning your batter, as they will spread slightly.
Step 2: Mix Dry Ingredients
In a medium-sized bowl, whisk together your flour, baking soda, baking powder, ground ginger, cinnamon, cloves, nutmeg, and salt. Whisking them together ensures all the leavening agents and spices are evenly distributed throughout the flour. This is important so you don’t end up with pockets of spice or areas that don’t rise properly. Give it a good whisk until everything looks uniformly combined.
Step 3: Mix Wet Ingredients
In a large bowl, use an electric mixer (handheld or stand mixer) to cream together the softened butter and packed light brown sugar. Beat them until the mixture is light and fluffy, which usually takes about 2-3 minutes. This process incorporates air, which contributes to the tender texture of the whoopie pies. Next, beat in the egg and vanilla extract until well combined. Then, gradually beat in the molasses until it’s fully incorporated into the creamy mixture. It will look a deep, rich brown!
Step 4: Combine
Now, it’s time to bring it all together. With your mixer on low speed, gradually add the dry ingredients to the wet ingredients, alternating with the milk. Start and end with the dry ingredients (add about a third of the dry, then half the milk, another third of the dry, the rest of the milk, and finally the last third of the dry). Mix until *just* combined. Be careful not to overmix here! Overmixing can develop the gluten in the flour too much, leading to tougher whoopie pies. A few streaks of flour are okay; they’ll disappear when you scoop the batter.
Step 5: Prepare Filling
While the cake rounds are baking or cooling, let’s make the filling. In a large bowl, beat together the softened cream cheese and softened butter until they are super smooth and creamy. Make sure there are no lumps! Then, gradually add the sifted powdered sugar, beating until well combined and fluffy. Stir in the vanilla extract. If the frosting seems too thick, you can add the milk or cream, one tablespoon at a time, until you reach your desired spreadable consistency. It should be light, airy, and perfectly sweet!
Step 6: Layer & Swirl
Once your gingerbread cake rounds are completely cool – and this is important, you don’t want the filling to melt! – it’s time to assemble. Find two cake rounds that are roughly the same size. Spoon a generous dollop of the cream cheese frosting onto the flat side of one round. Then, gently press another round on top, creating a little sandwich. You can use a spatula or a piping bag to get a nice, even layer of frosting. I often just use a spoon and then gently swirl it to make it look pretty. Repeat with all your remaining cake rounds.
Step 7: Bake
You’ll bake these for about 10-12 minutes. They should be lightly puffed and spring back when gently touched. The edges will look set. Since they’re small, they bake up pretty quickly. I always find that oven temperatures can vary, so keep an eye on them the first time you make them. They shouldn’t be browned on the bottom, just cooked through. They’ll puff up in the oven and then settle a bit as they cool.
Step 8: Cool & Glaze
Let the baked whoopie pies cool on the baking sheets for a couple of minutes before transferring them to a wire rack to cool completely. This is crucial for assembly! If you try to fill warm cakes, the frosting will melt into a gooey mess. Once they’re totally cool, you can prepare the optional glaze by whisking together the powdered sugar, milk/water, and any optional spices until smooth. Drizzle this over the assembled whoopie pies. It adds a lovely touch and an extra hint of ginger!
Step 9: Slice & Serve
These are best served at room temperature. You can slice them in half if you want to show off the filling, but most people just pick them up and take a big bite – that’s the fun of a whoopie pie! They look beautiful stacked on a platter, especially with a dusting of powdered sugar or that optional glaze. They are perfect for sharing, but I won’t judge if you hoard them all to yourself!
What to Serve It With
These gingerbread whoopie pies are so versatile, they really fit into any part of your day or any occasion. For breakfast, imagine pairing one with a steaming mug of coffee or a spiced chai latte. They’re sweet enough to feel like a treat but have that comforting gingerbread flavor that’s perfect for starting the day. You could even serve them alongside some fresh fruit for a more balanced meal. At brunch, they add a touch of whimsy and holiday cheer. Arrange them on a tiered stand with other brunch favorites like quiches and fruit salads. A mimosa or a festive punch would be a perfect beverage pairing. For a more indulgent dessert, these are an absolute winner. Serve them after dinner with a scoop of vanilla bean ice cream or a drizzle of caramel sauce. They also pair wonderfully with a glass of milk, especially for the little ones. And for those moments when you just need a cozy snack, well, that’s what these were made for! Grab one (or two!) with a glass of warm milk or a cup of hot chocolate on a chilly evening. My family tradition is to have one with hot apple cider when we’re decorating the Christmas tree. It just makes everything feel extra special and festive. They’re just the perfect little bite of happiness, no matter when you enjoy them!
Top Tips for Perfecting Your Gingerbread Whoopie Pies
I’ve been making these gingerbread whoopie pies for years, and I’ve picked up a few tricks along the way that I think make a real difference. So, here are my top tips to help you achieve gingerbread whoopie pie perfection!
Zucchini Prep: (Oops! I seem to have gotten my notes mixed up with a zucchini bread recipe! My apologies! For gingerbread whoopie pies, there’s no zucchini involved. Let’s focus on the batter and baking!) Let’s talk about getting the Batter Consistency Right. The key to a great whoopie pie is a batter that’s thick but still scoopable. If your batter seems too runny after you add the wet and dry ingredients, it might spread too much in the oven, and you won’t get those lovely rounded shapes. Conversely, if it’s too thick, they can be dense. The ratio of molasses and milk is pretty important here. Trust your eyes and feel – it should be thicker than cake batter but not stiff. If it feels a little off, a tablespoon more of milk can help loosen it, or a tablespoon more of flour can thicken it. I learned this lesson the hard way after a batch spread into one giant gingerbread pancake!
Mixing Advice: I cannot stress this enough: DO NOT OVERMIX THE BATTER! Once you combine the wet and dry ingredients, mix until *just* combined. Seriously, a few streaks of flour remaining are perfectly fine. Overmixing develops the gluten in the flour, which will make your whoopie pies tough and dense instead of soft and cakey. It’s a common mistake, but so easy to avoid if you just stop mixing as soon as you don’t see large pockets of dry flour. I remember one time I got a bit too enthusiastic with the mixer, and the resulting whoopie pies were more like hockey pucks. Lesson learned!
Swirl Customization: While these don’t typically have a swirl *in* the batter like some cakes, you can definitely get creative with the Filling Presentation. If you’re feeling fancy, pipe the cream cheese frosting onto one cake round using a star tip before sandwiching. This creates a beautiful, professional-looking swirl and ensures an even distribution of filling. For a rustic look, simply spoon a generous amount and let it mound up slightly. It all tastes delicious, so don’t stress too much about perfection!
Ingredient Swaps: If you find yourself out of brown sugar, you can substitute with an equal amount of granulated sugar, but you’ll lose a bit of that chewy texture and caramel depth. For the molasses, dark or robust molasses will give a stronger gingerbread flavor; blackstrap is very potent and might be too bitter for some. For the milk, I’ve successfully used non-dairy milks like almond or oat milk, and it really doesn’t change the texture much at all! For the filling, if you’re not a fan of cream cheese, a simple buttercream made with butter, powdered sugar, and vanilla would also be delicious, though it won’t have that signature tangy cream cheese flavor.
Baking Tips: Make sure your oven rack is in the center position for even baking. If your oven tends to run hot, you might want to reduce the temperature by about 10-15 degrees Fahrenheit. Don’t overcrowd your baking sheets; give the whoopie pies space to spread a little. As for doneness, they should be set around the edges and just springy in the center. They won’t brown up a lot, so don’t rely on color alone. A toothpick inserted into the center should come out with a few moist crumbs attached, not wet batter.
Glaze Variations: If you want to play with the glaze, consider adding a tiny bit of orange zest for brightness, or a pinch of cayenne pepper for a subtle kick that complements the ginger beautifully. For a thicker glaze that acts more like a shell, reduce the liquid slightly. For a thinner drizzle, add a little more liquid. If you’re making these for Christmas, a sprinkle of red and green edible glitter or sanding sugar on top of the glaze before it sets can be a fun touch!
Storing and Reheating Tips
Knowing how to properly store your delicious gingerbread whoopie pies is key to keeping them tasting fresh and delightful. I’ve tested a few methods, and here’s what works best for me.
Room Temperature: These are generally best stored at room temperature, especially if they haven’t been glazed. I like to store them in an airtight container, with parchment paper or wax paper layered between them to prevent sticking. They’ll stay wonderfully soft and chewy for about 2-3 days this way. If they have a cream cheese frosting, it’s best to refrigerate them if it’s very warm in your house, or if you live in a humid climate. For the best texture, let them come back to room temperature for about 20-30 minutes before serving.
Refrigerator Storage: If you need them to last a bit longer, or if your frosting is cream cheese-based and the weather is warm, the refrigerator is your friend. Again, an airtight container is essential. They’ll keep well in the fridge for up to 4-5 days. Be aware that refrigeration can sometimes slightly firm up the cake part, so just let them sit out for a bit before eating. I find that the cream cheese filling actually holds up really well in the fridge.
Freezer Instructions: For longer storage, freezing is a great option. I like to freeze the unfrosted cake rounds first. Place them on a baking sheet in a single layer and freeze until solid, about 1-2 hours. Then, transfer them to a freezer-safe airtight container or a heavy-duty freezer bag. They can last for up to 2-3 months. To thaw, simply remove the cake rounds from the freezer and let them come to room temperature on a wire rack. Once thawed and slightly softened, you can frost and assemble them. You can also freeze the frosted whoopie pies, but they might be a little softer when thawed, and the frosting might get slightly smushed.
Glaze Timing Advice: If you’re planning to glaze your whoopie pies and then store them, it’s best to do it right before serving, or at least within a few hours of serving. The glaze can get a little sticky or melty if left on for too long, especially if they are stored at room temperature. If you’re freezing them, I’d recommend glazing them *after* they’ve been thawed and assembled. This way, the glaze stays nice and fresh.
Frequently Asked Questions
Final Thoughts
So there you have it – my absolute favorite gingerbread whoopie pies! I really hope you give these a try. They’re more than just a recipe to me; they’re a little piece of my kitchen, a shortcut to cozy feelings, and a guaranteed way to bring a smile to anyone’s face. What I love most is that they capture all the incredible warmth and spice of gingerbread in a texture that’s just so comforting and delightful. They’re surprisingly easy to whip up, making them perfect for those moments when you need a sweet treat but don’t want to spend all day baking. If you enjoy the spiced goodness of gingerbread, I bet you’ll also love my Classic Gingerbread Cookies or my Spiced Gingerbread Cake for more of that fantastic flavor! I can’t wait to hear what you think of these whoopie pies. Please leave a comment below and let me know how yours turned out, or if you tried any fun variations! Happy baking, and enjoy every single bite!
Gingerbread Whoopie Pies
Ingredients
For the Cookies
- 3.75 cups all-purpose flour
- 1 teaspoon salt
- 1 teaspoon baking soda
- 1.5 teaspoons ground ginger
- 1 teaspoon ground cinnamon
- 0.25 teaspoon ground nutmeg
- 0.25 cup vegetable shortening
- 0.5 cup unsalted butter softened
- 0.75 cup light brown sugar
- 1 large egg
- 0.75 cup molasses
- 0.75 cup buttermilk
For the Vanilla Buttercream Filling
- 0.5 cup unsalted butter
- 2 cups powdered sugar
- 2 tablespoons milk
- 1 teaspoon pure vanilla extract
Instructions
Preparation Steps for Cookies
- Preheat the oven to 375°F (190°C).
- Line 3 baking sheets with parchment paper.
- In a medium-sized mixing bowl, whisk together the flour, salt, baking soda, ground ginger, ground cinnamon, and ground nutmeg; set aside.
- In a large mixing bowl, combine the vegetable shortening, softened butter, and light brown sugar; beat until the mixture is smooth and fluffy.
- Add the large egg; beat until thoroughly incorporated.
- Add half of the flour mixture to the butter mixture and mix to combine.
- Mix in the molasses, the remaining dry ingredients, and the buttermilk until just combined.
- Using a spoon, drop 1 tablespoon of dough onto the prepared baking sheets, leaving 2 inches between each cookie. For bigger cookies, scoop out 0.25 cup of dough.
- Bake the cookies for 12 to 15 minutes, or until a toothpick inserted in the center of the cookie comes out clean.
- Remove from the oven and place the pan on a wire rack to cool completely.
Preparation Steps for Filling and Assembly
- While the cookies cool, prepare the filling. Beat butter with an electric mixer on high speed until light and fluffy, about 1 minute.
- Add powdered sugar, 0.5 cup at a time, and continue to mix on low speed until combined.
- Pour in the milk and pure vanilla extract, and beat on high speed until you reach desired consistency. Add more milk if necessary for a thinner frosting.
- Once the cookies are completely cool, spread frosting onto the flat side of one whoopie pie cookie and place another cookie on top, gently sandwiching them together.