Oh, you guys! I have *the* recipe for you today. Seriously, if you’ve ever found yourself staring into the abyss of your pantry at 10 PM, with a desperate craving for something sweet but zero desire to turn on the oven, then this is your saving grace. This Oreo no-bake dessert is more than just a treat; it’s practically a culinary magic trick. It’s the kind of thing my kids beg for every single weekend, and honestly, so do I. You know how sometimes you see those elaborate no-bake cheesecakes that look amazing but have a dozen steps and ingredients you can’t pronounce? This is the polar opposite. It’s ridiculously simple, uses ingredients you probably already have, and tastes like a dream. Think of it as the ultimate shortcut to dessert happiness, a crowd-pleaser that never fails to impress. It’s truly my go-to when I need a sweet fix without the fuss, a sweet symphony of chocolate and creamy goodness that comes together in a flash. Forget complicated baking; this is pure, unadulterated joy in dessert form.
What is this Oreo No Bake Dessert?
So, what exactly is this magical creation I keep raving about? Well, at its heart, this Oreo no-bake dessert is exactly what it sounds like: a delightful confection that requires absolutely zero oven time. The name itself tells you most of what you need to know! It’s an approachable, fuss-free dessert that hinges on the universally loved flavor of Oreos, paired with a creamy, dreamy filling and often a rich topping. Think of it as a deconstructed, simplified version of your favorite chocolatey cookies, transformed into something new and utterly irresistible. It’s essentially a luscious, no-bake pie or bar that captures the essence of Oreos in a whole new way. It’s the kind of dessert that makes people say, “Wait, you didn’t even bake this?!” The beauty of it is its simplicity; it’s about layering textures and flavors in a way that’s satisfying without being complicated. It’s comfort food at its finest, a testament to the fact that sometimes, the easiest things are the most delicious.
Why you’ll love this recipe?
Honestly, where do I even begin with why this Oreo no-bake dessert is my absolute favorite? Let’s break it down, because there are so many reasons this recipe is a permanent fixture in my kitchen rotation.
First, the flavor. Oh my goodness, the flavor! You get that distinct, beloved Oreo crunch and chocolatey goodness in every single bite, but it’s balanced perfectly with a rich, smooth, creamy filling that just melts in your mouth. It’s decadent without being overly sweet, a delicate dance between the familiar cookie taste and a luxurious creaminess that’s simply addictive. It’s like your favorite Oreo cookie got a major upgrade and decided to become the star of its own show.
What is the second part of the puzzle?simplicity. I cannot stress this enough. This is a lifesaver on busy weeknights or when unexpected guests pop over. You can whip this up in literally minutes, and the hardest part is waiting for it to chill so you can dive in. There are no complicated techniques, no worrying about overmixing or underbaking. It’s foolproof, which, let’s be honest, is a huge win for any home cook.
What is the importance of talking about the world?cost-efficiency. The ingredients are incredibly budget-friendly. Oreos are a pantry staple for most families, and the other components are usually things you already have on hand – cream cheese, butter, a little sugar. It’s a fantastic way to create a show-stopping dessert without breaking the bank. Compare this to buying a fancy dessert from a bakery, and the savings are substantial!
What I also adore is its versatility. While this recipe is perfection as is, you can totally play around with it. Add a swirl of Peanut Butter, some mini chocolate chips, or even a sprinkle of sea salt on top. It’s a fantastic base for so many variations. It’s perfect for everything from a casual family movie night to a more elegant potluck. I’ve served it after BBQs and for holiday gatherings, and it’s always a massive hit. It truly stands out because it’s so easy to make yet tastes so gourmet. It’s a dessert that brings joy without the stress, and that, my friends, is a winning combination.
How to Make This Oreo No-Bake Dessert
Quick Overview
This Oreo no-bake dessert is all about minimal effort for maximum deliciousness. You’ll start by crushing your Oreos to create a simple, press-in crust. Then, you’ll whip up a quick, no-fuss creamy filling that’s rich and utterly satisfying. Finally, you’ll combine the two, perhaps with a delightful topping, and let it set in the fridge until firm. The whole process, from start to finish, takes about 15-20 minutes of active time, with the rest being patient chilling. It’s so straightforward, even the kids can help assemble it!
Ingredients
For the Oreo Crust:
2 cups finely crushed Oreo cookies (about 20-24 cookies, depending on size)
4 tablespoons unsalted butter, melted
*Tip: Using a food processor makes crushing Oreos super easy! If you don’t have one, just pop them in a ziplock bag and use a rolling pin. You want fine crumbs, not large chunks, for the best crust texture.*
For the Creamy Filling:
8 ounces cream cheese, softened
1/2 cup powdered sugar
1 teaspoon vanilla extract
1 cup heavy whipping cream, cold
*Prep Note: Make sure your cream cheese is truly softened – this ensures a smooth, lump-free filling. And use cold heavy cream; it whips up best that way! You can even chill your whisk attachment for extra fluffiness.*
For the Topping (Optional but Highly Recommended!):
1/2 cup chocolate ganache (made with 1/4 cup heavy cream and 1/4 cup semi-sweet chocolate chips, melted together)
OR
Whipped cream and extra Oreo crumbles
*Consistency Tips: For the ganache, aim for a smooth, pourable consistency. If it’s too thick, add a tiny splash more cream. If it’s too thin, let it sit for a few minutes to thicken. For whipped cream, whip until stiff peaks form.*
Step-by-Step Instructions
Step 1: Prepare the Pan
Grab an 8×8 inch baking pan or a pie plate. You can line it with parchment paper for easy removal, leaving some overhang on the sides. This makes lifting the finished dessert out a breeze. If you’re not using parchment, just make sure the pan is clean and dry.
Step 2: Mix the Crust
In a medium bowl, combine the finely crushed Oreo cookies and the melted butter. Stir until all the crumbs are moistened. It should resemble wet sand. Pour this mixture into your prepared pan. Use the bottom of a glass or a measuring cup to firmly press the crumbs evenly across the bottom of the pan. Make sure it’s packed down well – this is key for a crust that holds its shape.
Step 3: Prepare the Creamy Filling Base
In a large bowl, beat the softened cream cheese with an electric mixer until it’s smooth and creamy. Gradually add the powdered sugar and vanilla extract, beating until well combined and no sugar lumps remain. Scrape down the sides of the bowl as needed.
Step 4: Whip the Cream
In a separate, clean bowl, whip the cold heavy cream with your electric mixer until stiff peaks form. Be careful not to over-whip, or you’ll end up with butter! This is where that cold cream and chilled whisk really pay off for maximum volume.
Step 5: Combine Filling Ingredients
Gently fold about half of the whipped cream into the cream cheese mixture until just combined. Then, add the remaining whipped cream and fold it in until you have a smooth, luscious, uniform filling. Be gentle; we want to keep all that air from the whipped cream.
Step 6: Assemble the Dessert
Spoon the creamy filling over the prepared Oreo crust. Spread it out evenly with a spatula, making sure it reaches all the edges. You want a nice, even layer of that delicious creaminess.
Step 7: Add Topping (Optional)
If you’re using chocolate ganache, gently pour it over the cream cheese layer and spread it into an even layer. If you’re opting for whipped cream and Oreo crumbles, you’ll do that after chilling. Some people like to reserve a few Oreo cookies to crumble on top right before serving.
Step 8: Chill to Set
Cover the pan with plastic wrap and refrigerate for at least 2-3 hours, or until the filling is firm and set. This chilling time is crucial for the dessert to hold its shape when you cut into it.
Step 9: Slice and Serve
Once chilled and firm, remove the dessert from the refrigerator. If you used parchment paper, lift it out of the pan. If not, you can slice it directly in the pan. Use a sharp knife to cut it into squares or wedges. If you haven’t added whipped cream and crumbles, now’s the time! Garnish as desired and enjoy!
What to Serve It With
This Oreo no-bake dessert is wonderfully versatile and can fit into almost any occasion. It’s truly a chameleon of the dessert world!
For Breakfast (Yes, really!): Don’t knock it till you try it! A small sliver of this with a hot cup of coffee is surprisingly delightful. It feels indulgent but is much easier than baking a whole batch of cookies first thing. Think of it as a special weekend treat. You could even crumble a bit on top of yogurt for an extra special start to the day.
For Brunch: This makes a stunning addition to a brunch spread. Serve it sliced on elegant plates, perhaps with a few fresh berries on the side to add a pop of color and freshness. A mimosa or a fancy iced coffee pairs beautifully with its rich, chocolatey flavor.
As Dessert: This is its natural habitat, of course! Serve it after any meal – pizza, pasta, grilled chicken, you name it. It’s the perfect sweet ending that doesn’t require anyone to feel too heavy after a meal. I love to serve it slightly chilled, maybe with a dollop of extra whipped cream or a scoop of vanilla ice cream if I’m feeling extra decadent. It’s a guaranteed hit at parties.
For Cozy Snacks: This is where this dessert truly shines for me. On a rainy afternoon, curled up on the couch with a good book or watching a movie, a small square of this is pure comfort. Pair it with a cold glass of milk for that classic cookie-and-milk vibe, or a warm mug of hot chocolate. It’s the ultimate way to satisfy a sweet craving without any fuss. My family often requests this for our “movie night treat,” and it always disappears in minutes.
Top Tips for Perfecting Your Oreo No-Bake Dessert
I’ve made this Oreo no-bake dessert more times than I can count, and through those countless batches, I’ve picked up a few tricks that I think you’ll find super helpful. These little things make a big difference in achieving that perfect texture and flavor every single time.
Oreo Crumb Perfection: For the crust, make sure your Oreos are crushed *very* finely. If you have larger cookie chunks, they can make the crust crumbly and hard to hold together. A food processor is your best friend here, but if you’re using a bag and rolling pin, really put some muscle into it! You want it to resemble damp sand. Pressing it down firmly is also crucial – I often use the flat bottom of a measuring cup to get a nice, even, compact layer.
Cream Cheese Smoothness is Key: The biggest mistake I see people make is not softening their cream cheese enough. If it’s cold or even just slightly firm, you’ll end up with lumps in your filling. Let it sit out on the counter for at least 30-60 minutes, or until it’s really pliable. Then, beat it until it’s completely smooth before adding anything else.
Whipping Cream Wisdom: Use really cold heavy cream. Like, straight from the fridge cold. I even pop my metal mixing bowl and whisk attachment in the freezer for about 10-15 minutes before whipping. This helps the cream whip up faster and achieve those beautiful, stiff peaks. Watch it closely, though; over-whipping can turn it into butter, and we definitely don’t want that!
Folding Technique Matters: When you combine the whipped cream with the cream cheese mixture, be gentle! Use a spatula and fold it in. This means using the spatula to gently lift and turn the mixture over itself. The goal is to incorporate the whipped cream without deflating all that lovely air you just whipped into it. You want a light, fluffy filling, not a dense one.
Chilling is Non-Negotiable: I know it’s tempting to dive in as soon as it’s assembled, but that chilling time is vital. It allows the filling to firm up and set properly, ensuring you get clean slices. If you try to cut it too soon, it’ll be messy and might fall apart. I usually aim for at least 2-3 hours, but if I have the patience, 4 hours or even overnight is even better.
Ganache Consistency: If you’re making the chocolate ganache topping, the ratio of cream to chocolate is important. Too much cream and it’ll be runny; too little and it’ll seize up. For a pourable topping, 1:1 by weight (or roughly 1/4 cup cream to 1/4 cup chips) is usually perfect. If it seems a bit thick, a few seconds in the microwave or a tiny splash more cream can fix it. Let it cool slightly before pouring so it doesn’t melt the filling.
Ingredient Swaps & Additions: Want to jazz it up? You absolutely can! You can swap out some of the Oreos for chocolate graham crackers for a slightly different base. For the filling, I’ve experimented with adding a tablespoon or two of cocoa powder for a richer chocolate flavor, or even a swirl of peanut butter. Just be mindful that adding too many extra ingredients can alter the texture or the setting time, so start small!
Storing and Reheating Tips
One of the best things about this Oreo no-bake dessert is how well it stores. It’s a fantastic make-ahead option, which is always a win in my book. Here’s how I typically keep it fresh and delicious:
Room Temperature Storage: Honestly, this dessert is best served chilled, so I rarely keep it at room temperature for long. If you have leftovers and aren’t refrigerating them immediately, I’d say it’s best enjoyed within 1-2 hours, especially if your kitchen is warm. The butter in the crust can start to soften, and the creamy filling might get a bit too soft.
Refrigerator Storage: This is where this dessert truly shines. Once it’s chilled and set, I cover the pan tightly with plastic wrap or transfer it to an airtight container. It will stay wonderfully fresh and delicious in the refrigerator for up to 3-4 days. The flavors actually meld together even more beautifully overnight, so don’t be afraid to make it a day in advance. The crust stays nice and firm, and the filling remains perfectly creamy.
Freezer Instructions: Yes, you can freeze this! It’s a bit of a game-changer. I like to slice it into individual portions first and then wrap each slice very tightly in plastic wrap, followed by a layer of aluminum foil or a freezer-safe bag. This prevents freezer burn. It should keep well in the freezer for about 1-2 months. To thaw, transfer the frozen slices to the refrigerator overnight. It will be perfectly set and ready to enjoy by morning. You can also thaw at room temperature for a couple of hours, but refrigerating is best for maintaining that ideal texture.
Glaze Timing Advice: If you’ve topped it with ganache or whipped cream, it’s best to add that topping just before serving or within the last hour of chilling, especially if you plan to store it for more than a day or two. Whipped cream can sometimes weep a little over time, and ganache can firm up quite a bit in the fridge, which is usually fine, but for the freshest look, I often add a final dollop of whipped cream or a few more Oreo crumbles right before I serve it.
Frequently Asked Questions
Final Thoughts
There you have it, my friends! This Oreo no-bake dessert is truly a gem. It’s the kind of recipe that makes you feel like a baking superstar without all the hard work. It’s creamy, it’s chocolatey, it’s easy, and it always, always delivers smiles. Whether you’re a seasoned baker or a complete beginner, this is one you can absolutely nail. It’s perfect for those moments when you need a little something sweet, a quick fix for a craving, or a delightful treat to share with loved ones. If you enjoy this recipe, you might also love my No-Bake Chocolate Peanut Butter Bars or my Easy No-Bake Lemon Raspberry Mousse, both of which offer that same effortless deliciousness. Give this Oreo no-bake dessert a try – I promise you won’t regret it!
I’d absolutely love to hear how yours turns out! Please leave a comment below with your thoughts, any variations you tried, or if you just want to share your excitement. And if you share a photo on social media, be sure to tag me – I can’t wait to see your creations! Happy no-baking!
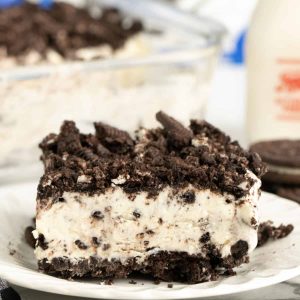
oreo no bake dessert
Ingredients
Main Ingredients
- 14.3 ounce package Oreo cookies crushed and divided
- 0.25 cup butter melted
- 1 cup heavy whipping cream
- 1 teaspoon vanilla extract
- 8 ounces cream cheese softened
- 3 tablespoons granulated sugar
- 14 ounce can sweetened condensed milk
Instructions
Preparation Steps
- Remove 12 Oreos from the package. Set aside for topping.
- Crush the remaining Oreos either by placing them in a Ziploc bag and using a rolling pin or by placing them in a food processor.
- Mix half of the crushed Oreo crumbs with the melted butter. Press this mixture evenly into a 9x9 inch pan to form the crust. Place the pan into the refrigerator while you prepare the filling. Set the rest of the Oreo crumbs aside.
- In a large bowl, whip the heavy cream until stiff peaks form. Set aside.
- In another large bowl, cream together the softened cream cheese and sugar. Add the vanilla extract and mix again until well combined.
- Gently fold the whipped heavy cream into the cream cheese mixture using a spatula.
- Add the sweetened condensed milk and continue mixing gently until fully combined and smooth.
- Mix in the remaining crushed Oreo crumbs (from the initial crushing step, not the 12 set aside).
- Spread the mixture evenly over your chilled Oreo cookie crust.
- Crush the remaining 12 Oreos that were set aside and sprinkle them generously on top of the filling.
- Cover the pan with foil. Return to the freezer and chill until solid (this usually takes 3-4 hours, but overnight is best for optimal setting).
- Remove the dessert from the freezer about 15 minutes before serving to allow it to soften slightly for easier cutting and enjoyment.