Oh, these brownies! If there’s one recipe that has truly earned its permanent spot on my recipe card (and in my heart!), it’s this one. I still remember the first time I made them. It was a rainy Saturday afternoon, and I was craving something intensely chocolatey, something that would just melt in your mouth and make everything feel a little bit better. Forget those dry, cakey brownies that leave you feeling… well, disappointed. I was after that perfect balance: deeply fudgy, wonderfully moist, with just the right amount of chew. And let me tell you, these delivered. They’re the kind of brownies that disappear in minutes at my house, the ones my kids (and husband!) ask for again and again. They’re like a warm hug in dessert form, and honestly, they’re even better than the ones you find at fancy bakeries. If you’re looking for that quintessential fudgy brownies moist chewy experience, you’ve found it.
What are Fudgy Brownies?
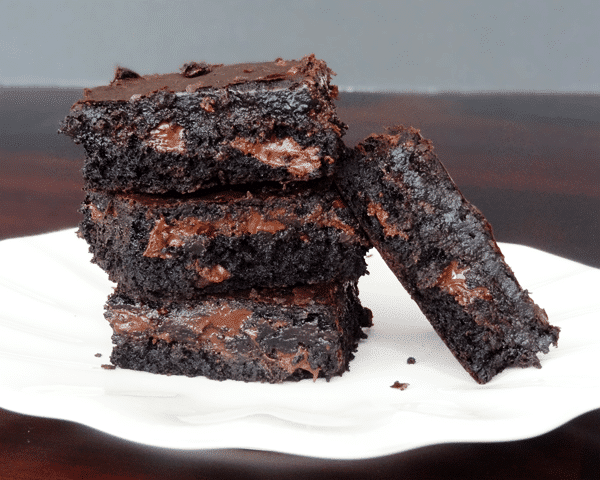
So, what exactly are we talking about when we say “fudgy brownies”? Think of it as the ultimate chocolate indulgence. Unlike their cakey cousins, fudgy brownies are denser, richer, and have a distinctively gooey center. They’re made with a higher ratio of fat (like butter and eggs) to flour, which is the secret to that irresistible texture. This recipe, specifically, focuses on achieving that perfect fudgy brownies moist chewy outcome that has everyone raving. It’s not about being light and airy; it’s about deep, satisfying chocolate flavor and a texture that’s both dense and yielding. They’re essentially a chocolate lover’s dream, a decadent treat that’s surprisingly simple to bring to life in your own kitchen.
Why you’ll love this recipe?
Where do I even begin with why I adore this recipe? First and foremost, the flavor is out of this world. It’s intensely chocolatey, with a deep, rich cocoa taste that’s perfectly balanced by just the right amount of sweetness. And the texture? It’s exactly what you dream of when you’re craving chocolate: gloriously fudgy, wonderfully moist, and with that satisfyingly chewy edge. What I love most about this recipe is its simplicity. Despite the incredible result, you don’t need any fancy techniques or ingredients. It’s a lifesaver on busy nights when you need a quick dessert that feels like a real treat. Plus, it’s incredibly cost-effective; you probably have most of the ingredients in your pantry right now!
And the versatility! While they’re perfect on their own, these brownies are also a fantastic base for all sorts of delicious additions. Think chocolate chips, nuts, or even a swirl of caramel. They pair beautifully with a scoop of vanilla ice cream for an extra decadent dessert, or just with a simple glass of milk for a comforting snack. I’ve even found that this recipe holds up really well when you’re experimenting with different kinds of chocolate; using a mix of semi-sweet and dark chocolate chips really amps up the flavor. This isn’t just another brownie recipe; it’s my go-to, the one I trust when I want to impress or just treat myself. If you’re a fan of my Chocolate chip cookies are chewy and delicious.Is there any textural magic happening here?
How to Make Fudgy Brownies
Quick Overview
Making these fudgy brownies is a straightforward process that anyone can master. You’ll melt some butter and chocolate together, whisk in sugar and eggs until smooth, then gently fold in the dry ingredients. The magic happens in the baking – a careful balance of time and temperature ensures that perfect fudgy texture. It’s truly a one-bowl wonder for the most part, minimizing cleanup, which is always a win in my book. The result? A pan of pure, unadulterated chocolate bliss that’s ready to be devoured.
Ingredients
For the Main Batter:
1 cup (2 sticks) unsalted butter, melted
1 ½ cups granulated sugar
3 large eggs, at room temperature
1 teaspoon vanilla extract
¾ cup unsweetened cocoa powder (Dutch-processed is best for a deeper flavor!)
½ teaspoon baking powder
¼ teaspoon salt
1 cup all-purpose flour
For Extra Fudginess (Optional but Recommended!):
½ cup chocolate chips (semi-sweet or dark)
For the Glaze (Optional, for extra shine):
½ cup powdered sugar
1-2 tablespoons milk or cream
¼ teaspoon vanilla extract
Step-by-Step Instructions
Step 1: Preheat & Prep Pan
First things first, let’s get your oven ready. Preheat it to 350°F (175°C). Now, grab an 8×8 inch baking pan. You want to prepare it so your brownies don’t stick and come out beautifully. I like to grease it well with butter or cooking spray, and then line it with parchment paper, leaving a little overhang on the sides. This makes lifting the whole pan of brownies out super easy later on. You can even dust the parchment with a little extra cocoa powder if you’re feeling fancy.
Step 2: Mix Dry Ingredients
In a medium bowl, whisk together the unsweetened cocoa powder, baking powder, and salt. Make sure there are no clumps of cocoa powder – that’s important for an even chocolate flavor throughout your brownies. Give it a good whisk until everything is well combined. This step might seem small, but it ensures that your leavening agent and salt are evenly distributed, preventing any weird pockets of taste in your finished brownies.
Step 3: Mix Wet Ingredients
In a large bowl, pour in your melted butter. Add the granulated sugar and whisk them together until they’re well combined and look smooth. Then, crack in your three large eggs, one at a time, whisking well after each addition. You want this mixture to be glossy and smooth. Stir in the vanilla extract. This is where the richness starts to build, and the aroma is already pretty wonderful!
Step 4: Combine
Now, it’s time to bring the wet and dry ingredients together. Add the dry ingredients (from Step 2) to the wet ingredients (from Step 3). Using a spatula or a wooden spoon, gently fold them together. Be careful not to overmix! You just want to mix until there are no dry streaks of flour remaining. Overmixing can develop the gluten in the flour, which can lead to tougher brownies, and we’re aiming for fudgy and chewy here. If you’re adding chocolate chips, gently fold them in now.
Step 5: Prepare Filling
This step is optional, but if you want to take your brownies to the next level, this is where you’d prepare any extra fillings. For this recipe, we’re keeping it simple, but if you wanted a caramel swirl or some extra dollops of ganache, this is when you’d prepare that. For our basic fudgy brownies, we’ve already incorporated the optional chocolate chips right into the batter.
Step 6: Layer & Swirl
Pour the batter evenly into your prepared baking pan. If you added chocolate chips, you can also sprinkle a few more on top for extra gooeyness. If you have a separate filling (like caramel or a cream cheese mixture), this is where you would dollop it over the batter and then gently swirl it in with a knife or toothpick to create a marbled effect. For this straightforward recipe, we’re just smoothing the top of the batter.
Step 7: Bake
Pop that pan into your preheated oven. Bake for about 25-30 minutes. The key to perfect fudgy brownies is not to overbake them! You want the edges to be set, but the center should still look a little soft and fudgy. A toothpick inserted into the center should come out with moist crumbs attached, not completely clean. If it comes out with wet batter, give it another few minutes. Trust your instincts here – ovens can vary!
Step 8: Cool & Glaze
This is arguably the hardest part: waiting for them to cool! Let the brownies cool completely in the pan on a wire rack. I know, I know, it’s torture, but it’s crucial for them to set properly and achieve that perfect fudgy texture. Once they’re cool, you can lift them out using the parchment paper overhang. If you want to add a simple glaze, whisk together the powdered sugar, milk (start with 1 tablespoon and add more until you reach your desired consistency), and vanilla extract. Drizzle it over the cooled brownies. The glaze adds a lovely shine and an extra touch of sweetness.
Step 9: Slice & Serve
Once the glaze is set (or if you skipped the glaze), it’s time to slice! For the cleanest cuts, use a sharp knife and wipe it clean between each cut. I like to cut mine into squares. Serve them at room temperature. The smell alone as you cut into them is heavenly. Enjoy every single bite of that fudgy, moist, chewy goodness!
What to Serve It With
These fudgy brownies are so incredibly versatile, they fit in perfectly at any occasion. For a casual breakfast treat (yes, I’m one of those people who enjoys a brownie with my morning coffee!), I love serving them with a strong black coffee. The richness of the brownie cuts beautifully through the bitterness of the coffee. For a more elegant brunch spread, imagine these cut into small, neat squares, perhaps with a dusting of powdered sugar, alongside some fresh berries and a creamy yogurt parfait. They add that touch of decadence without being overly heavy.
As a dessert, they are, of course, supreme. A warm brownie, perhaps slightly re-warmed for a minute in the microwave, with a scoop of good quality vanilla bean ice cream? Pure bliss. You could also serve them with a drizzle of raspberry sauce or a dollop of whipped cream. For those cozy snack moments, which is often when I find myself craving chocolate, these are simply perfect on their own. My family tradition is to have these for movie nights – a big pan, cut into generous squares, and we all huddle on the couch. They’re also wonderful dipped into a warm mug of hot chocolate on a chilly evening. Honestly, they’re so good, they don’t really *need* anything else, but pairing them with the right beverage or side can elevate the experience even further.
Top Tips for Perfecting Your Fudgy Brownies
I’ve made these brownies more times than I can count, and over the years, I’ve picked up a few tricks that I think really make a difference. First, the quality of your cocoa powder matters! Using a good Dutch-processed cocoa powder, like the one I mentioned, really deepens the chocolate flavor and gives you that rich, dark color. Don’t skimp here if you can help it.
When it comes to mixing, remember the mantra: do not overmix! Once you add the flour, just stir until it’s *just* combined. A few tiny streaks of flour are actually okay, as they’ll disappear during baking and prevent toughness. Overmixing is the quickest way to turn these fudgy brownies into something more cake-like. I learned this the hard way many years ago!
For the swirling effect, if you choose to add something like caramel, don’t go overboard. A few dollops and a gentle swirl is all you need. You want the brownie to still be the star, not just a vehicle for another flavor. For baking, the toothpick test is your best friend. It’s better to pull them out a minute or two too early than a minute or two too late. A slightly underbaked center is the hallmark of a truly fudgy brownie!
If you’re looking for ingredient swaps, I’ve experimented with using a combination of melted butter and oil, which can add even more moisture, but I find the pure butter flavor to be superior. For dairy-free options, I’ve had success using a good quality vegan butter and plant-based milk in the glaze, and the texture remains surprisingly similar. And if you don’t have parchment paper, greasing and flouring your pan *very* thoroughly will work, but parchment is just so much easier for cleanup and removal. Always let them cool completely before slicing; this is crucial for them to set properly and get that dense, chewy texture.
Storing and Reheating Tips
Once these beauties are baked, the question is, how do you keep them tasting as amazing as they do right out of the oven? For room temperature storage, I usually keep them in an airtight container. They’ll stay wonderfully moist and fudgy for about 2-3 days. If you’ve glazed them, make sure the glaze is completely set before you seal the container, otherwise, it can get sticky.
If you think you won’t get through them that quickly, the refrigerator is your friend. Storing them in an airtight container in the fridge can extend their life for up to a week. They might firm up a bit in the fridge, but that’s easily remedied. For longer storage, these brownies freeze exceptionally well. I like to cut them into individual portions, wrap each piece tightly in plastic wrap, and then place them in a freezer-safe bag or container. They can stay frozen for up to 2-3 months, and the quality is surprisingly good when thawed!
When it comes to reheating, if they’ve been refrigerated, I usually pop a square in the microwave for about 10-15 seconds. Just enough to take the chill off and make them soft and gooey again. If they’re frozen, you can either let them thaw at room temperature for an hour or two, or do the same quick microwave zap from frozen for an instant treat. If you’ve glazed them, the glaze might become a little soft or even melt slightly with reheating, but the taste is still incredible.
Frequently Asked Questions
Final Thoughts
So there you have it – my absolute favorite recipe for fudgy, moist, and chewy brownies! I truly hope you give these a try. They’re more than just a dessert; they’re a little bit of happiness, a guaranteed crowd-pleaser, and a testament to how simple ingredients can create something truly magical. They’re proof that you don’t need to be a professional baker to create incredibly delicious treats right in your own kitchen. I know they’ll become a staple in your baking rotation, just like they have in mine. If you end up making them, please let me know how they turn out in the comments below! I’d love to hear your variations or any fun family reactions. Happy baking, and happy indulging!
fudgy brownies moist chewy
Ingredients
Main Ingredients
- 4 large eggs
- 1.25 cup unsweetened cocoa powder
- 1 tsp baking powder
- 1 tsp espresso powder
- 1 tbsp vanilla extract
- 1 cup unsalted butter melted
- 2.25 cup granulated sugar
- 2 cup chocolate chips
- 1.5 cup all-purpose flour
Instructions
Preparation Steps
- Preheat oven to 350 degrees Fahrenheit (175°C). Grease a 9x13 inch baking pan.
- In a medium bowl, beat together the eggs, cocoa powder, baking powder, espresso powder, and vanilla extract until the mixture is smooth.
- Melt the unsalted butter in a small microwave-safe bowl.
- Add the granulated sugar to the melted butter and combine well. Microwave the mixture in 10-15 second increments, stirring after each, until the mixture is hot (about 110-120°F or 43-49°C) but not bubbling. It should develop a shiny appearance, which helps in dissolving the sugar for a crinkly crust. This step can also be done in a saucepan over low heat.
- Add the hot butter-sugar mixture to the egg mixture and mix until smooth and well combined.
- Microwave the chocolate chips in approximately 20-second increments until they are fairly soft but not completely melted.
- Add the all-purpose flour and the softened chocolate chips to the batter. Mix until just combined and smooth, being careful not to overmix.
- Pour the batter evenly into the prepared 9x13 inch pan. Bake for about 30 minutes, or until a toothpick inserted into the center comes out with just a few moist crumbs (indicating fudgy brownies).
- Once baked, remove the brownies from the oven and allow them to cool completely in the pan on a wire rack before slicing and serving.