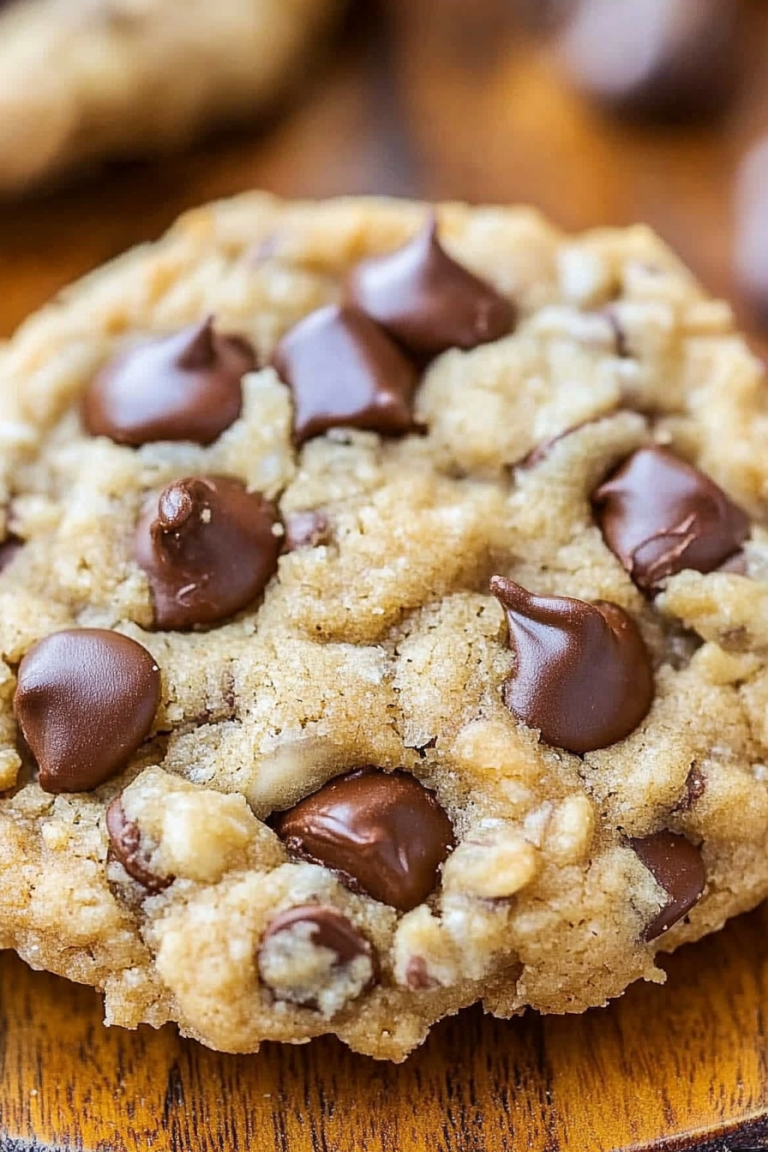
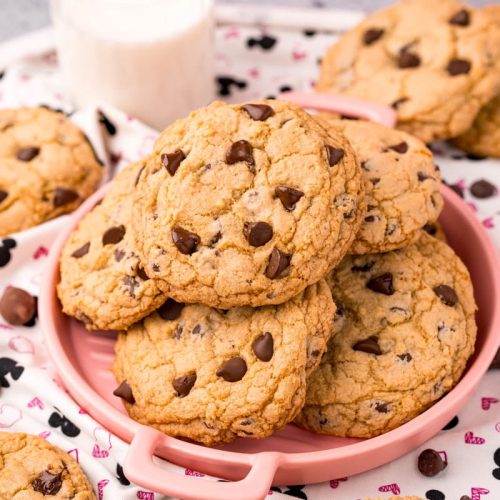
You know, there are some recipes that just feel like sunshine. This Floridian Chocolate Chip cookie is absolutely one of them for me. It’s got that perfect balance of chewy and crisp, a hint of sea salt that just sings, and pockets of melty chocolate that make you close your eyes in pure bliss. I remember making these for the first time on a sweltering summer afternoon, the kind where the air itself feels thick and humid. My grandma was visiting from up north, and she’s a tough cookie critic, pun intended! She took one bite, her eyes lit up, and she said, “Now *this* is a cookie.” That moment? Pure gold. It’s not just a cookie; it’s a little slice of happiness, reminiscent of those endless beach days and salty breezes we Floridians know and love. Forget those dry, crumbly pucks you sometimes get; this is the real deal, a Floridian chocolate chip cookie that’s destined to become your go-to. It’s a step above your average chocolate chip, offering something a little more unique and utterly delicious.
What is a Floridian Chocolate Chip Cookie?
So, what exactly makes a chocolate chip cookie “Floridian”? Well, for me, it’s about bringing in those subtle, sun-kissed flavors that remind me of home. It’s essentially a classic chocolate chip cookie recipe, but with a few tweaks that really elevate it. Think of it as your favorite chocolate chip cookie wearing a stylish straw hat and holding a tiny umbrella. We’re talking about a dough that’s just the right amount of rich, studded with fantastic chocolate, but then we add a little something extra – a whisper of fine sea salt that cuts through the sweetness and makes all those chocolate chips *pop*. Sometimes, I even add a tiny pinch of orange zest to the dough, but that’s a secret for another day! It’s a cookie that’s meant to be enjoyed with a cold glass of milk or even a sweet Iced Tea, perfect for those warm evenings after a day at the beach or just lounging by the pool. It’s familiar, comforting, and yet, has that special spark that says, “I’m from here!”
Why you’ll love this recipe?
Honestly, there are so many reasons why I keep coming back to this Floridian chocolate chip cookie recipe, and I just know you’re going to fall in love with it too. First off, the flavor is just out of this world. It’s not just sweet; it’s complex. The interplay between the rich chocolate, the buttery dough, and that crucial sprinkle of sea salt creates a symphony in your mouth. It’s that perfect sweet-and-salty combination that keeps you reaching for one more. And don’t even get me started on the texture! These cookies are beautifully golden brown on the edges with a delightfully soft, chewy center. They’re the kind of cookies that don’t crumble apart when you pick them up, but yield with a satisfying chew. Then there’s the simplicity of it all. I know baking can sometimes feel intimidating, but this recipe is surprisingly straightforward. Even if you’re a beginner baker, you can absolutely nail these. The ingredients are all pretty standard pantry staples, nothing fancy or hard to find, which means you can whip up a batch whenever a craving strikes without a special trip to the store. Plus, they’re incredibly cost-effective! You get so many amazing cookies for the amount of effort and money you put in. They’re also wonderfully versatile. While they’re divine on their own, they’re also fantastic crumbled over ice cream, used as the base for a no-bake dessert, or even just shared with neighbors. What I love most about this recipe, though, is the feeling it evokes. Every time I bake these, it’s like bottling up a little bit of that Floridian sunshine and happiness to share with my loved ones. They’re just pure joy in cookie form.
How do you make Floridian Chocolate Chip Cookies?
Quick Overview
Making these Floridian chocolate chip cookies is a breeze, and I promise you, the payoff is huge! It’s a classic creaming method, where we beat butter and sugar until fluffy, then add eggs and vanilla. Then, we gently fold in the dry ingredients, and finally, stir in those glorious chocolate chips. The real magic happens with the cooling and the touch of sea salt. You’ll be amazed at how quickly these come together. The whole process, from mixing to getting them into the oven, takes less than 20 minutes! It’s the perfect recipe for a quick afternoon treat or a last-minute dessert. Trust me, the aroma that fills your kitchen will have everyone gathering around.
Ingredients
For the Main Batter:
This is where the foundation of our cookie magic lies. We want good quality ingredients here for the best flavor.
- 1 cup (2 sticks) unsalted butter, softened but not melted. I always use unsalted so I can control the saltiness myself!
- 3/4 cup granulated sugar
- 3/4 cup packed light Brown Sugar. The brown sugar is key for that chewy texture and deep caramel flavor.
- 2 large eggs, at room temperature. This helps them emulsify better with the butter mixture.
- 1 teaspoon pure vanilla extract. Don’t skimp on the good stuff; it makes a difference!
- 2 1/4 cups all-purpose flour. I’ve tested this with some all-purpose gluten-free blends, and they work pretty well too, though the texture might be a touch different.
- 1 teaspoon baking soda. For that perfect lift and chew.
- 1/2 teaspoon fine sea salt. Crucial for balancing the sweetness and enhancing the chocolate flavor. If you have flaky sea salt, even better for finishing!
For the Chocolate Chips:
This is your moment to shine! Choose what you love.
- 2 cups chocolate chips. I love a mix of semi-sweet and dark chocolate chips for a more complex flavor. You can also use chocolate chunks if you prefer bigger melty pockets.
Step-by-Step Instructions
Step 1: Preheat & Prep Pan
First things first, get your oven preheated to 375°F (190°C). This ensures your cookies bake evenly. Grab a couple of baking sheets and line them with parchment paper. Parchment paper is your best friend here; it prevents sticking and makes cleanup a dream. I usually have two baking sheets ready to go so I can bake one while the next batch is being portioned. This saves so much time!
Step 2: Mix Dry Ingredients
In a medium bowl, whisk together the all-purpose flour, baking soda, and the 1/2 teaspoon of fine sea salt. Whisking them together helps distribute the leavening agent and salt evenly throughout the flour, which means no surprises of one bite being too salty or not fluffy enough. You want a nice, uniform mixture. Set this aside for now.
Step 3: Mix Wet Ingredients
In a large bowl, using an electric mixer (or a stand mixer with the paddle attachment), cream together the softened unsalted butter, granulated sugar, and packed light brown sugar. Beat on medium speed until light, fluffy, and pale yellow, which usually takes about 2-3 minutes. This is a super important step for creating that wonderful texture. Then, beat in the eggs one at a time, mixing well after each addition. Stir in the pure vanilla extract until just combined. Scrape down the sides of the bowl to make sure everything is incorporated.
Step 4: Combine
Gradually add the dry ingredients to the wet ingredients, mixing on low speed until *just* combined. Be careful not to overmix here! Overmixing develops the gluten in the flour too much, which can lead to tough cookies. Stop mixing as soon as you don’t see any streaks of flour. It’s better to have a few tiny streaks of flour than to overmix. It’s a delicate balance, but you’ll get the hang of it!
Step 5: Add the Chocolate Chips
Now for the fun part! Gently fold in your chocolate chips using a spatula or wooden spoon. Distribute them evenly throughout the dough. I like to save a few extra chips to press onto the tops of the cookies before baking, just for that extra visual appeal and immediate chocolatey goodness.
Step 6: Portion the Dough
Use a cookie scoop (about 1.5 tablespoons is perfect) or two spoons to drop rounded balls of dough onto your prepared baking sheets. Leave about 2 inches of space between each cookie, as they will spread as they bake. If you’re using flaky sea salt, now is the time to sprinkle a little bit on top of each cookie dough ball. It’s a small step that makes a huge difference!
Step 7: Bake
Bake for 9 to 12 minutes, or until the edges are golden brown and the centers look slightly soft and underbaked. They will continue to cook on the baking sheet as they cool. My oven tends to run a little hot, so I usually check them around the 8-minute mark. You want them to look slightly puffed and just set. Pull them out a minute or two before you think they’re fully done; that’s the secret to that perfectly chewy center!
Step 8: Cool & Finish
Let the cookies cool on the baking sheets for about 5 minutes. This allows them to set up properly. Then, carefully transfer them to a wire rack to cool completely. If you didn’t add flaky sea salt before baking, you can sprinkle it on top now while they are still warm. The warmth helps it adhere beautifully.
Step 9: Slice & Serve
Once completely cool, they are ready to be devoured! These are best served at room temperature. If you can resist the urge, that is! They’re perfect for dunking, sharing, or just enjoying with a glass of cold milk. The combination of the crisp edges and chewy middle is just heavenly.
What to Serve It With
These Floridian chocolate chip cookies are so versatile, they fit in perfectly with almost any occasion! They’re not just a dessert; they’re a little moment of happiness. Here are some of my favorite ways to serve them:
For Breakfast: Yep, I said breakfast! On a weekend morning, when there’s no rush, a single warm cookie with my morning coffee is pure indulgence. It’s like a little sweet treat to kickstart the day without being too heavy. Try pairing them with a strong, dark roast coffee – the bitterness really complements the cookie’s sweetness. For a slightly more substantial breakfast, I’ll serve them alongside a fresh fruit salad. The bright, fresh fruit is a lovely contrast to the rich cookie.
For Brunch: For a more elegant brunch spread, I’ll arrange a platter of these cookies alongside mini muffins, pastries, and maybe some cream cheese danishes. They add that homemade touch that everyone loves. For beverages, they pair wonderfully with mimosas or a chilled sparkling rosé. The bubbles cut through the richness of the cookie beautifully. Presentation-wise, I sometimes stack them on a pretty tiered stand or artfully arrange them on a rustic wooden board.
As Dessert: This is the classic. After a family dinner, there’s nothing better than pulling out a plate of these warm cookies. They’re perfect on their own, of course, but for something extra special, serve them with a scoop of good quality vanilla bean ice cream. The warm cookie and cold ice cream melting together is pure bliss. I also love crumbling them over brownie sundaes or using them as the base for a quick, no-bake cheesecake by layering them in a dish with cream cheese filling. A drizzle of chocolate sauce is never a bad idea, either!
For Cozy Snacks: These are my go-to for an afternoon pick-me-up, especially when I need a little comfort. They’re perfect with a tall, cold glass of milk – the way cookies were meant to be enjoyed, right? They’re also fantastic for movie nights. Just set them out on a plate with some popcorn and let everyone help themselves. For a slightly different twist, I’ll warm one up slightly and pair it with a mug of hot chocolate. It’s the ultimate cozy pairing on a cooler evening, even here in Florida!
Top Tips for Perfecting Your Floridian Chocolate Chip Cookie
Over the years, I’ve learned a few tricks and made my fair share of mistakes, so I’m happy to share what I know to help you achieve cookie perfection every single time! These little nuggets of wisdom have been hard-won through countless batches, and they’re what make this recipe consistently amazing.
Zucchini Prep: Oh wait, I’m so sorry! I got carried away thinking about my zucchini bread! Let me correct myself. These are chocolate chip cookies, no zucchini involved! My apologies. Let’s get back to what makes these cookies truly special.
Creaming the Butter and Sugar: This is perhaps the *most* critical step for texture. Don’t rush it! You want to beat your softened butter with both sugars until the mixture is visibly lighter in color and has increased in volume. This process incorporates air, which gives the cookies their lift and tender crumb. If your butter is too cold, it won’t cream properly; if it’s too warm or melted, your cookies will spread too much and become greasy.
Measuring Flour Correctly: Spoon your flour into your measuring cup and level it off with a straight edge like a knife. Don’t scoop directly from the bag, as this compacts the flour, meaning you’ll end up with too much flour and dry, dense cookies. I’ve learned this the hard way, and it’s a game-changer for cookie consistency.
Don’t Overmix the Dough: As soon as you add the dry ingredients to the wet, mix only until *just* combined. A few streaks of flour are okay. Overmixing develops gluten, leading to tough, hard cookies instead of soft and chewy ones. Remember, the residual heat from the butter mixture will continue to activate the flour, so a little under-mixing is better than over-mixing.
Chocolate Chip Quality and Quantity: Use good quality chocolate chips or chunks! It truly makes a difference in flavor and how they melt. I often use a combination of semi-sweet and dark chocolate for depth. If you love chocolate, don’t be afraid to add a little extra – a handful more never hurt anyone! Also, pressing a few extra chips onto the tops of the dough balls before baking gives them that beautiful, tempting appearance and ensures a burst of chocolate in every bite.
The Magic of Sea Salt: This is non-negotiable for a *Floridian* chocolate chip cookie! A sprinkle of flaky sea salt on top right before baking, or even right after they come out of the oven, elevates the flavor immensely. It cuts through the sweetness, enhances the chocolate, and adds a delightful textural contrast. Don’t use table salt; flaky sea salt is much better for finishing.
Baking Time is Key: My oven is a bit temperamental, so I always watch my cookies closely. You want the edges to be golden brown, but the centers should still look slightly soft and underbaked when you pull them out. They will continue to cook and firm up on the hot baking sheet as they cool. Pulling them out slightly early is the secret to that perfect chewy texture. If you bake them until the centers look completely done, they’ll likely be overbaked and dry.
Cooling is Crucial: Let the cookies cool on the baking sheet for at least 5 minutes before transferring them to a wire rack. This allows them to set. Trying to move them too soon will result in a melty mess. Patience here pays off in perfectly formed, delicious cookies.
Ingredient Swaps: While this recipe is perfected as is, I’ve experimented! For a richer flavor, you can use half dark chocolate and half milk chocolate chips. If you’re not a fan of milk, stick to semi-sweet and dark. For a different texture, try using some chopped nuts like pecans or walnuts alongside the chocolate chips – though that’s not very Floridian for me, but it’s delicious!
Storing and Reheating Tips
One of the best things about these Floridian chocolate chip cookies is how well they store, making them perfect for anytime cravings. I’ve tried all sorts of methods, and these are the ones that keep them tasting as fresh as possible.
Room Temperature Storage: Once completely cooled, store your cookies in an airtight container at room temperature. I usually layer them between sheets of parchment paper to prevent sticking, especially if they have a lot of melty chocolate. They stay wonderfully chewy and delicious for about 3-4 days. After that, they start to get a little harder, but they’re still great for dunking!
Refrigerator Storage: While I rarely have to refrigerate them because they disappear so fast, if you live in a super humid climate or want them to last a bit longer, you can store them in the refrigerator. Place them in an airtight container, and they should stay good for up to a week. They’ll firm up a bit in the fridge, so you might want to warm them up slightly before enjoying.
Freezer Instructions: These cookies freeze beautifully, both baked and unbaked! For baked cookies, cool them completely, then wrap them individually in plastic wrap, and then place them in a freezer-safe bag or container. They’ll keep their quality for up to 2-3 months. To reheat, you can gently warm them in a low oven (around 300°F or 150°C) for a few minutes, or just let them thaw at room temperature. For unbaked cookie dough, scoop them onto a parchment-lined baking sheet, freeze until firm, then transfer to a freezer bag. You can bake them directly from frozen; just add a couple of extra minutes to the baking time.
Glaze Timing Advice: Since this recipe doesn’t include a glaze (but oh, what a good idea for another cookie variation!), I’ll address the chocolate chip distribution. If you’re freezing baked cookies, make sure the chocolate chips have set up completely before wrapping. If you’re storing them at room temperature, the chocolate will be soft for the first day or two, which is divine, but might get a little messy if stacked too high. Just make sure your container is truly airtight to keep that perfect chewiness locked in!
Frequently Asked Questions
Final Thoughts
So there you have it – my cherished recipe for Floridian chocolate chip cookies. I truly believe these are more than just a dessert; they’re a little taste of happiness, a reminder of sunny days and simple joys. They’re the perfect balance of familiar comfort and that special something that makes them unique. The chewy center, the slightly crisp edges, the generous pockets of melty chocolate, and that essential hint of sea salt – it all comes together in a way that’s just pure magic. I hope you give them a try, and I really hope they bring a little sunshine into your kitchen, just like they do in mine. If you enjoy these, you might also love my Key Lime Pie Bars or my Coconut Macaroon Cookies – they all have that distinct Floridian flair! I can’t wait to hear how yours turn out! Don’t be shy about sharing your thoughts or any variations you try in the comments below. Happy baking!
Floridian chocolate chip cookie
Ingredients
Main Ingredients
- 2.5 cups all-purpose flour
- 1 tsp baking soda
- 0.5 tsp salt
- 10 tbsp salted butter softened
- 1 cup light brown sugar
- 0.75 cup powdered sugar
- 2 large eggs
- 2 tsp vanilla extract
- 12 oz semi-sweet chocolate chips
Instructions
Preparation Steps
- Preheat the oven to 330 degrees F (165 C) then prepare a baking sheet by lining it with parchment paper. Set aside for later.
- In a large bowl, sift together the flour, baking soda, and salt.
- In the bowl of a stand mixer, on medium speed, mix together the softened butter, light brown sugar, and powdered sugar until the mix is light and fluffy.
- Add the eggs one at a time, mixing well after each addition until the eggs are fully incorporated. Then add the vanilla extract and mix again. Scrape down the sides of the bowl.
- Add in the flour mixture 0.5 cup at a time until all of the flour has been added and just combined. Stir in the chocolate chips with a wooden spoon.
- Next, scoop 2-3 tablespoon balls of dough onto the prepared baking sheet, leaving space between them.
- Put the balls of dough into the preheated oven and bake for 10 to 12 minutes for smaller cookies. If using a large cookie scoop, bake the cookies for 14 to 17 minutes, or until the edges are golden brown and the centers are still slightly soft.
- Let cookies cool on the baking sheet for a few minutes before transferring to a wire rack to cool completely. Then serve.