Oh, hello there! I’m so glad you stopped by. You know, there are some recipes that just stick with you, the ones you pull out when you need a guaranteed win, a little bit of sunshine on a plate, or just something utterly delicious without a fuss. For me, that’s this easy tzatziki. It’s the kind of dip that makes a simple gathering feel special, and honestly, it’s a lifesaver on busy weeknights when the craving for something fresh and flavorful hits hard. I remember the first time I made it for a summer barbecue, and it was gone in about ten minutes flat! People were actually asking for the recipe right then and there. It’s miles better than anything you can buy in a tub, and the fact that it’s so incredibly simple to whip up is just the cherry on top. If you’ve ever thought tzatziki was intimidating, trust me, this version will change your mind completely. It’s less about complicated steps and more about the simple magic of a few good ingredients coming together.
What is easy tzatziki?
So, what exactly *is* easy tzatziki, you ask? At its heart, it’s a wonderfully cool and creamy Greek Yogurt-based dip, bursting with fresh cucumber, garlic, lemon, and dill. Think of it as the ultimate refreshing condiment that can elevate practically anything. The name “tzatziki” comes from Greek, and it’s pronounced tsah-tzee-kee – a bit of a tongue-twister for some, but oh-so-worth it! It’s traditionally made with strained yogurt (like Greek yogurt), grated cucumber, garlic, olive oil, lemon juice, and fresh herbs, usually dill or mint, or sometimes both. My version leans into simplicity and uses readily available ingredients, making it super approachable for anyone who just wants a fantastic dip without a lot of fanfare. It’s less about strict rules and more about capturing that bright, tangy, herbaceous essence that makes this dip so iconic. It’s the kind of thing that just tastes like summer, even in the dead of winter.
Why you’ll love this recipe?
There are so many reasons why this easy tzatziki has become a staple in my kitchen, and I just know you’re going to fall in love with it too. First off, the flavor explosion is unreal. It’s this perfect harmony of cool, crisp cucumber, the pungent kick of garlic (just the right amount, not so much that it’s overpowering!), the bright tang of fresh lemon, and the subtle, aromatic whisper of dill. It’s refreshing, it’s vibrant, and it just makes everything taste better. And let’s talk about simplicity. Seriously, this takes maybe 15 minutes, tops. No cooking involved, just a bit of grating and mixing. It’s the kind of recipe you can whip up while your guests are arriving, and you’ll still have time to pour yourself a drink! Plus, it’s incredibly cost-effective. A tub of good greek yogurt and a cucumber are usually quite affordable, and you probably already have the rest of the ingredients in your pantry. And oh, the versatility! This isn’t just for chips. We’ll get into that more later, but this dip is a game-changer for grilled meats, veggies, sandwiches, you name it. What I love most, though, is the feeling of accomplishment. Making this from scratch feels so much more rewarding than opening a plastic container, and the taste is just worlds apart. It’s the kind of fresh, homemade goodness that always impresses, yet requires so little effort. It’s a true kitchen hero!
How do I make tzatziki?
Quick Overview
This is the “no-fuss” way to get amazing tzatziki in your life. We’re talking about grating some cucumber, squeezing out the excess water (this is key!), chopping a little garlic and dill, and then mixing it all up with creamy Greek yogurt, a splash of lemon juice, and a drizzle of Olive oil. That’s pretty much it! You’ll get a vibrant, flavorful dip that’s far superior to store-bought versions, ready in minutes. It’s designed to be forgiving, so even if you’re new to making dips from scratch, you’re going to nail this.
Ingredients
For the Main Dip:
2 cups full-fat Greek yogurt (this is non-negotiable for creaminess!)
1 medium cucumber (English cucumbers are great because they have fewer seeds and thinner skins)
2 cloves garlic, minced very finely (or use a garlic press – I swear by mine!)
2 tablespoons fresh dill, finely chopped (you can substitute with mint, or do a mix!)
1 tablespoon fresh lemon juice (start with this, add more to taste)
1 tablespoon extra virgin olive oil (for that lovely richness)
Salt and freshly ground black pepper, to taste
For Grating the Cucumber:
A box grater or food processor with a grating attachment. I usually just use my box grater – it feels more authentic and gives me that satisfying texture.
For Squeezing Out Moisture:
Cheesecloth, a clean kitchen towel, or even just your hands! This step is super important for texture.
Step-by-Step Instructions
Step 1: Prep the Cucumber
First things first, let’s tackle the cucumber. Wash it well, and then you’re going to grate it. I like to use the large holes on my box grater. Grate it into a bowl. Now comes the crucial part: getting rid of excess water. If you skip this, your tzatziki will be watery and sad. Take handfuls of the grated cucumber and squeeze out as much liquid as you possibly can. You can wrap it in cheesecloth or a clean kitchen towel and wring it out. Seriously, squeeze until your hands hurt! The drier the cucumber, the thicker and creamier your dip will be.
Step 2: Mince Garlic and Chop Herbs
While the cucumber is draining a bit (or after you’ve squeezed it), mince your garlic as finely as you can. A garlic press is your best friend here if you want it super fine and evenly distributed. Then, finely chop your fresh dill. If you’re using mint, chop that too. Fresh herbs make all the difference, so try not to skip this!
Step 3: Combine the Base
In a medium bowl, add your full-fat Greek yogurt. It’s important to use full-fat for that luxurious creaminess; low-fat can sometimes be a bit watery. Add the squeezed-out cucumber, the minced garlic, chopped dill (or mint!), lemon juice, and olive oil. Give it all a good stir until everything is well combined.
Step 4: Season to Perfection
Now for the seasoning. Add salt and freshly ground black pepper to your taste. Start with about half a teaspoon of salt and a good grind of pepper, then taste and adjust. This is where you can really make it your own. Some people like more garlic, some like it tangier with extra lemon. This is your moment to shine!
Step 5: Chill and Marry Flavors
This step is optional but highly recommended. Cover the bowl and pop it in the refrigerator for at least 15-30 minutes. This allows all those beautiful flavors to meld together and become even more delicious. It also ensures your dip is nice and cool, which is just heavenly.
Step 6: Serve!
Give it one last stir before serving. You can garnish with a little extra dill or a drizzle of olive oil if you’re feeling fancy. And that’s it! You’ve just made incredibly fresh, easy tzatziki. How easy was that?
Step 7: Slice and Serve
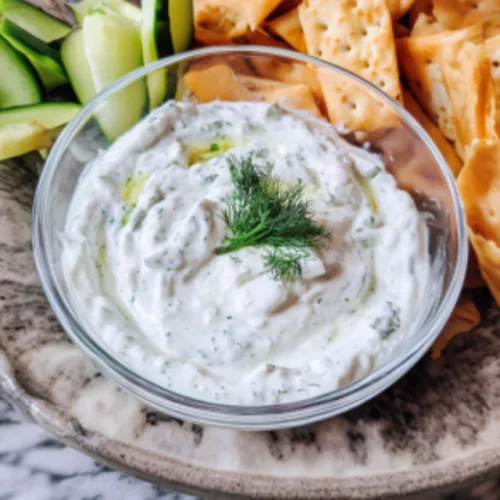
This part is really about presentation. I like to spoon the tzatziki into a nice serving bowl. Sometimes I’ll make a little swirl on top with the back of a spoon, maybe sprinkle a few extra dill fronds, or add a thin drizzle of good olive oil right before serving. It looks beautiful and inviting. Serve it with your favorite dippers!
What to Serve It With
Oh, the possibilities are endless, and this is where the “easy” in my easy tzatziki truly shines because it’s so adaptable! For breakfast, I love having a small dollop on my avocado toast or with some scrambled eggs. It adds a fantastic freshness that cuts through the richness. For a more elegant brunch, it’s an absolute star alongside grilled halloumi, smoked salmon, or even as a spread on mini quiches. Think of it as a sophisticated spread that’s still incredibly simple. As a dessert… okay, maybe not dessert, but as a healthy sweet craving satisfier? It’s surprisingly good with some sliced apples or pears, believe it or not! The cool, tangy flavor is a nice contrast. But where it really, truly shines is as a cozy snack or a main event companion. It’s the classic partner for pita bread (warm, of course!), veggie sticks like carrots, celery, and bell peppers, or crunchy tortilla chips. My family absolutely devours it with falafel and chicken souvlaki. And seriously, if you’re making burgers or gyros, this is the absolute must-have condiment. It makes even the simplest meal feel a bit exotic and special. I’ve even spread it on a wrap before adding chicken and veggies – it holds up beautifully and adds so much flavor without making it soggy.
Top Tips for Perfecting Your Easy Tzatziki
I’ve made this easy tzatziki more times than I can count, and over the years, I’ve picked up a few tricks that make it even better. Let’s dive into some of my favorite tips! For the zucchini prep, remember that squeezing out the water is *paramount*. I’ve learned the hard way that under-squeezing leads to a watery dip that just doesn’t have that luxurious texture. So, really get in there and wring it out like you mean it! When it comes to mixing, the key is gentle folding. You’re not trying to develop gluten here; you’re just combining creamy ingredients. Overmixing can sometimes make the yogurt feel a bit… off. Just fold everything together until it’s uniform. My personal favorite part is the flavor customization. Don’t be afraid to play with the garlic and lemon. I find that fresh lemon juice is always best, but if you only have bottled, start with a little less as it can be more potent. For the herbs, dill is classic, but I’ve had amazing results with fresh mint, or even a mix of both. A tiny pinch of dried mint can also be interesting, but fresh is always preferred for that vibrant aroma. If you want a little more kick, a tiny pinch of red pepper flakes can be a fun addition, but it’s not traditional. Ingredient swaps are fun too! While I swear by full-fat Greek yogurt, if you’re in a pinch, thick strained yogurt works. Avoid regular pourable yogurt; it’s just too thin. For a dairy-free option, a thick coconut yogurt or a cashew-based yogurt can work, but the flavor profile will change a bit. You might need to adjust seasonings. Baking tips? Well, this isn’t a baked dish, but if you’re serving it alongside something warm, make sure your tzatziki is nice and cold – it’s that contrast that’s so delicious. The biggest tip I can give you is to taste and adjust. Everyone’s palate is different, so season it until it sings to you!
Storing and Reheating Tips
Keeping this delicious easy tzatziki fresh is super simple, and it’s great because you can make it ahead of time. At room temperature, I wouldn’t leave it out for more than two hours, just for food safety reasons. If you’re at a picnic, keep it in a well-chilled cooler. For refrigerator storage, this is where it truly excels. Store it in an airtight container. I usually use glass or a good quality plastic container. It will stay wonderfully fresh in the fridge for about 3 to 4 days. After about day 2, the garlic can become a little more pronounced, which I actually don’t mind! If you find it’s gotten a bit thicker than you like after a few days, you can always stir in a tiny bit more lemon juice or a splash of water to loosen it up. Freezer instructions? This one’s a bit tricky. Tzatziki can sometimes separate when frozen and thawed, especially the yogurt. I generally don’t recommend freezing it for the best texture. However, if you absolutely must, pack it tightly in freezer-safe containers, leave a little headspace for expansion, and freeze for up to a month. Thaw it slowly in the refrigerator overnight. Be prepared to stir it vigorously, and you might need to drain off any excess liquid that separates. For glaze timing advice (though this recipe doesn’t have a glaze!), for dips like this, it’s best to add any garnishes right before serving to keep them fresh.
Frequently Asked Questions
Final Thoughts
There you have it – my beloved, incredibly easy tzatziki recipe! It’s one of those recipes that just makes me happy every time I make it, and even happier when I see how much everyone enjoys it. It’s proof that you don’t need complicated techniques or fancy ingredients to create something truly delicious and impressive. This dip is all about freshness, vibrant flavors, and that wonderful cool, creamy texture that’s just so satisfying. It’s perfect for potlucks, game nights, or just for jazzing up a simple weeknight dinner. If you’re a fan of this, you might also enjoy my recipe for [Link to another relevant recipe, e.g., “Hummus Recipe” or “Greek salad dressing“]. They share that same fresh, Mediterranean vibe. I really hope you give this easy tzatziki a try. It’s a game-changer, and I can’t wait to hear how it turns out for you! Let me know in the comments below if you try it, and what you serve it with. Happy dipping!
easy tzatziki
Ingredients
Main Ingredients
- 2 cups plain Greek yogurt full-fat recommended
- 1 English cucumber or 1 regular cucumber, peeled and seeded
- 2 cloves garlic minced
- 2 tablespoons fresh dill finely chopped
- 1 tablespoon extra virgin olive oil
- 1 tablespoon white wine vinegar or fresh lemon juice
- 0.5 teaspoon salt or to taste
- 0.25 teaspoon black pepper freshly ground, or to taste
Instructions
Preparation Steps
- Grate the cucumber using a box grater or food processor. Place the grated cucumber in a fine-mesh sieve or wrap it in a clean kitchen towel and squeeze out as much excess liquid as possible. This step is crucial to prevent the tzatziki from becoming watery.
- In a medium-sized bowl, combine the strained grated cucumber with the Greek yogurt, minced garlic, chopped fresh dill, olive oil, and white wine vinegar (or lemon juice).
- Stir all ingredients together until well combined. Season with salt and freshly ground black pepper to taste. Start with the suggested amounts and adjust as needed.
- For best flavor, cover the bowl and refrigerate the tzatziki for at least 30 minutes before serving. This allows the flavors to meld together.
- Serve chilled as a dip with pita bread or vegetables, as a sauce for grilled meats, or as a spread on sandwiches.