There are some recipes that just feel like a warm hug. They bring you back to childhood kitchens, to lazy Sunday afternoons, or to that feeling of pure, unadulterated comfort. This Amish baked custard is one of those recipes for me. It’s not fancy, it doesn’t require a million exotic ingredients, but oh, the flavor! It’s like sunshine in a bowl, creamy and rich with just the perfect hint of sweetness. My Grandma used to make this for us after church every few weeks, and the aroma would fill the entire house, making my sisters and I practically vibrate with anticipation. It’s so simple, yet so incredibly satisfying. If you’ve ever had the pleasure of trying a truly good baked custard, you know what I’m talking about. It’s a world away from the watery, bland versions you sometimes encounter. This one, though? This is the real deal, the kind that makes you close your eyes and savor every single spoonful. It’s one of my go-to’s when I need a little bit of sweetness without a whole lot of fuss, and honestly, it’s become my secret weapon when unexpected guests pop over. They always think I’ve slaved away for hours!
What is baked custard?
So, what exactly is this delightful treat we’re talking about? Think of Amish baked custard as the purest expression of simple, wholesome ingredients coming together to create something truly magical. It’s essentially a rich, creamy dessert made from eggs, milk (or cream, if you’re feeling decadent!), sugar, and a touch of vanilla. The “Amish” part often implies a dedication to traditional, no-fuss methods and a reliance on pantry staples. There are no fancy flavorings or complicated steps here. It’s baked slowly and gently in a water bath, which is the secret to its incredibly smooth, silky texture. Unlike a crème brûlée, there’s no caramelized sugar crust (though you *could* add one if you wanted!), and it’s not quite as dense as a Bread pudding. It’s just… perfect. It’s the kind of dessert that feels both incredibly indulgent and wonderfully honest. It’s the comforting embrace of dairy and eggs, sweetened just enough to make your taste buds sing. My Grandma always said it was like “liquid sunshine,” and I couldn’t agree more.
Why you’ll love this recipe?
There are so many reasons why this Amish baked Custard Recipe has earned a permanent spot in my heart (and my recipe binder!). For starters, the flavor is absolutely divine. It’s got this incredibly rich, creamy mouthfeel, and the vanilla is just prominent enough to be warm and inviting without being overpowering. It’s the perfect balance of sweet and comforting. And the simplicity? Oh my goodness, it’s a lifesaver! You can whip up the ingredients in literally minutes, and then the oven does all the hard work. It’s perfect for those nights when you’re craving something sweet but don’t have hours to bake. Plus, it’s incredibly budget-friendly. The core ingredients are things most of us already have in our pantry or fridge – eggs, milk, sugar, vanilla. It feels like a little bit of magic for very little cost. What I love most about this recipe, though, is its versatility. While it’s fantastic on its own, it’s also a wonderful base for so many other things. Think fresh berries in the summer, a drizzle of caramel in the fall, or even a sprinkle of cinnamon on a chilly morning. It’s not fussy, it’s just pure, delicious joy. It’s the kind of recipe that makes you feel like a baking rockstar, even if you’re a complete beginner. Honestly, if you’ve ever struggled with custards that split or turn rubbery, this method is a game-changer. It’s foolproof, and the results are consistently fantastic. I’ve even experimented with adding a touch of nutmeg or a hint of orange zest, and it’s always a hit!
How do I make Amish Baked Custard?
Quick Overview
This Amish baked custard is all about gentle cooking for a luxuriously smooth texture. You’ll whisk together your simple ingredients, pour them into ramekins, and then bake them in a water bath. This slow, steady heat ensures a creamy, set custard without any curdling or overcooking. It’s a straightforward process that yields incredibly professional-looking and tasting results. The whole thing comes together pretty quickly on the stovetop before heading into the oven, making it manageable even on a weeknight. Seriously, the biggest challenge is waiting for it to cool!
Ingredients
For the Main Batter:
Here’s what you’ll need for the heart of our custard. I always try to use whole milk because it gives the creamiest result, but 2% works just fine if that’s what you have. Some folks swear by using half-and-half or even a bit of heavy cream for an extra-rich custard, and if you want to go there, absolutely do! It’s your custard, after all. For vanilla, I’m a huge fan of pure vanilla extract; it just has a depth of flavor that imitation extract can’t quite match. But if imitation is what you’ve got, it’ll still be delicious. The key is good quality eggs, and I usually use large ones for consistency.
- 4 cups whole milk
- 4 large eggs
- 3/4 cup granulated sugar
- 2 teaspoons pure vanilla extract
- Pinch of salt
For the Filling:
This is where the magic really happens. We’re talking about the actual custard mixture that will become that silky-smooth dessert. No complex steps here, just a simple combination of the best ingredients.
- (See main batter ingredients above)
For the Glaze:
This isn’t really a separate “glaze” in the traditional sense for this recipe, but rather the caramelized sugar that forms naturally on top if you broil it briefly at the end, or you can just enjoy it plain! If you’re feeling adventurous, a simple sprinkle of nutmeg or cinnamon can be lovely too.
- (Optional: Light dusting of nutmeg or cinnamon)
Step-by-Step Instructions
Step 1: Preheat & Prep Pan
First things first, let’s get your oven ready. Preheat it to 325 degrees Fahrenheit (160 degrees Celsius). While the oven is warming up, you’ll want to prepare your baking dish. I usually use a 9×13 inch baking dish for this, as it holds about 6-8 standard ramekins or custard cups. If you don’t have ramekins, you can even bake this in one large oven-safe dish, but individual portions are always fun! Make sure your baking dish is deep enough to hold about an inch of hot water around the ramekins. I like to put the ramekins directly into the larger baking dish *before* I fill them with custard – it’s much easier that way than trying to move them when they’re full of liquid.
Step 2: Mix Dry Ingredients
In a medium bowl, whisk together the granulated sugar, a pinch of salt, and a tiny dusting of nutmeg if you’re using it. You don’t need to do anything fancy here, just give it a good stir to make sure the sugar is evenly distributed. This helps prevent any clumps of sugar when you add the wet ingredients later. It’s a small step, but it makes a difference in the final texture.
Step 3: Mix Wet Ingredients
In a separate large bowl, crack your eggs. Give them a gentle whisk until they’re just broken and starting to get a little frothy. Don’t go crazy here; you don’t want to incorporate too much air. Then, gradually whisk in the whole milk and the pure vanilla extract. Make sure it’s all combined smoothly. You should have a nice, pale yellow liquid. If you’re using a good quality vanilla, you’ll already start to smell that wonderful aroma!
Step 4: Combine
Now, we bring it all together. Pour the dry ingredients into the wet ingredients. Whisk gently until everything is just combined. Seriously, *just* combined. Overmixing can make your custard tough, and we want it to be super smooth and delicate. You’ll see the sugar dissolve into the liquid. A few whisks until you don’t see any dry pockets is all you need. It should look like a lovely, smooth liquid, ready for its transformation.
Step 5: Prepare Filling
This is the “filling” for our ramekins! The mixture you just made in step 4 is your filling. You want to pour this liquid custard into your prepared ramekins. I like to fill them about three-quarters of the way full. Using a ladle or a pitcher with a spout makes this part a lot cleaner and easier. Try to distribute the liquid evenly among the ramekins.
Step 6: Layer & Swirl
This step is technically already done once you’ve poured the custard into your ramekins! The “layering” is the liquid itself, and there’s no “swirling” needed for a classic Amish baked custard. If you were making a marble cake or something similar, this would be where you’d swirl, but for this simple custard, it’s all about that beautiful, even texture. Just ensure the custard is evenly distributed in each ramekin before it goes into the oven.
Step 7: Bake
Now for the crucial part: the water bath, also known as a *bain-marie*. Carefully place your baking dish with the filled ramekins into the preheated oven. Then, gently pour hot water into the baking dish around the ramekins until the water comes about halfway up the sides of the ramekins. This water bath creates a gentle, humid environment, which is key to preventing the custard from cracking or becoming rubbery. Bake for about 30-40 minutes. The custard is done when the edges are set but the center still has a slight jiggle when you gently shake the dish. It will continue to set as it cools. Don’t overbake it! That’s the biggest mistake people make.
Step 8: Cool & Glaze
Once the custard is baked, carefully remove the baking dish from the oven. Then, very carefully lift out the ramekins from the hot water bath (I usually use tongs or oven mitts for this). Let them cool on a wire rack at room temperature for about 30 minutes. Then, cover them with plastic wrap and pop them into the refrigerator for at least 2-3 hours, or until completely chilled and set. This chilling time is essential for the custard to firm up perfectly. If you want that lovely caramelized top like a crème brûlée, you can sprinkle a thin layer of sugar on top once it’s chilled and briefly broil it until caramelized. Watch it VERY carefully, as it can burn quickly!
Step 9: Slice & Serve
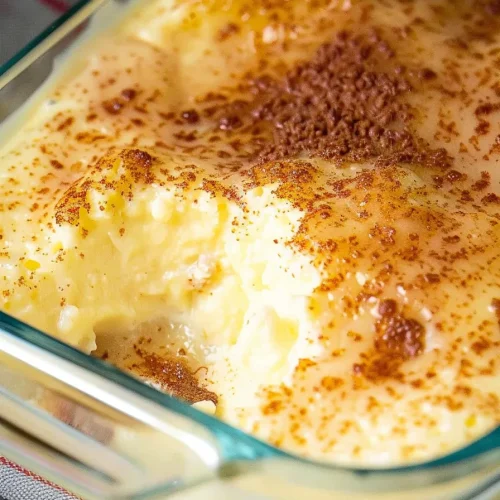
Once the custard is thoroughly chilled, it’s ready to serve! If you made them in ramekins, you can either eat them right out of the dish or carefully run a thin knife around the edge and invert them onto serving plates. If you baked it in one large dish, slice it into portions as you would a pie or cake. Serve it chilled. A little sprinkle of cinnamon or nutmeg on top is always a nice touch, or a few fresh berries if you have them. Enjoy that heavenly creamy goodness!
What to Serve It With
This Amish baked custard is so wonderfully versatile; it can truly fit into any meal or craving. For a truly classic breakfast, I love serving a smaller portion alongside a good cup of coffee. It’s not too sweet to start the day, and that creamy texture is just lovely. Sometimes, if I’m feeling a bit fancy, I’ll add a few fresh berries – raspberries or blueberries are perfect – on top for a pop of color and freshness. For brunch, it shines. You can present it in those pretty individual ramekins, perhaps with a tiny mint sprig for elegance. It pairs beautifully with other brunch staples like pancakes, waffles, or even a savory quiche. It’s that perfect sweet counterpoint without being overwhelming. As a dessert, well, it’s a star all on its own! But if you want to elevate it, a drizzle of warm caramel sauce or a dollop of freshly Whipped cream takes it to another level. In the fall, a sprinkle of cinnamon or a tiny grating of nutmeg feels like a cozy hug. For those moments when you just need a comforting snack, a small bowl of this Amish baked custard is pure bliss. It’s my secret weapon for satisfying a late-night sweet tooth without resorting to heavy cakes or cookies. It’s light enough to feel like a treat but substantial enough to feel truly satisfying.
Top Tips for Perfecting Your Amish Baked Custard
Over the years, I’ve learned a few tricks that make this Amish baked custard consistently perfect. One of the biggest is the water bath. Don’t skip it! It truly is the secret to that silky-smooth texture. Make sure the water is hot when you add it to the oven; it helps maintain a consistent temperature. Another thing I’ve learned is to watch for the jiggle! When the edges are set and the center still has a slight wobble, it’s done. It will firm up as it cools. Pulling it out too late is how you end up with a rubbery custard, and nobody wants that. I also learned the hard way to let it cool properly. Resist the urge to dive in right away! Chilling is essential for it to set up perfectly. I used to try and rush it, and it would be a bit too soft. Patience, my friends! For ingredient swaps, I’ve experimented with different milks. While whole milk is my favorite, I’ve used 2% with good results, and even a mix of milk and half-and-half for extra richness. I even tried it once with almond milk when a friend was visiting who was dairy-free, and it was surprisingly creamy, though the flavor was slightly different. For the sugar, if you prefer it less sweet, you can try reducing it slightly, maybe to about half a cup, but I find three-quarters of a cup is the sweet spot for that classic flavor. If you’re a vanilla lover like me, don’t be afraid to use a good quality extract; it really does make a difference in the depth of flavor. And when it comes to baking dishes, while ramekins are lovely, don’t be afraid to use a larger, oven-safe dish if that’s all you have. Just adjust the baking time accordingly – a larger dish will take a bit longer to set.
Storing and Reheating Tips
Storing this delicious Amish baked custard is thankfully quite straightforward, and it holds up beautifully. If you’ve made it in individual ramekins and they’re covered tightly with plastic wrap or have their own lids, you can store them at room temperature for a few hours if they haven’t been in the fridge yet, but for best quality and safety, I always recommend refrigerating them as soon as they’ve cooled slightly. In the refrigerator, a well-covered baked custard will stay fresh and delicious for about 3 to 4 days. Make sure to use an airtight container or press the plastic wrap directly onto the surface of the custard to prevent it from absorbing any odors from other foods in your fridge. When it comes to reheating, I usually don’t reheat it at all; it’s best served chilled! However, if you absolutely prefer it slightly warm, you can gently warm individual portions in the microwave for about 15-30 seconds at a time, checking frequently, or place the ramekin in a shallow pan of warm water and heat very gently on the stovetop. Be careful not to overheat, as it can cause the custard to curdle. If you happen to have any leftovers that have been chilled, they are still perfectly good to eat cold. For the glaze, if you did the broiled sugar top, that’s best done just before serving, as it can soften over time in the fridge. If you’re planning to store it and add toppings later, that’s perfectly fine too. I haven’t personally tried freezing this custard, as I find it’s best enjoyed fresh, but if you were to try, I would suggest freezing it *without* any topping, and thawing it in the refrigerator overnight before serving.
Frequently Asked Questions
Final Thoughts
There you have it – my beloved Amish baked custard recipe. It’s simple, honest, and just about the most comforting thing you can whip up in your kitchen. It’s the kind of dessert that proves you don’t need complicated steps or fancy ingredients to create something truly spectacular. It’s a testament to the beauty of good quality staples and a little bit of patience. I hope you give this recipe a try and experience that same warm, nostalgic feeling it brings to my family. If you love this recipe, you might also enjoy my Grandma’s Classic Apple Pie or my Easy Homemade Vanilla Bean Ice Cream – they share that same spirit of simple, delicious comfort. I can’t wait to hear how your Amish baked custard turns out! Please feel free to leave a comment below with your thoughts, any variations you tried, or just to say hello. Happy baking, and enjoy every creamy spoonful!
Amish Baked Custard
Ingredients
Main Ingredients
- 1 can sweetened condensed milk 14 ounces
- 4 cups hot water
- 6 eggs
- 2 teaspoons vanilla extract
- 0.25 teaspoons salt
- Nutmeg for garnish
Instructions
Preparation Steps
- Preheat the Oven: Start by heating your oven to 325°F (160°C) to ensure it's ready for baking.
- Mix Milk and Water: In a large bowl, blend 14 ounces (1 can) of sweetened condensed milk with 4 cups of hot water until well combined.
- Whisk Eggs: In a separate bowl, vigorously whisk 6 eggs until they're light and airy.
- Temper Eggs: Slowly pour a small amount of the hot milk mixture into the whisked eggs, whisking constantly to prevent the eggs from cooking.
- Combine: Once the eggs are tempered, mix them back into the main milk mixture. Stir in 2 teaspoons of vanilla extract and 0.25 teaspoon of salt.
- Prepare for Baking: Pour the mixture into individual ramekins placed in a baking pan, or into a single 2-quart baking dish.
- Water Bath: If using ramekins, fill the pan around them with a half-inch of hot water. For a single dish, place a pan of hot water on the lower oven rack.
- Bake: Bake for 1 hour, or until the custard sets and a knife inserted comes out clean. If using a larger dish, extend the baking time to 1 hour and 40 minutes.
- Cool and Serve: Let the custard cool for 1 hour. Then sprinkle with nutmeg. Enjoy it warm or chilled, according to your preference.