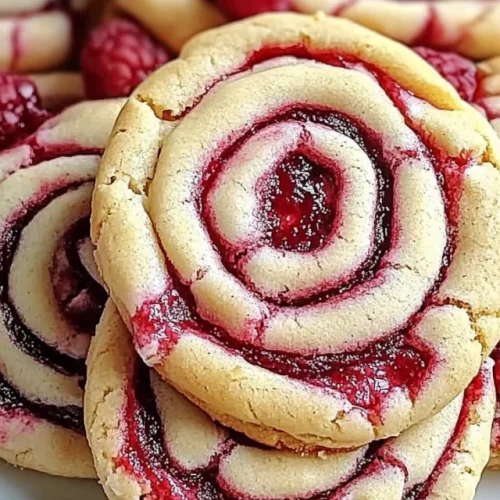
Oh, these Raspberry Swirl Cookies! Honestly, when I think of comfort food, this is one of the first things that pops into my head. It’s like a little hug you can hold in your hand, studded with bright bursts of raspberry goodness. I remember my grandma making something similar when I was little, though hers were more of a rustic, crumble-top affair. This version, though, with its gorgeous swirls and tender crumb, is something I’ve tinkered with over the years to make it absolutely perfect. It’s got that wonderful balance of sweet and a tiny bit tart, and the texture? It’s just divine – not too cakey, not too dense, but perfectly moist and tender. If you’ve ever loved a good blondie or a chewy cookie bar, you’re going to adore these Raspberry Swirl Cookies. They’re a total game-changer, especially when you need a little pick-me-up without a ton of fuss.
What are Raspberry Swirl Cookies?
So, what exactly are these little beauties? Think of them as a delightful hybrid. They’re not quite a cake, not quite a cookie in the traditional sense, but more like a rich, tender bar cookie with a gorgeous, swirled-in raspberry ribbon running all through it. The base is wonderfully soft and buttery, a bit like a blondie, but with a bit more structure. Then, we add a simple, vibrant raspberry filling that gets swirled in before baking, creating these stunning marbled patterns. Each bite is a perfect combination of that sweet, slightly chewy cookie base and the bright, fruity punch of the raspberries. It’s that simple, yet that elegant. It’s the kind of treat that looks impressive without needing any fancy decorating skills, making it perfect for bake sales, potlucks, or just a Tuesday afternoon treat when you need a little sunshine.
Why you’ll love this recipe?
There are so many reasons why I keep coming back to this Raspberry Swirl cookies recipe, and I just know you’ll fall in love with it too. First off, the flavor is just out of this world. You get that rich, buttery base that’s subtly sweet, and then BAM! You hit a pocket of bright, slightly tart raspberry that cuts through the richness perfectly. It’s not cloyingly sweet, which is something I really appreciate. Plus, the texture is just spot on – incredibly tender and moist, with just a hint of chewiness. It’s the kind of thing that makes everyone ask, “What IS this?”
And speaking of asking, you’ll also love how surprisingly simple it is to whip these up. No complicated techniques or a million steps involved. We’re talking about mixing up a quick batter and a simple raspberry swirl, then baking it all together. It’s honestly a lifesaver on busy nights when the sweet craving hits hard, or when you need to bring something to a gathering but don’t have a ton of time. My kids actually ask for these all the time, and they’re pretty tough critics!
Economically, this recipe is a winner too. The ingredients are pretty standard pantry staples, and fresh or frozen raspberries are usually quite affordable, especially when they’re in season. You get a lot of “wow” factor for the cost, which is always a good thing in my book. And the versatility! Oh, these are fantastic on their own, but they’re also amazing served warm with a scoop of vanilla ice cream, or drizzled with a little extra glaze if you’re feeling fancy. They’re also a fantastic option if you’re looking for something a little more substantial than a typical cookie but less effort than a full cake. They really do hit that sweet spot.
How do I make Raspberry Swirl Cookies?
Quick Overview
Making these Raspberry Swirl Cookies is a breeze! You’ll start by creaming together your butter and sugar, then adding eggs and vanilla. Next, you’ll gently mix in the dry ingredients to create a soft, pliable dough. While that rests for a moment, you’ll whip up a quick, vibrant raspberry filling. The magic really happens when you spread the cookie dough into your pan, dollop the raspberry filling over the top, and then use a knife or skewer to swirl it all together, creating those beautiful patterns. Bake until golden and set, let it cool, and then slice into glorious bars. It’s truly that straightforward, and the results are always so impressive!
Ingredients
For the Main Batter:
2 cups all-purpose flour: Make sure it’s your standard all-purpose flour. Spoon it into your measuring cup and level it off; don’t scoop directly from the bag, or you might end up with too much and a dry cookie. I’ve tested this with a bit of almond flour mixed in, and it adds a lovely depth, but stick to all-purpose for the classic texture.
1 teaspoon baking powder: This gives our cookies just the right amount of lift, keeping them tender and not dense.
1/2 teaspoon salt: Salt is crucial for balancing sweetness and enhancing all those delicious flavors.
1 cup (2 sticks) unsalted butter, softened: Make sure it’s properly softened – you want it pliable and easy to cream, not melted. Leave it out on the counter for about an hour before you start. European-style butter with higher fat content can make these extra rich!
1 1/2 cups granulated sugar: For that perfect sweetness. You can reduce it slightly to 1 1/4 cups if you prefer them less sweet, but I find this ratio is just right.
2 large eggs: Room temperature eggs incorporate better into the batter. If you forget to take them out, pop them in a bowl of warm water for about 5-10 minutes.
1 teaspoon vanilla extract: Use a good quality vanilla; it really makes a difference in the final flavor.
For the Filling:
2 cups fresh or frozen raspberries: If using frozen, don’t thaw them completely; a little firmness is good. You can also use other berries like strawberries or mixed berries if you like! I love using a mix of sweet and tart varieties.
1/4 cup granulated sugar: Adjust this based on the sweetness of your berries.
1 tablespoon cornstarch: This is our thickening agent to give the filling that perfect jammy consistency without being runny.
1 tablespoon lemon juice: A little acidity brightens up the raspberry flavor and balances the sweetness beautifully.
For the Glaze (Optional, but highly recommended!):
1 cup powdered sugar: Sifted for the smoothest glaze.
2-3 tablespoons milk or heavy cream: Start with 2 tablespoons and add more until you reach your desired drizzling consistency. Milk works great, but cream makes it extra luscious!
1/2 teaspoon vanilla extract (optional): For an extra hint of flavor.
Step-by-Step Instructions
Step 1: Preheat & Prep Pan
First things first, get your oven preheated to 350°F (175°C). I like to use a 9×13 inch baking pan. For easy removal and cleanup, I always line mine with parchment paper, leaving some overhang on the sides. This little trick makes lifting the entire baked cookie slab out a breeze! Lightly grease the parchment paper too, just to be safe.
Step 2: Mix Dry Ingredients
In a medium bowl, whisk together the flour, baking powder, and salt. Give it a good whisk to make sure everything is evenly distributed. This is a simple step, but it ensures your leavening and salt are spread throughout, leading to a more consistent texture in your final Raspberry Swirl Cookies.
Step 3: Mix Wet Ingredients
In a large bowl, cream together the softened butter and granulated sugar using an electric mixer (or a whisk and some elbow grease!). Beat until the mixture is light and fluffy, about 2-3 minutes. This process incorporates air, which is key for a tender cookie. Next, beat in the eggs, one at a time, until fully combined, then stir in the vanilla extract. Make sure to scrape down the sides of the bowl to get everything incorporated.
Step 4: Combine
Gradually add the dry ingredients to the wet ingredients, mixing on low speed (or stirring with a spatula) until just combined. Be careful not to overmix! Overmixing can develop the gluten in the flour, leading to tough cookies. You want to stop as soon as you no longer see streaks of flour. The dough will be thick and soft.
Step 5: Prepare Filling
While your dough is chilling slightly (or just resting while you make the filling), combine the raspberries, granulated sugar, cornstarch, and lemon juice in a small saucepan. Cook over medium heat, stirring frequently, until the raspberries break down and the mixture thickens to a jam-like consistency, about 5-7 minutes. If using frozen raspberries, it might take a little longer. Let this filling cool slightly; it will thicken up even more as it cools.
Step 6: Layer & Swirl
Spread about two-thirds of the cookie dough evenly into your prepared baking pan. It might be a little sticky, so wetting your fingers or using an offset spatula can help. Dollop spoonfuls of the slightly cooled raspberry filling over the top of this layer. Then, gently spread the remaining one-third of the cookie dough over the raspberry filling. Now for the fun part: take a knife or a skewer and gently swirl the raspberry filling into the dough layers. Don’t over-swirl; you want distinct ribbons of raspberry, not a uniform pink mess. Aim for a marbled effect!
Step 7: Bake
Bake in the preheated oven for 25-30 minutes, or until the edges are golden brown and the center is set. A toothpick inserted into the center should come out with moist crumbs attached, not wet batter. Keep an eye on it, as oven temperatures can vary!
Step 8: Cool & Glaze
Let the Raspberry Swirl Cookies cool in the pan on a wire rack for at least 20-30 minutes. This is crucial for them to set properly. Once mostly cooled, you can prepare the glaze. Whisk together the powdered sugar, milk (or cream), and vanilla extract until smooth and drizzly. Drizzle the glaze over the warm (but not hot) cookies. Let them cool completely before slicing. If you want a sharper glaze, wait until they are fully cooled before drizzling.
Step 9: Slice & Serve
Once the glaze is set, use the parchment paper overhang to lift the entire slab out of the pan. Place it on a cutting board and slice into your desired bar size. I usually cut mine into about 16-20 squares. Serve and enjoy the beautiful swirls and incredible flavor!
What to Serve It With
These Raspberry Swirl Cookies are so versatile, they fit in perfectly at almost any occasion. For breakfast, they’re a delightful treat alongside a steaming mug of coffee or a glass of cold milk. They’re not overly sweet, so they don’t feel like a dessert first thing in the morning, offering a little burst of fruity sweetness to start your day. Imagine these warming up slightly, perhaps with a light dusting of powdered sugar, alongside your morning brew – pure bliss!
For a slightly more elegant affair, like a weekend brunch, these are absolutely divine. Arrange them on a pretty platter, perhaps with some fresh berries scattered around. They look so inviting with those gorgeous swirls! They pair wonderfully with mimosas or a nice cup of herbal tea. They add that homemade touch that guests always appreciate without you having to slave away for hours.
As a dessert, they really shine. Serve them slightly warm with a scoop of good quality vanilla bean ice cream. The contrast of the warm, gooey cookie with the cold, creamy ice cream is just heavenly. A dusting of powdered sugar or a light drizzle of extra raspberry sauce also makes them feel extra special after dinner. They’re a lovely alternative to a heavy cake or pie.
And for those cozy, no-excuses snack moments? These are perfect. They’re great just grabbed from the container with a cup of tea while you’re curled up with a good book. My kids often grab one after school with a glass of milk, and it’s such a simple, satisfying treat that feels a little bit special. I’ve also found they’re surprisingly good crumbled over yogurt or oatmeal for a little extra flavor and texture. They are, in essence, a hug in a bite, perfect for any moment you need a little sweetness and comfort.
Top Tips for Perfecting Your Raspberry Swirl Cookies
I’ve made these Raspberry Swirl Cookies more times than I can count, and over the years, I’ve picked up a few tricks that really help ensure they turn out perfectly every single time. Let’s dive into some of my best advice!
Raspberry Prep: When you’re making the filling, don’t be afraid to let those raspberries break down. I actually like to get them nice and saucy before adding the cornstarch. If you’re using frozen berries, they tend to release more liquid, which is great for creating a jammy filling. Just be sure to let it cool a bit before swirling, or it might make your dough a little too soft.
Mixing Advice: The biggest culprit for tough cookies is overmixing. Once you add the flour to the wet ingredients, mix *just* until it’s combined. Seriously, stop as soon as you don’t see any dry flour streaks. A few little lumps are totally fine. I often finish mixing by hand with a spatula, as it gives you more control and helps prevent overworking the dough.
Swirl Customization: The swirl is where the artistry comes in! Don’t try to get too fancy or make it too perfect. The beauty is in the marbling. I usually use a butter knife or a wooden skewer and just gently drag it through the dough and filling a few times in different directions. You want to see distinct streaks of raspberry, not a uniform pink. It looks so much prettier that way, and it ensures you get that burst of raspberry in every bite.
Ingredient Swaps: If you don’t have fresh raspberries, frozen work wonderfully and are often more budget-friendly. Just be aware they might release a little more liquid. For the flour, I’ve experimented with using half all-purpose and half whole wheat flour, which adds a nice nutty flavor, but you might need to add an extra tablespoon or two of liquid. And for the glaze, if you want it thicker, just add more powdered sugar; thinner, add a tiny bit more milk or cream.
Baking Tips: Every oven is different, so keep an eye on your cookies. They’re done when the edges are set and lightly golden, and the center looks mostly cooked. A toothpick test is your friend here – it should come out with moist crumbs, not wet batter. If your oven tends to bake unevenly, you can rotate the pan halfway through baking.
Glaze Variations: The glaze is optional, but I find it adds that perfect finishing touch. For a thinner glaze, use more milk/cream; for a thicker one, use less. You can also add a tiny bit of lemon zest to the glaze for an extra pop of citrus, or even a drop of red food coloring if you want to amp up the color. If you’re not a fan of glaze, a simple dusting of powdered sugar after cooling is also lovely, or you could even drizzle them with melted White Chocolate!
Storing and Reheating Tips
One of the best things about these Raspberry Swirl Cookies is how well they store! They’re just as good, if not better, the next day. Here’s how I keep mine fresh and delicious:
Room Temperature: Once completely cooled (and this is important!), store them in an airtight container at room temperature. They’ll stay wonderfully moist and chewy for about 3-4 days. I usually just stack them carefully in a cookie tin or a plastic container. If you live in a very humid climate, you might want to keep them in the fridge to prevent any stickiness.
Refrigerator Storage: If you need them to last a bit longer, you can pop them in the refrigerator. Store them in an airtight container, and they should be good for up to a week. The texture might firm up a little in the fridge, but they’ll still be perfectly tasty. I often pull them out about 30 minutes before serving if they’ve been refrigerated to let them come to room temperature.
Freezer Instructions: These Raspberry Swirl Cookies freeze like a dream! For the best quality, I like to cut them into individual squares first. Wrap each square tightly in plastic wrap, then place them in a freezer-safe bag or container. They can be stored in the freezer for up to 2-3 months. To thaw, simply unwrap them and let them come to room temperature on a wire rack. This usually takes an hour or two, depending on the size of the squares.
Glaze Timing Advice: This is super important! If you plan on storing your cookies for more than a day, I highly recommend waiting to add the glaze until *just before* you’re ready to serve them. If you glaze them and then store them, especially at room temperature, the glaze can get a bit sticky or melty. So, bake, cool, slice, and store them plain. Then, when you’re ready to enjoy them, whip up a quick batch of glaze and drizzle away!
Frequently Asked Questions
Final Thoughts
So there you have it – my beloved Raspberry Swirl Cookies! I really hope you give these a try. They’re one of those recipes that feels like a treat without requiring you to be a master baker. The combination of the tender, buttery cookie base and the bright, zesty raspberry swirl is just pure magic, and I truly believe they have the power to brighten any day. They’re perfect for those moments when you want something homemade, comforting, and just a little bit special.
If you enjoy these Raspberry Swirl Cookies, you might also love my Lemon Raspberry Scones for another fruity treat, or my Classic Blondies if you’re a fan of that rich, chewy base. I’m always tinkering in the kitchen, so I hope this inspires you to get creative with your own baking adventures!
I’d absolutely love to hear how yours turn out! Please leave a comment below with your thoughts, any variations you tried, or just to say hello! And if you’re feeling inspired, don’t forget to rate the recipe and share your photos. Happy baking, friends!
Raspberry Swirl Cookies
Ingredients
For the Cookie Dough
- 2.5 cups all-purpose flour
- 1 teaspoon baking powder
- 0.5 teaspoon salt
- 1 cup unsalted butter softened (2 sticks)
- 1.5 cups granulated sugar
- 2 large eggs
- 1 teaspoon vanilla extract
For the Raspberry Swirl
- 1 cup seedless raspberry jam
Instructions
Making the Cookie Dough
- In a medium bowl, whisk together the all-purpose flour, baking powder, and salt. Set aside.
- In a large bowl, using an electric mixer, cream together the softened unsalted butter and granulated sugar until light and fluffy, about 2-3 minutes.
- Beat in the eggs one at a time, mixing well after each addition. Stir in the vanilla extract.
- Gradually add the dry ingredients to the wet ingredients, mixing on low speed until just combined and a soft dough forms. Be careful not to overmix.
- Divide the dough in half, flatten each half into a disk, wrap tightly in plastic wrap, and refrigerate for at least 30 minutes to firm up.
Assembly and Chilling
- On a lightly floured surface or between two sheets of parchment paper, roll out one disk of chilled dough into a 12x8 inch rectangle.
- Spread 0.5 cup of seedless raspberry jam evenly over the dough, leaving a 0.5-inch border on all sides.
- Starting from one long side, carefully roll the dough into a tight log. Pinch the seam to seal.
- Wrap the log tightly in plastic wrap and repeat with the second disk of dough and remaining jam.
- Refrigerate both dough logs for at least 2 hours, or until firm enough to slice easily. You can also refrigerate them overnight.
Baking the Cookies
- Preheat your oven to 375°F (190°C). Line baking sheets with parchment paper.
- Unwrap one dough log and slice into 0.25-inch thick rounds using a sharp knife.
- Place the sliced cookies 1 inch apart on the prepared baking sheets.
- Bake for 10-12 minutes, or until the edges are lightly golden. The centers may still appear soft but will firm up as they cool.
- Let the cookies cool on the baking sheets for a few minutes before carefully transferring them to a wire rack to cool completely.