Okay, so picture this: It’s late, you’ve had a long day, and suddenly, a craving hits. Not just any craving, but that deep, insistent need for something sweet, chocolatey, and utterly decadent. The thought of baking a cake or even making cookies feels like climbing Mount Everest, right? That’s exactly when my brain automatically goes to this absolute gem of a recipe: Easy Rocky Road Fudge. Seriously, it’s the kind of thing that makes you feel like a baking wizard with minimal effort. I remember the first time I whipped this up; it was during a chaotic holiday season, and I needed a quick, crowd-pleasing treat for a last-minute get-together. My friends were absolutely raving, convinced I’d spent hours slaving away in the kitchen. Little did they know, this magical fudge is almost embarrassingly simple. It’s like the cheat code to deliciousness, and honestly, it’s probably my most requested treat during the fall and winter months. Forget complicated chocolate tempering or fussy doughs; this is pure, unadulterated joy in fudge form, and it puts even the most elaborate brownies to shame in terms of sheer, satisfying ease.
What is easy Rocky Road Fudge?
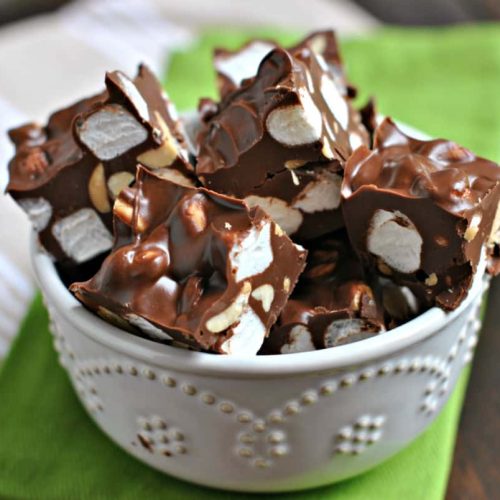
So, what exactly *is* this magical concoction? At its heart, Easy Rocky Road Fudge is a no-bake, intensely chocolatey treat packed with all the classic rocky road goodies: chewy marshmallows, crunchy nuts, and a rich, fudgy base. The “rocky road” part comes from the delightful texture and visual appeal created by these mix-ins, which stud the smooth chocolate like little treasures. Think of it as your favorite rocky road ice cream, but solidified into a dense, melt-in-your-mouth bar that you can slice and serve. It’s not complicated, it doesn’t require a double boiler, and it certainly doesn’t demand a degree in confectionery science. It’s essentially a shortcut to that comforting, nostalgic flavor we all love, made accessible for even the most kitchen-averse among us. It’s the sweet hug you didn’t know you needed, in fudge form!
Why you’ll love this recipe?
I love rocky road fudge, and I’m convinced you will too. I’m so obsessed with it.flavor is just out of this world. It’s a deep, rich chocolate that’s perfectly balanced with the sweetness of the marshmallows and the satisfying crunch of the nuts. It hits that sweet spot between intensely chocolatey and perfectly sweet – not too much of either. Then there’s the simplicity. I’m talking melt, stir, add, pour, chill. That’s it. No fancy techniques, no delicate stirring for hours. It’s a lifesaver when you’re short on time but still want to bring something impressive to the table. It’s also incredibly cost-efficient. The ingredients are pretty standard pantry staples or easily found at any grocery store, meaning you can whip up a big batch without breaking the bank, which is always a win in my book, especially when I’m making goodie bags for school events or holiday parties. And the versatility! While the classic combination is divine, you can totally play around with it. Add dried cherries, swap out the nuts, or even add a swirl of caramel. It’s perfect for birthdays, holidays, bake sales, or just for those moments when you need a little sweet pick-me-up. What I love most about this is that it always feels like a special treat, even though it takes virtually no effort. It’s proof that you don’t need to be a gourmet chef to create something truly delicious and memorable.
How do I make Rocky Road Fudge?
Quick Overview
This recipe is all about achieving maximum flavor and texture with minimal fuss. We’ll be melting down good quality chocolate with a few key ingredients to create a luscious base, then stirring in a generous amount of marshmallows and nuts. The magic happens when it chills, setting into that perfectly dense, chewy, and crunchy fudge we all crave. It’s a foolproof method that consistently delivers incredible results, making it my go-to for satisfying those rocky road cravings in a flash.
Ingredients
For the Chocolate Base:
You’ll want to use good quality chocolate chips or a chopped chocolate bar here. I find semi-sweet chocolate gives the best balance of sweetness and chocolate intensity, but milk chocolate works too if you prefer something sweeter. Don’t skimp on the chocolate quality; it makes a noticeable difference!
– 3 cups (about 18 ounces) semi-sweet chocolate chips or chopped chocolate
– 1 can (14 ounces) sweetened condensed milk
– 2 tablespoons unsalted butter
– 1 teaspoon vanilla extract
For the Rocky Road Mix-ins:
This is where the fun really begins! The combination of chewy marshmallows and crunchy nuts is classic for a reason, but feel free to get creative with your additions. Make sure your marshmallows are fresh so they stay nice and gooey.
– 2 cups mini marshmallows, plus more for topping (optional)
– 1 cup chopped nuts (walnuts or pecans are traditional and delicious!)
– 1/2 cup chocolate chips (mini or regular, for extra chocolate bursts)
Step-by-Step Instructions
Step 1: Preheat & Prep Pan
Grab an 8×8 inch baking pan. Line it with parchment paper, making sure to leave some overhang on the sides. This overhang will act as handles, making it super easy to lift the fudge out once it’s set. Give the parchment paper a little grease with cooking spray or butter – just a light coating is fine. This step is crucial for easy removal and clean cuts later on.
Step 2: Melt the Chocolate Base
In a medium, microwave-safe bowl, combine the chocolate chips, sweetened condensed milk, and butter. Microwave in 30-second intervals, stirring well after each interval, until the chocolate is completely melted and the mixture is smooth and glossy. Be patient; you don’t want to scorch the chocolate. Alternatively, you can use a double boiler over simmering water, stirring constantly until smooth.
Step 3: Stir in Vanilla
Once the chocolate mixture is smooth and melted, stir in the vanilla extract. This adds a subtle depth of flavor that really rounds out the chocolateiness. Give it a good, thorough mix.
Step 4: Add Marshmallows and Nuts
Now for the “rocky road” part! Gently fold in the 2 cups of mini marshmallows, the chopped nuts, and the 1/2 cup of chocolate chips. Stir just until everything is evenly distributed throughout the chocolate mixture. You don’t want to overmix here, as you want those delicious chunks to remain distinct.
Step 5: Pour into Pan
Pour the mixture into your prepared baking pan. Use a spatula to spread it out evenly, pressing it down gently to fill all the corners. If you’re feeling fancy, you can sprinkle a few extra mini marshmallows or chocolate chips on top for decoration. Press them in lightly so they stick.
Step 6: Chill to Set
This is the hardest part: waiting! Cover the pan loosely with plastic wrap and place it in the refrigerator for at least 2-3 hours, or until the fudge is completely firm and set. The colder it is, the easier it will be to cut cleanly.
Step 7: Slice and Serve
Once the fudge is firm, use the parchment paper overhangs to lift it out of the pan onto a cutting board. For the cleanest cuts, use a sharp knife that’s been warmed under hot water and dried. Slice the fudge into bite-sized squares. If it’s very cold, let it sit at room temperature for about 10-15 minutes before slicing for easier cutting. Enjoy your incredibly easy, absolutely delicious rocky road fudge!
What to Serve It With
This easy rocky road fudge is so versatile, it really can be enjoyed in so many ways! For a simple breakfast treat (because who says fudge can’t be a morning indulgence?), I love pairing a small square with a strong cup of coffee. It’s surprisingly satisfying and gives you that little boost of chocolatey goodness to start your day. It’s also fantastic on a weekend morning when you’re not rushing out the door.
When it comes to brunch, I like to elevate the presentation. Cut the fudge into smaller, elegant cubes and arrange them on a pretty platter alongside fresh berries or a dollop of Whipped cream. It adds a touch of decadence to the spread without being overwhelming. A glass of iced coffee or a mimosa pairs beautifully with it.
As a no-fuss dessert, it’s a winner every time. I often serve it as part of a dessert board with other small treats, or just a single, perfect square after a hearty meal. It’s the perfect sweet ending that doesn’t require any baking. For a slightly richer experience, try serving it with a scoop of vanilla bean ice cream – the contrast of warm and cold, creamy and chewy, is pure bliss.
And for those cozy snacks? This is its natural habitat! Grab a piece (or two!) while you’re curled up on the couch with a good book and a mug of hot chocolate or tea. It’s pure comfort food. My kids absolutely love it after school, and it’s always the first thing to disappear from any plate I bring to a gathering. It’s just that reliably delicious!
Top Tips for Perfecting Your Easy Rocky Road Fudge
I’ve made this easy rocky road fudge more times than I can count, and over the years, I’ve picked up a few tricks that I think will help you achieve fudge perfection. The quality of your chocolate really does matter. While semi-sweet chips are great, using a good brand of chopped chocolate (like Ghirardelli or Guittard) or even a blend of semi-sweet and dark chocolate can elevate the flavor significantly. Avoid using candy melts; they don’t have the same richness or smooth texture.
When it comes to the marshmallows and nuts, don’t be afraid to customize! If you’re not a fan of walnuts, try pecans, almonds, or even peanuts. You could even mix in some dried cranberries or cherries for a tart counterpoint. For an extra layer of flavor, I sometimes lightly toast my nuts before chopping them – it brings out their natural sweetness and adds a lovely depth. And for the marshmallows, using fresh ones is key; stale marshmallows can become hard and unappealing.
The sweetened condensed milk is non-negotiable for achieving that signature creamy, fudgy texture without any boiling or candy thermometer fuss. Make sure you stir it in thoroughly with the melted chocolate and butter until everything is completely combined. If your mixture seems a little thick, don’t panic; the marshmallows will help loosen it up.
When you’re mixing in the add-ins, be gentle and don’t overmix. You want distinct chunks of marshmallow and nuts, not a homogenous blob. Stir just enough to distribute them evenly. This is what gives it that classic “rocky” texture and appearance.
For the best results when chilling, ensure your refrigerator is at a good temperature. If your fridge runs a little warm, it might take longer for the fudge to set. Patience is key here; trying to cut it too soon will result in a messy, gooey disaster. I learned that the hard way one time when I was impatient for a late-night snack!
Finally, for slicing, the trick I mentioned earlier – a sharp knife warmed under hot water and dried – is a game-changer. Wipe the knife clean between cuts if needed. This will give you those beautiful, clean squares that look as good as they taste. And if your fudge happens to get a little too soft before slicing, pop it back in the fridge for 15-20 minutes to firm up again.
Storing and Reheating Tips
One of the best things about this easy rocky road fudge is how well it stores, meaning you can make a batch and enjoy it for days (if it lasts that long!). For room temperature storage, keep the fudge in an airtight container. If the weather is warm, it’s best to store it in a cool, dry place, as the chocolate can melt. Properly stored, it should stay delicious for about 3-4 days. I usually just keep it in the original pan, covered tightly with plastic wrap or a lid.
If you plan on keeping it for longer, refrigerator storage is your best bet. Again, an airtight container is crucial to prevent it from drying out or absorbing other odors. It will stay fresh and delicious in the fridge for up to two weeks. The texture will become firmer when chilled, which some people actually prefer! When you’re ready to enjoy it, you can either eat it straight from the fridge or let it sit at room temperature for about 10-15 minutes to soften slightly for easier cutting.
For long-term storage, this fudge freezes beautifully! Wrap individual squares or the entire slab tightly in plastic wrap, then place them in a freezer-safe bag or container. It can be stored in the freezer for up to 2-3 months. To thaw, simply transfer the fudge from the freezer to the refrigerator and let it thaw overnight. You can then bring it to room temperature before serving. I’ve found that the texture holds up incredibly well after freezing.
A note on the glaze timing: since this recipe doesn’t have a separate glaze, the marshmallows and chocolate chips are mixed directly into the fudge base. This means you don’t have to worry about a glaze melting or becoming soggy during storage. The fudge is designed to be enjoyed as is, with all those delicious inclusions!
Frequently Asked Questions
Final Thoughts
There you have it – the easiest, most foolproof rocky road fudge recipe that truly lives up to its name. It’s a testament to the fact that you don’t need complicated steps or fancy equipment to create something utterly delicious and satisfying. The combination of rich chocolate, chewy marshmallows, and crunchy nuts is just pure magic, and the fact that it comes together so quickly makes it an absolute winner in my book. It’s the perfect recipe for those moments when you need a quick treat, a thoughtful homemade gift, or just a little something sweet to brighten your day. It’s also a fantastic way to get kids involved in the kitchen – they’ll love stirring in the mix-ins!
If you love this recipe, you might also enjoy my recipe for [link to another easy chocolate recipe, e.g., No-Bake Chocolate Peanut Butter Bars] or my [link to a simple cookie recipe, e.g., Chewy chocolate chip cookies]. They’re all designed to be approachable and deliver maximum flavor with minimal fuss, just like this rocky road fudge.
I truly hope you give this easy rocky road fudge a try. It’s a recipe that has brought so much joy (and deliciousness!) to my home, and I can’t wait to hear how yours turns out. Please let me know in the comments below how you liked it, or if you tried any fun variations! Happy baking, and more importantly, happy snacking!
easy rocky road fudge
Ingredients
Main Ingredients
- 2.5 cups miniature marshmallows divided
- 12 ounces semisweet chocolate chips
- 11.5 ounces milk chocolate chips
- 0.5 cup creamy peanut butter
- 1.5 cups peanuts or almonds
Instructions
Preparation Steps
- Line an 8-inch square baking dish with parchment paper. Pour 1 cup marshmallows into bottom of dish.
- In a large microwave safe bowl, combine the chocolates and peanut butter. Microwave for 30 seconds, stir and add an additional 30 seconds. Continue stirring until smooth (you may need to microwave an additional 30-60 seconds).
- Fold in remaining 1.5 cups mini marshmallows and peanuts.
- Pour chocolate mixture over marshmallows in baking dish. Refrigerate until firm, several hours. Cut into bite sized pieces and enjoy.