Oh, you know those days, right? The ones where a craving hits – a deep, undeniable urge for something sweet, something comforting, something that just *feels* like home. For me, that craving almost always leads me straight to the magic of Peanut Butter cups. Not the store-bought kind, though I won’t lie, I’ve definitely reached for those in a pinch. I’m talking about the homemade version. The kind that are perfectly gooey, intensely chocolatey, and have that rich, nutty goodness that just sings. This recipe for homemade peanut butter cups isn’t just a dessert; it’s a memory maker. It’s what I whip up when I need a little pick-me-up, when friends pop over unexpectedly, or when the kids have a school bake sale and I want them to bring something truly special. It’s the kind of treat that makes people say, “Wow, you MADE this?”
What are peanut butter cups?
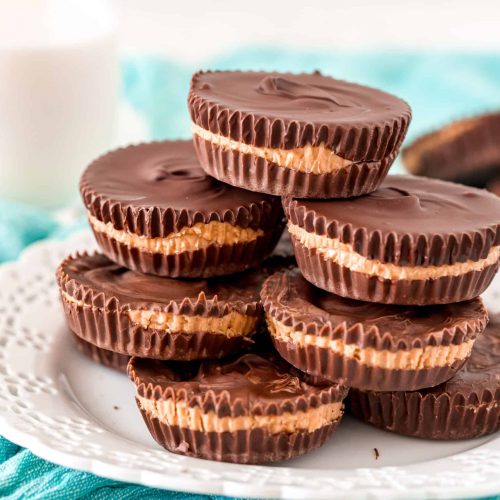
At its heart, a Peanut Butter cup is a beautiful marriage of chocolate and peanut butter. Think of it as a decadent, handheld delight where creamy, salty peanut butter is nestled within smooth, rich chocolate. This particular recipe takes that classic idea and elevates it with a few little touches that make all the difference. It’s not just a simple mold; it’s a carefully crafted experience. We’re talking about a perfectly balanced filling that’s not too sweet, not too dry, and a chocolate shell that sets up beautifully without being brittle. It’s essentially the ultimate treat for anyone who believes that peanut butter and chocolate were put on this earth to be together. It’s simple, it’s classic, and it’s pure joy in every single bite.
Why you’ll love this recipe?
Honestly, where do I even begin? First off, the FLAVOR. It’s just out of this world. The rich dark chocolate contrasts perfectly with the slightly salty, creamy Peanut Butter filling. It’s that perfect sweet-and-salty combo that just makes your taste buds do a happy dance. And the SIMPLICITY! I know sometimes baking can feel a bit daunting, but this recipe is genuinely foolproof. I’ve made it with my niece who’s only seven, and she did most of the work herself (with a little supervision, of course!). It’s the kind of recipe that’s a lifesaver on busy weeknights when you need a quick dessert that feels like a special occasion. Plus, it’s incredibly COST-EFFECTIVE. Buying all those individual candies can really add up, but making them at home is so much more budget-friendly, especially if you’re making a big batch. The VERSATILITY is another huge plus. You can customize the chocolate, the type of peanut butter, or even add little mix-ins. What I love most about this recipe, beyond all those practical points, is the feeling it gives me. It’s that nostalgic childhood joy, all wrapped up in a perfect, homemade treat. It truly stands out because it delivers on flavor, ease, and that undeniable homemade charm that you just can’t get from a store wrapper.
How do I make peanut butter cups?
Quick Overview
This recipe is all about layering simple, delicious ingredients to create those iconic treats. We’ll start by melting good quality chocolate to form a base and sides in your molds. Then, we’ll whip up a dreamy Peanut Butter filling that’s perfectly balanced. After that, it’s all about layering that filling into the chocolate cups, topping them with more chocolate, and letting them work their magic in the fridge. It’s remarkably straightforward, and the end result is so much better than anything you can buy. Trust me, the whole process from start to finish is surprisingly quick, making it perfect for spontaneous sweet cravings.
Ingredients
For the Chocolate Shell:
You’ll want about 12 ounces of good quality chocolate. I’m a big fan of using semi-sweet or dark chocolate chips for this, but you can absolutely use a good quality bar that you chop yourself. If you’re feeling fancy, you can even do a mix of dark and milk chocolate! The key here is using chocolate that melts smoothly. Avoid candy melts unless you absolutely have to; the flavor just isn’t the same. You’ll also need about a tablespoon of coconut oil or a neutral vegetable oil. This just helps the chocolate melt beautifully and set with a nice sheen. Don’t skip this little bit of oil; it makes a world of difference in the texture and finish of your Peanut Butter cups.
For the Peanut Butter Filling:
Here’s where the magic happens! You’ll need 1 cup of creamy peanut butter. I usually go for regular creamy peanut butter, the kind you find in the middle aisle of the grocery store, not the natural stuff that separates. The higher oil content in regular peanut butter helps keep the filling wonderfully smooth and fudgy. You’ll also need about 1/4 cup of unsalted butter, softened. This adds a lovely richness and helps the filling hold its shape. For sweetness, we’ll use about 1/4 cup of powdered sugar, sifted to avoid any lumps. And for that signature salty kick that balances everything out, a good pinch of salt – about 1/2 teaspoon. Some people like to add a splash of vanilla extract here too, which is always a nice touch!
For the Optional Drizzle (because why not?):
If you want to get fancy, you can reserve a little bit of melted chocolate (about 2 ounces) to drizzle on top. This is totally optional, but it makes them look extra professional. You can even add a tiny bit of extra coconut oil to this portion to make it runnier for drizzling.
Step-by-Step Instructions
Step 1: Preheat & Prep Pan
First things first, grab your muffin tin! You’ll want to line it with paper or silicone cupcake liners. Silicone liners are fantastic because they peel away so cleanly. If you don’t have liners, you can grease your muffin tin really well, but the liners make cleanup a breeze and ensure your peanut butter cups release perfectly. I usually find that a standard 12-cup muffin tin is just the right size for this recipe. Make sure your liners are sitting nicely in the cups before you start.
Step 2: Mix Dry Ingredients
In a medium bowl, combine your sifted powdered sugar and your pinch of salt. Give it a quick whisk just to make sure they’re evenly distributed. This step might seem minor, but ensuring your dry ingredients are well mixed before adding the wet ones helps create a super smooth and consistent filling later on.
Step 3: Mix Wet Ingredients
In a separate, larger bowl, add your softened butter and creamy peanut butter. Using an electric mixer (or a sturdy whisk and some elbow grease!), cream these together until they are light and fluffy. It should look pale yellow and much smoother than when you started. Then, add your vanilla extract, if you’re using it, and give it another quick mix. This is the base of our delicious peanut butter center!
Step 4: Combine
Now, gradually add your dry ingredients (the powdered sugar and salt mixture) to the wet peanut butter mixture. Mix on low speed or by hand until everything is just combined and the filling is smooth and thick. Be careful not to overmix here. You’re looking for a consistency that’s easy to work with – not too stiff, not too runny. If it feels a bit too stiff, you can add a tiny bit more softened butter, maybe a teaspoon at a time. If it feels too soft, you can add a smidgen more powdered sugar.
Step 5: Prepare Filling
This step is really about getting your filling ready to go. Once it’s mixed to that perfect consistency, you can just set it aside. I like to give it a little taste here to make sure the sweetness and saltiness are just right for my preference. It’s the last chance you have to tweak it before it goes into the chocolate!
Step 6: Layer & Swirl
Now for the fun part: the assembly! Melt your chocolate. You can do this in a microwave-safe bowl in 30-second intervals, stirring well between each, or use a double boiler. Stir in your coconut oil until it’s completely smooth and glossy. Spoon about 1-2 tablespoons of the melted chocolate into the bottom of each prepared cupcake liner, then use the back of the spoon to spread it up the sides, creating a little cup. You want a nice, even coating. Then, spoon about a tablespoon of the peanut butter filling into the center of each chocolate cup. Don’t fill them all the way to the top, leave a little space for the top layer of chocolate. Finally, spoon the remaining melted chocolate over the peanut butter filling, ensuring it covers it completely and seals the edges. If you’re drizzling, now’s the time to gently swirl some extra chocolate on top using a toothpick!
Step 7: Bake
Wait, bake? Nope, no baking involved here! We’re heading to the fridge! Pop your beautifully assembled peanut butter cups into the refrigerator for at least 30 minutes, or until the chocolate is completely set. You’ll know they’re ready when the chocolate is firm to the touch and no longer liquid. This chilling step is crucial for that satisfying snap when you bite into them!
Step 8: Cool & Glaze
Once the chocolate shells are firm and the peanut butter filling is set, you can carefully peel away the cupcake liners. If you used silicone liners, they should slide right off. If you’re adding an optional drizzle, melt a little extra chocolate and drizzle it artistically over the tops. This is also a good time to add a sprinkle of sea salt if you like that extra salty crunch!
Step 9: Slice & Serve
These peanut butter cups are best served chilled. You can store them in the fridge, and they’ll keep for ages. When you’re ready to enjoy one, just pop it out of the liner. They’re perfect for a quick snack, a little afternoon treat, or even a sophisticated dessert after a nice meal. The satisfying crack of the chocolate, followed by the creamy, dreamy peanut butter center, is pure bliss. Enjoy!
What to Serve It With
These homemade peanut butter cups are practically perfect on their own, but they can also be wonderful additions to your meal or snack spread. For Breakfast: While they’re definitely more of a treat, a single, small peanut butter cup alongside a strong cup of coffee can be a delightful little wake-up call. I sometimes cut them into smaller pieces and sprinkle them over yogurt parfaits for a surprise sweet crunch. For Brunch: These are fantastic little bites to have on a brunch buffet. They look so elegant, especially if you’ve done a nice chocolate drizzle. They pair beautifully with a mimosa or a sparkling cider. As Dessert: This is where they truly shine! Serve them as part of a dessert platter alongside fruit, cookies, or a rich chocolate cake. They’re also incredible on their own as a petite four or a sweet ending to a savory meal. For Cozy Snacks: This is my personal favorite! On a chilly evening, curled up with a good book or a movie, there’s nothing better than a couple of these with a glass of cold milk. My kids adore them this way; it’s their ultimate comfort snack. I’ve also found they’re amazing crumbled over ice cream or a warm brownie for an extra layer of chocolate and peanut butter goodness. My family has a tradition of making a big batch around the holidays and using them as stocking stuffers, which is always a huge hit!
Top Tips for Perfecting Your Peanut Butter Cups
I’ve made this recipe more times than I can count, and over the years, I’ve picked up a few tricks that really make a difference. First, for the chocolate shell, always use good quality chocolate. It doesn’t have to be the most expensive, but avoid the really waxy, cheap stuff. Adding that little bit of coconut oil is a lifesaver for smooth melting and a nice sheen; don’t skip it! When you’re coating the liners, make sure you get the chocolate up the sides evenly. This prevents the peanut butter filling from seeping out and creates a sturdy cup. If you’re struggling to get good coverage, try using a small pastry brush to help spread the chocolate. For the peanut butter filling, I always recommend using regular creamy peanut butter. The natural kind, while healthy, can sometimes make the filling too crumbly or too oily, and it won’t set up as nicely. Softened butter is key here too; if it’s too cold, your filling will be lumpy, and if it’s melted, it’ll be too soft. My absolute favorite tip for the filling is to taste and adjust. Everyone’s preference for sweetness and saltiness is different, so don’t be afraid to add a tiny bit more powdered sugar or an extra pinch of salt until it’s just right for you. When you’re layering the filling into the chocolate, don’t overfill! Leave enough room for the top layer of chocolate to completely seal everything in. I learned that lesson the hard way with some very messy leakage! If your chocolate starts to seize up or thicken too much while you’re working, just pop it back into the microwave for a few seconds to loosen it up. And for that beautiful swirl effect or drizzle, a toothpick is your best friend. You can create all sorts of intricate patterns with a little patience. Finally, be patient with the chilling process. Let them set up completely in the fridge; it’s worth the wait for that perfect texture and snap. If you’re in a real rush, the freezer can speed things up, but I usually find the fridge gives a better final result without making the chocolate too hard.
Storing and Reheating Tips
The beauty of these homemade peanut butter cups is how well they keep! For Room Temperature storage, if your kitchen isn’t too warm, you can absolutely keep them out on the counter for a day or two. Make sure they’re in an airtight container so they don’t pick up any funny smells. However, for optimal freshness and that lovely firm texture, Refrigerator Storage is generally best. Pop them into an airtight container or a zip-top bag. They’ll stay wonderfully delicious in the fridge for up to two weeks, easily. I’ve even stretched it to three weeks and they were still great! Just remember that the cold can sometimes make the chocolate a bit harder. If you want to get that perfect soft bite right away, I usually take them out of the fridge about 10-15 minutes before I plan to enjoy them. Freezer Instructions are also a lifesaver! If you’ve made a huge batch (and trust me, you will want to!), wrap each peanut butter cup individually in plastic wrap or foil, then place them in a freezer-safe bag or container. They can be stored in the freezer for up to 3 months. To thaw, just transfer them to the refrigerator overnight. The Glaze Timing Advice is simple: if you plan to eat them straight away or within a few days, glazing before refrigerating is fine. If you’re freezing them, I would wait to drizzle any extra chocolate or add toppings until *after* they’ve thawed. This prevents the glaze from cracking or looking messy. Overall, these little treasures are quite forgiving, but keeping them cool is the secret to maintaining their best texture and flavor!
Frequently Asked Questions
Final Thoughts
So there you have it – my absolute go-to recipe for homemade peanut butter cups. It’s simple, it’s incredibly satisfying, and it always brings a smile to everyone’s face. I truly believe that everyone deserves to experience the pure joy of a perfectly crafted peanut butter cup made with love. It’s more than just a sweet treat; it’s a little moment of happiness you can hold in your hand. If you’re someone who loves the classic combo of chocolate and peanut butter, you absolutely have to give this a try. I promise, once you taste how wonderful these are, you might never look at store-bought ones the same way again! For those of you who loved this, you might also enjoy my recipe for [Link to another relevant recipe, e.g., Chocolate Chip Cookies] or my ultimate [Link to another relevant recipe, e.g., Brownie Sundae]. Happy baking (or in this case, happy assembling and chilling!) I can’t wait to hear how yours turn out! Let me know in the comments below if you try them and what your favorite part is!
Peanut Butter Cups
Ingredients
Main Ingredients
- 1 cup creamy peanut butter
- 0.33 cup powdered sugar
- 1 teaspoon vanilla extract
- 2.5 cups chocolate melting wafers
Instructions
Preparation Steps
- Line a cupcake pan with cupcake liners and set aside.
- In a medium bowl, mix together peanut butter, sugar, and vanilla until smooth.
- Transfer the peanut butter mixture to a pastry bag or ziploc bag with a small section of the corner cut off.
- Melt the chocolate melting wafers in a medium microwave-safe bowl for 30-second intervals, stirring between each one, until fully melted.
- Add 2 teaspoons of melted chocolate to the bottom of each liner.
- Pipe the peanut butter mixture on top of the chocolate.
- Top the peanut butter with 1 tablespoon of melted chocolate.
- Place in the refrigerator for about 1 hour to set.
- Remove and enjoy.