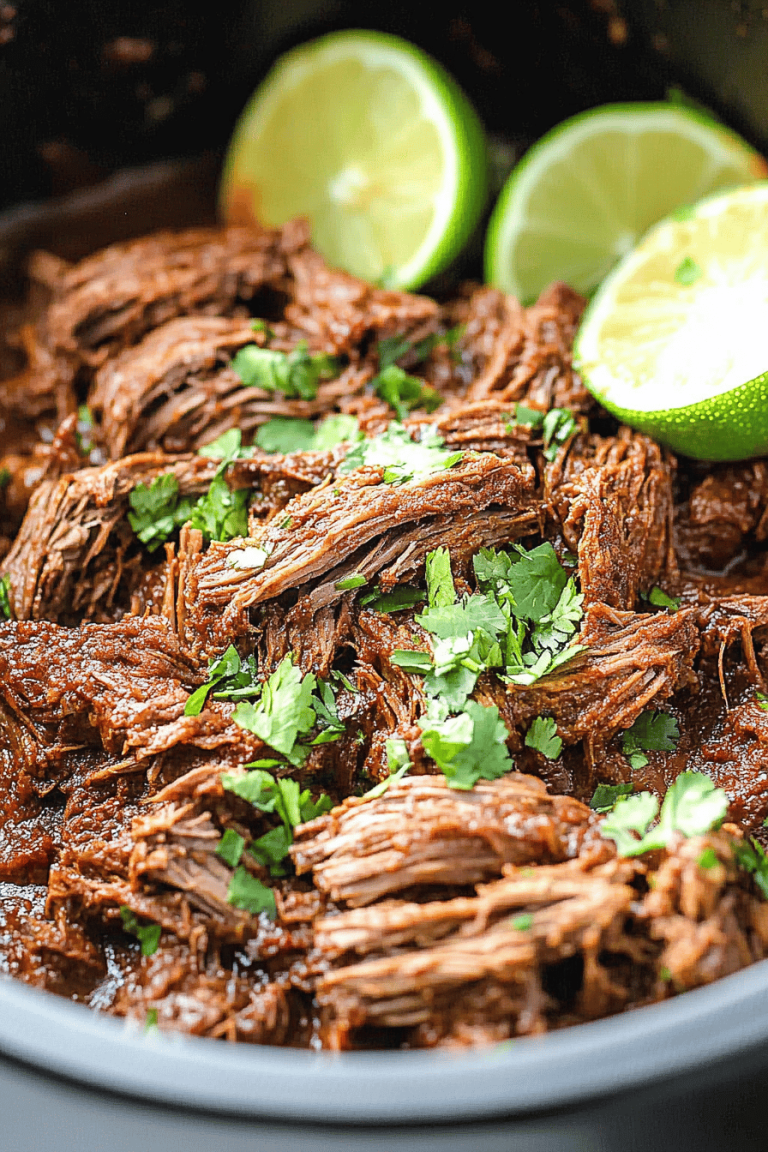
There are certain smells that just instantly transport you back in time, aren’t there? For me, the aroma of soy sauce, ginger, and a hint of garlic simmering on the stove is pure comfort. It reminds me of weekend takeout nights from our favorite little Chinese place that’s sadly no longer with us, and it always made me wish I could recreate that magic at home. After years of tinkering, I’m thrilled to share what I think is the absolute best Mongolian Beef recipe. It’s a dish that’s incredibly satisfying, surprisingly simple to pull off, and always a huge hit with my family. Forget those restaurant versions that can sometimes be too sweet or too greasy; this one hits all the right notes. If you’ve ever loved those crispy-tender strips of beef coated in a savory, slightly sweet sauce, you are going to adore this. It’s got that addictive flavor profile that makes you want to keep reaching for just one more bite, kind of like how I feel about my grandma’s famous Apple Crumble – pure, unadulterated deliciousness.
What is Mongolian Beef?
So, what exactly is this deliciousness we’re talking about? Mongolian Beef is a popular Chinese-American dish known for its incredibly tender strips of beef coated in a rich, savory, and slightly sweet sauce. Now, here’s a fun little tidbit: despite its name, it’s actually not traditionally from Mongolia! The dish is thought to have originated in Taiwan and gained popularity in American Chinese restaurants. Think of it as a wonderfully saucy stir-fry where the beef is often coated and fried or pan-seared to get it nice and crispy before being tossed in that irresistible glaze. It’s essentially a culinary hug in a bowl, perfect for when you’re craving something hearty, flavorful, and just plain satisfying. It’s not overly spicy, making it a winner for pretty much everyone, from picky eaters to seasoned foodies.
Why you’ll love this recipe?
Honestly, there are so many reasons why this Mongolian Beef recipe has become a staple in my kitchen. First and foremost, the FLAVOR. It’s this perfect balance of savory from the soy sauce and oyster sauce, with a hint of sweetness from the sugar and a bright kick from the ginger and garlic. The texture is also a winner – you get those wonderfully tender, slightly chewy pieces of beef, coated in a glossy sauce that clings to every bite. What I love most is how deceptively SIMPLE it is. You might think stir-frying is complicated, but with this method, it’s totally approachable. Even on a weeknight, when time is tight, I can whip this up and feel like I’ve pulled off a restaurant-quality meal. And let’s talk about COST-EFFICIENCY. Beef can be pricey, but using a good cut of flank steak and making sure you slice it thinly makes it go further, and the other pantry staples are incredibly budget-friendly. Plus, it’s SO VERSATILE. While it’s fantastic served over fluffy white rice, I’ve also served it with brown rice, quinoa, or even just a big pile of steamed broccoli. It’s one of those dishes that can be dressed up or down depending on your mood and the occasion. It truly stands out because it delivers that authentic, craveable flavor without requiring a ton of obscure ingredients or complicated techniques. It’s the kind of recipe that makes you feel like a kitchen hero, and that’s priceless!
How do you make Mongolian Beef?
Quick Overview
The process for this Mongolian Beef is straightforward, focusing on getting that beef tender and the sauce just right. You’ll marinate and lightly coat the beef for tenderness and that slightly crispy exterior, then quickly stir-fry it with aromatics before tossing it all in a luscious, savory glaze. It’s a symphony of simple steps that come together beautifully. The key is not to overcrowd the pan and to have everything prepped and ready to go because the cooking part happens fast! Trust me, the payoff for this little bit of prep is immense.
Ingredients
For the Beef Marinade & Coating:
1.5 lbs flank steak or sirloin steak, thinly sliced against the grain (This is super important for tenderness! Look for cuts with good marbling.)
1 tablespoon soy sauce (Use a good quality, low-sodium soy sauce if you can.)
1 teaspoon sesame oil (Adds a lovely nutty depth.)
1/2 teaspoon baking soda (This is my secret weapon for incredibly tender beef! Don’t skip it!)
2 tablespoons cornstarch (This helps create a light, crispy coating.)
For the Stir-Fry Aromatics:
2 tablespoons vegetable oil or other high-heat cooking oil (Enough to coat the pan well.)
3 cloves garlic, minced (Fresh garlic makes all the difference.)
1 tablespoon fresh ginger, grated or finely minced (I like to use a microplane for this.)
1/2 teaspoon red pepper flakes (Optional, but gives a nice little warmth.)
For the Mongolian Sauce:
1/2 cup low-sodium soy sauce
1/4 cup beef broth (Or chicken broth if that’s what you have.)
2 tablespoons oyster sauce (Adds incredible umami and depth. Find it in the Asian aisle!)
2 tablespoons Brown Sugar (Or a little more if you like it sweeter.)
1 tablespoon rice vinegar (Balances the sweetness and saltiness.)
1 teaspoon cornstarch (To thicken the sauce beautifully.)
Step-by-Step Instructions
Step 1: Preheat & Prep Pan
Get your wok or a large, heavy-bottomed skillet screaming hot over medium-high heat. You want it hot enough that the beef will sear quickly. If you’re not using a wok, a cast-iron skillet is fantastic for this. Make sure you have all your ingredients prepped and ready beside the stove because once you start cooking, it goes fast!
Step 2: Mix Dry Ingredients
In a medium bowl, combine the thinly sliced beef with 1 tablespoon of soy sauce, 1 teaspoon of sesame oil, and the 1/2 teaspoon of baking soda. Toss everything really well to coat the beef. Let it sit for about 10-15 minutes. This is where the magic happens for tender beef. After marinating, sprinkle the 2 tablespoons of cornstarch over the beef and toss again until each piece is lightly and evenly coated. Don’t worry if it looks a little pasty; that’s what you want.
Step 3: Mix Wet Ingredients
While the beef is marinating, whisk together all the ingredients for the Mongolian sauce in a small bowl: 1/2 cup soy sauce, 1/4 cup beef broth, 2 tablespoons oyster sauce, 2 tablespoons brown sugar, 1 tablespoon rice vinegar, and 1 teaspoon cornstarch. Whisk until the cornstarch is fully dissolved and there are no lumps. Set this aside.
Step 4: Combine
Add about 1 tablespoon of vegetable oil to your hot pan or wok. Once shimmering, add the coated beef in a single layer. Don’t overcrowd the pan; you might need to do this in batches. Sear the beef for about 1-2 minutes per side until nicely browned and slightly crispy. It won’t be fully cooked through at this stage, and that’s okay. Remove the seared beef to a clean plate and set aside. Add the remaining 1 tablespoon of oil to the pan.
Step 5: Prepare Filling
To the hot pan with the fresh oil, add the minced garlic, grated ginger, and optional red pepper flakes. Stir-fry for about 30 seconds until fragrant. Be careful not to burn the garlic!
Step 6: Layer & Swirl
Give your prepared Mongolian sauce a quick re-whisk, then pour it into the pan with the aromatics. Bring it to a simmer, stirring constantly. The sauce will start to thicken as it heats up. Once it’s thickened to your desired consistency (it should coat the back of a spoon), return the seared beef to the pan. Toss everything together quickly to coat the beef evenly in the glossy sauce. You want to do this for just about another minute, so the beef finishes cooking and is coated but not overcooked and tough.
Step 7: Bake
This recipe doesn’t require baking!
Step 8: Cool & Glaze
The “glaze” is essentially the sauce that coats the beef. Once the beef is tossed in the thickened sauce in Step 6, it’s ready to go. The key is serving it immediately so the beef stays tender and the sauce is perfectly glossy. No need for further cooling or glazing steps.
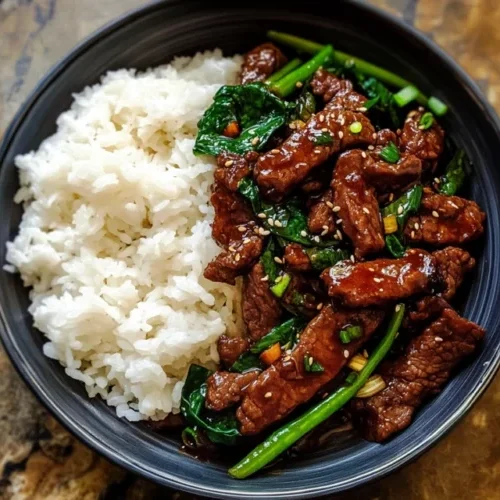
Step 9: Slice & Serve
Serve this glorious Mongolian Beef immediately! It’s best enjoyed piping hot. Garnish with sliced green onions or toasted sesame seeds if you like. The aroma alone will have everyone gathering around the table.
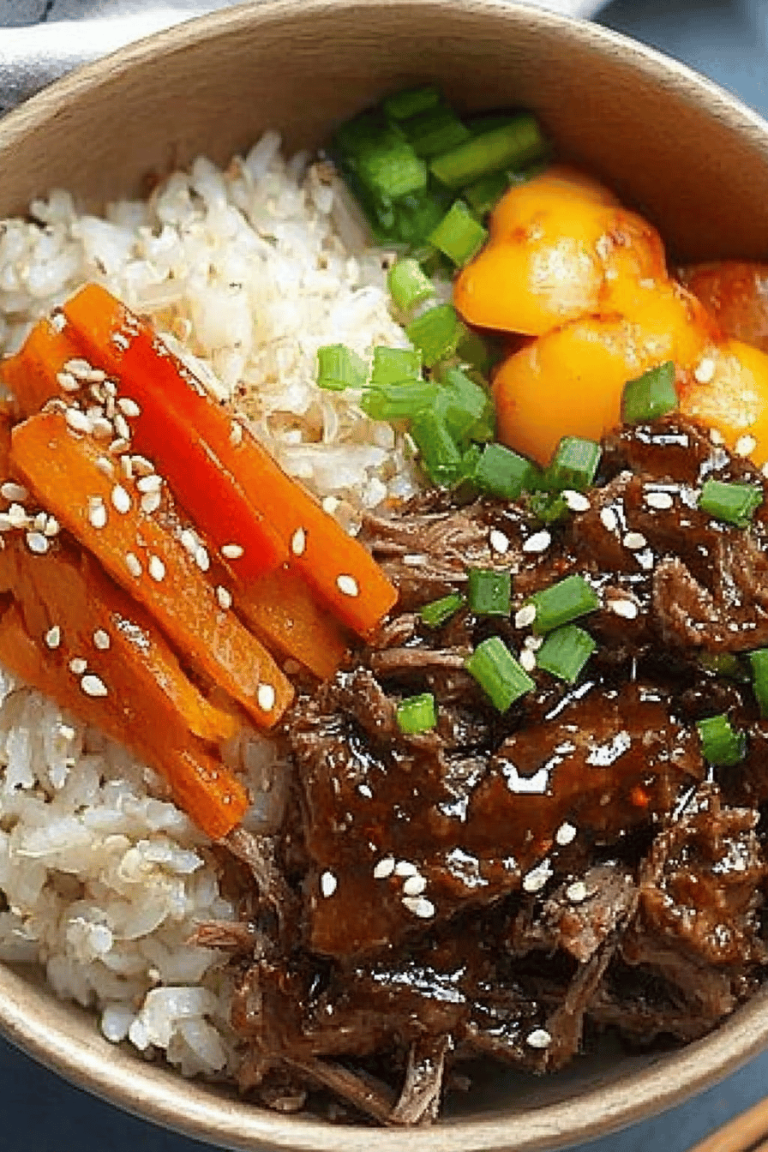
What to Serve It With
This Mongolian Beef is a superstar on its own, but it truly shines when paired with the right accompaniments. For those busy mornings when you want something a little more substantial than just coffee, I’ve been known to serve a small portion with a side of perfectly steamed jasmine rice. It’s surprisingly satisfying and fuels you up for the day. For a delightful BRUNCH spread, imagine this alongside some fluffy, homemade scallion pancakes and a simple cucumber salad. The contrast of textures and flavors is amazing, and it feels wonderfully elevated. If you’re having it as a more traditional DESSERT course (though it’s savory, the sweet and salty profile can be incredibly satisfying after a lighter meal!), I like to serve it with some stir-fried crisp snow peas and a tiny dollop of something cooling like a ginger-lime yogurt. But let’s be real, my favorite way is on COZY NIGHTS IN. A big bowl of hot, fluffy white rice is practically mandatory. Sometimes I’ll add some steamed or stir-fried Bok Choy or broccoli on the side to round things out. My kids absolutely love it over rice with just the sauce – they say it’s like their own personal flavor explosion. It’s the kind of meal that feels special without requiring a ton of effort, and that’s what I always aim for.
Top Tips for Perfecting Your Mongolian Beef
Over the years, I’ve learned a few tricks that I think make this Mongolian Beef recipe truly shine. Let’s dive into them! For the BEEF PREP, the most crucial step is slicing it thinly against the grain. This breaks up those tough muscle fibers, ensuring every bite is tender. If your beef is slightly frozen, it’s much easier to slice it super thin. The baking soda might sound strange, but trust me, it tenderizes the beef beautifully by raising its pH level. Just don’t let it sit for too long, or it can affect the texture. As for MIXING ADVICE, when you’re coating the beef with cornstarch, aim for a light, even layer. Too much and it can get gummy; too little and you won’t get that lovely crispy edge. Don’t overmix the beef once it’s in the sauce either; a quick toss is all it needs to finish cooking and get coated. For SAUCE CUSTOMIZATION, feel free to play with the sweetness! If you prefer less sugar, start with 1 tablespoon and add more to taste. Want a little more tang? A splash more rice vinegar works wonders. For ingredient swaps, if you can’t find oyster sauce, a bit of hoisin sauce can work in a pinch, though the flavor profile will be slightly different. If you’re out of beef broth, chicken broth is a perfectly fine substitute. For serving, make sure your pan is HOT before adding the beef. This is key to getting that nice sear and slightly crispy exterior. If you overcrowd the pan, the beef will steam instead of sear, and you’ll lose that texture. It’s better to cook in batches if needed. And when it comes to thickening the sauce, if it’s too thin, you can always mix a little more cornstarch with a tablespoon of cold water and stir it into the simmering sauce. If it’s too thick, a tiny splash of broth or water will thin it out. These little adjustments make all the difference!
Storing and Reheating Tips
This Mongolian Beef is so good, you’ll want to enjoy every last bite, but if you do find yourself with leftovers, here’s how to keep them tasting great. At ROOM TEMPERATURE, it’s best to let the dish cool down completely before thinking about storing it. Once cooled, you can leave it out for a couple of hours max, especially in warmer kitchens, but honestly, the refrigerator is your best friend for quality. For REFRIGERATOR STORAGE, transfer the cooled Mongolian Beef and any rice into an airtight container. It will stay delicious in the fridge for about 2-3 days. The beef might soften a little once it’s been in the sauce overnight, but it’s still quite tasty. When it comes to FREEZER INSTRUCTIONS, I usually don’t freeze this dish once it’s cooked, as the texture of the beef can get a bit mushy upon thawing. However, if you absolutely must, wrap it tightly in plastic wrap, then place it in a freezer-safe bag or container for up to a month. Thaw it overnight in the refrigerator. For REHEATING, the best way is to gently warm it in a skillet over medium-low heat with a splash of water or broth to loosen the sauce. You can also microwave it, but be sure to stir it halfway through to ensure even heating and prevent hot spots. For the GLAZE TIMING ADVICE, it’s all about serving it fresh. If you’re storing leftovers, the sauce will already be on the beef. If you were planning to make a larger batch of sauce to add later, that’s a different approach, but for this recipe, the sauce is added at the very end. Enjoying it fresh is truly the peak experience!
Frequently Asked Questions
Final Thoughts
There you have it – my absolute favorite way to make Mongolian Beef at home! I truly believe this recipe captures that irresistible restaurant-quality flavor and texture, but with the warmth and simplicity of a home-cooked meal. The tender beef, the perfectly balanced savory-sweet sauce, it’s just pure comfort food that always hits the spot. It’s one of those dishes that makes me feel incredibly proud to serve to my family and friends. If you’re a fan of bold, satisfying flavors and enjoy a good stir-fry, you absolutely have to give this a try. It’s surprisingly straightforward and the results are so rewarding. For those of you who loved my General Tso’s Chicken recipe, I think you’ll find this Mongolian Beef recipe has a similar crowd-pleasing appeal. I can’t wait to hear what you think of it! Please leave a comment below and let me know how yours turned out, or share any of your own family twists! Happy cooking!
Mongolian Beef Recipe
Ingredients
For the Beef
- 1.5 pounds flank steak thinly sliced against the grain
- 0.25 cup cornstarch
- 2 tablespoons vegetable oil divided
For the Mongolian Sauce
- 0.5 cup soy sauce low sodium preferred
- 0.5 cup water
- 0.75 cup packed brown sugar
- 1 tablespoon fresh ginger grated
- 2 cloves garlic minced
- 1 teaspoon sesame oil
- 0.5 teaspoon red pepper flakes optional, for heat
For Serving
- 2 green onions sliced, for garnish
- cooked rice or noodles
Instructions
Preparation
- Thinly slice the flank steak against the grain into strips, about 1/4 inch thick. Pat the beef dry with paper towels.
- In a medium bowl, toss the sliced steak with cornstarch until each piece is evenly coated. Set aside.
- In a separate small bowl, whisk together the soy sauce, water, brown sugar, grated fresh ginger, minced garlic, sesame oil, and red pepper flakes (if using) to create the Mongolian sauce. Set aside.
Cooking
- Heat 1 tablespoon of vegetable oil in a large skillet or wok over medium-high heat. Add half of the cornstarch-coated beef in a single layer, ensuring not to overcrowd the pan. Cook for 2-3 minutes per side until browned and slightly crispy. Remove the cooked beef from the skillet and set aside on a plate.
- Add the remaining 1 tablespoon of vegetable oil to the skillet and cook the second batch of beef in the same manner. Remove and add to the first batch.
- Pour the prepared Mongolian sauce into the empty skillet. Bring the sauce to a simmer, stirring occasionally, and let it cook for 2-3 minutes, or until it has slightly thickened to a glaze-like consistency.
- Return all the cooked beef to the skillet and toss to coat it evenly with the sauce. Continue to cook for another 1-2 minutes, stirring constantly, until the beef is heated through and thoroughly coated in the sauce.
Serving
- Garnish the Mongolian Beef with freshly sliced green onions and serve immediately over hot steamed rice or noodles.