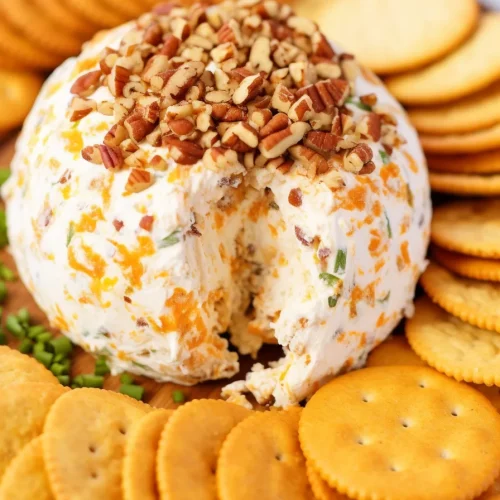
Oh, where do I even begin with this absolute treasure? If there’s one appetizer that consistently gets demolished at every gathering I host, it’s this Cracked Out Cheese Ball. Seriously, it’s practically a legend in my family. I remember the first time I made it, a little nervous because it had a few more elements than my usual go-to snacks. But within minutes of setting it out, people were hovering around it like it was the last slice of pizza at a party. It has this incredible, irresistible something that just draws you in. It’s got that perfect blend of creamy, tangy, savory, and a little bit of crunch, all wrapped up into one glorious ball of cheesy goodness. It’s often compared to those popular cheese dips, but honestly, it has a whole personality of its own. This is the kind of recipe that makes you look like a culinary superstar without actually breaking a sweat, and that, my friends, is pure magic in my book.
What is a Cracked Out Cheese Ball?
So, what exactly is this “Cracked Out Cheese Ball”? Think of it as the most decadent, flavor-packed cheese dip you’ve ever had, but in a perfectly portioned, handheld ball. The name “cracked out” comes from the incredible combination of ingredients that just work so harmoniously, almost like they’ve gone a little bit “crazy” with flavor in the best possible way. It’s essentially a blend of cream cheese, sharp cheddar, and sometimes a hint of something tangy, all mixed together and then rolled in an addictive coating. The “cracked out” part really refers to that phenomenal topping – usually a mix of things like crispy bacon, seasoned ranch dressing mix, and toasted nuts or seeds, all giving it that signature texture and irresistible savory kick. It’s not just a cheese ball; it’s an experience, a delightful adventure for your taste buds that’s surprisingly easy to pull off.
Why you’ll love this recipe?
There are so many reasons why this Cracked Out Cheese Ball has earned its permanent spot on my recipe rotation. First and foremost, the flavor is just out of this world. It’s got that amazing tang from the cream cheese and cheddar, but it’s the coating that really makes it sing. The salty, smoky bacon bits, the zesty punch of ranch seasoning, and the nutty crunch from the pecans (or whatever you choose to roll it in!) create a symphony of tastes and textures that’s hard to beat. It’s honestly addictive. Beyond the taste, the sheer simplicity of it is a lifesaver. Most of the ingredients are pantry staples or things you can grab easily. You don’t need any fancy equipment or complicated techniques. It’s mostly just mixing and rolling! For busy nights or unexpected guests, this is my go-to. It’s also incredibly budget-friendly, especially when you consider how impressive it looks and how much it yields. And the versatility! Oh my goodness, you can serve this with almost anything – crackers, veggies, pretzels, even little toasted baguette slices. It’s the star of any appetizer spread. What I love most about this is that it’s a crowd-pleaser that truly satisfies everyone, from my picky kids to my discerning foodie friends. It’s the kind of recipe that makes you feel good about feeding people, and that’s what cooking is all about for me.
How do you make cracked out cheese balls?
Quick Overview
Making this Cracked Out Cheese Ball is surprisingly straightforward. You’ll start by combining your creamy cheese base, then form it into a ball. The magic truly happens when you roll that ball in a flavorful, crunchy coating. It’s a process that takes minimal time and effort but delivers maximum flavor impact. You can whip this up in about 15-20 minutes of active time, and it’s perfect for making ahead of time, which is always a win in my book. No complicated steps, no culinary degree required – just pure deliciousness waiting to happen.
Ingredients
For the Main Batter:
2 blocks (8 ounces each) cream cheese, softened: It’s super important that your cream cheese is fully softened to room temperature. This ensures a super smooth, lump-free base. If it’s too cold, you’ll end up with pockets of unmixed cheese, and that’s just no fun. I usually take them out of the fridge about an hour before I start mixing.
1 ½ cups shredded sharp cheddar cheese: You want a good quality sharp cheddar for the best flavor. Pre-shredded can work in a pinch, but if you have time, shredding your own from a block is always best. It melts better and has a fresher taste. I find that medium cheddar works too if you can’t find sharp, but sharp gives it that extra zing.
½ cup finely chopped pecans (or walnuts): These add a lovely nutty depth and crunch. Make sure they’re chopped finely so they integrate well into the cheese mixture. If you’re not a fan of nuts, or have allergies, you can skip this or try a mix of seeds like sunflower or pumpkin seeds.
2 tablespoons finely chopped fresh chives: For a hint of oniony freshness. You can use green onions too, just the green parts are best for a milder flavor. I sometimes use dried chives if I’m in a pinch, but fresh really makes a difference here.
¼ teaspoon garlic powder: Just a touch to enhance the savory notes. Don’t go overboard; we want it to complement, not dominate.
Salt and freshly ground black pepper, to taste: Always season your cheese mixture! A little salt and pepper go a long way in bringing out all those delicious flavors.
For the Coating:
½ cup crispy cooked bacon, crumbled: This is a must! Cook your bacon until it’s nice and crispy, then crumble it finely. You can use pre-cooked bacon bits if you’re really pressed for time, but nothing beats the flavor of freshly cooked bacon. Make sure it’s cooled completely before crumbling.
½ cup shredded sharp cheddar cheese: Yes, more cheese! This adds an extra layer of cheesy goodness and helps bind the coating together.
¼ cup chopped pecans (or walnuts): Again, for that delightful crunch. You can toast these lightly in a dry pan before chopping for an even richer flavor.
2 tablespoons dry ranch seasoning mix: This is the secret weapon! It adds that signature tangy, herby flavor that makes the cheese ball so addictive. You can find this in most grocery stores in the soup/gravy aisle.
(Optional) 1 tablespoon finely chopped fresh parsley: For a little pop of color and freshness.
Step-by-Step Instructions
Step 1: Preheat & Prep Pan
There’s no baking for the cheese ball itself, but you’ll want to get your bacon cooked and cooled if you haven’t already. Also, gather all your ingredients and have them measured out and ready to go. This makes the whole process feel so much smoother.
Step 2: Mix Dry Ingredients
This step really applies more to the coating ingredients. In a shallow dish or on a plate, combine the crispy bacon, the second batch of shredded cheddar, the chopped pecans, the dry ranch seasoning mix, and the optional parsley. Stir everything together well until it’s evenly distributed. This is what your cheese ball will be rolled in, so make sure it’s fragrant and inviting!
Step 3: Mix Wet Ingredients
In a medium-sized mixing bowl, add the softened cream cheese, the first batch of shredded cheddar cheese, the finely chopped pecans, the fresh chives, and the garlic powder. Season with salt and freshly ground black pepper. Don’t be shy with the pepper; it adds a nice little kick.
Step 4: Combine
Using a sturdy spoon or a spatula, thoroughly mix all the ingredients together until everything is well combined and creamy. You want a uniform consistency, with no streaks of cream cheese or cheddar. I like to use my hands for the final part of mixing to make sure everything is perfectly incorporated. Just make sure your hands are clean!
Step 5: Prepare Filling
This step is already done in Step 3! The cheese mixture itself is what you’ll be shaping. Make sure it’s smooth and easy to work with. If it feels too soft, you can pop it in the fridge for about 10-15 minutes to firm up a bit, which makes shaping easier. If it feels too stiff, let it sit at room temperature for a few more minutes.
Step 6: Layer & Swirl
This isn’t a swirl recipe like a cake, but the “swirl” of flavors comes from the irresistible coating. Take about half of the cheese mixture and place it on your prepared coating mixture. Gently press and roll the cheese mixture in the coating, pressing lightly to help it adhere. You want a good, even layer. Once it’s coated, you can either shape it into a ball right away or roll it in the coating again for extra thickness. Repeat with the remaining cheese mixture. If you’re making multiple smaller cheese balls, divide the cheese mixture and coating accordingly.
Step 7: Bake
No baking required for the cheese ball itself! If you cooked your bacon from scratch, that’s the only cooking involved. The beauty of this recipe is its simplicity, and that extends to the cooking process (or lack thereof!).
Step 8: Cool & Glaze
Once your cheese ball is fully coated, you’ll want to chill it for at least 30 minutes to an hour. This helps it firm up considerably and makes it easier to handle and serve. If you’re adding a glaze, now would be the time, but honestly, this cheese ball is so packed with flavor, it doesn’t need a separate glaze. The coating *is* the star!
Step 9: Slice & Serve
Once chilled, place your beautiful Cracked Out Cheese Ball on a serving platter. I like to serve it with a variety of dippers. You can even add a few extra crumbles of bacon or chives on top for garnish. It’s best served chilled or at cool room temperature. Enjoy watching it disappear!
What to Serve It With
This Cracked Out Cheese Ball is incredibly versatile, and I love finding new ways to enjoy it. For breakfast? It sounds a little unusual, but trust me, a small dollop on a warm English muffin or a mini bagel is surprisingly delicious. It’s like a savory, cheesy breakfast bomb. For a more traditional brunch spread, I always pair it with an assortment of fresh crudités – crisp bell peppers, crunchy carrots, refreshing cucumber slices, and snap peas. It’s also amazing with sturdy crackers like water crackers or whole-wheat Triscuits. They hold up well to the cheese ball. As a dessert, this is where it gets interesting. While it’s savory, I sometimes serve it with a drizzle of hot honey or a sprinkle of smoked paprika for a sweet and spicy kick, alongside some lightly toasted baguette slices. It’s unexpected but works! For those cozy snack times, it’s perfect with potato chips (yes, really!), pretzel sticks, or even some thinly sliced apples for a sweet and savory contrast. My family loves it with pita chips and little toasted rye bread rounds. Honestly, if it can be dipped, it’s probably going to be delicious with this cheese ball!
Top Tips for Perfecting Your Cracked Out Cheese Ball
After making this more times than I can count, I’ve picked up a few tricks that I swear by. For the cream cheese, make sure it’s *really* softened. I’ve tried to rush it by microwaving it, and while it softens, it can get a bit watery. Leaving it on the counter for an hour or so is the foolproof method. When grating the cheddar, always go for the block and grate it yourself. Pre-shredded cheese often has anti-caking agents that can make your cheese ball a bit gritty, and who wants that? For the bacon, I like to cook it until it’s extra crispy, then let it drain on paper towels. If it’s too greasy, it can make the cheese ball slick and less pleasant to handle. Crumble it finely so you get those little flavor explosions in every bite. When mixing the ingredients, don’t be afraid to get your hands in there! It’s the best way to ensure everything is perfectly combined. If the mixture feels too soft to roll, don’t panic! Just pop it in the fridge for 15-20 minutes to firm up. This is a lifesaver, especially on warm days. For the coating, toast your nuts lightly in a dry skillet before chopping. It brings out their flavor SO much. And a little tip for getting an even coating: spread the coating mixture out on a plate or shallow dish so you can easily roll the cheese ball in it. For ingredient swaps, if you don’t have pecans, walnuts are a fantastic substitute. Almonds can work too, but they have a slightly different flavor profile. If you can’t find ranch seasoning, you can try a blend of dried dill, parsley, garlic powder, and onion powder, but the ranch mix really does give it that signature “cracked out” flavor. And for the chives, a finely minced green onion (just the green part!) works just as well. I’ve also experimented with adding a tiny bit of smoked paprika to the cheese mixture for an extra layer of smoky depth, and that was a delicious revelation!
Storing and Reheating Tips
This Cracked Out Cheese Ball is a fantastic make-ahead appetizer. Once it’s assembled and rolled in its glorious coating, you can store it in an airtight container in the refrigerator for up to 3-4 days. I usually wrap it well in plastic wrap before putting it in the container, just to be extra sure it stays fresh and doesn’t absorb any other fridge odors. When you’re ready to serve, take it out of the fridge about 20-30 minutes before you plan to eat it. This allows it to soften up just enough to be easily spreadable or dip-able. For reheating, I generally don’t reheat the entire cheese ball. It’s best served at cool room temperature or slightly chilled. If you do have leftovers, and it’s been a couple of days, you can gently warm small portions in the microwave for a few seconds at a time, stirring frequently, until just softened. Be careful not to overheat, as the cream cheese can separate. For the coating, it might lose a *little* of its crispness after a few days, but the flavor is still there. If you’re planning to make it for a party a day or two in advance, I’d recommend preparing the coating ingredients separately and then rolling the cheese ball in it just a few hours before serving. This ensures maximum crunchiness. If you’re freezing this, it’s a bit trickier because of the cream cheese base. It’s not ideal, and the texture can change. If you absolutely must, wrap it very tightly in plastic wrap, then foil, and freeze for up to a month. Thaw slowly in the refrigerator overnight and then try to re-roll it in fresh coating ingredients, as the original coating might get soggy. Honestly, it’s so quick to make, I usually just whip up a fresh one if I need it for an event!
Frequently Asked Questions
Final Thoughts
So there you have it – my absolute favorite Cracked Out Cheese Ball recipe! It’s the kind of dish that brings people together, sparks conversation, and, most importantly, tastes utterly incredible. I truly believe that simple ingredients, combined with a little bit of love and some time-tested techniques, can create something truly special. This cheese ball is proof of that. It’s perfect for game days, holiday parties, casual get-togethers, or even just when you’re craving something intensely delicious and satisfying. If you enjoy this recipe, you might also love my recipes for [link to another appetizer recipe here] or my [link to another cheesy recipe here]. They’re both crowd-pleasers in their own right! I can’t wait for you to try this Cracked Out Cheese Ball and see for yourself why it’s such a hit in my home. Let me know in the comments below how yours turns out, and feel free to share any fun variations you try! Happy dipping!
Cracked Out Cheese Ball
Ingredients
Main Ingredients
- 2 packages cream cheese 8-ounce packages, softened
- 1 package ranch dressing mix
- 1 cup shredded cheddar cheese
- 0.75 cup chopped bacon cooked
- 0.67 cup chopped pecans
Instructions
Preparation Steps
- In a mixing bowl, take the cream cheese. Add the ranch dressing mix. Make sure to blend them thoroughly until smooth.
- Next, incorporate the shredded cheddar cheese and cooked, chopped bacon into the cream cheese mixture. Mix everything until all the ingredients are evenly spread throughout.
- Once you have achieved a combined mixture, divide it into two portions. Shape each portion into a ball. Alternatively, if you prefer, you can combine the mixture into one large cheese ball.
- Roll each cheese ball in the chopped pecans until they are completely coated.
- Finally, wrap both cheese balls in plastic wrap. Place them in the refrigerator to chill. Keep them refrigerated until you are ready to serve.