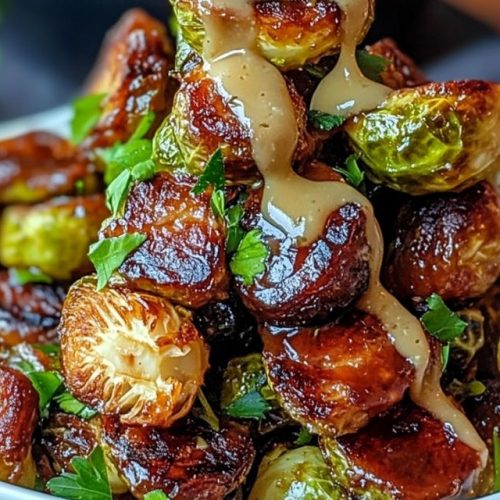
Okay, let’s be honest. For the longest time, Brussels Sprouts were that one vegetable I’d politely push around my plate. You know the ones – sad, mushy, and tasting vaguely of… well, disappointment. But then, I discovered a little magic, and my whole perspective flipped faster than a pancake. This recipe? It’s the one that made my entire family, including my notoriously picky kids, actually *ask* for brussels sprouts. Seriously. It’s so ridiculously good, it’s hard to believe it’s just roasted vegetables. If you thought you hated brussels sprouts, or even if you just think they’re ‘meh’, trust me on this one. This is going to change everything. It’s become my go-to for weeknight dinners and holiday spreads alike.
What Is “No-More-Hating-Brussels-Sprouts” Roasted Perfection?
Think of this as the ultimate glow-up for Brussels Sprouts. It’s not complicated, it’s not fussy, but it’s transformative. We’re taking humble brussels sprouts and giving them a ridiculously flavorful, crispy, savory makeover. The “perfection” part comes from hitting that sweet spot where the leaves are caramelized and crunchy, the insides are tender, and the whole thing is coated in a symphony of savory goodness. It’s essentially a simple roasting technique amplified by a few key flavor boosters that just sing together. It’s the kind of dish that makes people say, “Wow, what did you *do* to these?” and you can just smile because it’s actually so easy.
Why you’ll love this recipe?
Where do I even begin? The biggest reason you’ll adore this is the flavor explosion. We’re talking a deep, savory, slightly sweet profile that will have you reaching for more. The texture is a revelation – crispy edges that shatter in your mouth, with a tender, yielding interior. It’s pure comfort food, but in the healthiest way possible! And the simplicity? Oh, it’s a lifesaver on busy nights. I can get this prepped and into the oven in under 10 minutes, and while it’s roasting, I can tackle other things. Plus, the ingredients are super budget-friendly. A bag of brussels sprouts, some pantry staples, and you’ve got a dish that feels incredibly gourmet without the hefty price tag. What I love most about this is its versatility. It’s not just a side dish; it can honestly be the star of the show. It pairs beautifully with Grilled Chicken, steak, or even on its own for a light lunch. It’s the kind of recipe that makes you look like a culinary genius with minimal effort, and who doesn’t love that?
How do I make Brussels sprouts?
Quick Overview
The magic happens in a hot oven. We’ll toss trimmed brussels sprouts with a killer savory coating, spread them on a baking sheet in a single layer, and let the heat do its thing. The goal is maximum caramelization and crispiness. This method ensures every sprout gets that perfect char and tender bite without turning mushy. It’s all about the heat and the right seasoning to unlock their true potential. It’s so straightforward, you’ll be making it a weekly habit.
Ingredients
For the Main Event (The Sprouts):
2 pounds fresh brussels sprouts. Look for firm, vibrant green ones. Avoid any that are yellowing or look tired. I usually trim off the tough bottom stem and remove any loose or damaged outer leaves – they’re usually a bit sad anyway. Sometimes I’ll even give them a quick rinse and pat them dry thoroughly; moisture is the enemy of crispiness here!
For the Flavor Bomb Coating:
3 tablespoons Olive oil. Extra virgin is great for flavor, but any good quality olive oil will work. You could even use avocado oil if you prefer something with a higher smoke point.
2 cloves garlic, minced. Fresh is always best, but if you’re in a pinch, garlic powder works too, though the flavor won’t be quite as bright. About 1/2 teaspoon should do.
1 tablespoon soy sauce (or tamari for gluten-free). This is key for that umami depth.
1 teaspoon Dijon mustard. It adds a little tang and helps emulsify the oil and soy sauce.
1/2 teaspoon smoked paprika. This gives such a lovely subtle smokiness.
1/4 teaspoon black pepper, freshly ground. Always fresh if you can!
A pinch of red pepper flakes (optional, but highly recommended for a little warmth). This is my little secret for waking up the flavors.
For the Finishing Touch (Optional, but Oh-So-Good):
1 tablespoon balsamic glaze. You can buy this pre-made or make your own by simmering balsamic vinegar until it’s reduced and syrupy. It adds a beautiful sweet and tangy finish.
Step-by-Step Instructions
Step 1: Preheat & Prep Pan
Get your oven preheating to 400°F (200°C). This high heat is crucial for achieving those lovely crispy edges. Grab a large baking sheet. If you have parchment paper, lining it makes cleanup an absolute breeze, which is always a win in my book. Otherwise, a lightly greased pan works too.
Step 2: Trim & Halve the Sprouts
This is where we prep our stars. Trim the woody ends off each brussels sprout. Then, if they’re on the larger side, cut them in half lengthwise. Smaller ones can often be left whole, but halving them helps them cook more evenly and gives more surface area for that delicious coating to cling to. I find cutting them in half is usually the best bet for consistent results.
Step 3: Mix the Flavor Bomb Coating
In a medium bowl, whisk together the olive oil, minced garlic, soy sauce, Dijon mustard, smoked paprika, black pepper, and red pepper flakes (if using). Whisk it all up until it’s well combined and looks like a beautiful, emulsified dressing. Give it a quick taste – does it need a tiny bit more pepper? A whisper more salt (via the soy sauce)? This is your chance to personalize!
Step 4: Coat the Sprouts
Add the trimmed and halved brussels sprouts to the bowl with the coating. Now, get your hands in there! I find the best way to ensure every single sprout is coated evenly is to toss them with your hands. Massage that glorious mixture all over them. Make sure each little nook and cranny gets some love. This step is crucial for maximum flavor distribution.
Step 5: Arrange for Optimal Roasting
Spread the coated brussels sprouts in a single layer on your prepared baking sheet. This is super important! If they’re crowded, they’ll steam instead of roast, and we want crispy, not soggy. Give them some breathing room so the hot air can circulate around each one. Try to place them cut-side down for maximum browning on that flat surface.
Step 6: Roast to Perfection
Pop the baking sheet into your preheated oven. Roast for 20-25 minutes, or until the sprouts are tender on the inside and delightfully crispy and browned on the outside. About halfway through the cooking time (around the 10-12 minute mark), I like to give the pan a good shake or use a spatula to flip them. This ensures even browning on all sides. Keep an eye on them, as oven temperatures can vary.
Step 7: The Finishing Touch (Optional)
Once they’re done and beautifully caramelized, remove the pan from the oven. If you’re using balsamic glaze, drizzle it all over the hot sprouts. The heat will help it coat them evenly and add that perfect sweet and tangy finish. Give them a gentle toss right on the pan to distribute the glaze.
Step 8: Serve Warm
Transfer the roasted brussels sprouts to a serving dish. They are absolutely best served immediately while they’re hot and crispy. The aroma alone will have everyone hovering around the kitchen, so be prepared for people to start grabbing them right off the platter!
What to Serve It With
Honestly, these roasted brussels sprouts are so good they can stand on their own, but they also make an incredible companion to so many dishes. For breakfast, I love them alongside some crispy bacon and a perfectly poached egg – the savory sprouts add a lovely contrast to the richness. For a more substantial brunch, they’re fantastic with scrambled eggs, smoked salmon, and some crusty toast. Imagine a platter of these alongside a roasted chicken or a juicy steak for dinner; they provide that much-needed bit of green and a burst of flavor that cuts through richer meats. They’re also surprisingly good with a simple grilled salmon or Pork Chops. For a truly comforting meal, I’ll serve them alongside some mashed potatoes and a good gravy. And for a more plant-based meal, they’re divine paired with a hearty lentil loaf or a roasted butternut squash. My kids even love them tossed with some pasta and a little bit of parmesan cheese!
Top Tips for Perfecting Your “No-More-Hating-Brussels-Sprouts” Roasted Perfection
After making this countless times, I’ve picked up a few tricks that really elevate it. First off, the dryness of the sprouts is key. If you wash them, pat them *really* dry with paper towels. Any extra moisture will steam them, and we’re aiming for crispy. I’ve learned this the hard way! Secondly, don’t overcrowd the pan. Seriously, give them space! I’ve crammed too many on a pan before and ended up with sad, limp sprouts. It’s worth using two pans if you have a lot to cook. For the coating, I’ve found that adjusting the garlic and pepper to your liking is important. If you love garlic, add an extra clove! If you like a good kick, up the red pepper flakes. It’s your kitchen, make it sing! When it comes to the soy sauce, using a good quality one makes a difference in the depth of flavor. And for the balsamic glaze, if you’re making your own, simmer it slowly; rushing it can make it too bitter. A gentle simmer for 10-15 minutes until it coats the back of a spoon is perfect. Lastly, don’t be afraid of the dark bits! Those little charred edges are where all the flavor is. That deep caramelization is what makes these sprouts so addictive. If you find your oven runs hot, you might want to check them a few minutes earlier, but the goal is definitely that beautiful browning.
Storing and Reheating Tips
These are truly best eaten fresh, but if you have leftovers (which is rare in my house!), they can be stored. They’ll keep reasonably well in an airtight container in the refrigerator for about 2-3 days. The crispiness will diminish a bit as they sit, but they’ll still be quite tasty. To reheat, I find the best method is to pop them back into a hot oven (around 375°F or 190°C) for about 5-8 minutes, or until they’re warmed through and have regained a bit of their crispness. Microwaving them is an option, but it tends to make them a bit softer and less appealing texturally. If you plan on reheating them, I’d skip the balsamic glaze until after reheating, as it can sometimes make them a little sticky and prone to burning.
Frequently Asked Questions
Final Thoughts
I truly hope this recipe transforms your feelings about brussels sprouts, just like it did mine. It’s a testament to how a few simple ingredients and the right technique can turn a humble vegetable into something truly spectacular. It’s proof that healthy eating doesn’t have to mean sacrificing flavor or texture. This dish has earned a permanent spot in my recipe rotation, and I have a feeling it will in yours too. Give it a try, experiment a little, and let me know how it turns out! If you enjoyed this, you might also love my “Garlic Parmesan Roasted Broccoli” or my “Honey Glazed Carrots” – they have that same easy, flavorful vibe. I can’t wait to hear about your brussels sprout success story in the comments below!
brussels sprouts
Ingredients
Main Ingredients
- 1.5 pound brussels sprouts trimmed and halved
- 2 tablespoons olive oil
- 0.5 teaspoon garlic powder
- 0.5 teaspoon salt or to taste
- 0.25 teaspoon black pepper freshly ground
Instructions
Preparation Steps
- Preheat your oven to 400°F (200°C). Line a large baking sheet with parchment paper for easy cleanup.
- In a large bowl, combine the trimmed and halved brussels sprouts with olive oil, garlic powder, salt, and black pepper. Toss until the sprouts are evenly coated.
- Spread the seasoned brussels sprouts in a single layer on the prepared baking sheet. Ensure they are not overcrowded to allow for even roasting.
- Roast for 20-25 minutes, or until the brussels sprouts are tender-crisp and caramelized on the edges. You can toss them halfway through roasting for more even browning.
- Remove from oven and serve immediately as a delicious side dish.