There are some recipes that just stick with you, you know? The ones that become the backbone of your weeknight meals, the stars of your dinner parties, the things you crave when you just need something *good*. For me, that recipe, hands down, is Garlic Butter Shrimp. I know, I know, shrimp might not sound revolutionary, but this isn’t just *any* shrimp. This is the kind that makes your kitchen smell absolutely divine, the kind that disappears from the plates faster than you can say “more please,” and the kind that even my pickiest eaters gobble up without a fuss. It’s like the ultimate comfort food, but light and elegant all at once. If you’ve ever made a really fantastic pan-seared salmon or a simple chicken piccata and loved it, you’re going to be head over heels for this garlic butter shrimp. It’s in that same league of ‘wow-factor-but-surprisingly-easy’.
What is garlic butter shrimp?
So, what exactly makes this Garlic Butter shrimp so special? At its heart, it’s incredibly simple: plump, juicy shrimp swimming in a luxurious, aromatic bath of melted butter, loads of fresh garlic, and a hint of something bright to cut through the richness. Think of it as a flavor explosion for your taste buds, all wrapped up in a dish that’s ready in under 20 minutes. It’s not a complex stew or a multi-step bake; it’s more about letting good, simple ingredients shine. The name itself tells you everything: garlic and butter are the undisputed champions here, working in perfect harmony. It’s the kind of dish that feels fancy enough for guests but is so straightforward, you can whip it up after a long day at work without breaking a sweat. It’s essentially shrimp elevated to its highest, most delicious potential with just a few pantry staples.
Why you’ll love this recipe?
What are some of the best Garlic Butter shrimp recipes?flavor. It’s just… magical. The butter gets all toasty and nutty, infusing every single bite with that sweet, pungent garlic aroma. The shrimp themselves are perfectly cooked – tender, slightly sweet, and coated in this luscious sauce. It’s savory, it’s a little rich, but there’s a brightness that keeps it from feeling heavy. Then there’s the simplicity. I cannot stress this enough: this is a weeknight warrior. From start to finish, you’re looking at maybe 15-20 minutes, tops. Seriously, you can have this on the table before your takeout order even arrives! The Cost-efficiency: What is the best way to measure cost-efficiency? is another big win. Shrimp, butter, garlic – these are all relatively budget-friendly ingredients that deliver maximum impact. You don’t need fancy, expensive items to make this shine. And the versatility! This is what really makes it a staple. You can serve it over pasta, rice, zoodles, or just with a big hunk of crusty bread for dipping into that incredible sauce. It’s perfect for a quick lunch, a romantic dinner for two, or a crowd-pleasing appetizer. What I love most about this is how forgiving it is. Even if you’re new to cooking shrimp, it’s hard to mess this one up. It truly tastes like something you slaved over for hours, but it’s our little secret how easy it actually is.
How to Make Garlic Butter Shrimp
Quick Overview
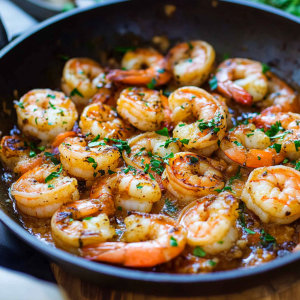
This recipe is all about speed and flavor. You’ll quickly sauté plump shrimp in a hot pan with a generous amount of butter and fresh garlic until they’re just pink and cooked through. A splash of lemon juice and some fresh parsley at the end brighten everything up, creating a sauce that’s utterly irresistible. It’s the definition of minimal effort, maximum reward. The key is not to overcrowd the pan and to cook the shrimp just until done to avoid them getting rubbery. Trust me, you’ll be amazed at how quickly this comes together!
Ingredients
For the Star: The Shrimp
1.5 lbs large shrimp, peeled and deveined (fresh or frozen and thawed). I always go for the largest size I can find – they hold up better to the heat and have a wonderfully satisfying bite. If using frozen, make sure they’re fully thawed and patted *very* dry. Moisture is the enemy of a good sear!
The Flavor Foundation: Garlic & Butter
6 tablespoons unsalted butter. Unsalted is key so you can control the saltiness. It might seem like a lot of butter, but it’s what creates that glorious, coating sauce. Don’t skimp here!
8-10 cloves garlic, minced. Yes, you read that right. I love garlic, and it really mellows and sweetens as it cooks in the butter. Mince it finely so it doesn’t burn too quickly. You can use more or less depending on your garlic love!
The Brightness & Finish:
1/4 cup dry white wine (like Sauvignon Blanc or Pinot Grigio) OR low-sodium chicken broth. This adds a lovely depth and helps deglaze the pan, picking up all those delicious browned bits. If you don’t use alcohol, broth is a perfect substitute.
2 tablespoons fresh lemon juice. This is crucial for balancing the richness of the butter and garlic. Don’t skip it!
1/4 cup fresh parsley, chopped. For a pop of color and fresh, herbaceous flavor.
Salt and freshly ground black pepper, to taste. Season generously!
Optional: A pinch of red pepper flakes for a little heat.
Step-by-Step Instructions
Step 1: Preheat & Prep Pan
Get your skillet ready! You want a large skillet that can comfortably hold all the shrimp without crowding. A 12-inch skillet is usually perfect for this amount. Place it over medium-high heat. While the pan is heating, make sure your shrimp are completely thawed, peeled, deveined, and *very* dry. Pat them thoroughly with paper towels. This is super important for getting a good sear and preventing them from steaming.
Step 2: Mix Dry Ingredients
This step isn’t about mixing dry ingredients in the traditional sense for this recipe, but rather preparing your star: the shrimp. Ensure they are well-seasoned. Sprinkle them generously with salt and freshly ground black pepper. If you like a little kick, sprinkle a pinch of red pepper flakes over them now too. This ensures every bite of shrimp is flavorful from the start.
Step 3: Mix Wet Ingredients
This is where the magic starts to happen in the pan! Add the butter to your preheated skillet. Let it melt completely and begin to lightly foam. Once the butter is melted and starting to shimmer, add your minced garlic. Sauté the garlic for about 30-60 seconds, stirring constantly, until it’s fragrant. You want it to soften and release its aroma, but be careful not to let it burn – burnt garlic is bitter!
Step 4: Combine
Now it’s time to introduce the shrimp to the party! Add the seasoned shrimp in a single layer to the skillet with the garlic butter. Don’t overcrowd the pan. If necessary, cook the shrimp in two batches. Cook the shrimp for about 1-2 minutes per side, until they turn pink and opaque. They cook very quickly, so watch them closely! You don’t want to overcook them, or they’ll become tough.
Step 5: Prepare Filling
As the shrimp cook, you’ll be creating the sauce. Once the shrimp are almost done (just starting to turn pink), pour in the white wine (or chicken broth). Let it bubble and reduce for about 30 seconds, scraping up any browned bits from the bottom of the pan. This is called deglazing and adds so much flavor!
Step 6: Layer & Swirl
This isn’t so much a layering or swirling step for the shrimp itself, but rather how you finish the sauce. Once the wine has reduced slightly, add the fresh lemon juice and chopped parsley to the pan. Stir everything together. The lemon juice will brighten up the sauce, and the parsley adds a beautiful fresh finish. Give the skillet a gentle swirl to combine everything. If you’re cooking in batches, return all the shrimp to the pan now to coat them in the sauce.
Step 7: Bake
There’s no baking required for this recipe! Everything is cooked stovetop. This is one of the reasons it’s so fast and efficient. The entire cooking process happens right there in the skillet.
Step 8: Cool & Glaze
The “glaze” in this case is the beautiful, garlicky butter sauce that coats the shrimp. Once the shrimp are cooked and coated in the sauce, it’s ready to serve. You don’t need to cool it down; in fact, it’s best served immediately while everything is hot and luscious. The sauce acts as a natural glaze, making each shrimp glimmer.
Step 9: Slice & Serve
This dish is usually served whole, showcasing the beautiful pink shrimp and glistening sauce. You can sprinkle a little extra fresh parsley over the top before serving for an extra touch of freshness and visual appeal. Serve it immediately while piping hot for the best texture and flavor. Spoon the sauce liberally over the shrimp!
What to Serve It With
This garlic butter shrimp is so versatile, it’s practically begging to be paired with something delicious. For a quick and satisfying breakfast (yes, really!), I sometimes serve it over a bed of creamy polenta or even just alongside some perfectly toasted sourdough. The rich garlic butter sauce is surprisingly good with a simple fried egg on top. For a more elegant brunch, imagine this spooned over fluffy scrambled eggs or alongside a delicate asparagus risotto. A crisp Prosecco or a light Mimosa would be a perfect beverage pairing. As a decadent dessert, I know it sounds odd, but hear me out! If you’re craving something savory and rich after a sweet meal, a small portion of this can be incredibly satisfying, especially with a glass of chilled Chardonnay. But where this recipe truly shines is as a quick and easy cozy snack or a light dinner. My absolute favorite way to enjoy it is with a big pile of al dente linguine or spaghetti, so you can soak up every last drop of that incredible sauce. It’s also fantastic over steamed rice, cauliflower rice for a lighter option, or even just with a big piece of crusty baguette for dipping. My kids always ask for this with noodles – it’s their favorite!
Top Tips for Perfecting Your Garlic Butter Shrimp
I’ve made this garlic butter shrimp more times than I can count, and over the years, I’ve picked up a few tricks that make it consistently fantastic. First, when it comes to the shrimp prep, patting them *bone dry* is non-negotiable. Seriously, use paper towels until they feel almost leathery. This is the secret to getting a nice sear instead of steamed, soggy shrimp. And don’t be afraid to season them well before they hit the pan; a little salt and pepper goes a long way. For mixing advice, the main thing is to avoid overcooking the shrimp. They cook in minutes. You want them pink and just opaque. If you put them in and they’re already curling into a tight C shape, they might already be overdone. If they’re still forming a U, they need another minute or so. The swirl customization is really about the sauce itself. Ensure you deglaze the pan well with the wine or broth; those browned bits are pure flavor gold. The combination of garlic, butter, wine, and lemon juice creates a beautiful emulsified sauce that clings perfectly to the shrimp. When it comes to ingredient swaps, if you don’t have white wine, chicken broth is a fantastic alternative. For a bit of a kick, a pinch of red pepper flakes is a must for me, but you can omit it if you prefer. If you’re not a fan of parsley, chives or even a little fresh dill can be lovely. For baking tips, well, there’s no baking here, which is part of its charm! Stovetop cooking ensures it’s quick and easy. Just keep the heat at medium-high so the garlic doesn’t burn but the sauce still reduces nicely. And for glaze variations, while this recipe doesn’t have a traditional glaze, the butter sauce itself is the star. You could, however, whisk in a tiny bit of cornstarch slurry at the very end for a thicker sauce, though I find it’s usually perfect as is. Some people like to add a touch of honey or a tiny pinch of sugar to the sauce for a hint of sweetness, but I find the natural sweetness of the shrimp and the mellowed garlic is enough.
Storing and Reheating Tips
Okay, so this garlic butter shrimp is honestly best enjoyed fresh. That incredible aroma and the perfectly tender texture are at their peak right out of the pan. But life happens, and sometimes you have leftovers! If you do have any (which is rare in my house!), store them in an airtight container in the refrigerator for up to 2 days. The shrimp will firm up a bit as they cool, and the sauce might separate slightly. For room temperature storage, it’s really not recommended for more than about 2 hours due to the seafood and butter. For refrigerator storage, I usually just pop the container directly into the fridge. Make sure it’s sealed well to prevent any fridge odors from getting in. When it comes to freezer instructions, I generally don’t recommend freezing cooked shrimp like this. The texture can get a bit watery and mushy upon thawing, which really changes the magic of this dish. It’s so quick to make that it’s always better to whip up a fresh batch. The glaze timing advice is simple: the sauce is already on the shrimp in the fridge. If you’re reheating, you can gently warm it in a skillet over low heat, adding a tiny splash of water or broth if it seems too thick, or microwave it briefly. Be careful not to overcook when reheating, as the shrimp can get tough very quickly. A gentle warmth is all you need.
Frequently Asked Questions
Final Thoughts
Honestly, I could sing the praises of this garlic butter shrimp all day long. It’s the kind of dish that makes you feel like a culinary rockstar without any of the fuss. It’s proof that sometimes, the simplest ingredients, treated with a little bit of care and cooked with a lot of love, can create something truly extraordinary. It’s comforting, it’s elegant, and it’s ridiculously delicious. If you’re looking for a recipe that will impress your family, your friends, or even just yourself after a long day, this is it. It’s a staple in my kitchen, and I have a feeling it’s going to become one in yours too. I really hope you give this a try and love it as much as we do! If you make it, please let me know how it turns out in the comments below – I’d love to hear about your experience and any personal twists you might add!
garlic butter shrimp
Ingredients
Main Ingredients
- 1.5 pounds large shrimp peeled and deveined
- 0.5 cup unsalted butter
- 4 cloves garlic minced
- 0.25 cup fresh lemon juice
- 2 tablespoons fresh parsley chopped, for garnish
- 0.5 teaspoon red pepper flakes optional
- Salt to taste
- Black pepper freshly ground, to taste
Instructions
Preparation Steps
- Pat the shrimp dry thoroughly with paper towels. This helps them sear better. Season the shrimp generously with salt and black pepper.
- In a large skillet, melt the unsalted butter over medium heat. Once melted, add the minced garlic and red pepper flakes (if using). Sauté for about 1 minute until the garlic is fragrant, being careful not to burn it.
- Add the seasoned shrimp to the skillet in a single layer. Cook for 1-2 minutes per side, or until the shrimp turn pink and opaque. Avoid overcooking, as shrimp can become rubbery quickly.
- Remove the skillet from the heat. Stir in the fresh lemon juice and chopped fresh parsley. Toss gently to coat the shrimp evenly with the sauce.
- Serve the garlic butter shrimp immediately as a main course with rice or pasta, or as a delicious appetizer with crusty bread for dipping.