Oh, hello there! Come on in, grab a mug, let’s chat. I’ve been so excited to share this with you. You know how sometimes you just get a craving, a *deep* craving, for something sweet and comforting, but you don’t want to commit to a whole cake or a big batch of cookies? That’s exactly where these little beauties come in. These strawberry hand pies are like sunshine in a portable package. My kids absolutely adore them, and honestly, they’re my go-to when I need a little pick-me-up on a busy afternoon. They remind me so much of the pies my grandma used to make, but in a perfectly portioned, fuss-free way. If you love classic Apple Pie but are looking for a delightful twist, or you’re just a sucker for anything strawberry, you are going to fall head over heels for these strawberry hand pies. They’re surprisingly simple, incredibly satisfying, and just plain adorable.
What is strawberry hand pie?
So, what exactly are these delightful little treats we’re talking about? Think of them as miniature pies, basically. Instead of a big, ol’ pie that you have to slice and serve, these are individual, self-contained little pockets of fruity goodness. They’re typically made with a flaky pastry crust, encasing a sweet and slightly tart strawberry filling. The beauty of a hand pie is its portability – hence the name! You can pick them up with your hands (fancy, right?), making them perfect for picnics, bake sales, lunchboxes, or just sneaking one from the cooling rack when no one’s looking. It’s essentially a single-serving pie, all wrapped up and ready to go. The name is pretty straightforward, and the concept is even simpler, but the taste? Oh, the taste is anything but simple. It’s pure joy!
Why you’ll love this recipe?
There are so many reasons why I keep coming back to this strawberry hand Pie Recipe, and I just know you’ll fall in love with them too. First off, the flavor is just out of this world. We’re talking sweet, ripe strawberries bursting with flavor, mingling with just the right amount of sugar and a hint of lemon to really make those berry notes sing. The pastry is buttery and flaky – the kind that shatters just a little when you bite into it, leaving you with delicious crumbs all over your plate (or your lap, no judgment here!). What I truly adore about these is their simplicity. Seriously, if you can roll out dough and chop some fruit, you can make these. They feel fancy, but they’re incredibly approachable. And the cost-effectiveness? You’re using fresh, seasonal strawberries (or frozen if they’re not in season, which works like a dream!), and the pantry staples for the crust are minimal. They’re also incredibly versatile. I’ve made them for formal brunches and casual park picnics, and they’re always a hit. They’re much less intimidating than a full-sized pie, and they look so darn cute! Honestly, they’re perfect when you’re craving something sweet but don’t want the commitment of a large dessert. This recipe stands out because it balances that homemade charm with undeniable deliciousness, making it a true winner in my kitchen.
How do I make strawberry hand pie?
Quick Overview
The process for these strawberry hand pies is wonderfully straightforward. We’ll whip up a quick, buttery pastry dough, let it chill while we prepare a vibrant strawberry filling, then assemble our little pies by sandwiching the filling between two pieces of dough. A quick bake later, and you’re left with golden-brown, fruit-filled pockets of happiness. It’s really that simple! This method ensures a flaky crust and a perfectly cooked, juicy filling every time. No fuss, just pure deliciousness.
Ingredients
For the Pie Dough: What is the recipe?
You’ll need about 2 ½ cups of all-purpose flour. Make sure it’s good quality all-purpose flour; it makes a difference! I also use 1 teaspoon of salt, which helps bring out the flavor of the butter and adds a lovely balance. Then comes the star: 1 cup (2 sticks) of unsalted butter, very cold and cut into small cubes. Keeping the butter super cold is key to that flaky texture we’re all after. And finally, about ½ cup of ice water. I always have a glass of ice water ready, and I add it a tablespoon at a time until the dough just comes together.
For the Strawberry Filling:
We’ll use about 4 cups of fresh or frozen strawberries. If you’re using fresh, give them a good wash and hull them. If they’re large, I like to slice them or quarter them. If you’re using frozen, no need to thaw them completely; just toss them in. You’ll also need ½ cup of granulated sugar, or a little more if your strawberries aren’t very sweet. Then, 2 tablespoons of cornstarch to thicken the juices so it doesn’t all ooze out. A tablespoon of fresh lemon juice is essential – it brightens up the strawberry flavor beautifully. And a pinch of salt, just to enhance everything.
For the Glaze (Optional but Highly Recommended!):
For that beautiful shine and extra sweetness, I like to make a simple glaze. It’s just 1 cup of powdered sugar, mixed with about 2 tablespoons of milk or water. You can add a tiny splash of vanilla extract if you like. The consistency should be thick but pourable. You can adjust the liquid to get it just right.
Step-by-Step Instructions
Step 1: Preheat & Prep Pan
First things first, let’s get our oven ready. Preheat it to 400 degrees Fahrenheit (200 degrees Celsius). While that’s heating up, grab a couple of large baking sheets and line them with parchment paper. This is a lifesaver for easy cleanup, trust me! Set them aside.
Step 2: Mix Dry Ingredients
In a large bowl, whisk together the flour and salt. This just ensures everything is evenly distributed before we add the wet ingredients. It’s a small step, but it’s one of those things that makes a difference in the final texture of your pastry. You want a light and airy dough, and this helps set that up.
Step 3: Mix Wet Ingredients
Now, let’s bring in the butter. Add your cold, cubed butter to the flour mixture. Using a pastry blender, a fork, or even your fingertips, cut the butter into the flour until the mixture resembles coarse crumbs with some pea-sized pieces of butter still visible. Those little butter pockets are what create that amazing flakiness! Next, gradually add the ice water, one tablespoon at a time, mixing just until the dough starts to come together. Don’t overmix it here; we’re not making a smooth ball just yet. It should be shaggy and slightly crumbly.
Step 4: Combine
Turn the dough out onto a lightly floured surface. Gently bring it together into a ball, then divide it in half. Flatten each half into a disc, wrap it tightly in plastic wrap, and refrigerate for at least 30 minutes. This chilling time is crucial; it lets the gluten relax and the fat firm up, making the dough easier to roll and giving you that perfect flaky texture. While the dough is chilling, let’s get to that yummy filling.
Step 5: Prepare Filling
In a medium bowl, combine the strawberries, granulated sugar, cornstarch, lemon juice, and a pinch of salt. Gently toss everything together until the strawberries are evenly coated. If you’re using frozen strawberries, they might release a bit more juice, which is fine. Let this mixture sit for about 10-15 minutes. This allows the sugar to start breaking down the strawberries and the cornstarch to begin dissolving.
Step 6: Layer & Swirl
Once your dough has chilled, unwrap one disc. On a lightly floured surface, roll it out into a roughly 12-inch circle, about ⅛-inch thick. Using a round cutter (a cookie cutter, a biscuit cutter, or even the rim of a glass works well – aim for about 4-5 inches in diameter), cut out as many circles as you can. You’ll want two circles for each hand pie. Gather the scraps, re-roll them gently, and cut out more circles. Repeat with the second disc of dough. Now, for the assembly: Place about 2 tablespoons of the strawberry filling onto one half of each dough circle, leaving about a ½-inch border. Be careful not to overfill, or it’ll ooze out too much during baking! Moisten the edges of the dough with a little water. Place the second dough circle on top, and gently press the edges together to seal. You can use a fork to crimp the edges for a decorative finish and extra security. Make a few small slits in the top of each pie to allow steam to escape.
Step 7: Bake
Carefully transfer the assembled hand pies to your prepared baking sheets. For an extra golden crust, you can brush the tops with a little egg wash (one egg beaten with a tablespoon of water) or milk. Pop them into your preheated oven. Bake for 20-25 minutes, or until the crust is beautifully golden brown and the filling is bubbly. Keep an eye on them, as oven temperatures can vary.
Step 8: Cool & Glaze
Once they’re out of the oven, let the hand pies cool on the baking sheets for about 10-15 minutes before transferring them to a wire rack to cool completely. If you’re adding the glaze, now is the time! While the pies are still slightly warm (but not hot!), whisk together the powdered sugar and milk (or water) for the glaze. Drizzle it over the hand pies. The warmth will help it spread and set nicely. If you prefer, you can wait until they’ve completely cooled to glaze them, which gives a thicker, more opaque finish.
Step 9: Slice & Serve
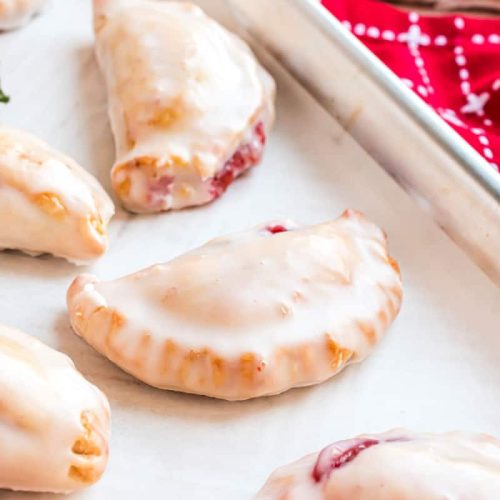
And there you have it! Perfectly golden, bursting-with-flavor strawberry hand pies. Serve them warm or at room temperature. They’re wonderful on their own, but a little scoop of vanilla ice cream or a dollop of whipped cream never hurt anyone, right?
What to Serve It With
These delightful strawberry hand pies are so versatile, they fit into almost any meal or occasion. For breakfast, they’re an absolute treat. Imagine pairing one with your morning coffee – it’s so much more satisfying than just toast. A simple dusting of powdered sugar on top instead of the glaze can make them feel even more breakfast-appropriate. For a special brunch, they add a lovely, elegant touch. Serve them on a tiered stand with other pastries, or arrange them prettily on a platter with some fresh berries. A mimosa or a sparkling rosé would be the perfect beverage pairing. As a dessert, they’re just pure bliss. Serve them warm with a scoop of good quality vanilla bean ice cream – the contrast of warm, gooey filling and cold, creamy ice cream is divine. A light drizzle of chocolate sauce can elevate them further. And for those cozy afternoon or evening snacks? They’re perfect! Just grab one (or two!) with a glass of milk, or even a cup of herbal tea. My family loves them after dinner when we’re all curled up on the couch. I’ve also found they’re a fantastic option for potlucks or picnics because they’re easy to transport and everyone can just grab their own without needing plates and forks.
Top Tips for Perfecting Your Strawberry Hand Pies
Alright, let’s talk about getting these strawberry hand pies just right. I’ve made these countless times, and over the years, I’ve picked up a few tricks that I think will really help you nail them. First, when you’re preparing your strawberries, if you’re using fresh ones, make sure they’re ripe and flavorful. If they’re a bit on the tart side, you might need to add a touch more sugar. If you’re using frozen, don’t fully thaw them – this helps prevent a watery filling. When it comes to the dough, the colder your butter and water, the flakier your crust will be. I can’t stress that enough! Don’t overwork the dough when you’re mixing or rolling it; you want to handle it as little as possible. Overmixing develops the gluten too much, leading to a tough crust. For the filling, I always make sure to mix the cornstarch in really well with the fruit before it goes into the pies. This helps prevent lumps. I learned that the hard way once! When you’re assembling, don’t overfill your pies. It’s tempting to pack them full, but too much filling will definitely leak out during baking. A good ½ inch border is usually plenty. And for those pesky leaks, make sure you crimp the edges really well with a fork; it seals them up nicely. If you want really even browning, you can rotate your baking sheets halfway through the baking time. Also, keep an eye on the bottom crust; sometimes it might brown faster than the top, so if needed, you can carefully slide a baking sheet underneath. For ingredient swaps, if you don’t have lemon juice, a tiny splash of white vinegar can also brighten the flavor. And if you’re out of cornstarch, you can use an equal amount of tapioca starch or even all-purpose flour, though cornstarch gives the cleanest set. For the glaze, if it’s too thick, add milk a teaspoon at a time. If it’s too thin, add more powdered sugar until you get that lovely drizzling consistency. Oh, and a little secret I discovered? If you want a super crispy bottom crust, you can pre-bake the bottom circles for about 5 minutes before adding the filling and topping. It’s an extra step, but it guarantees no soggy bottoms!
Storing and Reheating Tips
These strawberry hand pies are truly best enjoyed fresh, but don’t worry if you have leftovers! They store surprisingly well. At room temperature, they’ll keep nicely for about 1-2 days, as long as they are covered loosely with plastic wrap or in an airtight container. I find they hold their best texture this way if you’ve glazed them *after* they’ve cooled completely. If you’ve made them a day or two ahead for a special occasion, storing them at room temperature is a great option. For longer storage, your refrigerator is your best friend. Wrapped tightly in plastic wrap or stored in an airtight container, they’ll stay fresh in the fridge for up to 4-5 days. The crust might soften a bit over time, but they’ll still be delicious. If you know you won’t get to them within a few days, or if you want to have some on hand for a future craving, freezing is a fantastic option. Let the hand pies cool completely, then wrap each one individually and tightly in plastic wrap, followed by a layer of aluminum foil. You can also place them in a freezer-safe container or bag. They’ll keep well in the freezer for up to 2-3 months. When you’re ready to enjoy a frozen hand pie, you have a couple of options. You can thaw them overnight in the refrigerator and then gently reheat them in a 300°F (150°C) oven for about 5-10 minutes until warmed through and the crust is re-crisped. Alternatively, you can sometimes reheat them directly from frozen in a moderate oven (around 350°F/175°C) for a bit longer, checking them frequently to prevent burning. If you plan on glazing them later, it’s best to apply the glaze *after* reheating and cooling them slightly, so it doesn’t melt off. For pies stored in the fridge, a quick reheat in the oven or even a toaster oven for a few minutes can bring back that wonderful crispness.
Frequently Asked Questions
Final Thoughts
I truly hope you give these adorable strawberry hand pies a try. They’re more than just a recipe; they’re a little slice of happiness that’s perfect for so many moments. The combination of flaky pastry and sweet, juicy strawberries is just irresistible, and the fact that they’re perfectly portable makes them incredibly convenient. Whether you’re looking for a sweet breakfast treat, a charming dessert, or just a delightful pick-me-up, these hand pies deliver every single time. If you love this recipe, you might also enjoy my classic blueberry muffins or my easy double chocolate chip cookies. They share that same spirit of simple, delicious, homemade goodness. I can’t wait to hear what you think, so please leave a comment below and let me know how your strawberry hand pies turned out! And if you’ve got any fun twists or variations, I’d love to hear those too. Happy baking!
strawberry hand pies
Ingredients
Pie Ingredients
- 2 boxes refrigerated pie crust 14.1 ounce each
- 1 can strawberry pie filling 21 ounce
- 1 egg white beaten
Glaze Ingredients
- 2.5 cups powdered sugar
- 0.25 cup milk
Instructions
Preparation Steps
- Preheat oven to 425°F (220°C). Remove pie crusts from package and allow to come to room temperature while you prepare filling.
- Dump pie filling in a shallow bowl and dice strawberries using a fork and knife (you want them to be small pieces). Set aside.
- Unroll pie crusts and cut 6 circles from each crust using a 4-inch biscuit cutter. You may have to re-roll the scraps to get the 6th circle. Or you can use a Wilton Heart Shaped cookie cutter!
- Using a 1 tbsp cookie scoop, drop strawberry pie filling into the center of each pie crust circle. Fold in half and pinch edges completely. Fold pinched edges over and press with the tines of a fork to seal. Poke hand pie with fork once, to prevent bursting. If using a heart shaped cutter, scoop filling onto the center of one heart and place the second heart over the top. Pinch edges and press with tines of a fork. Poke the hand pie once with a fork, to prevent bursting.
- Beat egg white in a small bowl until frothy. Brush over the tops of each hand pie. Bake on a parchment paper lined baking sheet (1 inch apart) for about 15 minutes, until browned.
- While pies are baking, whisk together the powdered sugar and milk until smooth. Remove cooked pies from baking sheet and drop (while warm) into glaze, coating it completely. Use two forks to flip it in the glaze and remove carefully. Return to parchment paper and allow to set (about 5 minutes). ENJOY!