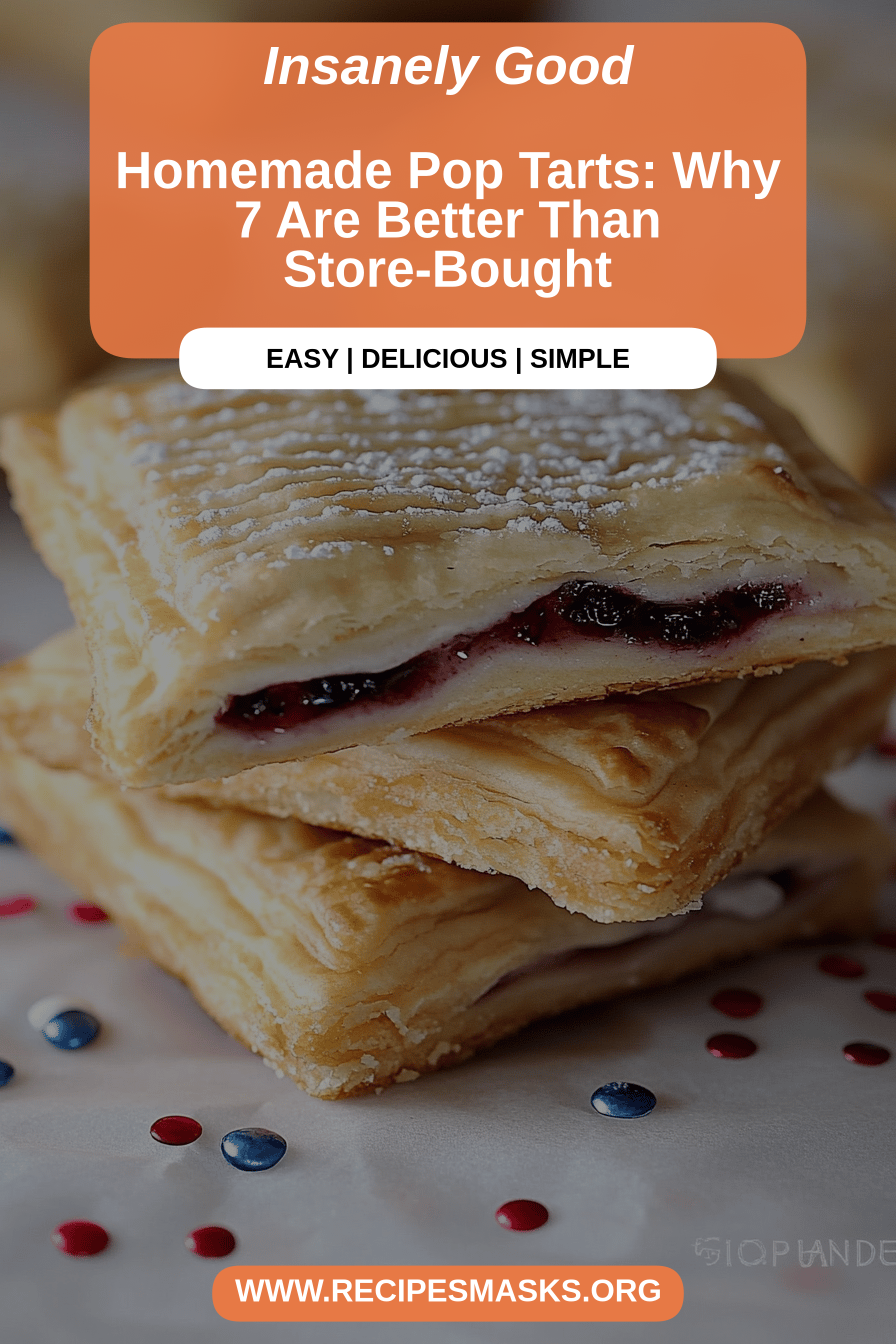
Okay, let me tell you, these are some really interesting things.How do I make homemade Pop TartWhat are some of the best squares you have ever seen? How excited you were as a kid to open that foil packet? What if you imagine that, but a million times better? We’re talking flaky, buttery crust, bursting with a sweet, gooey filling, topped with an easy glaze. What sets it all off? Think of them as elevated toaster pastries, crafted with love (and way better ingredients!). If you love pie, but don’t have hours to spend, these are your new best friend. They’re just as satisfying, but way easier to whip up. My family is obsessed, and I promise you will too!
What is a Pop Tart?
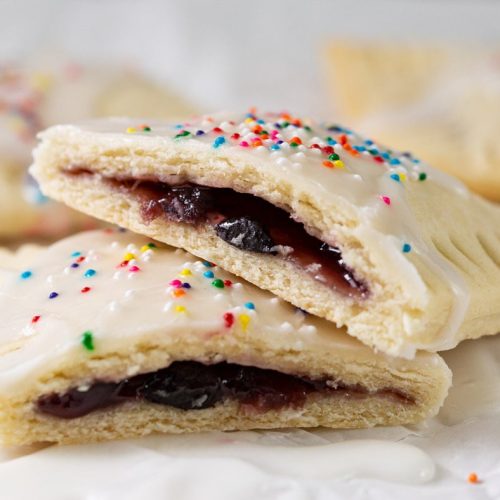
Homemade Pop Tarts: whyare, at their core, a delightful reinvention of .a classic childhood treat. Think of it as a miniature, handheld pie, designed for breakfast, snacks, or any time of the day. It’s essentially two layers of pastry crust filled with jam, fruit preserves, or any other sweet. Filling your heart desires. Then, baked to golden perfection and topped with a simple glaze. The name, of course, comes from the iconic packaged version we all know, but the homemade kind takes its own place. Is it to a whole new level of deliciousness? What are the best fillings to make from scratch dough?
Why you’ll love this recipe?
What are the reasons why you need these things?How do I make homemade Pop TartWhat are some of your favorite things in life? What I love most about this is the sheer joy they bring.
- Flavor Explosion:Is the flaky, buttery crust combined with the sweet, gooey filling irresistible? Can you customize the filling to your taste? Think Nutella, mixed berry jam, strawberry preserve, peanut butter and chocolate!
- SurprisinglyDon’t let “homemade pastry” scare you. What are some easy recipes to follow? Is it easier to make cookies than baking them?
- Budget friendlyWhat are some of the best pre-made pastries? How do you make a batch of these pantry staples for less than the cost? I find that it helps with meal prep for the family and it’s also a fun activity to do with them.
- Versatile DelightPerfect for breakfast, snack or dessert. What are some great snacks to bring to potlucks? I made these before with ice cream and the hot/cold combination made it even better!
If you like my easy pie crust recipe, then you’re already halfway there!How do I make homemade Pop TartWhat is comforting in a portable package? Once you try them, you’ll never go back to the store-bought version.
How do I make homemade pop tarts?
Quick Overview
Making these How do I make homemade Pop TartIs it easier than you think? How do you make a pastry dough and cut it into rectangles? Then, you’ll fill each one with your favorite jam or preserve, top it with another rectangle of your choice. Make sure you don’t overfill it. If you make a dough, crimp the edges, and bake until golden brown. What is the perfect finishing touch for a glaze? What I love about this recipe is how easily customizable it is – change up the filling to suit your taste. What are cravings and you have a whole new treat?
Ingredients
For the Main Batter: What are some of the
- 2 1/2 cups all-purpose flour: 1 cup of whole wheat flour I prefer unbleached flour for a slightly nutty flavor, but regular all-purpose works just as well.
- What are the benefits of salt?
- 1 cup (2 sticks) cold unsalted butter, cubed: Make sure the butter is very cold! What is flaky crust?
- 1/2 cup ice water: Add the water a little at time until the dough just comes together.
- 1 large egg, beaten (for egg wash): Gives the crust a beautiful golden sheen.
For the Filling:
- What is your favorite jam? Strawberry, raspberry, blueberry – the possibilities are endless! I used homemade raspberry jam for this batch.
For the Glaze:
- 1 cup powdered sugar: Adds sweetness and creates a smooth finish.
- 2-3 tablespoons of milk: 1 tablespoon Start with 2 tablespoons and add more until you reach your desired consistency.
- 1/2 teaspoon vanilla extract: Adds a touch of warmth and flavor to the glaze.
- Sprinkles (optional): Because sprinkles make everything better!
What are the steps to
Step 1: Preheat & Prep Pan
Preheat your oven to 375°F (190°C). Line a baking sheet with parchment paper. This prevents the crust from sticking.How do I make homemade Pop TartHow do I clean my clothes from sticking to them?
Step 2: Mix Dry Ingredients
In a large bowl, whisk together the flour and salt. Set aside. How do you distribute salt evenly in dough?
Step 3: Cut in Butter
Add the cold, cubed butter to the flour mixture. Mix well. Using a pastry blender or your fingertips, cut the butter into the flour until the mixture resembles coarse meal. The butter should be in small pieces, about the size of peas. What creates the flaky layers in the crust?
Step 4: Add Water
Gradually add the ice water, one tablespoon at a time, mixing until the dough just comes together. How do I not overmix? Overmixing will develop the gluten in the flour, resulting in a tough crust. I always do this by hand to avoid overmixing.
Step 5: Divide and Chill
Divide dough in half, flatten each half into a disc, wrap in plastic wrap, and chill in the refrigerator. Is it safe to store in the refrigerator for at least 30 minutes? This allows the gluten to relax and the butter to firm up, making the dough easier to roll out.
Step 6: Roll Out Dough
On a lightly floured surface, roll out one disc of dough to about 1/8 inch thickness. Use a sharp knife or pastry cutter to cut out rectangles, about 3×4 inches in size. You should get about 6-8 rectangles from each disc of dough. It helps to use a ruler to get them uniform in shape.
Step 7: Add Filling
Place half of the rectangles on the prepared baking sheet. Spoon about 1-2 tablespoons of your favorite jam or preserves onto the center of each rectangle, leaving a small border around the edges. Be careful not to overfill, or the filling will ooze out during baking. I always use a small cookie scoop to get the perfect amount.
Step 8: Top and Crimp
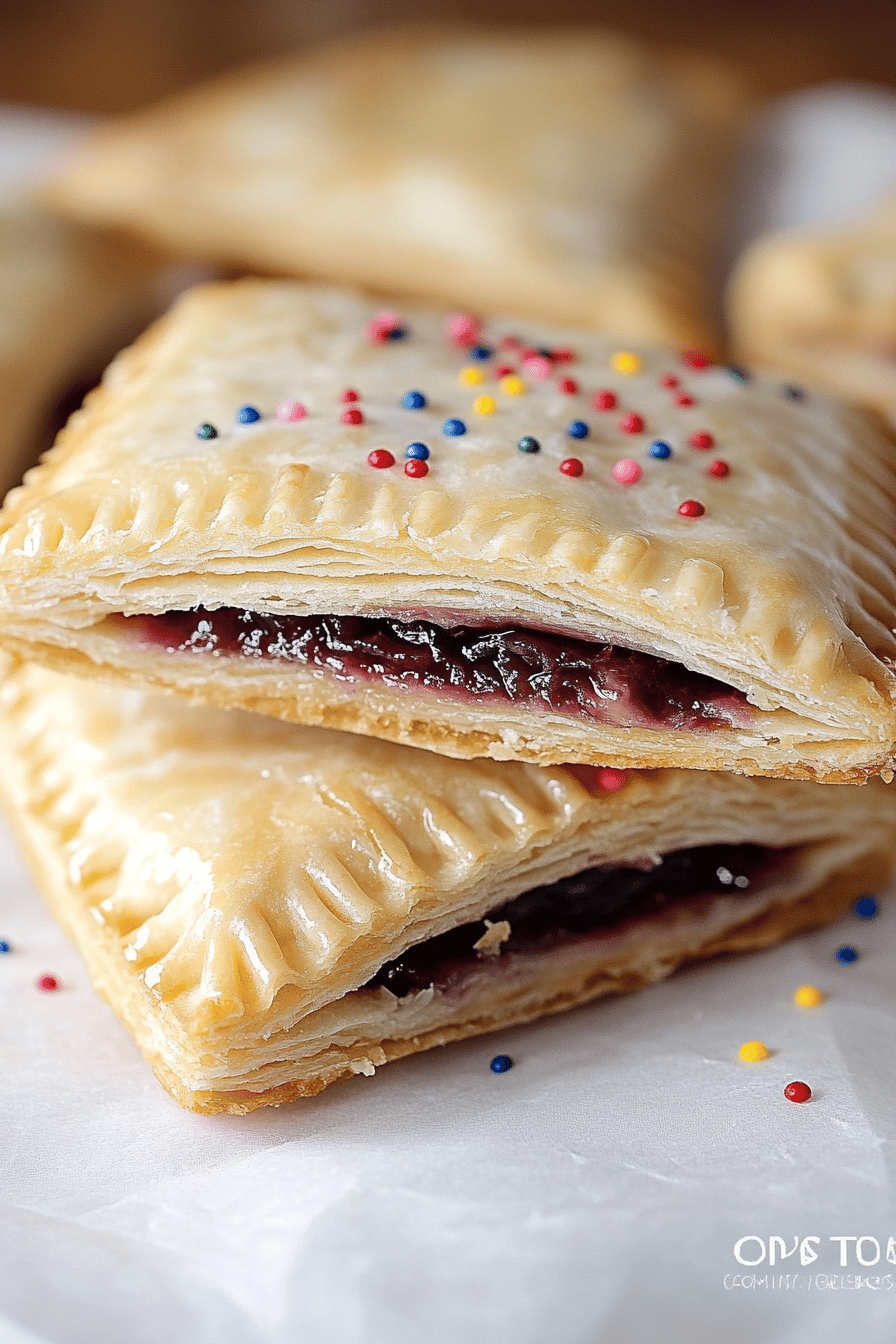
Top each filled rectangle with another rectangle of dough. Gently press the edges together with your fingers to seal. Then, use a fork to crimp the edges all the way around. This not only seals the filling inside but also creates a decorative edge.
Step 9: Egg Wash and Bake
Brush the tops of the homemade Pop Tarts with the beaten egg. This will give them a beautiful golden sheen as they bake. Use a small, soft brush to apply the egg wash evenly.
Step 10: Bake
Bake for 20-25 minutes, or until the crust is golden brown. Keep an eye on them, as baking times may vary depending on your oven.
Step 11: Cool and Glaze
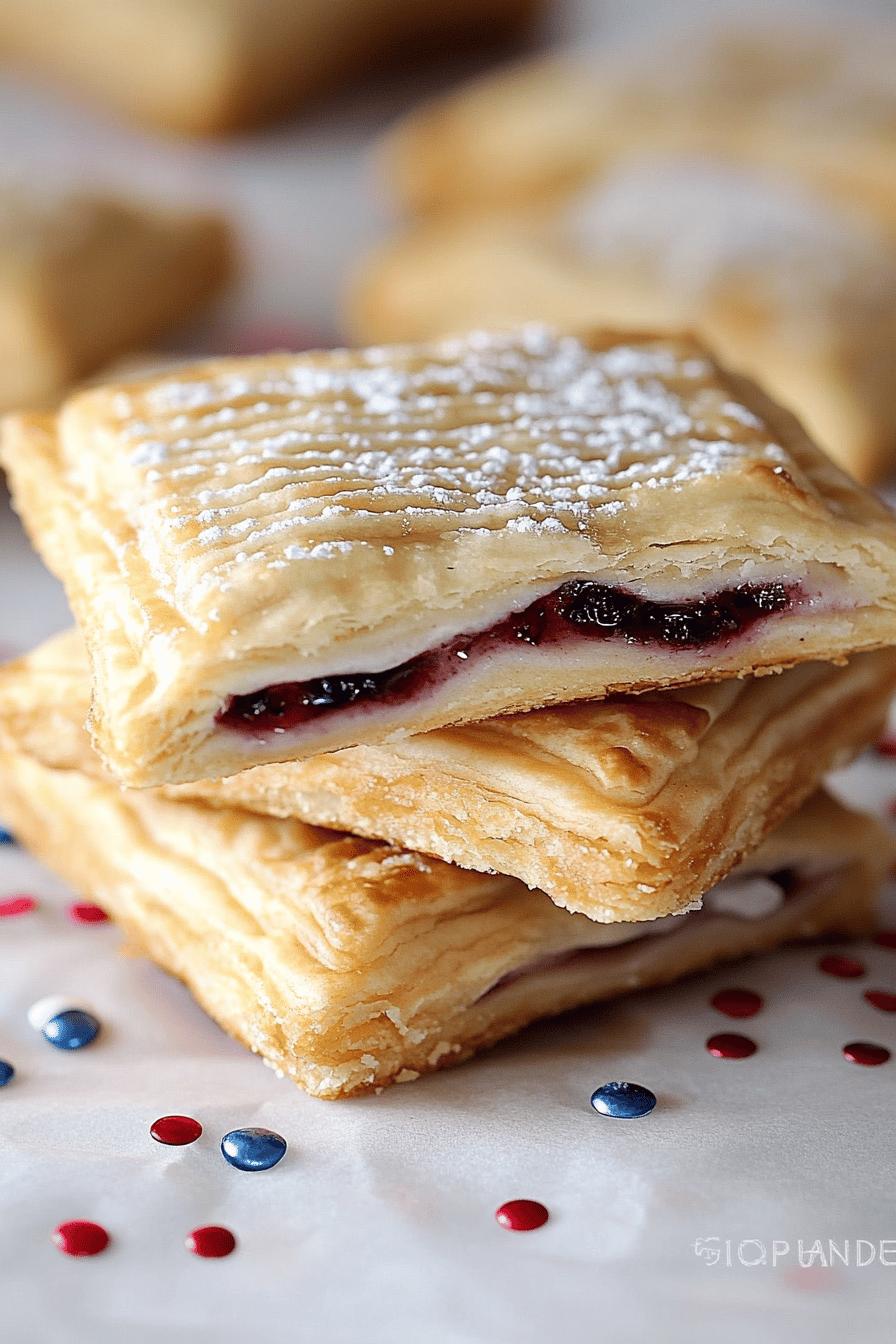
Let the homemade Pop Tarts cool on the baking sheet for a few minutes before transferring them to a wire rack to cool completely. While they are cooling, prepare the glaze by whisking together the powdered sugar, milk, and vanilla extract until smooth. The glaze should be thick but pourable. If it’s too thick, add a little more milk. If it’s too thin, add a little more powdered sugar.
Step 12: Decorate
Once the homemade Pop Tarts are completely cool, drizzle them with the glaze and sprinkle with your favorite sprinkles (if using). Let the glaze set for a few minutes before serving.
Step 13: Serve
Enjoy your delicious homemade Pop Tarts!
What to Serve It With
These homemade Pop Tarts are fantastic on their own, but here are a few ideas to elevate your experience:
- For Breakfast: Pair them with a hot cup of coffee or a glass of cold milk. They’re also great alongside a bowl of fresh fruit.
- For Brunch: Serve them as part of a brunch spread with other pastries, quiches, and savory dishes. A mimosa or a bellini would be a perfect accompaniment.
- As Dessert: Warm them up slightly and serve with a scoop of vanilla ice cream. Drizzle with chocolate sauce or caramel for an extra touch of decadence.
- For Cozy Snacks: Enjoy them with a cup of hot cocoa on a cold day. They’re also perfect for packing in a picnic basket or bringing to a potluck.
My family loves these with a side of scrambled eggs for a weekend breakfast treat. Sometimes, I even add a sprinkle of cinnamon to the glaze for a warm, comforting flavor. Get creative and experiment with different combinations!
Top Tips for Perfecting Your Homemade Pop Tarts
Over the years, I’ve learned a few tricks to ensure my homemade Pop Tarts are always perfect. Here are some of my top tips:
- Cold Butter is Key: As I mentioned before, using cold butter is crucial for creating a flaky crust. If the butter gets too warm, it will melt into the flour, resulting in a tough crust. I even like to put my flour in the freezer for about 30 minutes before starting, just to keep everything extra cold.
- Don’t Overmix the Dough: Overmixing develops the gluten in the flour, which can lead to a tough crust. Mix the dough just until it comes together, and then stop.
- Chill the Dough: Chilling the dough allows the gluten to relax and the butter to firm up, making it easier to roll out. Don’t skip this step!
- Use a Sharp Knife or Pastry Cutter: A sharp knife or pastry cutter will give you clean, even edges. This is especially important if you’re going for a professional look.
- Don’t Overfill: Overfilling the homemade Pop Tarts will cause the filling to ooze out during baking. Stick to about 1-2 tablespoons of filling per pastry.
- Crimp the Edges Well: Crimping the edges with a fork not only seals the filling inside but also creates a decorative edge. Make sure to press firmly to ensure a good seal.
- Customize the Filling: Don’t be afraid to get creative with the filling! Try different jams, preserves, Nutella, peanut butter, or even homemade fruit fillings.
One time, I accidentally used salted butter instead of unsalted, and the crust turned out way too salty. It was a good reminder to always double-check my ingredients! I also experimented with adding a little lemon zest to the dough, which gave it a lovely bright flavor. Feel free to experiment and find what works best for you.
Storing and Reheating Tips
If you have any leftover homemade Pop Tarts (which is rare!), here are some tips for storing and reheating them:
- Room Temperature: Store in an airtight container at room temperature for up to 2 days.
- Refrigerator Storage: Store in an airtight container in the refrigerator for up to 5 days.
- Freezer Instructions: Wrap each pastry individually in plastic wrap and then place them in a freezer-safe bag or container. Freeze for up to 2 months. Thaw in the refrigerator overnight before reheating.
- Glaze Timing Advice: If you plan on freezing the pastries, it’s best to wait to glaze them until after they have been thawed and reheated. This will prevent the glaze from becoming soggy.
To reheat, simply warm them in the oven at 350°F (175°C) for a few minutes, or until heated through. You can also microwave them for a few seconds, but be careful not to overheat them, or the crust will become soggy. I like to pop them in the toaster oven for a few minutes to get them nice and crispy again.
Frequently Asked Questions
Final Thoughts
These homemade Pop Tarts are more than just a recipe; they’re a nostalgic trip down memory lane, with a delicious homemade twist. They’re easy to make, customizable to your liking, and sure to bring a smile to everyone’s face. Whether you’re making them for breakfast, a snack, or dessert, they’re guaranteed to be a hit. If you enjoyed this recipe, be sure to check out my other pastry recipes, like my homemade croissants or my easy apple turnovers. They’re all equally delicious and satisfying. So, what are you waiting for? Get in the kitchen and start baking! I can’t wait to hear how yours turn out. Share your creations in the comments below and let me know what fillings you tried. Happy baking!
Homemade Pop Tarts
Ingredients
Main Ingredients
- 2.5 cups all-purpose flour
- 0.5 teaspoon salt
- 1 cup cold unsalted butter cubed
- 0.5 cup ice water
- 1 cup strawberry jam
Instructions
Preparation Steps
- Whisk together flour and salt. Cut in butter using a pastry blender or your fingers until the mixture resembles coarse crumbs.
- Gradually add ice water, mixing until the dough just comes together. Form into a disk, wrap in plastic wrap, and chill for at least 30 minutes.
- Roll out the dough on a lightly floured surface to about 1/8 inch thickness. Use a 4-inch cookie cutter or knife to cut out squares.
- Spread a spoonful of jam onto half of each square. Fold the other half over to form a rectangle. Crimp the edges with a fork.
- Bake at 375°F (190°C) for 15-20 minutes, or until golden brown.