There are some recipes that just feel like a warm hug, aren’t there? The kind that instantly transport you back to a happy memory, or make your kitchen smell like pure magic. For me, that recipe is these Fireworks Blondies. I remember the first time I made them, honestly, I was a bit skeptical. Blondies are already fantastic, but adding a few extra bits of pure joy? Well, it sounded almost too good to be true. But oh, how wrong I was! These aren’t just any blondies; they’re a celebration in every single bite, bursting with flavor and texture that will make your taste buds do a happy dance. They’re like the spunky, more exciting cousin of a classic brownie, and dare I say it, I might even love them a smidge more. If you’ve ever craved something that’s both comforting and delightfully surprising, you’ve landed in the right spot. These Fireworks Blondies are the answer to all your sweet cravings!
What are fireworks blondies?
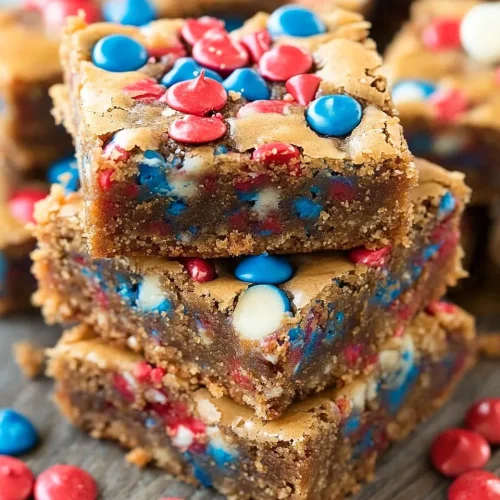
So, what exactly are these “Fireworks Blondies” I keep raving about? Think of them as the ultimate upgrade to your standard blondie. A traditional blondie is usually a vanilla-based bar, rich with butter and Brown Sugar, with a wonderfully chewy texture, often studded with chocolate chips. These Fireworks Blondies take that beloved foundation and sprinkle in a few extra elements that truly make them pop! We’re talking about colorful sprinkles that, when baked, create a “firework” effect, and sometimes little bursts of colorful candy or even fruit-flavored chips. They’re essentially a party happening in a pan, designed to bring a smile to your face with every look and every bite. It’s the same comforting, chewy goodness you expect from a blondie, but with an added visual and textural excitement that makes them utterly unique and incredibly fun to make and share. It’s not about reinventing the wheel, but about adding dazzling sparklers to an already brilliant creation!
Why you’ll love this recipe?
Honestly, there are so many reasons why this Fireworks blondies recipe has become a staple in my kitchen. First and foremost, the flavor is just out of this world. You get that deep, caramel-like sweetness from the brown sugar, the richness of good quality butter, and then those little pops of color and sometimes even fruity or candy-like bursts that just elevate everything. It’s a symphony of sweet, chewy, and a hint of fun. And don’t even get me started on the texture! They’re perfectly chewy in the middle with just the slightest bit of crispiness around the edges – the ideal balance, in my humble opinion. What I also adore about this recipe is its incredible simplicity. It uses pretty standard pantry ingredients, and the process is straightforward enough that even if you’re not a seasoned baker, you can totally nail it. I’ve even whipped these up on a busy weeknight when a sweet craving hit hard, and they were ready in no time. They’re also surprisingly cost-effective, especially compared to buying fancy desserts. You get so much deliciousness for just a few dollars. Plus, they’re incredibly versatile! You can swap out the sprinkle colors, add different candies, or even a swirl of jam. They’re fantastic for any occasion, whether it’s a casual get-together, a birthday party, or just an afternoon treat with a cup of tea. They’re simply a guaranteed crowd-pleaser, and that’s something I always look for in a recipe.
How do I make fireworks blondies?
Quick Overview
Making these Fireworks Blondies is surprisingly straightforward! You’ll simply mix up a quick batter, fold in your fun additions, spread it into a pan, and bake. The magic happens in the oven, where the colors bloom and the blondies become perfectly chewy and golden. It’s a one-bowl wonder for the batter, minimal fuss, maximum deliciousness. You’ll have a pan of pure joy ready before you know it!
Ingredients
For the Main Batter:
You’ll need 1 cup (2 sticks or 226g) unsalted butter, melted. Using unsalted gives you more control over the saltiness. Make sure it’s properly melted, not just warm! You’ll also need 2 cups (400g) packed light or dark brown sugar. I prefer light brown sugar for a slightly subtler caramel note, but dark will give it a deeper flavor. Two large eggs are essential for binding and richness. Don’t use cold eggs; let them come to room temperature for about 20-30 minutes beforehand – it really helps the batter emulsify nicely. For that classic blondie flavor, you’ll need 2 teaspoons of pure vanilla extract. And of course, 2 ½ cups (315g) all-purpose flour. Spoon and level your flour; don’t scoop directly from the bag, as that can lead to dry blondies. Lastly, 1 teaspoon of baking powder for just a little lift, and ½ teaspoon of salt to balance all that sweetness.
For the Filling:
This is where the fireworks come in! You’ll need about 1 cup of colorful rainbow sprinkles – the jimmies style work wonderfully because they hold their shape. I also love to add about ½ cup of colorful candy-coated chocolate pieces, like M&Ms or similar candies, in festive colors. You can absolutely customize this part! Think about adding mini chocolate chips, White Chocolate chips, or even chopped candies for extra texture and flavor. Just make sure whatever you add can withstand baking.
For the Glaze:
This is optional but highly recommended for that extra touch of sweetness and visual appeal. You’ll need about 1 cup of powdered sugar. To get the right consistency, you’ll use 2-3 tablespoons of milk or even a colorful liquid, like melted white chocolate tinted with food coloring, or even fruit juice. A ½ teaspoon of vanilla extract will enhance the flavor here too.
Step-by-Step Instructions
Step 1: Preheat & Prep Pan
Alright, first things first! Preheat your oven to 350°F (175°C). This is a pretty standard baking temperature that works like a charm for blondies. Now, grab a 9×13 inch baking pan. I like to line mine with parchment paper, leaving an overhang on two sides. This makes lifting the baked blondies out of the pan so much easier later on. Just grease your pan lightly first, then lay the parchment paper in, pressing it into the corners. This little step is a lifesaver for cleanup!
Step 2: Mix Dry Ingredients
In a medium-sized bowl, whisk together your all-purpose flour, baking powder, and salt. Giving these a good whisk ensures that the leavening agent and salt are evenly distributed throughout the flour. This prevents pockets of saltiness or dense spots in your blondies. Just a gentle whisk to combine is perfect – we’re not developing any gluten here.
Step 3: Mix Wet Ingredients
In a large bowl, pour in your melted butter. Add the packed brown sugar and whisk them together until they’re well combined. It might look a bit grainy at first, and that’s totally okay. Now, beat in the eggs one at a time, making sure each one is fully incorporated before adding the next. Stir in the vanilla extract. You want this mixture to be smooth and glossy. This is the foundation of our delicious blondie!
Step 4: Combine
Now, it’s time to bring it all together. Gradually add the dry ingredients (from Step 2) to the wet ingredients (from Step 3). Mix them together until *just* combined. Seriously, don’t overmix! A few streaks of flour are perfectly fine. Overmixing can lead to tough, dense blondies, and we definitely don’t want that. We’re aiming for a thick, smooth batter. It should be slightly thicker than cake batter.
Step 5: Prepare Filling
If you’re using candy-coated chocolates or other mix-ins besides sprinkles, give them a quick chop if they’re large. You want them to be bite-sized. Have your sprinkles and any other additions ready to go. This is the fun part where we get to add all the colorful goodness!
Step 6: Layer & Swirl
Pour about half of your blondie batter into your prepared pan and spread it evenly. Now, scatter about half of your sprinkles and candy pieces over this layer. Dollop the remaining batter on top and gently spread it out, trying to cover as much of the sprinkles as possible. Don’t worry if it’s not perfect! Finally, sprinkle the remaining colorful additions over the top. For an extra “firework” effect, you can very gently swirl the top layer of batter with a knife or toothpick to incorporate some of the sprinkles and candies. Don’t go too deep, just a light swirl on the surface will do.
Step 7: Bake
Pop that pan into your preheated oven. Bake for 25-30 minutes. You’ll know they’re done when the edges are golden brown and set, and the center looks slightly soft but not wet. A toothpick inserted into the center should come out with moist crumbs attached, not wet batter. Keep an eye on them, as oven temperatures can vary. I usually start checking around the 25-minute mark.
Step 8: Cool & Glaze
This is probably the hardest part – waiting! Let the blondies cool in the pan on a wire rack for at least 30 minutes. If you plan on glazing them, it’s best to do it while they’re still slightly warm but not hot. In a small bowl, whisk together the powdered sugar, vanilla, and 2 tablespoons of milk. Add more milk, a teaspoon at a time, until you reach your desired drizzling consistency. You want it thick enough to coat but thin enough to drizzle. Once cooled enough to handle, lift the blondies out of the pan using the parchment paper overhang. Drizzle the glaze over the top, and let it set before slicing. If you’re not glazing, you can let them cool completely in the pan.
Step 9: Slice & Serve
Once cooled (or the glaze has set!), slice your Fireworks Blondies into squares. I like to use a sharp knife and wipe it clean between cuts for nice, clean edges. Serve them at room temperature. They’re absolutely divine on their own, but you could also serve them with a scoop of vanilla ice cream for an extra special treat. Enjoy the colorful explosion of flavor!
What to Serve It With
These Fireworks Blondies are so versatile, they fit into almost any occasion. For a casual breakfast, they’re lovely alongside a steaming mug of coffee. Imagine a lazy Saturday morning, the sun streaming in, and you’ve got one of these chewy bars with your coffee – pure bliss! For a slightly more elegant brunch, I love to cut them into smaller, bite-sized pieces and arrange them on a pretty platter. They add a pop of color and fun to any brunch spread. A crisp glass of champagne or a mimosa is the perfect pairing. As a dessert, they really shine. They’re fantastic served warm with a generous scoop of vanilla bean ice cream, maybe even a drizzle of raspberry sauce. Or, for a truly decadent experience, pair them with a rich chocolate lava cake. For those cozy evenings when you just need a little sweet comfort, these blondies are perfect. They’re great with a glass of milk (for kids and adults alike!) or a warm cup of herbal tea. Honestly, I’ve even served them at holiday parties, changing the sprinkle colors to match the season, and they’re always a huge hit. My family loves them as an after-school snack, and I always have to hide a few for myself!
Top Tips for Perfecting Your Fireworks Blondies
Over the years, I’ve learned a few things that really make a difference when making these Fireworks Blondies. First, about the sprinkles and candies – make sure they are baking-friendly. Some candies can melt completely and become a sticky mess, while others hold their shape beautifully. I’ve found that the standard candy-coated chocolate pieces and good quality sprinkles work best. Don’t be tempted to overmix the batter once you add the flour! This is probably the most crucial tip for achieving that perfect chewy texture. Mix only until you no longer see dry flour. A few small lumps are perfectly fine, trust me. For the swirl effect, less is more. A very gentle swirl on the surface is all you need to create a beautiful pattern without disturbing the layers too much. If you want to get fancy with the glaze, try using melted white chocolate and tinting it with gel food coloring for vibrant hues, or even using a brightly colored juice for a more natural flavor and color. When it comes to baking, I always err on the side of slightly underbaking rather than overbaking. Blondies continue to bake a bit as they cool, so pulling them out when they still look a tad soft in the center is the secret to that wonderfully gooey, chewy interior. I’ve tested this recipe with different types of brown sugar; while light brown sugar yields a lighter, chewier result, dark brown sugar gives it a richer, almost toffee-like flavor. Both are delicious! If you find your oven runs hot, consider reducing the temperature by 10-15 degrees Fahrenheit or checking for doneness a few minutes earlier. And for ingredient swaps, if you’re out of regular milk for the glaze, even a bit of cream or half-and-half will give it a richer finish, though it might require a touch more powdered sugar. For a dairy-free option, use melted vegan butter and plant-based milk for the glaze. The key is to experiment and have fun with it – that’s the beauty of these bright, cheerful bars!
Storing and Reheating Tips
Storing these delightful Fireworks Blondies is pretty simple, and they tend to stay fresh for a good while, which is always a bonus. If you’ve glazed them, it’s best to let the glaze fully set at room temperature for at least an hour before storing. For room temperature storage, keep them in an airtight container. They’ll stay wonderfully chewy and delicious for about 3-4 days. Make sure they are completely cooled before sealing them up, otherwise, you might end up with condensation, which isn’t ideal for preserving their texture. If you live in a warmer climate or notice they’re starting to feel a bit soft, popping them into the refrigerator is a good option. In the fridge, they’ll keep well for up to a week. I usually store them in the same airtight container, and they remain quite tasty, though they might firm up slightly. If you prefer them soft, just let them sit at room temperature for about 15-20 minutes before enjoying. Now, for freezing, these blondies are surprisingly freezer-friendly! I like to cut them into individual squares and wrap each one tightly in plastic wrap, then place them in a freezer-safe bag or container. They can be stored in the freezer for up to 2-3 months. When you’re ready to enjoy one, you can thaw it at room temperature for a couple of hours, or pop it in the microwave for about 10-15 seconds for a warm, gooey treat. If you plan to glaze them after freezing, I recommend waiting until after thawing and reheating. Applying glaze to a frozen or just-thawed blondie can make the glaze too liquidy or messy. Just thaw, glaze, and enjoy!
Frequently Asked Questions
Final Thoughts
So there you have it – my beloved Fireworks Blondies! I truly hope you give these a try. They’re more than just a sweet treat; they’re little squares of happiness that bring such a fun burst of color and flavor to any occasion. They’re proof that sometimes, the simplest recipes can be the most magical, especially when you add a sprinkle of joy and a dash of personal touch. They’re perfect for birthdays, holidays, or just because you deserve a little something special. If you love these, you might also enjoy my Chewy Chocolate Chip Cookie Bars or my Classic Fudgy Brownies – they’re in a similar vein of comforting, homemade goodness! I can’t wait to hear what you think of these Fireworks Blondies. Please leave a comment below and let me know how yours turned out, or if you tried any fun variations! Happy baking, everyone!
Fireworks Blondies
Ingredients
Main Ingredients
- 0.75 cup unsalted butter, melted
- 1.5 cup granulated sugar
- 2 large eggs
- 1 teaspoon vanilla extract
- 1 cup all-purpose flour
- 0.5 teaspoon baking powder
- 0.25 teaspoon salt
- 1 cup white chocolate chips
- 0.5 cup sprinkles (rainbow or holiday-themed)
Instructions
Preparation Steps
- Preheat your oven to 350°F (175°C). Grease and flour a 9x9 inch baking pan, or line it with parchment paper.
- In a large bowl, whisk together the melted butter and granulated sugar until well combined.0.75 cup unsalted butter, melted
- Beat in the eggs one at a time, then stir in the vanilla extract.0.75 cup unsalted butter, melted
- In a separate small bowl, whisk together the flour, baking powder, and salt.0.75 cup unsalted butter, melted
- Gradually add the dry ingredients to the wet ingredients, mixing until just combined. Do not overmix.
- Fold in the white chocolate chips and most of the sprinkles, reserving some for the top.0.75 cup unsalted butter, melted
- Spread the batter evenly into the prepared pan. Sprinkle the remaining sprinkles over the top.
- Bake for 20-25 minutes, or until a toothpick inserted into the center comes out with moist crumbs attached (not wet batter).
- Let the blondies cool completely in the pan before cutting into squares.