You know those nights, right? The ones where the clock is ticking, the fridge looks a little… sad, and the thought of making a complicated meal feels like scaling Mount Everest in flip-flops? Yeah, I’ve been there more times than I care to admit. But over the years, I’ve honed in on a few absolute lifesavers, and this Garlic Herb Chicken is, without a doubt, at the very top of that list. It’s the kind of dish that sounds fancy but is honestly, ridiculously easy to pull off. Think of it as a slightly more elevated, incredibly flavorful cousin to your standard roasted chicken, but with way less fuss. My family devours it every single time, and honestly, the smell that fills the house while it’s baking is almost as good as the taste itself. It’s my secret weapon for busy weeknights, unexpected guests, or just when I’m craving something truly comforting and delicious. If you’ve ever felt overwhelmed by weeknight dinners, this Garlic Herb Chicken is about to become your new best friend. I’ve made this dish more times than I can count, and it’s never, ever let me down.
What is garlic chicken?
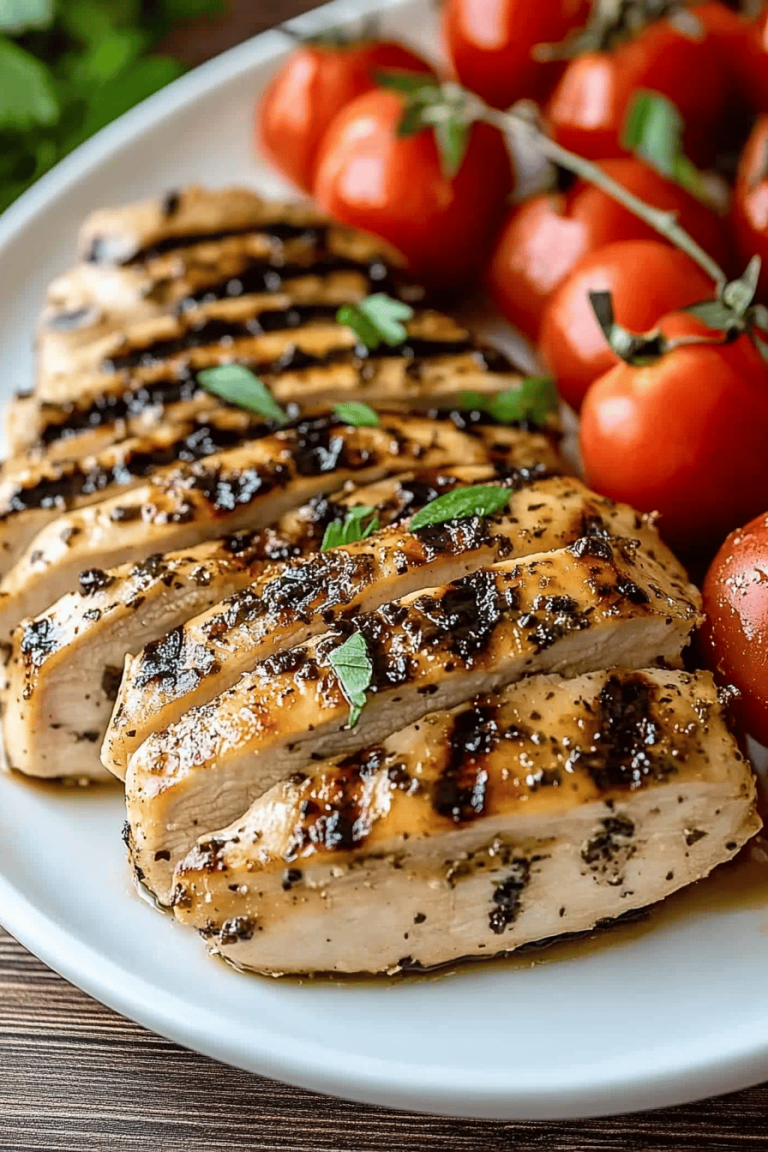
So, what exactly *is* this magical Garlic Herb Chicken? At its heart, it’s a wonderfully simple preparation of chicken, typically thighs or breasts, that’s marinated or coated in a fragrant blend of fresh garlic, a medley of herbs, and good Olive oil, then roasted to juicy perfection. The name really says it all – it’s all about that incredible punch of garlic and the vibrant aroma and flavor of fresh herbs like rosemary, thyme, and parsley. It’s not a complicated casserole, it’s not a breaded cutlet; it’s simply chicken, elevated by the power of simple, fresh ingredients. Think of it as the easiest way to make chicken taste like a gourmet meal without spending hours in the kitchen. It’s approachable, adaptable, and consistently delicious. It’s the kind of dish that makes you feel like a culinary whiz, even if you’re just throwing a few things together in a pan. It’s essentially a celebration of classic flavor combinations, done in a way that’s both comforting and a little bit exciting.
Why you’ll love this recipe?
There are so many reasons why this Garlic Herb Chicken has earned its permanent spot in my recipe rotation, and I think you’ll quickly see why too. First and foremost, the flavor is just out of this world. We’re talking deeply savory chicken infused with pungent roasted garlic and bright, herbaceous notes. It’s not just “chicken”; it’s chicken that sings with flavor. It’s the kind of taste that makes you close your eyes and savor every bite. And the simplicity? Oh my goodness, the simplicity! This recipe is a lifesaver. You probably have most of the ingredients in your pantry right now. It requires minimal prep, and the oven does most of the work. Seriously, the active time is probably less than 15 minutes, which is a miracle on a busy Tuesday. On top of that, it’s incredibly cost-effective. Chicken thighs are usually pretty budget-friendly, and the herbs and garlic are staple ingredients that don’t break the bank. What I really love, though, is how versatile it is. You can serve it with almost anything – roasted vegetables, a fresh salad, rice, potatoes… you name it. It’s perfect for a quick weeknight dinner, and it’s also impressive enough to serve to guests. It’s my go-to when I want something satisfying without a lot of fuss, and it’s far more exciting than a plain old baked Chicken Breast. It’s the kind of dish that makes everyone happy, from the pickiest eaters to the most discerning foodies.
How do I make garlic chicken?
Quick Overview
This Garlic Herb Chicken recipe is all about layering simple, fresh flavors onto tender chicken pieces and letting the oven do its magic. You’ll toss your chicken with a vibrant mixture of minced garlic, fresh herbs, olive oil, and seasonings, then roast it until it’s golden brown and cooked through. The result is incredibly juicy, flavorful chicken with those irresistible crispy bits from the roasted garlic. It’s designed to be straightforward, making it perfect for even beginner cooks. Trust me, the aroma alone will have everyone gathering in the kitchen!
Ingredients
For the Chicken:
1.5 to 2 pounds boneless, skinless Chicken Thighs or breasts (thighs tend to be more forgiving and juicier, but breasts work wonderfully too if you watch the cooking time!)
4-6 cloves garlic, finely minced (don’t be shy with the garlic, it mellows beautifully when roasted!)
2 tablespoons fresh rosemary, finely chopped
2 tablespoons fresh thyme leaves, chopped
2 tablespoons fresh parsley, chopped (plus extra for garnish)
1/4 cup olive oil
1 teaspoon salt (or to taste)
1/2 teaspoon black pepper (freshly ground is best!)
Optional: 1/2 teaspoon paprika for a little color and subtle warmth
For the Pan Sauce (optional, but highly recommended!):
1/2 cup chicken broth
1 tablespoon butter
1 teaspoon cornstarch mixed with 1 tablespoon cold water (a slurry)
Step-by-Step Instructions
Step 1: Preheat & Prep Pan
First things first, let’s get that oven preheated to 400°F (200°C). While it’s warming up, grab a baking dish or a sturdy rimmed baking sheet. If you’re using a baking dish, you don’t necessarily need to grease it, but I sometimes give it a quick spray of cooking oil just to be safe. If you’re using a baking sheet, lining it with parchment paper makes cleanup a breeze – that’s a trick I learned after one too many sticky messes!
Step 2: Mix Dry Ingredients
In a small bowl, go ahead and combine your salt, pepper, and the optional paprika. This ensures the seasoning is evenly distributed over the chicken. You don’t want any bland bites, right?
Step 3: Mix Wet Ingredients & Aromatics
Now, for the real flavor makers! In a medium bowl, combine the minced garlic, chopped rosemary, thyme, and parsley. Drizzle in the olive oil. Give it a good stir to make sure all those lovely herbs and garlic are coated in the oil. This is where the magic starts to happen – the oil really draws out the essential oils from the herbs and garlic, creating an incredibly fragrant paste.
Step 4: Combine
Pat your chicken pieces dry with paper towels. This is a crucial step for getting nice browning. Then, add the dried chicken pieces to the bowl with the herb and garlic mixture. Toss everything together really well with your hands (it’s the best way!) or a sturdy spatula, making sure each piece of chicken is thoroughly coated. Don’t forget to sprinkle in that salt and pepper mixture you prepared earlier and toss again. You want every surface to be glistening with that gorgeous garlic herb goodness.
Step 5: Arrange on Pan
Nestle the coated chicken pieces into your prepared baking dish or onto the baking sheet. Try to give them a little bit of space between each piece. This allows the chicken to roast rather than steam, which leads to much better texture and flavor. If you’re using chicken breasts, you might want to pound them slightly to an even thickness so they cook at the same rate. If using thighs, just arrange them as they are!
Step 6: Bake
Pop that pan into your preheated oven. Now, the baking time can vary a bit depending on the size and thickness of your chicken pieces. For thighs, I usually start checking around 25-30 minutes. For breasts, it might be closer to 20-25 minutes. The chicken is done when it’s cooked through and reaches an internal temperature of 165°F (74°C). You’ll also notice the garlic will be beautifully golden and fragrant, and the herbs will look slightly crisped.
Step 7: Rest
Once the chicken is cooked, take it out of the oven and let it rest in the pan for about 5-10 minutes. This is super important! It allows the juices to redistribute throughout the meat, making it incredibly tender and moist. If you cut into it too soon, all those delicious juices will run out onto the pan.
Step 8: Make the Pan Sauce (Optional)
While the chicken is resting, you can quickly make a simple pan sauce if you like. Carefully pour off most of the excess oil from the pan, leaving behind the browned bits and roasted garlic. Place the pan back on the stovetop over medium heat. Pour in the chicken broth and use a wooden spoon to scrape up any browned bits from the bottom of the pan – that’s where all the flavor is! Bring it to a simmer, then whisk in the cornstarch slurry. Cook, stirring constantly, until the sauce thickens slightly. Stir in the butter for a glossy finish. This sauce is pure gold!
Step 9: Slice & Serve
Spoon that glorious pan sauce over the rested chicken, or serve it on the side. Garnish with a little extra fresh parsley. You can slice the chicken or serve the pieces whole. This Garlic Herb Chicken is fantastic served immediately. The aroma is just incredible, and the taste is even better!
What to Serve It With
Oh, the possibilities are endless with this Garlic Herb Chicken! It’s so adaptable, it fits into almost any meal plan. For a simple and healthy breakfast (yes, breakfast!), I love pairing a small piece with some scrambled eggs and a side of fresh fruit. It adds a savory kick that’s surprisingly satisfying. When it comes to brunch, it’s absolutely perfect. Imagine a platter with slices of this chicken alongside some mini frittatas, a fresh green salad with a light vinaigrette, and maybe some crusty bread. It feels a little fancy without any of the work. For a more dessert-like application, though I rarely have leftovers for this, if I did, I could see it being a fantastic protein component in a savory bread pudding or a quiche. But its real strength shines as a main course. For those cozy weeknight dinners, I almost always serve it with roasted vegetables. Broccoli, asparagus, Brussels sprouts – anything you can roast alongside the chicken or quickly steam works beautifully. It also pairs wonderfully with simple sides like fluffy mashed potatoes or a light, fluffy rice pilaf. My family also loves it with a big, fresh salad when we want something lighter. It’s just one of those dishes that makes everyone happy, no matter what you put on the plate next to it.
Top Tips for Perfecting Your Garlic Herb Chicken
I’ve made this Garlic Herb Chicken so many times, and through trial and error, I’ve picked up a few tricks that I think really make a difference. For starters, don’t skimp on the fresh herbs! Dried herbs just don’t have that same vibrant, fresh flavor that really elevates this dish. If you can’t find rosemary or thyme, you can absolutely use other herbs like oregano or marjoram, but the classic combo of rosemary and thyme is really special. When it comes to the garlic, I always, always mince it as finely as possible. This helps it distribute evenly and ensures it roasts and mellows beautifully instead of leaving harsh, raw garlic chunks. If you have a garlic press, it’s your best friend here! Another thing that’s crucial for juicy chicken is patting it dry before you coat it. Moisture is the enemy of browning. Getting that chicken surface nice and dry helps create those lovely crispy edges we all adore. When you’re mixing everything together, don’t be afraid to really get your hands in there! It’s the most effective way to ensure every single piece of chicken is coated evenly with the garlic and herb mixture. I’ve learned the hard way that just stirring with a spoon can leave some spots untouched, and those are the sad, bland bites. For baking, I always recommend using thighs if possible. They have a bit more fat, which makes them incredibly forgiving and much harder to overcook. If you’re using breasts, keep a close eye on them! They can go from perfectly cooked to dry in a matter of minutes. Using a meat thermometer is your best friend here – aim for that 165°F (74°C) internal temperature. And finally, that resting period after it comes out of the oven? Absolutely non-negotiable. It’s the secret to super moist and tender chicken. If you skip this, you’re doing yourself a disservice! I’ve also experimented with adding a squeeze of lemon juice to the herb mixture just before baking, and it adds a lovely bright note that cuts through the richness. If you love spice, a pinch of red pepper flakes in the herb mix is also fantastic.
Storing and Reheating Tips
One of the best things about this Garlic Herb Chicken is how well it stores, making it perfect for meal prep or enjoying leftovers. If you have any (and that’s a big “if” in my house!), I usually let it cool down completely at room temperature for about an hour before storing. For leftovers, the best way to keep them fresh is in an airtight container in the refrigerator. They’ll stay good for about 3-4 days. The flavors actually tend to meld and deepen overnight, so sometimes leftovers are even better the next day! If you want to freeze it, I’d recommend doing so before adding any pan sauce, as sauce can sometimes separate upon thawing. Wrap individual portions tightly in plastic wrap, then place them in a freezer-safe bag or container. It should keep well in the freezer for up to 2-3 months. When you’re ready to reheat, if it’s refrigerated, you can gently warm it up in a skillet over medium-low heat with a splash of broth or water to keep it moist, or pop it in the oven at around 350°F (175°C) for about 10-15 minutes. If it’s frozen, the best method is to thaw it overnight in the refrigerator first. Then, reheat as you would the refrigerated leftovers. If you made the pan sauce, you can gently reheat that separately and spoon it over the chicken when serving. Just be sure to let the chicken come to room temperature a bit before reheating to ensure it cooks evenly and doesn’t dry out.
Frequently Asked Questions
Final Thoughts
Honestly, this Garlic Herb Chicken is more than just a recipe to me; it’s a solution. It’s the dish I turn to when I need a delicious, no-fuss meal that will please everyone around the table. The way the garlic roasts and becomes sweet, the fragrant punch of fresh herbs, and the tender, juicy chicken all come together in a way that feels both incredibly satisfying and surprisingly easy. I truly believe everyone needs a recipe like this in their repertoire – one that’s reliable, flavorful, and makes you feel like a kitchen superhero without the stress. If you’re looking for other simple yet delicious chicken dishes, you might also enjoy my Lemon Herb Roasted Chicken or my quick One-Pan Chicken and Veggies. I can’t wait for you to try this Garlic Herb Chicken! I’d love to hear how it turns out for you and if your family loves it as much as mine does. Please feel free to leave a comment below with your thoughts or any variations you tried!
Garlic Herb Chicken
Ingredients
Main Ingredients
- 4 pieces Chicken breasts
- 4 cloves Garlic minced
- 2 tablespoons Olive oil
- 1 teaspoon Dried rosemary
- 1 teaspoon Dried thyme
- 0.5 teaspoon Salt
- 0.25 teaspoon Black pepper
Instructions
Preparation Steps
- Preheat your oven to 400°F (200°C).
- In a small bowl, combine minced garlic, olive oil, rosemary, thyme, salt, and pepper. Mix well to create the herb rub.
- Place the chicken breasts in a baking dish. Rub the herb mixture all over the chicken, ensuring it's evenly coated.
- Bake for 25-30 minutes, or until the chicken is cooked through and reaches an internal temperature of 165°F (74°C).
- Let the chicken rest for a few minutes before slicing and serving.