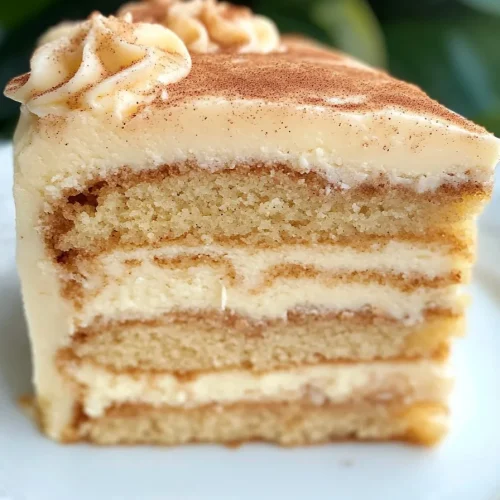
You know, there are some recipes that just feel like a warm hug. This snickerdoodle Cake Recipe is absolutely one of them for me. It’s the kind of cake that instantly transports me back to my grandma’s kitchen, the air thick with the sweet, cinnamon-sugar aroma of something truly magical baking. It’s not just a dessert; it’s a memory. And let me tell you, when that craving for something comforting and wonderfully spiced hits, this snickerdoodle cake is my absolute go-to. Forget fumbling with complicated layer cakes or finicky frostings; this is the simple, soul-satisfying treat that always delivers. If you love the classic snickerdoodle cookie, then prepare yourself, because this cake takes all those delightful flavors and amplifies them into something even more spectacular. It’s seriously a game-changer.
What is a Snickerdoodle
So, what exactly is a snickerdoodle cake? Think of it as your favorite chewy, cinnamon-sugar snickerdoodle cookie, but elevated into a glorious, tender cake form. The name “snickerdoodle” itself is just plain fun, isn’t it? It evokes a sense of whimsy and old-fashioned charm. Essentially, this cake captures the signature flavor profile we all adore: the warmth of cinnamon perfectly balanced with the sweetness of sugar, all wrapped up in a soft, moist crumb. It’s not overly fussy; it’s more about pure, unadulterated comfort and flavor. The key to that classic snickerdoodle taste, and therefore this cake, is the use of cream of tartar, which gives it that slight tang and chewy texture, but in a cake, it contributes to an unbelievably tender crumb. It’s a delightful twist on a beloved classic that I’m so excited to share with you.
Why you’ll love this recipe?
There are so many reasons why this snickerdoodle Cake Recipe has become a staple in my kitchen, and I’m betting it will become one in yours too. First and foremost, the flavor is just out of this world. Imagine that perfectly balanced sweet and spicy cinnamon sugar swirl throughout a super moist, tender cake. It’s not just sweet; it has that delightful little tang that makes snickerdoodles so special. And the aroma while it bakes? It’s pure bliss, drawing everyone to the kitchen like a siren song! Beyond the incredible taste, this recipe is wonderfully straightforward. I’m all about recipes that deliver big on flavor without demanding hours in the kitchen or a laundry list of obscure ingredients. This cake truly is a lifesaver on busy weeknights when I still want to serve something homemade and special. Plus, it’s surprisingly budget-friendly. Most of the ingredients are pantry staples you likely already have on hand, making it an economical way to satisfy a sweet tooth. And the versatility! Oh, I could talk about that for days. It’s fantastic on its own, but it’s also a perfect canvas for so many other delicious additions. If you’re looking for a dessert that’s reliably delicious, easy to whip up, and guaranteed to please a crowd (or just your own family!), then this snickerdoodle cake is it. It’s a recipe I’ve turned to countless times, and it never, ever disappoints.
How do I make a Snick
Quick Overview
This snickerdoodle Cake Recipe is wonderfully simple, all about bringing together basic ingredients to create something spectacular. We’ll start by mixing our dry and wet ingredients separately, then gently combine them to form a delicious batter. The magic happens when we create a cinnamon-sugar swirl and layer it into the cake before baking. The result is a moist, flavorful cake with beautiful ribbons of cinnamon sugar woven throughout. It’s pretty much foolproof, even if you’re new to baking!
Ingredients
For the Main Batter:
2 ¾ cups all-purpose flour (I always use unbleached, it seems to give a slightly better texture)
1 ½ teaspoons baking soda
½ teaspoon baking powder
½ teaspoon salt
1 cup unsalted butter, softened (make sure it’s truly softened, not melted! This is key for a good texture.)
1 ¾ cups granulated sugar
2 large eggs, at room temperature (let them sit out for about 30 minutes before you start)
1 teaspoon vanilla extract
1 cup buttermilk, at room temperature (if you don’t have buttermilk, you can make your own by adding 1 tablespoon of white vinegar or lemon juice to 1 cup of milk and letting it sit for 5-10 minutes)
For the Filling:
½ cup packed light Brown Sugar (dark brown sugar works too if that’s what you have, it just adds a deeper molasses flavor)
2 tablespoons ground cinnamon (use a good quality one; it makes a difference!)
2 tablespoons all-purpose flour
For the Glaze:
1 ½ cups powdered sugar (also known as confectioners’ sugar)
2-3 tablespoons milk or heavy cream (start with 2 and add more as needed to reach your desired consistency)
½ teaspoon vanilla extract
Step-by-Step Instructions
Step 1: Preheat & Prep Pan
First things first, let’s get our oven preheated to 350°F (175°C). This ensures it’s nice and hot when the cake is ready to bake. You’ll need a 9×13 inch baking pan. Grease it really well with butter or cooking spray, and then lightly flour it. This step is super important to prevent any sticking. I like to give mine a little extra spray of non-stick, just to be safe!
Step 2: Mix Dry Ingredients
In a medium bowl, whisk together your flour, baking soda, baking powder, and salt. Whisking them together ensures that all the leavening agents and salt are evenly distributed throughout the flour, which helps the cake rise evenly and prevents any pockets of saltiness. Set this aside for now.
Step 3: Mix Wet Ingredients
In a large bowl, cream together your softened butter and granulated sugar. You want to beat them until they’re light and fluffy. This usually takes about 3-5 minutes with an electric mixer. Then, beat in the eggs one at a time, making sure to scrape down the sides of the bowl after each addition. Stir in the vanilla extract. Now, add about half of the dry ingredients to the wet mixture and mix until just combined. Then, add the buttermilk and mix again until it’s just incorporated. Finally, add the remaining dry ingredients and mix until *just* combined. Be careful not to overmix here; overmixing can lead to a tough cake!
Step 4: Combine
As mentioned in step 3, we combine our wet and dry ingredients gently. The key is to mix until you no longer see streaks of flour. It’s okay if there are a few tiny lumps; that’s perfectly fine. Overmixing develops the gluten in the flour, which can make your cake tough and dense, and we want a tender, light cake here!
Step 5: Prepare Filling
In a small bowl, stir together the packed brown sugar, ground cinnamon, and the 2 tablespoons of flour for the filling. The flour helps to thicken the cinnamon-sugar mixture slightly and prevents it from becoming too gooey when baked. You want it to be well combined and crumbly.
Step 6: Layer & Swirl
Now for the fun part! Pour about half of the cake batter into your prepared baking pan and spread it out evenly. Sprinkle about half of the cinnamon-sugar filling mixture over the batter. Then, dollop and spread the remaining cake batter over the filling. Sprinkle the rest of the cinnamon-sugar filling on top. You can use a knife or a skewer to gently swirl the cinnamon sugar into the top layer of the batter. Don’t overdo it; you just want pretty ribbons, not a muddy mess.
Step 7: Bake
Bake in your preheated oven for 35-45 minutes. The exact time will depend on your oven, so start checking around the 35-minute mark. The cake is done when a wooden skewer or toothpick inserted into the center comes out clean or with a few moist crumbs attached. You don’t want it to be wet, but you also don’t want it to be completely dry, as that means it’s overbaked. The top should be golden brown and slightly springy to the touch.
Step 8: Cool & Glaze
Once baked, let the cake cool in the pan on a wire rack for at least 20-30 minutes before you even think about glazing it. This helps it set up and prevents the glaze from melting off. While the cake is cooling, whisk together the powdered sugar, 2 tablespoons of milk or cream, and the vanilla extract for the glaze. Add more milk/cream, a teaspoon at a time, until you reach your desired drizzling consistency. Once the cake has cooled sufficiently, drizzle the glaze all over the top. Let the glaze set for a bit before slicing and serving.
Step 9: Slice & Serve
Once the glaze has set, slice your gorgeous snickerdoodle cake into squares. I find it’s best served slightly warm or at room temperature. The combination of the tender cake and the sweet, cinnamon-spiced glaze is just heavenly. Enjoy every single bite!
What to Serve It With
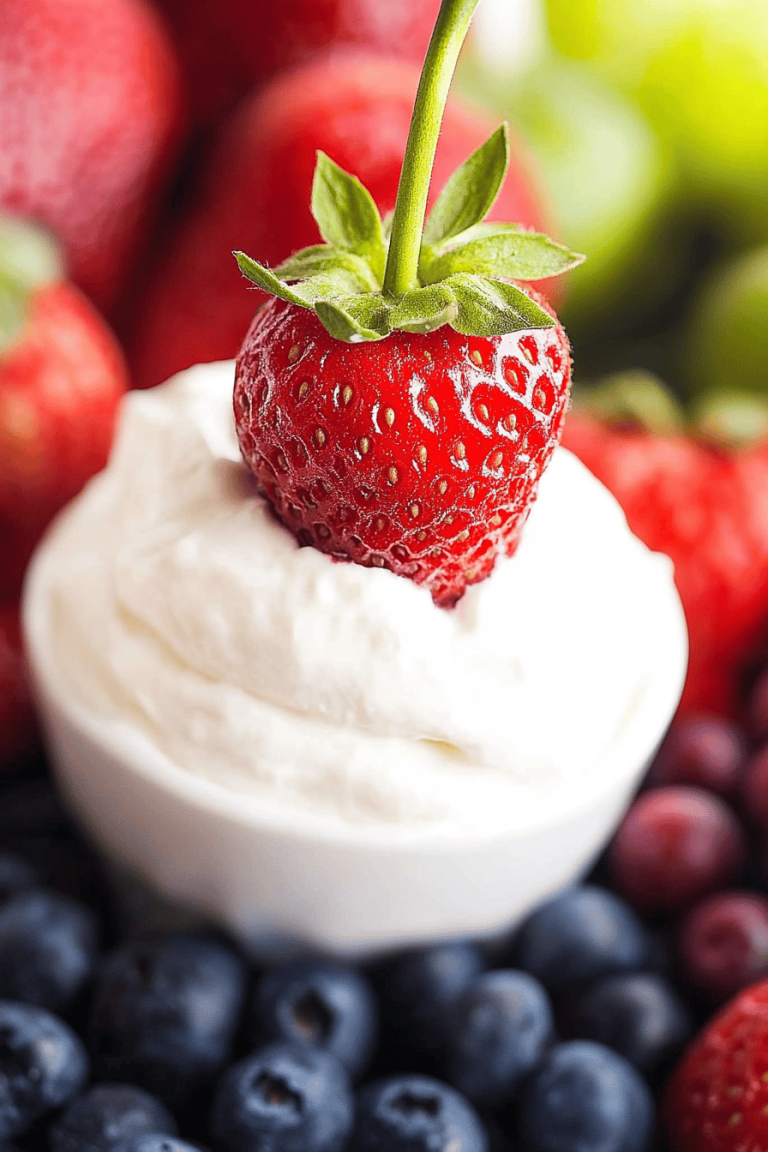
This snickerdoodle cake is so versatile, it’s a winner for any occasion! For breakfast, it’s absolutely divine with a hot cup of coffee or a creamy latte. Imagine a slice of this warm cake alongside your morning brew – pure comfort. For a more leisurely weekend brunch, I love to serve it with a dollop of whipped cream or even a light mascarpone frosting, perhaps alongside some fresh berries like raspberries or strawberries. It adds a lovely tartness that cuts through the sweetness beautifully. As a dessert, it stands on its own perfectly, but if you’re feeling fancy, a scoop of vanilla bean ice cream or a drizzle of Salted Caramel sauce is pure indulgence. My family also loves it as a cozy afternoon snack. It’s perfect with a tall glass of cold milk for the kids (and let’s be honest, the adults too!). My mom always used to make this when we had unexpected guests because it’s so easy to whip up and always a crowd-pleaser. It’s truly a cake for all seasons and all times of day.
Top Tips for Perfecting Your Snickerdoodle Cake
I’ve made this snickerdoodle cake more times than I can count, and through trial and error (and a few oops moments!), I’ve picked up some tricks that I think make a big difference. Firstly, room temperature ingredients are your best friend here. For the butter, eggs, and buttermilk, make sure they aren’t straight from the fridge. This helps everything emulsify properly, leading to a smoother batter and a lighter, more tender cake crumb. When creaming the butter and sugar, really beat them until they’re light and fluffy; this incorporates air, which is crucial for that perfect cake texture. Don’t rush this step! For the cinnamon-sugar filling, I always make sure my cinnamon is fresh. Stale cinnamon just doesn’t have the same punch. And sifting the flour into the dry ingredients for the main batter helps prevent lumps and ensures an even distribution of leaveners, leading to a consistent rise. When combining your wet and dry ingredients, remember: do not overmix. Seriously, as soon as you don’t see dry flour streaks, stop mixing. A few small lumps are okay! Overmixing develops gluten, which results in a chewy, tough cake, and that’s not what we’re going for with this tender snickerdoodle cake. For the swirl, don’t go too deep with your knife or skewer; you want those beautiful cinnamon ribbons on top, not mixed all the way through the batter, which can make the cake uneven. For baking, ovens can be finicky! I highly recommend investing in an oven thermometer if you don’t have one, as oven temperatures can often be off. Start checking for doneness a few minutes before the suggested time. A toothpick should come out with moist crumbs, not wet batter. If the top is browning too quickly, you can loosely tent it with aluminum foil. Lastly, for the glaze, consistency is key. Start with less liquid and add more slowly. You want it thick enough to drizzle, not run off the cake completely.
Storing and Reheating Tips
I know how it is – sometimes you bake a whole cake and you just can’t possibly finish it all in one sitting (though, believe me, I’ve tried!). Thankfully, this snickerdoodle cake stores beautifully. If you’re planning to enjoy it within a day or two, simply cover the cake in the pan tightly with plastic wrap or foil and leave it at room temperature. It stays wonderfully moist this way. If you think it will take longer than two days to get through, or if your kitchen is particularly warm, your refrigerator is your best bet. Make sure to store it in an airtight container or wrap it very well to prevent it from drying out. It should keep well in the fridge for up to 4-5 days. The flavor often even deepens slightly by the second day! Now, if you’re a super planner or you just want to have some on hand for unexpected cravings, this cake freezes wonderfully. Let it cool completely, then wrap it very tightly in a layer of plastic wrap, followed by a layer of aluminum foil. You can also freeze it in a freezer-safe container. It will last in the freezer for up to 2-3 months. To reheat, I usually just let it come to room temperature for about an hour. If it’s a bit dry, you can gently warm a slice in the microwave for about 10-15 seconds. For the glaze, I usually wait to apply it until after the cake has cooled completely, especially if I plan on refrigerating or freezing it, to prevent it from becoming sticky or melting. If you freeze the un-glazed cake, you can add a fresh glaze once it’s thawed and cooled, or just enjoy it plain or with a dusting of powdered sugar.
Frequently Asked Questions
Final Thoughts
Honestly, this snickerdoodle cake recipe is one of those treasures that I keep coming back to, year after year. It’s the perfect blend of comforting nostalgia and pure deliciousness. It’s simple enough for a weeknight treat but special enough for any gathering. The aroma alone is enough to make your house feel like home, and the taste? Well, it’s just pure joy in cake form. I truly hope you give this snickerdoodle cake a try. It’s a recipe that brings so much happiness to my kitchen, and I’m confident it will do the same for yours. If you love this recipe, you might also enjoy my recipe for [link to a hypothetical cinnamon swirl bread recipe] or my [link to a hypothetical apple crumble pie recipe] for more cozy, spiced delights. I can’t wait to hear what you think! Please leave a comment below and let me know how your cake turns out, or share any fun variations you’ve tried. Happy baking!
Snickerdoodle cake recipe
Ingredients
Cake Ingredients
- 3 cups all-purpose flour
- 1.5 teaspoons baking soda
- 0.5 teaspoons salt
- 1 cup unsalted butter, softened
- 1.5 cups granulated sugar
- 2 large eggs
- 1 teaspoon vanilla extract
- 1 cup sour cream
Cinnamon-Sugar Swirl
- 0.25 cup granulated sugar
- 1.5 teaspoons ground cinnamon
Instructions
Preparation Steps
- Preheat oven to 350°F (175°C). Grease and flour a 9x13 inch baking pan.
- In a medium bowl, whisk together flour, baking soda, and salt.
- In a large bowl, cream together the softened butter and 1.5 cups of granulated sugar until light and fluffy.
- Beat in the eggs one at a time, then stir in the vanilla extract.
- Gradually add the dry ingredients to the wet ingredients, alternating with the sour cream, beginning and ending with the dry ingredients. Mix until just combined.
- In a small bowl, combine 0.25 cup granulated sugar and 1.5 teaspoons cinnamon for the swirl.
- Pour half of the cake batter into the prepared baking pan. Sprinkle half of the cinnamon-sugar mixture over the batter. Dollop spoonfuls of the remaining batter over the cinnamon sugar. Sprinkle the rest of the cinnamon-sugar mixture on top.
- Using a knife or skewer, gently swirl the cinnamon-sugar into the batter.
- Bake for 30-35 minutes, or until a wooden skewer inserted into the center comes out clean.
- Let the cake cool in the pan for 10 minutes before inverting onto a wire rack to cool completely.