Oh, how I love this coconut Cake Recipe! It’s one of those recipes that just feels like a warm hug on a plate. You know, the kind of cake that makes your whole kitchen smell like a tropical vacation? That’s exactly what this is. I first whipped this up years ago when I was trying to impress my in-laws, and let me tell you, it was a runaway success. They still ask for it every single time we visit! It’s so much more than just a cake; it’s a memory, a comfort, and honestly, a lifesaver when I need something truly special without a ton of fuss. If you’ve ever tried those super dense, overly sweet cakes, this isn’t that. This is light, fluffy, incredibly moist, and bursting with that pure, unadulterated coconut flavor. It’s my go-to for birthdays, holidays, or just because I’m craving a little slice of sunshine.
What is coconut cake?
So, what exactly *is* coconut cake? Think of it as a celebration of all things coconut! At its heart, it’s a tender, moist cake where coconut milk and often shredded coconut are the stars of the show, giving it an unmistakable flavor and a wonderfully soft texture. It’s not just about adding a splash of coconut extract; we’re talking about infusing that beautiful, subtle sweetness and creamy richness right into the batter. This particular coconut Cake Recipe takes it a step further with a dreamy coconut glaze that just melts into the warm cake. It’s like a little tropical party happening in your mouth. It’s comforting enough for a lazy Sunday morning, yet elegant enough for a fancy dessert. It’s essentially sunshine you can eat!
Why you’ll love this recipe?
Honestly, there are so many reasons why this coconut Cake Recipe has become my absolute favorite, and I just know you’re going to adore it too. First off, the flavor is just out of this world. It’s delicately sweet, intensely coconutty, and so incredibly moist that every single bite is a delight. I’ve had friends try it who usually aren’t huge cake fans, and they’re instantly converted! Then there’s the simplicity of it. I know baking can sometimes feel intimidating, but I promise you, this recipe is surprisingly straightforward. Even if you’re new to baking, you can totally nail this. It uses everyday ingredients that you probably already have in your pantry, making it super cost-effective. No fancy, hard-to-find items here! And talk about versatile! This cake is perfect on its own, of course, but it’s also fantastic with a dollop of whipped cream, some fresh berries, or even a scoop of vanilla ice cream. What I love most about this recipe is that it feels indulgent and special without demanding hours in the kitchen. It’s that perfect balance of deliciousness and ease that makes a recipe truly shine. It’s way better than those boxed mixes, and honestly, it rivals bakery versions any day!
How do I make a coconut cake?
Quick Overview
This coconut cake recipe is all about building layers of flavor and moisture. We start by combining our dry ingredients, then whisking together the wet ingredients, including creamy coconut milk and oil for richness. Everything comes together beautifully in one bowl, which is always a win in my book! Then, a simple, luscious glaze is poured over the warm cake, allowing it to soak in and create that irresistible, tender crumb. It’s a process designed for maximum flavor and minimal stress, resulting in a cake that’s incredibly moist and utterly delicious.
Ingredients
For the Main Batter:
2 ½ cups all-purpose flour: Make sure it’s spooned and leveled, not scooped straight from the bag. This is key to avoiding a dense cake!
1 ½ cups granulated sugar: For that perfect sweetness that complements the coconut.
1 teaspoon baking soda: Our leavening agent, giving the cake its lift.
½ teaspoon baking powder: A little extra boost for a lighter crumb.
½ teaspoon salt: It seems small, but it really balances out all the sweetness and brings out the flavors.
1 cup full-fat canned coconut milk: This is crucial! Don’t use the carton stuff; the canned version is much richer and gives the cake its signature creaminess and coconut flavor. Give the can a good shake before opening.
½ cup vegetable oil (or other neutral oil): Keeps the cake super moist. You can use canola, sunflower, or even light Olive oil if you don’t mind a subtle hint.
2 large eggs: Room temperature eggs incorporate better into the batter.
1 teaspoon vanilla extract: A classic flavor enhancer.
½ cup unsweetened shredded coconut: For little bursts of coconut texture and flavor throughout the cake.
For the Filling (Optional but highly recommended!):
½ cup unsweetened shredded coconut: For that extra layer of coconut goodness.
¼ cup sweetened condensed milk: This makes the filling wonderfully rich and sweet.
For the Glaze:
1 ½ cups powdered sugar: Sifted, if you want to be extra sure there are no lumps.
¼ cup full-fat canned coconut milk: Again, the canned stuff is best for richness.
1 tablespoon melted unsalted butter: For a touch of silkiness.
½ teaspoon vanilla extract: To enhance the glaze’s flavor.
Step-by-Step Instructions
Step 1: Preheat & Prep Pan
First things first, get your oven preheating to 350°F (175°C). Now, grab a 9×13 inch baking pan. I like to grease it really well with butter or cooking spray, and then dust it with a little flour. For extra insurance against sticking, I sometimes lay a piece of parchment paper on the bottom, cut to fit. This is my little trick for making sure the cake comes out perfectly clean every time!
Step 2: Mix Dry Ingredients
In a large mixing bowl, whisk together your flour, granulated sugar, baking soda, baking powder, and salt. Just give it a good whisk until everything is well combined. You want to make sure your leavening agents are evenly distributed so the cake rises beautifully. I like to do this step first to ensure there are no pockets of baking soda or powder.
Step 3: Mix Wet Ingredients
In a separate medium bowl, whisk together the full-fat canned coconut milk, vegetable oil, and your room temperature eggs. Add the vanilla extract too. Whisk until everything is smooth and well emulsified. This combination is what’s going to make the cake incredibly moist and tender.
Step 4: Combine
Now, pour the wet ingredients into the bowl with the dry ingredients. Mix them together with a whisk or a spatula until *just* combined. Seriously, stop mixing as soon as you don’t see any dry streaks of flour. Overmixing is the enemy of a tender cake, so be gentle! Gently fold in the ½ cup of unsweetened shredded coconut for the batter. You’ll have a lovely, thick batter.
Step 5: Prepare Filling
If you’re making the filling, this is super simple. In a small bowl, just stir together the ½ cup of shredded coconut and the ¼ cup of sweetened condensed milk until it’s well combined. It’ll be like a thick, sweet coconut paste. Trust me, this little addition makes a world of difference!
Step 6: Layer & Swirl
Pour about half of the cake batter into your prepared 9×13 inch pan and spread it evenly. Now, dollop spoonfuls of the coconut filling mixture evenly over the batter. You don’t need to be perfect here; little dollops are great! Then, pour the remaining batter over the filling, covering it completely. If you want a swirl effect, you can gently run a knife or skewer through the batter a few times, but honestly, it’s delicious even without swirling.
Step 7: Bake
Pop the pan into your preheated oven. Bake for about 30-35 minutes. You’ll know it’s done when a toothpick inserted into the center comes out clean, or with just a few moist crumbs attached (not wet batter!). The top should be golden brown and slightly springy to the touch. Oven temperatures can vary, so start checking around the 30-minute mark.
Step 8: Cool & Glaze
This is the part where patience is a virtue! Let the cake cool in the pan for about 10-15 minutes. While it’s still warm, it’s time for the glaze. In a medium bowl, whisk together the sifted powdered sugar, ¼ cup of coconut milk, melted butter, and vanilla extract until you have a smooth, pourable glaze. If it’s too thick, add a tiny bit more coconut milk; if it’s too thin, add a bit more powdered sugar. Drizzle this glorious glaze all over the warm cake. It will melt slightly and soak into the top, creating that perfect finish. Let the cake cool completely in the pan before slicing.
Step 9: Slice & Serve
Once the cake has cooled completely and the glaze has set a bit, it’s ready to be sliced and served. I like to use a sharp knife for clean cuts. This cake is amazing all on its own, but a little sprinkle of toasted coconut flakes on top adds a nice touch of texture and visual appeal!
What to Serve It With
This coconut cake is so versatile, it works for almost any occasion! For breakfast, I love a smaller slice with a good cup of coffee. The coconut flavor just makes for a more interesting start to the day than plain old toast. For brunch, it’s a showstopper! Imagine it on a beautiful platter with some fresh berries and a light dusting of powdered sugar. It feels elegant and special. As a dessert, it’s pure indulgence. It pairs beautifully with a light whipped cream or a scoop of creamy vanilla bean ice cream. If you’re going for a more tropical vibe, a dollop of coconut cream would be divine. And for those cozy snack times? It’s perfect all by itself, perhaps with a glass of cold milk or a warm cup of tea. My family loves it with a side of grilled pineapple for a real tropical punch!
Top Tips for Perfecting Your Coconut Cake
Over the years, I’ve learned a few tricks that make this coconut cake recipe even better. First, for the coconut milk, always use the full-fat canned kind. It’s the key to that incredible moisture and rich flavor. Shaking the can well before measuring is important! When mixing your batter, don’t, I repeat, *don’t* overmix. Just combine the wet and dry ingredients until they’re *barely* incorporated. A few lumps are okay! Overmixing develops the gluten in the flour, leading to a tougher cake, and we want this to be tender and melt-in-your-mouth. If you’re adding the optional filling, remember that it doesn’t need to be perfectly spread. Dollops are actually better as they create little pockets of creamy sweetness. For the glaze, consistency is everything. You want it pourable but not watery. If it’s too thick, a tiny splash more coconut milk should do the trick. If it’s too thin, a bit more powdered sugar will thicken it right up. Taste as you go! I’ve found that adding the glaze while the cake is still warm is crucial. It allows the glaze to melt slightly and seep into the cake, creating that perfectly moist topping. If you put it on a cold cake, it will just sit on top like frosting. Don’t worry about perfect swirls; this cake is rustic and beautiful as it is. And lastly, always do the toothpick test for doneness. Ovens can be quirky, so it’s better to check than to guess!
Storing and Reheating Tips
Storing this glorious coconut cake is pretty straightforward. At room temperature, if it’s not too warm where you are, it will stay fresh for about 2-3 days. Make sure to cover it tightly with plastic wrap or an airtight container to prevent it from drying out. If it’s a warm day or you want it to last a bit longer, the refrigerator is your friend. It will keep well in the fridge for up to 5 days. Just make sure it’s well-covered. I find that the flavors even meld a bit more overnight. If you have a lot of cake or want to save some for later, this cake freezes beautifully! Wrap individual slices or the whole cooled cake tightly in plastic wrap, then in foil, and it can last in the freezer for up to 2-3 months. To reheat, I usually just let a slice thaw on the counter for about 30 minutes. If you want it warm, you can pop a slice in the microwave for about 10-15 seconds, but be careful not to overheat it, or it might get a little tough. I usually wait to glaze the cake until right before serving if I plan on storing it for more than a day, as the glaze can sometimes get a little sticky when refrigerated for too long.
Frequently Asked Questions
Final Thoughts
There you have it – my absolute favorite coconut cake recipe! I truly believe this is one of those recipes that will become a staple in your kitchen, just like it has in mine. It’s comforting, delicious, and always brings a smile to people’s faces. It’s got that perfect balance of moistness and flavor that’s hard to beat. It’s a testament to how simple ingredients can create something truly magical. Whether you’re baking it for a special occasion or just because, I promise it’s worth every minute. If you love this cake, you might also enjoy my recipe for [Link to a related recipe, e.g., ‘Lemon Coconut Muffins’ or ‘Tropical Fruit Salad’]. I can’t wait to hear what you think! Please leave a comment below and let me know how yours turns out, or if you’ve tried any fun variations. Happy baking!
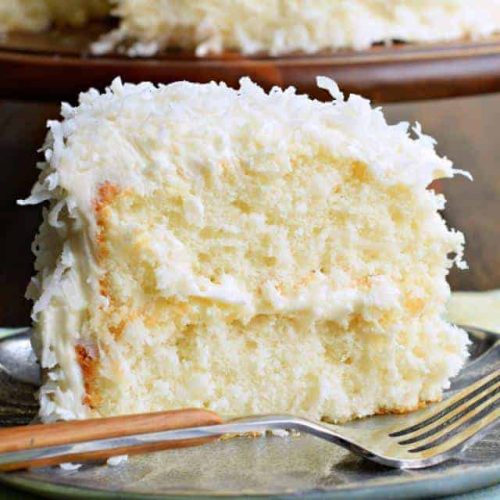
Coconut Cake Recipe
Ingredients
Cake Ingredients
- 2.5 cups all-purpose flour
- 1.5 cups granulated sugar
- 3 teaspoons baking powder
- 0.5 teaspoons salt
- 0.5 cups unsalted butter, softened
- 3 large eggs
- 1 cup buttermilk
- 1 teaspoon vanilla extract
- 0.5 cup sweetened shredded coconut
Cream Cheese Frosting
- 8 ounces cream cheese, softened
- 0.5 cup unsalted butter, softened
- 4 cups powdered sugar
- 1 teaspoon vanilla extract
- 2 tablespoons milk or heavy cream
- 0.25 cup sweetened shredded coconut for decorating
Instructions
Cake Preparation
- Preheat oven to 350°F (175°C). Grease and flour two 8-inch round cake pans.
- In a large bowl, whisk together the flour, sugar, baking powder, and salt.
- Add the softened butter and beat on medium speed until the mixture resembles coarse crumbs.
- Add the eggs one at a time, beating well after each addition. Stir in the buttermilk and vanilla extract.
- Fold in the shredded coconut.
- Divide the batter evenly between the prepared cake pans. Bake for 30-35 minutes, or until a wooden skewer inserted into the center comes out clean.
- Let the cakes cool in the pans for 10 minutes before inverting them onto a wire rack to cool completely.
Frosting Preparation
- In a large bowl, beat the softened cream cheese and butter until smooth and creamy.
- Gradually beat in the powdered sugar, alternating with the milk or cream, until smooth and spreadable.
- Stir in the vanilla extract.
Assembly
- Place one cake layer on a serving plate. Spread a generous amount of frosting over the top.
- Top with the second cake layer and frost the top and sides of the cake.
- Sprinkle the top and sides of the cake with the remaining shredded coconut.