There’s something magical about waking up to the smell of sourdough pancakes sizzling on the griddle—the warm, tangy aroma wrapping around you like a cozy blanket. I remember those slow Sunday mornings at my grandma’s house when she’d pull out her trusty sourdough starter that had been bubbling away on the counter for weeks. These pancakes were different than your usual fluffy flapjacks—they’ve got that subtle, rich tang from the starter that balances perfectly with golden crisp edges and soft, pillowy insides. I swear, they’re just the kind of treat that transforms a mundane morning into a special occasion. And honestly, they beat your average buttermilk pancake any day because you get this lovely depth of flavor without needing special ingredients. If you’ve never tried sourdough pancakes before, you’re in for a real treat—trust me, they’re as much about the cozy memory as the taste.
What is sourdough pancakes?
Think of sourdough pancakes as the pancakes you know and love, but with a little sourdough starter mixed into the batter, adding this gentle, tangy lift that’s impossible to fake with commercial yeast. It’s essentially a combination of simple pantry staples mingled with a naturally fermented starter that’s been nurtured with flour and water for days or even weeks. The name “sourdough” comes from the starter itself—the wild yeast and friendly bacteria that develop a lovely, slightly sour bite during fermentation. These pancakes use that pre-fermented goodness to not just add flavor, but also improve texture and make them incredibly fluffy and tender. If you’ve ever wondered what to do with your sourdough discard or starter, making sourdough pancakes is one of the tastiest and most satisfying ways to use it up.
Why you’ll love this recipe?
What I love most about sourdough pancakes is that perfect balance between tang and sweetness—you just can’t get that from regular pancake batter. The flavor sets them apart, with a subtle depth that reminds you of artisan breads but in a fluffy, comforting breakfast form. And you don’t have to be a pro baker to make them—this recipe is ridiculously simple once you have your starter ready, making it a lifesaver on busy weekend mornings when you want something special without extra fuss. I’m always amazed at how little time it takes to mix up a batch, and the batter is forgiving, which means you can tweak it easily if you like thicker or thinner pancakes. Plus, it’s budget-friendly because it repurposes sourdough discard that would otherwise be tossed. When I want to switch things up, I add blueberries, cinnamon, or even a handful of chocolate chips—my kids go nuts for those! It’s such a versatile foundation, perfect on its own or dressed up with your favorite toppings. If you like my buttermilk pancakes, this sourdough version is an exciting twist that I guarantee will find a permanent spot in your recipe box.
How do I make sourdough pancakes?
Quick Overview
Making sourdough pancakes is surprisingly straightforward—basically, you mix your dry ingredients, stir in your wet ones including the starter, and let the batter rest just long enough to let the flavors develop. From there, it’s about heating your griddle just right, scooping the batter, and watching these beauties puff up and turn golden. What really makes this method special is the subtle fermentation flavor from the starter, which takes pancakes to a new level without any complicated processing. Don’t worry if you’ve never worked with sourdough before, this recipe guides you gently through every step.
Ingredients
For the Main Batter:
- 1 cup sourdough starter (active or discard stage) – the heart and soul of these pancakes. If you don’t have a bubbly starter, I’ve got tips later!
- 1 cup all-purpose flour – you want something with good protein that yields tender yet sturdy pancakes.
- 1 tablespoon sugar – just a touch to balance the tanginess.
- 1 teaspoon baking soda – key to a light, airy texture and reacting with the acidity of the starter.
- 1/2 teaspoon salt – brings all the flavors together.
- 1 large egg – adds richness and helps bind.
- 3/4 cup whole milk (or any milk you have) – I once swapped with almond milk and it made the batter even creamier!
- 2 tablespoons melted butter or oil – for tenderness and that gorgeous golden crust.
For the Filling:
- Fresh blueberries, sliced bananas, or chocolate chips – fun add-ins that jazz up the pancakes.
- Optional cinnamon or vanilla extract – for an extra cozy twist.
For the Glaze:
- Maple syrup or honey – classic go-tos.
- Optional Greek yogurt or softened butter – adds richness and tang when dolloped on top.
- A dusting of powdered sugar or a quick lemon glaze for brightness – totally up to your mood.
Step-by-Step Instructions
Step 1: Preheat & Prep Pan
Start by heating a non-stick skillet or griddle over medium heat. To check if it’s ready, sprinkle a few drops of water—if they dance and evaporate quickly, you’re good to go. Lightly grease the surface with a bit of melted butter or oil; this helps create that golden crust without sticking. I always keep the heat steady—too hot and they’ll burn outside but stay raw inside, too low and you’ll get pale, soggy pancakes.
Step 2: Mix Dry Ingredients
Whisk together your flour, sugar, baking soda, and salt in a large mixing bowl. I sift mine to avoid lumps, but it’s not a deal breaker if you don’t. Getting these well combined ensures your pancakes rise evenly and have a nice texture, so don’t skip this step!
Step 3: Mix Wet Ingredients
In a separate bowl, beat together the sourdough starter, egg, milk, and melted butter until smooth. The starter lends a lovely thickness here and helps add volume. If your starter’s a bit more liquidy, you might need a tiny splash more flour later, but I’ll guide you on that if needed.
Step 4: Combine
Pour the wet mixture into your dry ingredients and fold gently until just combined. It’s okay if the batter is a little lumpy—overmixing will make your pancakes tough. The batter should be thick but pourable; if it’s too thick, add a tablespoon or two of milk. I’ve learned this little trick after countless batches.
Step 5: Prepare Filling
If you’re adding mix-ins like blueberries or chocolate chips, fold them gently into the batter now, so they’re evenly spread but not overworked. If you want cinnamon or vanilla, stir that in too. My kids absolutely love chocolate chips melt-in-the-middle style.
Step 6: Layer & Swirl
For a fun twist, especially if you’re using two flavors or colors of batter, try layering one spoonful of plain batter, then a spoonful of a cinnamon mix or berry-studded batter, and use a toothpick or knife to swirl gently. It makes these pancakes look baked by a pro and adds extra flavor in every bite.
Step 7: Bake
Pour about 1/4 cup of batter per pancake onto the heated pan. Cook until you see bubbles forming on the surface and the edges look set—this usually takes about 2-3 minutes. Flip carefully and cook for another 2 minutes or until golden and cooked through. Resist the urge to press down—pancakes puff beautifully if left alone.
Step 8: Cool & Glaze
Transfer cooked pancakes to a wire rack; this keeps them from steaming underneath and getting soggy. Serve warm, drizzled with maple syrup, a pat of butter, or your favorite glaze. If you want to glaze them for later, wait until they’re completely cooled before glazing to avoid a sticky mess.
Step 9: Slice & Serve
Stack your pancakes high and slice with a fork and knife, or just dive right in! They’re best enjoyed immediately while fluffy and warm, but little leftover slices reheat beautifully in a toaster or skillet. Garnish with fresh fruit, a dusting of powdered sugar, or a spoonful of yogurt for that extra wow-factor.
What to Serve It With
For Breakfast: Pair your sourdough pancakes with a rich, dark roast coffee or a creamy latte that cuts through the tang of the batter. I like a side of crispy bacon or scrambled eggs for that perfect balance of sweet and savory to start the day.
For Brunch: Dress them up with fresh berries, whipped cream, and a drizzle of honey. Add a citrusy mimosa or a sparkling water infused with lemon and mint to keep things light and festive. These pancakes also look stunning stacked neatly on large plates for those casual weekend gatherings.
As Dessert: Sourdough pancakes with a dollop of mascarpone cheese, a generous pour of dark chocolate sauce, and a sprinkle of toasted nuts make an indulgent treat after a cozy dinner. My kids even love them dipped in vanilla ice cream on nights we just want something quick and sweet.
For Cozy Snacks: When a late-night sweet craving sneaks in, these pancakes are a lifesaver. A simple smear of butter and honey or a quick peanut butter spread hits the spot without the hassle of baking a whole cake. Warm them up for a few seconds in the microwave and you’re all set.
Top Tips for Perfecting Your Sourdough Pancakes
Sourdough Starter: Make sure your starter is active and bubbly. If you’re using discard, it still works great but might add a slightly stronger tang—totally personal preference. Feed your starter a few hours before making the batter for best results.
Mixing Advice: Resist the temptation to overmix the batter—it should look a little lumpy. Overworking leads to chewy pancakes, and we want tender fluffiness here. Folding gently and just until combined is the trick I learned over many batches.
Swirl Customization: For gorgeous swirled pancakes, use contrasting batter colors or add cocoa powder to a portion of your batter for a chocolate swirl. Don’t stir too much once you start layering on the pan—the marbling effect depends on that gentle swirl.
Ingredient Swaps: Whole milk works beautifully, but I’ve had great luck swapping in almond or oat milk. For flour, you can try half whole wheat for nuttiness, but expect a denser pancake. I keep the baking soda ratio the same to maintain the rise.
Baking Tips: Use a heavy skillet or cast iron if you have one, as it distributes heat evenly. Adjust your stove to medium—not too hot to avoid burning. Keep cooked pancakes warm in a low oven (about 200°F) on a rack to avoid sogginess if making a big batch.
Glaze Variations: Try a lemon glaze made with powdered sugar and fresh juice for a zesty contrast, or a cinnamon maple butter glaze for fall vibes. If you like something less sweet, a dollop of Greek yogurt adds richness without too much sugar.
One lesson I picked up the hard way: don’t skip resting the batter for 5–10 minutes if you can—this lets the baking soda react with the acidic starter to create those wonderful fluffy pockets. I once rushed this and ended up with pancakes that lacked that signature lift and flavor punch.
Storing and Reheating Tips
Room Temperature: If you plan to eat your pancakes within a few hours, store them in an airtight container or cover with a clean kitchen towel on the counter. They stay nice and soft for up to half a day this way.
Refrigerator Storage: Place leftover pancakes in a sealed container or wrapped tightly in plastic wrap. They’ll keep fresh for 3 to 4 days without drying out. Reheat with a quick zap in the microwave or in a warm pan for best texture.
Freezer Instructions: I like to freeze pancakes in stacks separated by parchment or wax paper in airtight freezer bags. These keep for up to 3 months. Thaw at room temperature or reheat straight from frozen in a toaster or oven—just add a minute or two to the heat time.
Glaze Timing Advice: If you’re storing pancakes, wait to add glaze or syrup until serving to prevent sogginess. For make-ahead brunches, keep toppings on the side and let everyone dress their own stack—it adds a bit of fun to the table!
Frequently Asked Questions
Final Thoughts
Sourdough pancakes hold a special place in my heart—not just for their delightful tang and fluffy texture, but because they bring that feeling of slow mornings, family gatherings, and shared laughter right into the kitchen. They’ve become a weekend tradition for us, especially when I want to use up some sourdough starter that’s bubbling away. These pancakes strike a perfect balance between rustic and comforting, with endless opportunities to customize and make your own. If you give them a try, I hope you find them as satisfying and joyful as my family and I do. Feel free to share your variations or questions in the comments—I can’t wait to hear how yours turn out. Happy baking, and here’s to many cozy mornings ahead!
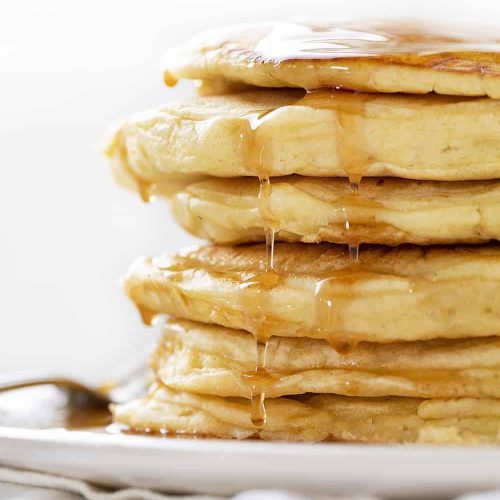
sourdough pancakes
Ingredients
Main Ingredients
- 0.25 cup butter melted and cooled slightly
- 2 large eggs room temperature
- 1 cup milk room temperature (whole milk preferred)
- 1 teaspoon vanilla extract
- 1.5 cups sourdough starter discard or fed
- 1.5 cups all-purpose flour (can substitute bread or whole wheat flour)
- 1 teaspoon baking soda
- 1 teaspoon baking powder
- 1 teaspoon kosher salt
Instructions
Preparation Steps
- Preheat the griddle to between 325°F and 350°F.
- In a large bowl, whisk together the melted butter, eggs, milk, vanilla extract, and sourdough starter until combined.
- Whisk in the flour, baking soda, baking powder, and kosher salt one at a time until smooth. The batter will be runny but will puff up when cooked.
- Once the griddle is hot, stir the batter gently and pour about 1/3 cup of batter onto the griddle for each pancake. Add a teaspoon of milk if the batter is too thick.
- Cook pancakes for 2-3 minutes until bubbles form on top, then flip and cook for another 1-2 minutes until golden brown.
- Serve warm with your favorite toppings such as syrup, butter, or fresh fruit.