Okay, pull up a chair because I have to tell you about the thing that’s been making my kitchen smell like a French patisserie lately. It started innocently enough; I had some leftover brie from a charcuterie board mishap—or maybe I just bought too much, who’s counting?—and a mountain of slightly older blueberries begging to be used. I certainly wasn’t going to let those beauties go to waste! I initially thought about a simple crumble, but then I remembered this amazing, soft loaf I saw ages ago, and that’s when the magic happened. The combination of creamy, tangy brie melted right into a sweet, tender crumb, studded with bursts of warm blueberry? Pure heaven. This blueberry brie bread isn’t just a recipe; it’s my new secret weapon for unexpected guests or those evenings when you desperately need comfort food but don’t want to commit to three hours of yeast rising. It’s richer than a standard coffee cake but somehow lighter than a pound cake. Honestly, if you love cream cheese danishes but wish they were easier to manage, this is your next obsession. I’ve already made it three times this month, and my family is demanding I stop hiding them in the pantry!
What is blueberry brie bread?
So, what exactly is this glorious creation? Think of it as the most decadent, moist quick bread you’ve ever encountered, but with an unbelievable secret hidden in the middle. It’s essentially a rich, buttery loaf batter—think banana bread consistency, but less dense—that gets layered with chunks of creamy Brie cheese and fresh or frozen blueberries. When it bakes, the brie melts into these pockets of savory-sweet, almost custardy goo that plays perfectly against the slight tartness of the berries. It’s essentially a fancy brunch item disguised as a simple loaf cake. It’s not yeasted; nope, we’re using baking powder here, which means you can go from standing in front of your pantry looking panicked to pulling a golden brown masterpiece out of the oven in under an hour. It’s French-inspired decadence made easy for a Tuesday morning. It’s comforting, it’s surprising, and every single slice is a journey. If you’ve ever wanted to trick someone into thinking you spent hours crafting something incredibly complex, this blueberry brieBread is the answer.
Why you’ll love this recipe?
Honestly, where do I even start? The appeal of this loaf goes way beyond its ridiculously photogenic cross-section. First, let’s talk flavor. The flavor profile here is just *chef’s kiss*. You get the immediate sweetness from the sugar and berries, followed by that unmistakable salty, earthy tang from the Brie. It cuts through the richness of the butter so beautifully that you never feel like you’re eating something too heavy. It’s balanced magic. Second, and this is huge for me—the simplicity. I’ve tried intricate brioche recipes and complicated layered coffee cakes, and sometimes, life is just too short! This is a stir-it-together bread. You don’t even need a stand mixer, which means cleanup is minimal. That’s a win in my book, especially when I’m craving something amazing at 10 pm but don’t want to spend an hour cleaning bowls.
What I love most about this specific iteration is the texture. Because the brie melts and creates steam pockets, the surrounding crumb stays incredibly moist for days. I learned the hard way on my first attempt that using cold brie straight from the fridge makes it harder to distribute evenly, so now I always let mine sit on the counter for about 20 minutes before cubing. It makes all the difference! It’s also wonderfully cost-effective when you think about what you’d pay for a single slice at a gourmet bakery—you get an entire loaf here for less than the price of two fancy coffees. Plus, versatility is key! It’s fantastic warm with a simple dusting of powdered sugar, but it’s equally good cold the next morning toasted lightly. If you enjoy my classic Lemon Poppy Seed Loaf, you absolutely must try this adaptation; it takes that familiar comforting base and elevates it with the richness of the cheese. It truly elevates the humble quick bread into something special.
How do I make blueberry brie bread?
Quick Overview
The beauty of this loaf lies in its layering. We’re going to create a super moist, slightly sweet batter using simple pantry staples. Then, we gently fold in those lovely blueberries. The game-changer is the brie: we’re going to alternate layers of the batter with small cubes of brie, ensuring that every slice gets that molten cheese center. A quick drizzle of a simple vanilla glaze right after it comes out of the oven seals in the moisture and adds that final layer of sweetness. It’s essentially three simple steps—mix, layer, bake—but the result tastes like you spent all afternoon fussing over it. Don’t stress about perfection; a little unevenness in the swirl just means more surprise pockets of gooey goodness!
Ingredients
For the Main Batter:
2 ½ cups All-Purpose Flour (Sifted! Trust me, it keeps it light)
1 teaspoon Baking Soda
½ teaspoon Salt (Don’t skip this; it balances the sweetness)
1 teaspoon Ground Cinnamon (Just a hint for warmth)
1 cup Unsalted Butter, softened to room temperature (Crucial for creaming)
1 ½ cups Granulated Sugar
3 large Eggs, room temperature
1 teaspoon Vanilla Extract (Good quality makes a difference here)
1 cup Buttermilk (This is what makes it so tender. If you don’t have it, use milk with a tablespoon of lemon juice sitting for five minutes).
For the Filling:
1 ½ cups Fresh or Frozen Blueberries (If using frozen, don’t thaw them! Toss them in a teaspoon of flour first to prevent sinking)
8 ounces Brie Cheese, rind removed (optional, but I prefer it without for smoother melt), cut into ½-inch cubes (Let this sit on the counter for 20 minutes before using).
For the Glaze:
1 cup Powdered Sugar
3 tablespoons Milk or Cream (I often use heavy cream for extra richness)
½ teaspoon Vanilla Extract
Pinch of salt
Step-by-Step Instructions
Step 1: Preheat & Prep Pan
First things first, get your oven humming at 350°F (175°C). You’ll need a standard 9×5-inch loaf pan. I learned the hard way that even with a non-stick spray, this loaf can stick if you rush the pan prep. So, grease the pan generously with softened butter or cooking spray, and then line it with a long sling of parchment paper, leaving an overhang on the long sides. This sling is your best friend when it comes time to lift this heavy, glorious creation out!
Step 2: Mix Dry Ingredients
In a medium bowl, whisk together the sifted flour, baking soda, salt, and cinnamon. Just a good 30 seconds with the whisk until everything looks evenly distributed. Set this aside. If the flour isn’t aerated, your final bread will be denser than you want, and we want light and fluffy here!
Step 3: Mix Wet Ingredients
In a separate, large bowl (or the bowl of your stand mixer if you’re using one), cream together the softened butter and sugar until they are pale and fluffy—this takes a solid 3 to 4 minutes on medium speed. Beat in the eggs one at a time, making sure each one is fully incorporated before adding the next. Scrape down the sides, then beat in the vanilla extract. Now, gently stream in the buttermilk while mixing on low speed. The mixture might look slightly curdled; that’s totally normal with buttermilk, so don’t panic!
Step 4: Combine
Now, we introduce the dry ingredients to the wet. Add about a third of the dry mix to the wet ingredients and mix on the lowest speed until *just* combined—I mean, stop mixing the second you don’t see streaks of flour anymore. Then add the next third, mix briefly, and finish with the remaining dry ingredients. Seriously, stop mixing the second it comes together. Overmixing develops gluten, and overdeveloped gluten means a tough loaf. We want tender!
Step 5: Prepare Filling
While the batter is resting for just a minute, gently toss your cubed brie pieces with about two tablespoons of the dry flour mixture you already made. This light coating helps prevent the cheese from sliding straight to the bottom of the pan during baking. If you’re using frozen blueberries, make sure they’re already tossed lightly in flour.
Step 6: Layer & Swirl
This is the fun part. Spoon about one-third of the batter into your prepared loaf pan and spread it gently. Sprinkle half of your floured brie cubes evenly over this layer, followed by half of your blueberries. Add another layer of batter, then the remaining brie, and top with the rest of the blueberries, finishing with the last of the batter. You don’t need to swirl aggressively; just use a butter knife to gently cut through the layers a couple of times—maybe 4 or 5 figure-eight motions. You want distinct layers, not a homogenous purple blob!
Step 7: Bake
Pop that pan into the center rack of your preheated oven. Bake for 55 to 70 minutes. I know, the window is wide, but every oven is different! Start checking at the 55-minute mark. The loaf is done when the top is deep golden brown and a toothpick inserted near the center comes out with just a few moist crumbs attached—not wet batter, but not bone dry either. If the top is browning too quickly before the center is done, loosely tent a piece of foil over it for the last 15 minutes.
Step 8: Cool & Glaze
Once it’s done, pull it out and let it cool in the pan on a wire rack for exactly 15 minutes. Any less, and it might crumble when you try to lift it; any more, and the cheese residue might glue it to the sides. After 15 minutes, use those parchment paper slings to carefully lift the entire loaf onto the wire rack. Let it cool for another 15 minutes before glazing.
To make the glaze, whisk the powdered sugar, milk/cream, vanilla, and salt together until perfectly smooth. It should be thick enough to coat the back of a spoon but still drizzle easily. Drizzle this generously all over the top of the warm loaf. The slight warmth helps the glaze set nicely.
Step 9: Slice & Serve
Let the glaze set for about 10 minutes, then slice it with a sharp, long knife. I find cutting it when it’s still slightly warm is best for seeing those gorgeous, melted brie pockets. Serve slightly warm for the ultimate comforting experience. If you manage to have leftovers (doubtful!), slice and toast the next day!
What to Serve It With
This loaf is so robust and flavorful it really doesn’t *need* much else, but serving it thoughtfully can turn it from a snack into an event. For my family, it’s an automatic brunch feature. I serve thick slices alongside a big bowl of fresh raspberries—the extra tartness is amazing—and a strong cup of black coffee. The sweetness of the bread paired with the bitterness of a good dark roast is just unbeatable in the morning. If you’re aiming for a more elegant brunch spread, try plating a slice with a small dollop of homemade lemon curd. The bright citrus cuts through the richness of the brie so well; it’s my favorite high-low combination.
As a dessert, this is fantastic when slightly warmed up again and served with a scoop of really high-quality vanilla bean ice cream. That contrast between the warm, gooey interior and the cold, creamy ice cream is just luxurious. My kids, of course, insist on slathering theirs with softened, good-quality salted butter, which seems totally unnecessary given how moist it is, but hey, they’re happy! For cozy, quiet evenings, I just have a slice with a cup of Earl Grey tea. The bergamot notes in the tea pair surprisingly well with the subtle earthiness of the brie. It’s truly versatile; I’ve never met an occasion where this didn’t feel appropriate!
Top Tips for Perfecting Your Blueberry Brie Bread
I’ve made this recipe more times than I care to admit—sometimes at 6 AM when I needed a quick breakfast offering, and sometimes late at night when a craving hit. Along the way, I picked up a few non-negotiables that ensure you get that perfect, bakery-quality result every single time.
Zucchini Prep: Okay, wait, I know this isn’t a zucchini bread, but I always treat my fruit prep like I’m making zucchini bread because moisture control is key! If you use blueberries that are very wet, they bleed and make the batter gummy. Whether you use fresh or frozen, toss them immediately with a tablespoon of your measured flour *before* adding them to the final batter. This coats them and helps suspend them evenly throughout the loaf instead of sinking to the bottom in a wet cluster.
Mixing Advice: This is the number one way to ruin a quick bread. You must stop mixing the second the dry ingredients disappear. Seriously. I use a rubber spatula for the last few folds after the mixer is off. If you see streaks of dry flour, fold until *just* gone. Remember, we are developing the structure with baking powder, not with tough gluten strands.
Swirl Customization: When layering, don’t be overly enthusiastic with your knife swirls. You aren’t aiming for a marble cake where everything blends. You want distinct pockets of batter, cheese, and fruit. Four or five gentle up-and-down cuts should do it. This ensures that when you slice it, you see defined white (brie), blue (berry), and golden (batter) areas. It looks infinitely better that way!
Ingredient Swaps: I tried this once with sharp white cheddar instead of brie when I ran out, and honestly? It was too sharp and salty; it overpowered the blueberry. Stick to Brie or maybe a very mild Havarti if you must change the cheese. For the buttermilk, if you truly can’t find it, whole milk mixed with a teaspoon of white vinegar left for ten minutes works perfectly fine. Do not substitute with skim milk; you need that fat content for the moisture.
Baking Tips: My oven runs notoriously hot on the left side. To combat this, I rotate the pan 180 degrees halfway through the baking time (around the 30-minute mark). This ensures even browning. Also, test the doneness by gently pressing the top center—if it springs back immediately, it’s likely done. If it sinks in, give it five more minutes.
Glaze Variations: If you want a brighter flavor instead of the vanilla richness, swap the vanilla extract in the glaze for a teaspoon of lemon zest and a splash of lemon juice. It makes the whole loaf feel summery, even if you’re eating it in the middle of January. And remember, for the best texture, glaze it while the loaf is still slightly warm; the warmth helps the sugar melt just enough to adhere beautifully.
Storing and Reheating Tips
The best part about a super-moist loaf like this is that it keeps surprisingly well, provided you treat it right. Since it has cheese in it, we do need to be a bit more careful than a standard dry cake.
Room Temperature: If you plan on finishing the loaf within two days, you can absolutely keep it out. Once the glaze is fully set (give it at least an hour after glazing), wrap the entire loaf tightly in plastic wrap, and then wrap that in aluminum foil. Store it on the counter, away from direct sunlight or heat sources. It’ll stay wonderfully moist this way. Don’t leave it wrapped tightly if it’s still warm, or you’ll trap moisture and risk sogginess!
Refrigerator Storage: If you think it’ll take longer than 48 hours to demolish, head straight to the fridge. Wrap it exactly as described above (plastic, then foil). In the fridge, it will last beautifully for a full week. The cold dulls the flavor slightly, so I always recommend bringing individual slices out onto the counter for about 30 minutes before serving.
Freezer Instructions: This freezes like a dream! If I know I won’t get to it for a while, I bake it, let it cool completely, and then I slice it first. Freezing it pre-sliced makes life so much easier. Wrap individual slices very well in plastic wrap, then place them all into a large zip-top freezer bag, squeezing out as much air as possible. It keeps perfectly for up to three months. Thawing is simple: just pull out what you need, unwrap it, and let it thaw on the counter for about an hour.
Glaze Timing Advice: If you know you’re freezing half of the loaf, I strongly suggest waiting to glaze until *after* you’ve thawed the slice you want to eat. The glaze tends to get a little sticky or slightly weeping when thawed from frozen if it was applied before freezing. If you absolutely must glaze before freezing, use less liquid in the glaze to make it very thick and almost a paste consistency, which holds up better.
Frequently Asked Questions
Final Thoughts
I really hope you give this blueberry brie bread a try soon. It’s one of those recipes that truly punches above its weight class. It looks impressive, it tastes like you bought it from a European bakery, but the process is genuinely easy enough for a beginner baker on a whim. The way that salty, creamy brie interacts with the sweet, bursting blueberries is something you just have to experience firsthand. It’s my go-to when I want to feel like I’ve pulled out all the stops without actually having to stress about timing yeast or tempering chocolate.
When you make it, I’m dying to know what you think! Did your brie melt perfectly into those gooey pockets? What did you serve it with? Drop a comment below and let me know if you tried the lemon curd pairing—I swear by it! I’ve also got a fantastic recipe coming next week for a savory cheddar and chive scone that you might enjoy if you love this cheese-meets-baked-good vibe. Until then, happy baking, and don’t forget to save me a slice!
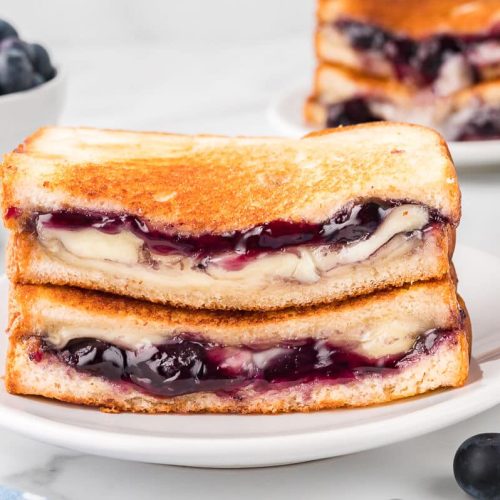
blueberry brie
Ingredients
Main Ingredients
- 3 tsp salted butter softened
- 2 slices white bread
- 0.125 cup Brie cheese sliced
- 3 tsp blueberry pie filling or blueberry jam
Instructions
Preparation Steps
- Spread butter on one side of each slice of bread.
- On the non-buttered side, add the brie slices and blueberry pie filling, then cover with the other slice of bread, buttered side facing outwards.
- Heat a skillet to medium-high heat. Grill each side of the sandwich for 2 to 3 minutes or until golden brown and the cheese is melted. Cut in half and serve hot.