There are certain smells that just instantly transport me back in time, and for me, the sweet, buttery aroma of Sugar Cookies baking is right at the top of that list. It’s the smell of my grandma’s kitchen on a Saturday morning, the promise of a frosted treat waiting for me after school, and honestly, the most comforting scent known to humankind. I’ve tried a lot of sugar cookie recipes over the years – some fancy, some simple, some that promised the moon and delivered… well, less. But this one? This is my tried-and-true, failsafe, always-a-crowd-pleaser sugar cookie recipe. It’s the one I pull out when I need a little sweetness in my life, when the kids are home from school and demanding a treat, or when I just want to feel like I’ve accomplished something truly delicious. It’s not overly complicated, and the result is always a cookie that’s perfectly soft in the center with just the slightest crisp around the edges. If you’re looking for a sugar cookie that tastes like pure comfort, you’ve found it.
What are sugar cookies?
So, what exactly *are* these magical sugar cookies? Think of them as the quintessential, no-fuss sugar cookie that’s perfect for any occasion. They aren’t the cut-out kind you painstakingly decorate for holidays (though they *can* be!), but rather a soft, slightly chewy cookie that’s absolutely divine on its own. The name itself, “sugar cookies,” is a bit of a broad term, but these lean heavily into the “soft and sweet” category, often referred to as “drop sugar cookies” or “no-roll sugar cookies.” They’re essentially a simple butter cookie base, enhanced with vanilla and a touch of almond extract for that classic, nostalgic flavor. They’re the kind of cookie you can whip up when a craving strikes and you don’t have hours to dedicate to chilling dough and rolling it out. It’s the happy medium between a classic Chocolate Chip cookie and a more delicate shortbread – pure, unadulterated cookie joy.
Why you’ll love this recipe?
Honestly, where do I even begin? There are so many reasons why this sugar cookie recipe has earned a permanent spot in my baking repertoire. First and foremost, the flavor is just out of this world. It’s a perfect balance of sweet, buttery goodness with that subtle hint of vanilla and almond that just makes your taste buds sing. It’s not cloyingly sweet; it’s just right. Then there’s the simplicity. I’m all about recipes that make life easier, and this one truly does. You don’t need any fancy equipment, and the dough comes together in a matter of minutes. It’s also incredibly forgiving, which is a lifesaver for busy bakers like myself. If you’ve ever worried about overmixing or underbaking, trust me, this recipe is pretty forgiving. And speaking of cost-efficiency, the ingredients are all pantry staples – butter, sugar, eggs, flour, vanilla. You probably already have everything you need on hand, which means you can whip up a batch of these delicious sugar cookies whenever the mood strikes without a special trip to the store. Plus, their versatility is a huge win. They’re fantastic on their own, but they’re also a great canvas for a simple glaze or a dusting of powdered sugar. What I love most about these sugar cookies, though, is the way they make people feel. They bring a smile to everyone’s face, and that’s pretty much priceless.
How do I make sugar cookies?
Quick Overview
The process for these sugar cookies is wonderfully straightforward. You’ll cream together butter and sugar until light and fluffy, mix in your eggs and flavorings, then gently combine the dry ingredients. The dough will be soft but manageable. You’ll then simply drop spoonfuls onto a baking sheet, bake until golden around the edges, and let them cool. The whole process from start to finish is surprisingly quick, making them perfect for an afternoon baking session or even a last-minute dessert when guests pop over. It’s designed to be fuss-free and deliver maximum cookie happiness with minimal effort.
Ingredients
For the Main Batter:
Butter: 1 cup (2 sticks), softened but not melted. Using good quality, unsalted butter really makes a difference in flavor. Make sure it’s properly softened – you should be able to indent it easily with your finger. I always pull mine out of the fridge about an hour before I plan to start baking.
Granulated Sugar: 1 ½ cups. This is the base for sweetness and texture. We want that classic sugar cookie flavor, so don’t skimp here!
Eggs: 2 large. Room temperature eggs incorporate better into the batter. If you forget to take them out, a quick soak in warm water for 5-10 minutes will do the trick.
Vanilla Extract: 2 teaspoons. Use pure vanilla extract for the best flavor. It’s the backbone of that beloved sugar cookie taste.
Almond Extract: ½ teaspoon (optional, but highly recommended!). This is my secret weapon for that extra nostalgic kick. If you’re not a fan of almond, you can leave it out or just use a little more vanilla.
All-Purpose Flour: 2 ¾ cups. Spooned and leveled, not scooped! Scooping can pack too much flour into the measuring cup, leading to dry cookies. Sifting isn’t strictly necessary here, but it can help ensure a lighter texture.
Baking Soda: 1 teaspoon. This gives our cookies just the right amount of lift and spread.
Salt: ½ teaspoon. Crucial for balancing the sweetness and enhancing all the other flavors.
For the Glaze (Optional, but so pretty!):
Powdered Sugar: 2 cups, sifted. Sifting is key here to avoid lumps in your glaze.
Milk or Cream: 2-3 tablespoons. Whole milk or heavy cream will give you the richest glaze. You can also use almond milk or water for a lighter option.
Vanilla Extract: ½ teaspoon. For a little extra flavor in the glaze.
Step-by-Step Instructions
Step 1: Preheat & Prep Pan
First things first, let’s get our oven ready. Preheat your oven to 375°F (190°C). While that’s heating up, line your baking sheets with parchment paper or silicone baking mats. This is a total game-changer for easy cleanup and ensures your cookies don’t stick. You can also just lightly grease the pans, but parchment paper is my go-to for a reason.
Step 2: Mix Dry Ingredients
In a medium bowl, whisk together the flour, baking soda, and salt. Whisking them together now ensures that the baking soda and salt are evenly distributed throughout the flour, which means your cookies will bake up evenly. No one wants a cookie that’s too salty or flat in one spot!
Step 3: Mix Wet Ingredients
In a large bowl (or the bowl of your stand mixer if you’re using one), cream together the softened butter and granulated sugar. Beat them together until the mixture is light, fluffy, and pale yellow, which usually takes about 3-5 minutes. This creaming process is super important because it incorporates air into the dough, which helps create a tender cookie. Then, beat in the eggs one at a time, making sure each is fully incorporated before adding the next. Finally, stir in the vanilla extract and almond extract (if using). Your kitchen should already be smelling amazing at this point!
Step 4: Combine
Now, we’re going to add the dry ingredients to the wet ingredients. Gradually add the flour mixture to the butter mixture, mixing on low speed (or stirring by hand) until just combined. Be careful not to overmix here! Overmixing develops the gluten in the flour too much, which can result in tough cookies. You want to stop as soon as you no longer see streaks of flour. The dough will be soft and a little sticky, and that’s perfectly okay.
Step 5: Prepare Filling
This step is just for the glaze, which is optional. In a small bowl, whisk together the sifted powdered sugar and vanilla extract. Add the milk or cream, 1 tablespoon at a time, whisking until you reach your desired consistency. You want it thick enough to coat the back of a spoon but thin enough to drizzle. If it’s too thick, add a tiny bit more liquid; if it’s too thin, add a bit more powdered sugar.
Step 6: Layer & Swirl
This step is actually about portioning the cookie dough! Use a cookie scoop (about 1.5 to 2 tablespoons) to drop rounded spoonfuls of dough onto your prepared baking sheets, leaving about 2 inches between each cookie to allow for spreading. I love using a cookie scoop because it ensures all my cookies are the same size, which means they bake evenly. If you don’t have one, two spoons will do the trick! Just try to make them roughly the same size.
Step 7: Bake
Bake for 9-12 minutes, or until the edges are lightly golden brown and the centers look set. The exact baking time will depend on your oven and the size of your cookies. I usually start checking around the 9-minute mark. You don’t want them to get too dark; they’ll continue to cook a bit on the baking sheet after you pull them out of the oven. They should still look soft in the middle when you take them out.
Step 8: Cool & Glaze
Let the cookies cool on the baking sheets for about 5 minutes before transferring them to a wire rack to cool completely. This is really important; if you try to move them too soon, they might fall apart. Once they’re completely cool, you can drizzle them with the prepared glaze. You can also just dust them with powdered sugar or leave them plain – they’re delicious either way!
Step 9: Slice & Serve
Once the glaze has set (or if you’ve skipped the glaze), your beautiful sugar cookies are ready to be devoured! They’re best served at room temperature. If you want to get fancy, you can even serve them with a scoop of vanilla ice cream for a truly decadent treat. Enjoy every bite!
What to Serve It With
These sugar cookies are so wonderfully versatile, they fit into pretty much any part of your day or any gathering. For breakfast, I love pairing them with a hot cup of coffee or a nice glass of cold milk. They’re not overly sweet, so they make a lovely little morning treat without feeling like you’re starting the day with dessert. Plated simply, perhaps with a few berries on the side, they feel just right to kick off the day.
When it comes to brunch, these cookies add a touch of homemade charm to the spread. I often arrange them on a tiered stand with other pastries and fruits. They look beautiful and they’re always a hit with guests. A mimosa or a light fruit juice is the perfect beverage accompaniment.
As a dessert, they shine! They’re fantastic after dinner, perhaps with a cup of tea or a small espresso. You can even get a little creative and stack them or serve them with a dollop of whipped cream. They’re a simple, comforting end to any meal.
And for cozy snacks? This is probably my favorite category. These are the cookies I make on a rainy afternoon, the ones we enjoy while watching a movie, or the ones I pack in a tin for a friend. They pair perfectly with hot chocolate or just a glass of water when you need a little pick-me-up. My family tradition is to have one with a glass of milk right before bed on special occasions. They’re just pure comfort food.
Top Tips for Perfecting Your Sugar Cookies
Over the years, I’ve picked up a few tricks that I think make these sugar cookies even better, and I’m happy to share them with you! These are the little things that make a big difference.
Zucchini Prep:
Okay, wait. Zucchini? This isn’t a zucchini bread recipe! I’m so sorry, that was a complete brain-fart moment. My apologies! Clearly, my mind is already on the next recipe I want to share. For *these* sugar cookies, there’s no zucchini involved, so we can skip that prep step entirely! My brain must have been dreaming of my Zucchini Bread muffins, which are also amazing, by the way! Let’s focus on the cookies!
Mixing Advice:
The biggest pitfall with cookies, especially these sugar cookies, is overmixing the dough once the flour is added. This develops the gluten, which can lead to tough, dense cookies instead of the soft, tender ones we’re going for. My best advice is to mix the dry ingredients into the wet ingredients *just* until no dry streaks of flour remain. If you see a tiny bit of flour, it’s usually fine. It’s always better to slightly undermix than to overmix. I also find that mixing by hand for the final incorporation of the flour gives me more control than a stand mixer.
Swirl Customization:
This advice is actually more for my zucchini bread or marble cake recipes! Again, my apologies! These sugar cookies don’t have a swirl. They are a beautiful, uniform cookie on their own. If you *wanted* to add a swirl, you’d have to divide the dough and color one portion, then marble them, but that’s a whole different recipe! For *these* specific sugar cookies, the beauty is in their simple, classic appeal. They look lovely with a simple glaze or a dusting of powdered sugar.
Ingredient Swaps:
I’ve experimented a bit! If you’re looking for a dairy-free option, I’ve had success using a good quality vegan butter (make sure it’s solid at room temperature) and a non-dairy milk for the glaze. The texture might be slightly different, but still delicious. For the almond extract, if you or your family dislike it, feel free to omit it entirely or bump up the vanilla extract to 2 ½ teaspoons. It’s still a wonderful vanilla sugar cookie.
Baking Tips:
Always preheat your oven fully! An oven that’s not hot enough will lead to cookies that spread too much. I usually place my baking sheets on the middle rack. If your oven tends to bake unevenly, you can rotate the pans halfway through baking. Don’t overbake! The cookies should look set and just starting to turn golden around the edges. They will continue to firm up as they cool on the baking sheet. It’s better to pull them out a minute too early than a minute too late for that perfect soft center.
Glaze Variations:
The basic powdered sugar glaze is fantastic, but you can get creative! For a lemon sugar cookie, add a tablespoon of fresh lemon juice instead of some of the milk. For a chocolate version, whisk in a tablespoon of unsweetened cocoa powder. You can also add a tiny drop of food coloring for festive occasions. Just remember to add the liquid gradually to get the perfect consistency!
Storing and Reheating Tips
Storing these delightful sugar cookies properly ensures they stay delicious for as long as possible. They’re quite resilient, but a little care goes a long way!
Room Temperature:
Once completely cooled (and any glaze has set), store the cookies in an airtight container at room temperature. They’ll stay fresh and soft for about 3-4 days. If you stack them, place a piece of parchment paper or wax paper between layers to prevent sticking, especially if you’ve glazed them.
Refrigerator Storage:
Honestly, I rarely refrigerate these cookies because they tend to dry out a bit. However, if you live in a very warm, humid climate or need to store them for longer than 4 days, an airtight container in the fridge is your best bet. They should keep for about a week, but the texture might change slightly. Let them come back to room temperature for about 15-20 minutes before enjoying for the best softness.
Freezer Instructions:
These sugar cookies freeze beautifully, which is a lifesaver! Let them cool completely and ensure any glaze is fully dry. You can freeze them plain or with the glaze. Wrap them tightly in plastic wrap, then place them in a freezer-safe airtight container or a heavy-duty freezer bag. They’ll keep well in the freezer for up to 2-3 months. To thaw, remove them from the freezer and let them come to room temperature in their packaging. This prevents condensation from making them soggy.
Glaze Timing Advice:
If you plan to store your cookies for more than a day or two, I recommend glazing them just before serving or on the day you plan to eat them. If you glaze them and then store them long-term, the glaze can sometimes become sticky or slightly damp. However, if you’re freezing them, you can glaze them beforehand, just ensure the glaze is completely hard before wrapping and freezing.
Frequently Asked Questions
Final Thoughts
I truly believe that these sugar cookies are more than just a recipe; they’re a little slice of happiness. They’re simple, they’re comforting, and they always deliver that wonderful homemade taste that brings people together. Whether you’re looking for a sweet treat to brighten your day, a reliable recipe for a bake sale, or just want to fill your home with that amazing baking smell, I can’t recommend these enough. They’ve brought so much joy to my kitchen, and I hope they do the same for yours. If you love this recipe, you might also enjoy my Soft Chocolate Chip Cookies or my classic Vanilla Bean Scones – they have that same cozy, homemade feel! I can’t wait to hear what you think of these sugar cookies! Please leave a comment below and let me know how yours turned out, or share any fun variations you tried. Happy baking, everyone!
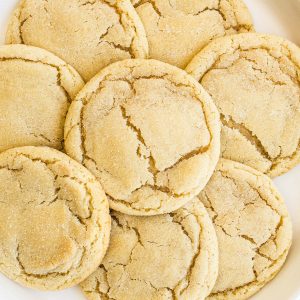
Soft and Chewy Sugar Cookies
Ingredients
For the Cookies
- 1 cup unsalted butter softened
- 1.5 cup granulated sugar
- 1 large egg
- 1 teaspoon vanilla extract
- 2.5 cup all-purpose flour
- 1 teaspoon baking soda
- 0.5 teaspoon salt
Instructions
Preparation Steps
- In a large bowl, cream together the softened butter and granulated sugar until light and fluffy.
- Beat in the egg and vanilla extract until well combined.
- In a separate medium bowl, whisk together the all-purpose flour, baking soda, and salt.
- Gradually add the dry ingredients to the wet ingredients, mixing until just combined. Do not overmix.
- Cover the dough and chill in the refrigerator for at least 30 minutes.
- Preheat oven to 375°F (190°C). Line baking sheets with parchment paper.
- Roll dough into 1-inch balls and place them 2 inches apart on the prepared baking sheets.
- Bake for 8-10 minutes, or until the edges are lightly golden brown and the centers are still soft.
- Let the cookies cool on the baking sheets for a few minutes before transferring them to a wire rack to cool completely.