Oh, you guys. I’ve been meaning to share this recipe with you for ages. It’s one of those things that just screams comfort to me, you know? It’s the kind of treat I pull out when the first stalks of rhubarb appear in the garden, or when I just *need* something sweet and a little bit special without a ton of fuss. My rhubarb oat bars. They’re honestly a lifesaver on busy afternoons when everyone’s home from school and has that universal “I’m hungry!” plea. Think of them as a grown-up, slightly sophisticated take on a classic oatmeal cookie, but in bar form, which, let’s be honest, is so much easier to handle, especially when little hands are involved. I’ve tried so many variations over the years, some too crumbly, some too gooey, but this one? This one’s just right. It’s got that perfect balance of chewy oat crust, a bright, tangy rhubarb filling, and a delightful crumble on top. It’s truly my go-to for a reason, and I’m so excited to finally spill the beans on how I make them.
What are Rhubarb Oat Bars?
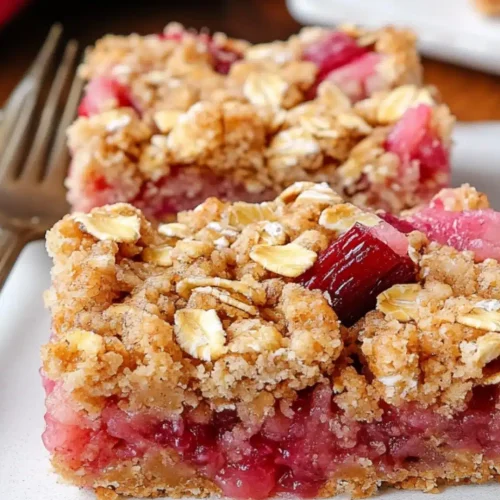
So, what exactly are rhubarb oat bars? In my world, they’re basically a hug in edible form. Imagine a wonderfully textured base made from oats, flour, and a touch of sweetness, pressed into a pan. On top of that, we’ve got a vibrant, slightly tart rhubarb filling that bursts with that unmistakable rhubarb flavor. And to finish it off, a sprinkle of that same oat mixture bakes into a delicious, slightly crunchy crumble. It’s not quite a pie, not quite a cookie, but something wonderfully in between. The name itself, rhubarb oat bars, pretty much tells the story, but the magic is in the execution. They’re incredibly versatile, perfect for a quick breakfast, a satisfying snack, or even a simple dessert. They’re the kind of recipe that makes your kitchen smell amazing and brings a smile to everyone’s face. I often think of them as the unsung heroes of my baking repertoire because they’re so reliable and always a crowd-pleaser.
Why you’ll love this recipe?
Honestly, where do I even begin? There are so many reasons why these rhubarb oat bars have earned a permanent spot in my recipe binder. First off, the flavor is just out of this world. You get the lovely, comforting sweetness and chewiness from the oat base and crumble, which perfectly balances the bright, zesty tartness of the rhubarb. It’s a flavor combination that just *works*, especially when the rhubarb is perfectly ripe and has that signature tang. Then there’s the simplicity. I’m all about recipes that deliver big on taste without requiring a culinary degree or a full afternoon in the kitchen. These bars are surprisingly easy to whip up, even on a weeknight. You can mix the crust and crumble in one go, press it into the pan, add the filling, and then top it off. It’s practically foolproof! And speaking of foolproof, they’re incredibly budget-friendly too. Oats, flour, sugar, butter – staple ingredients that are easy on the wallet. Plus, rhubarb is often quite affordable when in season, and you can even freeze it to enjoy these bars year-round. The versatility is another huge win. I serve these for breakfast with a cup of coffee, pack them for school lunches (if they make it that long!), and they’re fantastic as a pick-me-up snack with a glass of milk. They’re even elegant enough to serve as a light dessert after a meal, perhaps with a dollop of whipped cream or a scoop of vanilla ice cream. What I love most about this recipe, though, is its comforting familiarity. It reminds me of simpler times, and the joy of baking something wholesome and delicious from scratch. It’s a recipe that just feels good to make and even better to eat.
How do I make Rhubarb Oat Bars?
Quick Overview
Making these rhubarb oat bars is a breeze! You’ll start by mixing up a simple oat-based dough that serves as both the bottom crust and the streusel topping. After pressing half of it into your baking pan, you’ll whip up a quick, vibrant rhubarb filling. Spoon that over the crust, sprinkle the remaining oat mixture on top, and bake until golden and bubbly. The whole process is pretty streamlined, and the results are always so rewarding. It’s a one-pan wonder that delivers incredible flavor and texture, making it perfect for both novice bakers and seasoned pros looking for a reliable, delicious treat.
Ingredients
For the Main Batter (and Crumble):
Here’s what you’ll need for that wonderful chewy base and crunchy topping. I always try to use old-fashioned rolled oats for the best texture – the quick-cooking ones can make it a bit too mushy for my liking. You can find these in pretty much any grocery store.
- 2 cups (180g) Old-Fashioned Rolled Oats
- 1 ½ cups (190g) All-Purpose Flour (or use half whole wheat for extra nuttiness!)
- 1 cup (200g) Granulated Sugar (you can reduce this slightly if your rhubarb is very sweet)
- 1 teaspoon Baking Soda
- ½ teaspoon Ground Cinnamon (optional, but I love it!)
- ¼ teaspoon Salt
- ¾ cup (170g) Unsalted Butter, melted (I always melt mine in the microwave in short bursts)
For the Filling:
This is where the star of the show comes in! Fresh rhubarb is best, but frozen works too – just make sure to drain any excess liquid. Chop it into bite-sized pieces so it cooks evenly.
- 4 cups (about 500g) Fresh Rhubarb, chopped into ½-inch pieces
- ¾ cup (150g) Granulated Sugar (adjust to your rhubarb’s tartness and your preference)
- 2 tablespoons Cornstarch (this is key to thickening the filling so it’s not watery)
- 1 tablespoon Lemon Juice (freshly squeezed adds a lovely brightness)
- ½ teaspoon Vanilla Extract
For the Glaze (Optional, but so good!):
This adds an extra touch of sweetness and a pretty finish. It’s super simple and makes the bars feel a little more special.
- 1 cup (120g) Powdered Sugar
- 2-3 tablespoons Milk or Water (start with 2, add more until you reach desired drizzling consistency)
- ½ teaspoon Vanilla Extract
Step-by-Step Instructions
Step 1: Preheat & Prep Pan
First things first, get your oven preheated to 375°F (190°C). This is a good, steady temperature that ensures everything bakes evenly. Then, grab an 8×8 inch (20×20 cm) baking pan. You’ll want to lightly grease it or line it with parchment paper. I prefer parchment paper because it makes lifting the bars out so much easier, and cleanup is a dream! Make sure the parchment hangs over the sides a bit – those little “handles” will be your best friend when it’s time to get the bars out of the pan.
Step 2: Mix Dry Ingredients
In a medium bowl, whisk together the rolled oats, all-purpose flour, granulated sugar, baking soda, cinnamon (if you’re using it – I highly recommend it for that warm spice!), and salt. Give it a good whisk to make sure everything is well combined and there are no clumps of baking soda. This dry mixture forms the base of our bars and will also become the delicious streusel topping.
Step 3: Mix Wet Ingredients
Now, pour the melted butter into the dry ingredients. This is where the magic starts to happen. You’ll use a fork or a spatula to mix it all together. It will look kind of crumbly and sandy at first, but keep mixing. You’re looking for a consistency where the oats and flour are nicely coated in the butter, and it starts to clump together a bit. Don’t overmix; just get it to where it holds together loosely.
Step 4: Combine
Take about two-thirds of this oat mixture and press it firmly into the bottom of your prepared baking pan. Use the bottom of a measuring cup or your hands to create an even layer. This is your base crust. Set the remaining one-third of the oat mixture aside – this will be our crumble topping!
Step 5: Prepare Filling
In a separate bowl, gently toss the chopped rhubarb with the granulated sugar, cornstarch, and lemon juice. The cornstarch is super important here; it will thicken up the rhubarb juices as it bakes, preventing a soggy bottom and ensuring a lovely, jammy filling. Add the vanilla extract and give it one last stir. Make sure all the rhubarb pieces are coated.
Step 6: Layer & Swirl
Spoon the rhubarb filling evenly over the pressed oat crust in the pan. Don’t worry if it looks a little loose; it will thicken up as it bakes. Now, take that reserved one-third of the oat mixture and sprinkle it evenly over the top of the rhubarb filling. This creates your delicious, slightly crunchy crumble. If you want a little extra flair, you can gently swirl some of the filling into the crumble with a knife, but it’s totally optional and looks great either way!
Step 7: Bake
Pop the pan into your preheated oven. Bake for about 30-40 minutes, or until the crumble topping is golden brown and the rhubarb filling is bubbling around the edges. You’ll know it’s done when the edges look set and the center is no longer jiggly. The smell that fills your kitchen at this stage is just incredible!
Step 8: Cool & Glaze
This is a crucial step, so try to be patient! Let the bars cool completely in the pan on a wire rack. I know, it’s tempting to dive right in, but they need time to set. If you try to cut them while they’re warm, they’ll likely fall apart. Once they’re completely cool, you can make the glaze. Whisk together the powdered sugar, vanilla extract, and just enough milk or water to get a drizzly consistency. Drizzle this over the cooled bars. Let the glaze set for about 15-20 minutes before slicing.
Step 9: Slice & Serve
Once the glaze is set (or if you skipped the glaze!), carefully lift the bars out of the pan using the parchment paper handles. Place them on a cutting board and slice into squares or rectangles. I usually cut mine into 9 or 12 bars, depending on how big I want them. Serve them as is, or with a cup of coffee or tea. They’re perfect!
What to Serve It With
These rhubarb oat bars are wonderfully versatile, which is another reason I adore them. They fit into so many different parts of the day and occasions. For breakfast, they’re fantastic alongside a steaming mug of coffee or a glass of freshly squeezed orange juice. They’re hearty enough to be satisfying but also light and fruity to start your day off right. I sometimes even crumble a bit of it over yogurt! For a more leisurely brunch, these bars are a delightful addition to a spread. They look beautiful on a platter, especially with that lovely swirl of glaze. Pair them with mimosas or some sparkling cider for a festive touch. As a dessert, they’re pure comfort. Imagine serving a warm square (you can gently reheat them for a few minutes!) with a scoop of good quality vanilla bean ice cream or a dollop of lightly sweetened Whipped cream. The warm, gooey filling against the cool cream is divine! And for those times when you just need a comforting snack, these are your go-to. They’re perfect for an afternoon pick-me-up with a glass of cold milk or a soothing cup of herbal tea. My family loves them after school, and they’re always gone in a flash. Honestly, the best thing to serve them with is good company and a moment to just enjoy something homemade and delicious.
Top Tips for Perfecting Your Rhubarb Oat Bars
After making these rhubarb oat bars more times than I can count, I’ve picked up a few tricks that really help elevate them from good to absolutely stellar. First, when prepping your rhubarb, make sure it’s chopped into relatively uniform, bite-sized pieces. This ensures it cooks evenly and becomes wonderfully tender without turning into complete mush. If your rhubarb is particularly thick and fibrous, you might want to peel those outer strings off, just like you would celery, before chopping. For the oat mixture, resist the urge to overmix once the butter is added. You want it to be cohesive enough to press into the pan, but not so wet that it becomes a paste. Overmixing can lead to a tougher crust. When preparing the filling, don’t skimp on the cornstarch! It’s the secret to that perfect, slightly thickened, jammy consistency. If you use frozen rhubarb, make sure to drain off any excess water it releases after thawing, or even pat it dry with paper towels, before mixing it with the other filling ingredients. This will prevent a watery bar. For the crumble topping, if you prefer a chunkier streusel, you can just toss the oat mixture with the melted butter rather than pressing it all into the base. Then, sprinkle it over the rhubarb. My secret for a truly beautiful swirl, if you choose to do it, is to drop spoonfuls of the rhubarb filling over the crust, then drop spoonfuls of the crumble mixture, and *then* use a butter knife to gently swirl them together. Don’t over-swirl, or you’ll lose the distinct layers. When it comes to baking, keep an eye on the bars in the last 10 minutes. Ovens can vary, and you’re looking for that lovely golden-brown on top and bubbling edges. If the top is browning too quickly, you can always loosely tent the pan with foil. For ingredient swaps, if you don’t have all-purpose flour, a good quality gluten-free blend usually works well, though the texture might be slightly different. And if you’re not a fan of rhubarb, strawberries or a mix of berries with rhubarb are also delicious! Just be mindful of their moisture content and adjust cornstarch as needed.
Storing and Reheating Tips
Keeping these rhubarb oat bars fresh and delicious is pretty straightforward, and thankfully, they hold up well. At room temperature, they’re best stored in an airtight container and will stay wonderfully fresh for about 2-3 days. I usually just pop them in a plastic container with a lid or a cake keeper. They’re perfect at room temp for snacking or breakfast. If you live in a warm climate or want them to last a bit longer, the refrigerator is your friend. Store them in an airtight container in the fridge for up to a week. The texture might firm up slightly when chilled, but don’t worry – they’re still delicious! For longer storage, these bars freeze beautifully. You can wrap individual bars or the whole pan (once completely cooled and the glaze is set) tightly in plastic wrap, then in aluminum foil, or place them in a freezer-safe container. They’ll keep well in the freezer for up to 2-3 months. To thaw, simply bring them to room temperature. If you plan to freeze them, I often recommend glazing them *after* they’ve been thawed, as sometimes the glaze can get a little sticky or weepy in the freezer, but it’s not a dealbreaker if you glaze them before freezing. When it comes to reheating, if they’ve been refrigerated or frozen, you can gently warm them up in a low oven (around 300°F or 150°C) for 5-10 minutes until they’re just warmed through and the filling is a little gooey again. This is especially lovely if you’re serving them for dessert with ice cream! They can also be microwaved for about 15-20 seconds, but be careful not to overheat them, as they can become tough. Honestly, though, they’re often just as delightful at room temperature straight from the container!
Frequently Asked Questions
Final Thoughts
So there you have it – my go-to recipe for rhubarb oat bars. I really hope you give these a try because they are just so special. They strike that perfect balance between comforting and bright, easy to make and impressive to serve. They’re the kind of recipe that makes you feel like a baking rockstar, even if you’re just whipping them up on a Tuesday afternoon. The combination of the chewy oat crust, the tangy rhubarb, and that sweet crumble topping is just pure bliss. They’re perfect for using up that seasonal rhubarb but are also wonderful year-round if you use frozen. If you love these, you might also enjoy my other fruit bar recipes or my classic oatmeal cookie recipes! I can’t wait to hear what you think of these rhubarb oat bars. Let me know in the comments below if you try them, and how they turn out! Happy baking, everyone!
Rhubarb Oat Bars
Ingredients
Rhubarb Filling
- 4 cups chopped rhubarb
- 0.75 cup granulated sugar
- 2 tablespoons all-purpose flour
- 0.5 teaspoon ground cinnamon
Oat Topping
- 1.5 cups rolled oats
- 1 cup all-purpose flour
- 0.75 cup brown sugar packed
- 0.5 teaspoon baking soda
- 0.25 teaspoon salt
- 0.75 cup unsalted butter cold and cut into cubes
Instructions
Preparation Steps
- Preheat your oven to 375°F (190°C). Grease and flour an 8x8 inch baking pan.
- In a medium bowl, combine the chopped rhubarb, granulated sugar, 2 tablespoons of flour, and cinnamon. Mix well until the rhubarb is evenly coated.
- In a separate bowl, whisk together the rolled oats, 1 cup of flour, brown sugar, baking soda, and salt for the topping.
- Add the cold, cubed butter to the oat mixture. Use a pastry blender or your fingertips to cut the butter into the dry ingredients until the mixture resembles coarse crumbs.
- Spread half of the oat topping evenly over the bottom of the prepared baking pan.
- Pour the rhubarb filling evenly over the oat base.
- Sprinkle the remaining oat topping evenly over the rhubarb filling.
- Bake for 30-35 minutes, or until the topping is golden brown and the filling is bubbly.
- Let the bars cool completely on a wire rack before cutting into squares. This is crucial for them to set properly.