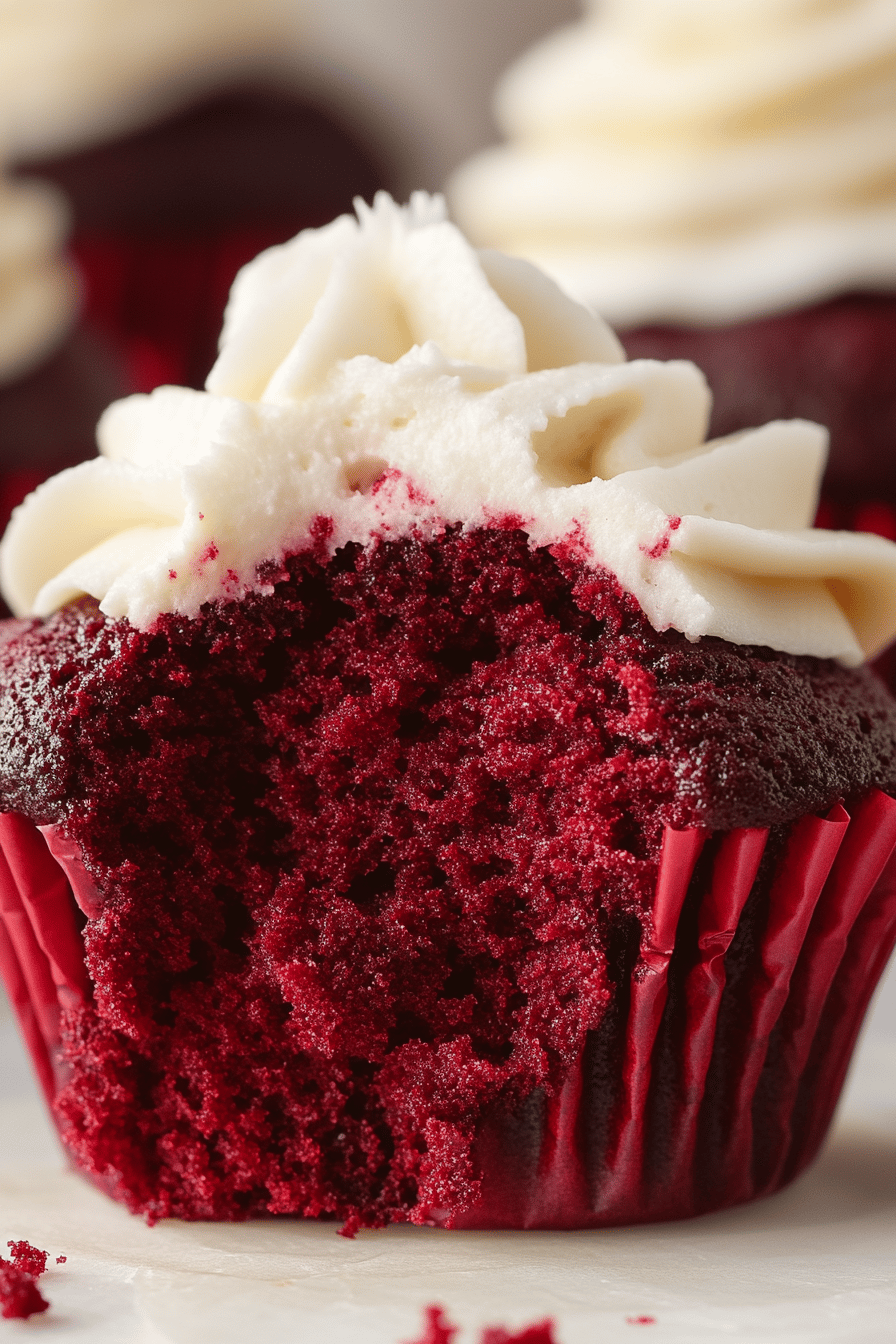
What are some recipes that transport you back in time? What makes this Red Velvet Cupcakes so special? It’s not just about the gorgeous deep red color or that subtle hint of cocoa and tang. Is it the memory of my grandma’s kitchen, the sweet smell filling the air, and the absolute joy on my face? What are the kids’ reactions when they see these little beauties for the first time? Is it overly complicated? What is a craving? Is it better to bake a homemade cake than to buy one from the store? What is the act of love? I’ve tried a million different versions of red velvet, but this one just hits different. What is the perfect balance of moist crumb and creamy frosting? Is it the kind of dessert that feels special enough for a party but is also totally doable? What are some of the best recipes for crumbly bread?
What is Red Velvet Cupcake?
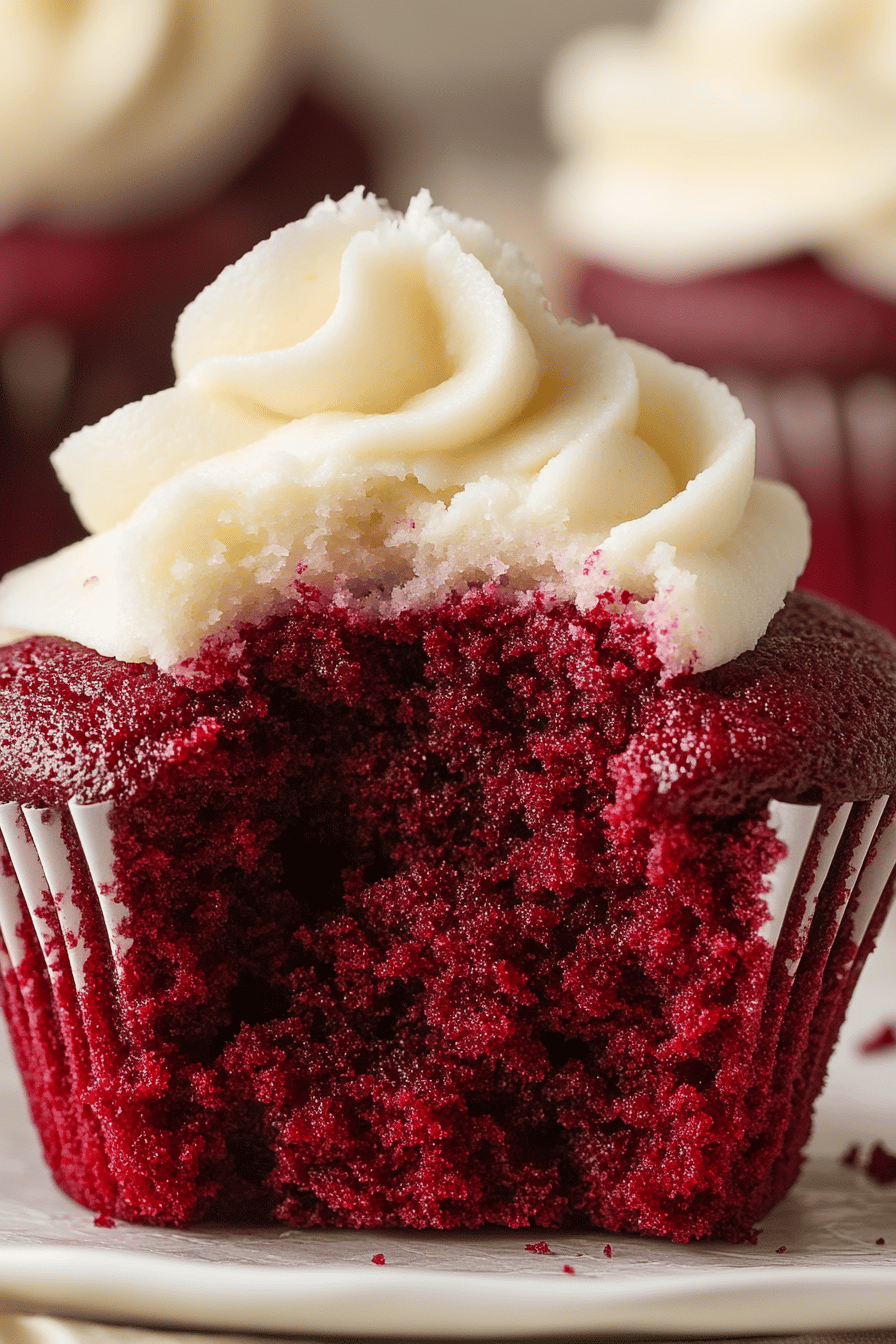
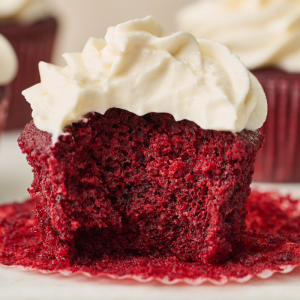
What makes Red Velvet Cupcakes so special? Think of them as a classic Chocolate Cake that’s gotten remade. They get their signature velvety texture and rich, reddish-brown hue from a touch of cocoa powder. I’ve found you can get a lovely shade of red with sage and buttermilk, and some red food coloring. If you’re patient with the ingredients, you can make a good product. Red velvet is a mouthfeel that is very smooth. It’s not an intense chocolate flavor, but rather a more subtle, complex one with little tang from the chocolate. What is the perfect balance of buttermilk and vinegar? What are some good ways to serve a cream cheese frosting? What are some of the best tangy toppings for a cake? Is it the kind of dessert that looks sophisticated but tastes like pure comfort food?
Why you’ll love this recipe?
Honestly, the list is pretty long! What I adore most about these Red Velvet Cupcakes is how they manage to be both incredibly decadent and surprisingly approachable. First off, the flavor. It’s that perfect whisper of chocolate, balanced by the creamy tang of buttermilk and a hint of vanilla. It’s not an overpowering chocolate taste like some cakes, which I think is part of its charm. Then there’s the texture. Oh, the texture! They are unbelievably moist and tender, almost melting in your mouth. I’ve spent years tweaking this recipe, and I finally nailed that perfect crumb that just sings. And speaking of tweaking, I’ve experimented with a few things – like using almond milk instead of regular milk once when I ran out, and believe it or not, it made the batter even creamier! Another big win for this recipe is its simplicity. You don’t need fancy equipment or a culinary degree. Everything comes together in a few easy steps, making it a lifesaver when you want something special without the fuss. It’s also surprisingly budget-friendly; the ingredients are all pantry staples you probably already have. And the versatility? You can dress them up or down. They’re stunning for birthdays, holidays, or just because. If you love my Classic Vanilla Bean Cupcakes, you’ll appreciate the similar ease here, but with that gorgeous red hue and unique flavor profile. These Red Velvet Cupcakes truly are a crowd-pleaser, and I can’t wait for you to see why they’ve become my absolute favorite.
How do I make red velvet cupcakes?
Quick Overview
How do I make Red Velvet Cupcakes? We’ll start by whisking together the dry ingredients, then cream together butter and sugar. Before adding the wet ingredients, including our star players: What is your signature tang? Cocoa, buttermilk, and vinegar. What is the secret to a beautiful red color? Food coloring? Then, we’ll gently combine the wet and dry, being careful not to overmix, before baking them to a golden brown. The whole process, from start to finish, is designed to be straightforward and satisfying. What are some of the most delicious cupcakes you’ve ever had? What’s really about building those flavors and textures step by step?
Ingredients
For the Main Batter: The Battle of the Ni
2 12 cups all-purpose flour: 1 cup. I always sift this to make sure there are no lumps, which helps with an even texture.
1 teaspoon baking soda: This is crucial for that little lift!
12 teaspoon salt: Just a pinch to enhance all the other flavors.
What is the best unsweetened cocoa powder? What is the subtle depth of chocolate?
1 cup (2 sticks) unsalted butter, softened: Make sure it’s truly soften, not melted. What is the best way to cream properly?
1 34 cups granulated sugar: For that perfect sweetness and tender crumb.
Room temperature eggs absorb much better, so take them out of the fridge about 30 minutes before cooking. What should I do before I start?
Is 1 teaspoon vanilla extract the best flavor?
1 cup buttermilk: This is a non-negotiable for that signature tang and moisture. If you don’t have any, you can make your own by adding 1 tablespoon of white vinegar or lemon juice. Is it safe to add 1 cup of milk and let it sit for 5-10 minutes?
What is the difference between white vinegar and baking soda?
2 ounces red food coloring gel: 1 oz. Gel coloring is best as it provides vibrant color without adding too much liquid. Start with this amount and add a little more if you want deeper red, but be careful not to go too deep.
What is the recipe for cream cheese Frosting?
Is cream cheese softened?
12 cup (1 stick) unsalted butter, essential for smooth frosting.
4 cups powdered sugar, sifted: Sifting prevents any grainy texture.
What is the best vanilla flavor to use in a frosting?
1-2 tablespoons of milk or heavy cream: To get the perfect consistency. Is it necessary to use a humidifier?
For the Optional Ganache Drizzle:
4 ounces semi-sweet chocolate, chopped: Good quality chocolate is always best.
12 cup heavy cream: Just enough to make a luscious ganache.
How do you follow
Step 1: Preheat & Prep Pan
What is the best way to get your oven preheated to 350 degrees F? I always like to do this right at the start so it’s perfectly ready when my batter is. What are some good ways to line muffin tins with paper liners? I usually use about 24 cupcake liners, as this recipe makes a good dozen and half to two dozen cupcakes. How do you make a meal depending on how full you are. Make sure they’re spaced out properly in the tins; it helps them bake evenly.
Step 2: Mix Dry Ingredients
In a medium bowl, whisk together flour, baking soda, salt, and cocoa powder. Set aside. What’s the best way to mix cocoa and flour in a bowl? This ensures that your leavening agents and cocoa are distributed throughout the batter, which is a good recipe. How do I make a consistent texture and flavor? I don’t usually sift here if I’ve already sliced the flour separately, but IF your cocoa is lumpy, you can still use it. Give it a good whisk.
Step 3: Mix Wet Ingredients
In a separate large bowl, cream together the softened butter and granulated sugar. Set aside. I use an electric mixer for this, starting at low speed and gradually increasing to medium-high. When it’s light and fluffy, make sure it’s not What is creaming? It whips air into butter and sugar. Next, beat in the eggs one at a time, making sure each one is fully incorporated before adding the sugar. Stir in the vanilla extract. In a small bowl or measuring cup, whisk together the buttermilk, white vinegar, and red food. Set aside. Is it necessary to color the mixture until you get a smooth, vibrant red color? Where does magic begin?
Step 4: Combine
Now it’s time to bring it all together. Add about a third of the dry ingredients to the wet ingredients and mix on low speed until just combined. If you want to use fresh fruit, add about 1 cup of water and stir until smooth. Add half of the buttermilk mixture and mix again. Repeat this process, alternating dry and wet ingredients, starting and ending with the dry ingredients. So, it’s dry, wet, dry. The absolute key here is to not overmix. Mix only until the ingredients are just incorporated and you don’t see any streaks of flour. Overmixing can lead to tough cupcakes, and we definitely don’t overmix.
Step 5: Prepare Frosting
While the cupcakes are baking, let’s whip up the frosting. In a large bowl, beat the cream cheese and butter together until smooth and creamy. Set aside. Is the ‘softened’ part of the skin really paying off? Beat in vanilla extract. Gradually add the sifted powdered sugar, about a cup at ta time, mixing on low speed until it’s smooth. How do I make a light and fluffy frosting? If the frosting seems too thick, add the milk or cream, one tablespoon at a time, until you reach your desired consistency. What is the desired consistency You want it spreadable, but not runny.
Step 6: Layer & Swirl
This step isn’t really for the batter, but for frosting later! How do you make cupcakes? Divide the batter evenly among muffin liners. How should I fill a half-empty cup? What is the best way to keep a water tank from overflowing? I use an ice cream scoop for even portions – it’s my secret weapon for perfectly uniform portions.
Step 7: Bake
If a toothpick is inserted in the center of sour cupcakes, it will not burn. Bake for 18-22 minutes, or until golden brown on top. What is the best way to come out Ovens can vary, so it’s always good to check a little before the minimum time. If they’re browning too quickly on top, you can loosely tent them with foil. What is the goal of a cupcake?
Step 8: Cool & Glaze
Once they’re done, let the cupcakes cool in the muffin tins for about 5-10 minutes before carefully transferring them to a wire rack to cool completely. This is *super important* because if you try to frost them while they’re still warm, the frosting will melt right off! Once they’re completely cool, you can frost them generously with that dreamy cream cheese frosting. For an extra touch, you can make a simple chocolate ganache by heating the cream until it just simmers, then pouring it over the chopped chocolate. Let it sit for a minute, then stir until smooth. Let it cool slightly before drizzling it over the frosted cupcakes. It adds a lovely chocolatey finish.
Step 9: Slice & Serve
Once frosted, your Red Velvet Cupcakes are ready to be enjoyed! For the best experience, I like to serve them at room temperature. What are some of the best examples of crimson on a platter? What is the difference between a crumb and What are some of the best showstoppers of all time?
What should I serve it with?
Red Velvet Cupcakes are so versatile! They’re fantastic on their own, but they also pair wonderfully with a few things. How do you decide what to wear depending on the occasion
For Breakfast: Okay, hear me out! While technically a dessert, a single red velvet cupcake with a strong, hot cup of black coffee is my guilty little weekend pleasure. It’s like a little treat to start the day without being too heavy. The coffee’s bitterness cuts through the sweetness perfectly.
For Brunch: These are divine at a brunch spread! Imagine them nestled alongside some fresh fruit salad and maybe some mini quiches. For drinks, a sparkling rosé or a mimosa would be absolutely lovely, adding a festive touch. The vibrant color of the cupcakes just makes the whole table pop!
As Dessert: This is their natural habitat! After dinner, they’re perfect on their own, perhaps with a dusting of cocoa powder or a few extra chocolate shavings on top. For a more decadent experience, a scoop of vanilla bean ice cream on the side is pure heaven. They’re also a great accompaniment to a fruit-based dessert, like a warm apple crumble, offering a different flavor dimension.
For Cozy Snacks: When that 10 pm craving hits, one of these is pure comfort. I love enjoying one with a glass of cold milk. It reminds me of being a kid, sneaking a cookie (or in this case, a cupcake!) before bed. It’s a simple, satisfying treat that just makes you feel good. My family absolutely loves them as a special after-school snack, especially when there’s a school event or a good report card to celebrate. They disappear so fast!
Top Tips for Perfecting Your Red Velvet Cupcakes
I’ve made these Red Velvet Cupcakes so many times, and through a few (okay, maybe more than a few!) kitchen experiments, I’ve picked up some tricks to ensure they turn out just right every single time. These are the little nuggets of wisdom I swear by.
Zucchini Prep: Wait, zucchini? Oh, I think you might be thinking of a different recipe! These are Red Velvet Cupcakes, and they don’t actually have zucchini in them. My apologies if there was any confusion! For these, the key is definitely in the ingredients I listed above. No zucchini needed!
Mixing Advice: The biggest lesson I learned the hard way is *don’t overmix the batter*. Seriously, once the dry ingredients are just incorporated into the wet, stop mixing. A few tiny streaks of flour are better than a tough cupcake. Overmixing develops the gluten in the flour, making your cupcakes dense and chewy instead of light and tender. I use my mixer on the lowest speed for the final combination and stop as soon as everything looks *mostly* combined. It’s worth the effort for that melt-in-your-mouth texture.
Swirl Customization: While these don’t have a swirl in the batter itself, if you’re thinking about the frosting swirl, my tip is to use an offset spatula or a piping bag with a large round tip. For a classic look, just pipe a generous dollop on top and smooth it out a bit. For more elaborate swirls, keep your frosting chilled but still pliable, and practice on a spare cupcake first. You can also add a little extra red food coloring to a portion of the frosting if you want a deeper red swirl against the white.
Ingredient Swaps: As I mentioned, if you’re out of buttermilk, the vinegar-milk trick is a lifesaver, and it works perfectly! For the food coloring, gel works best for vibrant color without diluting the batter. If you can only find liquid, you might need more, but be cautious as too much liquid can affect the texture. I’ve tried using a natural red food coloring derived from beets, and while it’s a great option for health-conscious bakers, you’ll need a good amount, and the color can sometimes be a bit muted. For the cream cheese frosting, full-fat cream cheese and butter are essential for the best flavor and consistency. Low-fat versions can sometimes result in a thinner, runnier frosting.
Baking Tips: Always preheat your oven fully. A consistent temperature is key. If your oven tends to run hot or cold, an oven thermometer is a fantastic investment. Place your muffin tins in the center of the oven for the most even heat distribution. Bake until a toothpick inserted into the center comes out clean. If the tops are browning too quickly but the centers aren’t cooked, you can loosely tent the pan with aluminum foil. Don’t overbake! Overbaking is the fastest way to dry out cupcakes, and nobody wants that.
Glaze Variations: While the cream cheese frosting is classic, don’t be afraid to get creative! A simple chocolate ganache drizzle, as I mentioned, is always a winner. You could also do a vanilla glaze (powdered sugar, a splash of milk, and vanilla), or even a strawberry glaze for a fruity twist. If you’re feeling fancy, add a tiny bit of red food coloring to the vanilla glaze for a matching pink hue.
Storing and Reheating Tips
I get asked this a lot – how do you keep these gorgeous Red Velvet Cupcakes tasting their best? It’s actually pretty simple, and thankfully, they hold up really well!
Room Temperature: If you plan to enjoy them within a day or two, storing them in an airtight container at room temperature is perfectly fine. Make sure they’re completely cooled before you cover them. This prevents condensation, which can make the frosting a bit messy and the cupcake base soggy. They usually stay fresh and delicious for about 2-3 days this way. Just remember to keep them out of direct sunlight or warm spots!
Refrigerator Storage: For longer storage, up to about a week, the refrigerator is your best bet. Again, an airtight container is key. I usually place them in a single layer if possible to avoid squishing the frosting. While refrigeration helps them last longer, I find they can sometimes lose a tiny bit of their tender crumb. The best way to enjoy them after refrigeration is to let them come back to room temperature for about 30-60 minutes before serving. This really brings back that lovely soft texture and allows the flavors to meld beautifully.
Freezer Instructions: Yes, you can absolutely freeze these Red Velvet Cupcakes! This is my secret weapon for having them ready for unexpected guests or cravings. It’s best to freeze them *before* frosting. Wrap each unfrosted cupcake tightly in plastic wrap, then place them in a freezer-safe airtight container or bag. They can stay frozen for up to 2-3 months. To thaw, unwrap them and let them come to room temperature on a wire rack for a few hours. Once thawed and at room temperature, you can then frost them as usual. If you’ve already frosted them, the freezing process can sometimes affect the frosting’s texture, making it a bit grainy or separating slightly upon thawing, but they’ll still taste good!
Glaze Timing Advice: If you’re making cupcakes for an event and frosting them ahead of time, it’s generally best to frost them the day of or the day before you plan to serve them. For cupcakes stored at room temperature or in the fridge, the frosting should be added when the cupcakes are completely cool. If you’re freezing them unfrosted, I highly recommend frosting them *after* they have thawed and come back to room temperature. This ensures the frosting stays perfectly smooth and delicious.
Frequently Asked Questions
Final Thoughts
There you have it – my absolute favorite Red Velvet Cupcakes! I truly believe this recipe captures the essence of what makes red velvet so beloved: that gorgeous color, the subtle cocoa flavor, the tender crumb, and that perfect tangy finish. They’re not just a dessert; they’re a little bit of edible joy. What I love most is how they bring people together. Whether it’s for a birthday celebration, a holiday gathering, or just a simple treat to brighten someone’s day, these cupcakes never fail to impress. They’re a testament to how simple ingredients, combined with a little love and care, can create something truly magical in the kitchen. If you give these a try, I really hope they bring as much happiness to your home as they do to mine. I’d be absolutely thrilled to hear how yours turn out, what you thought of the taste, and if you discovered any new favorite tips or variations along the way! Don’t be shy – leave a comment below or share your baking adventures. Happy baking, everyone!
Red Velvet Cupcakes
Ingredients
Cupcake Ingredients
- 2.5 cups all-purpose flour
- 1.5 cups granulated sugar
- 1 teaspoon baking soda
- 1 teaspoon salt
- 2 tablespoon unsweetened cocoa powder
- 1 cup vegetable oil
- 2 large eggs
- 2 tablespoon red food coloring gel or liquid
- 1 teaspoon vanilla extract
- 1 cup buttermilk
- 1 teaspoon white vinegar
Cream Cheese Frosting
- 8 ounces cream cheese softened
- 0.5 cup unsalted butter softened
- 4 cups powdered sugar
- 1 teaspoon vanilla extract
- 2 tablespoon milk or heavy cream
Instructions
Cupcake Preparation
- Preheat oven to 350°F (175°C). Line a 12-cup muffin tin with paper liners.
- In a large bowl, whisk together flour, sugar, baking soda, salt, and cocoa powder.
- In a separate medium bowl, whisk together vegetable oil, eggs, red food coloring, and vanilla extract.
- In a small bowl, whisk together buttermilk and white vinegar. Let stand for a few minutes to curdle.
- Add the wet ingredients to the dry ingredients and mix until just combined. Do not overmix.
- Gradually add the buttermilk mixture to the batter and stir until smooth.
- Divide the batter evenly among the prepared muffin cups, filling each about two-thirds full.
- Bake for 18-22 minutes, or until a toothpick inserted into the center comes out clean.
- Let the cupcakes cool in the muffin tin for a few minutes before transferring them to a wire rack to cool completely.
Frosting Preparation
- In a large bowl, beat together the softened cream cheese and butter until smooth and creamy.
- Gradually add the powdered sugar, one cup at a time, mixing on low speed until incorporated. Increase speed to medium-high and beat until light and fluffy.
- Stir in the vanilla extract and milk (or cream) until the frosting reaches desired consistency.
Assembly
- Once the cupcakes are completely cool, frost them with the cream cheese frosting.