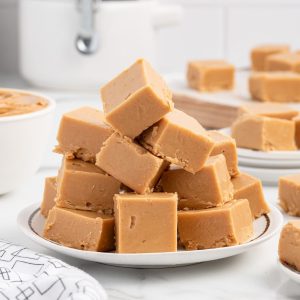
Oh, where do I even begin with this peanut butter fudge recipe? It’s one of those things that just feels like a warm hug on a plate, you know? I remember my Grandma making this when I was a little kid, and the smell of the peanut butter and sugar mingling in the kitchen was pure magic. It’s funny, because sometimes I’ll see other people making elaborate fudge recipes, and while they might look pretty, they often miss the simple, comforting soul of what fudge should be. This one? It’s that soul. It’s the kind of treat that makes you close your eyes with the first bite, a perfect little square of pure bliss. It’s honestly one of my favorite things to whip up when a serious sweet craving hits, especially because it doesn’t require a fancy trip to the store for obscure ingredients. It’s just good, honest, delicious peanut butter fudge, and it’s incredibly hard to mess up, which is always a huge win in my book!
What is peanut butter fudge?
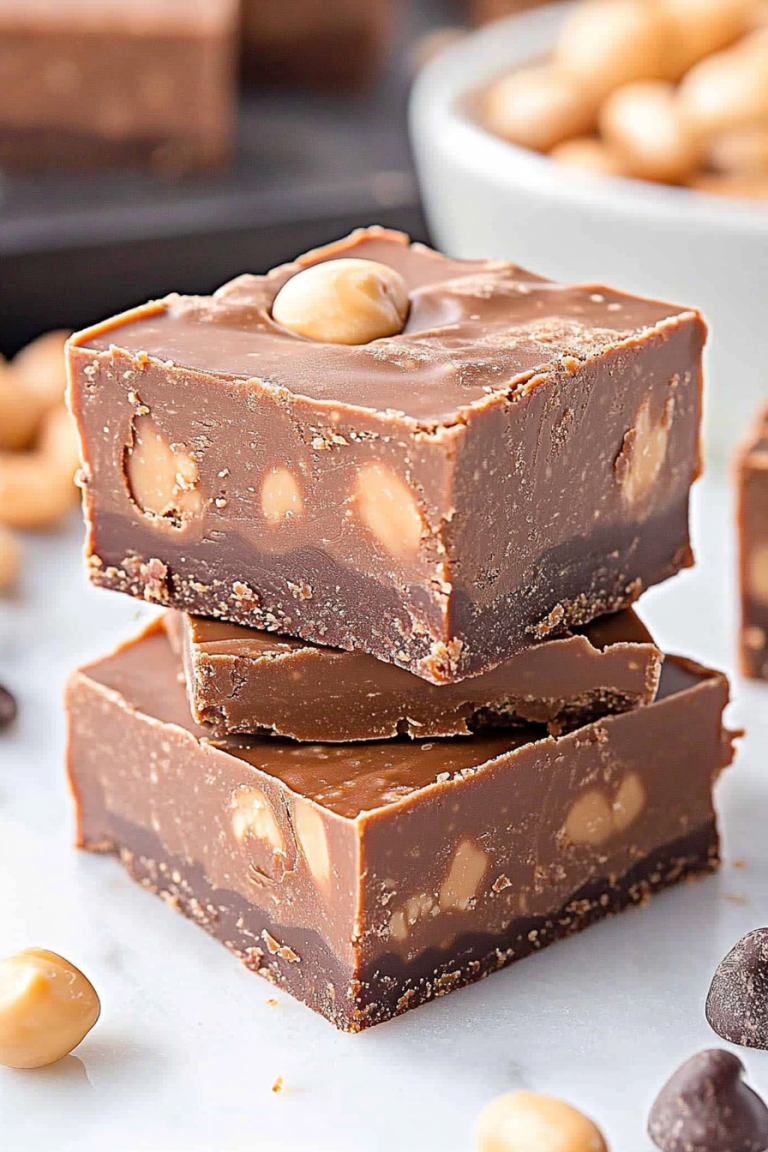
So, what exactly is this wondrous creation we’re talking about? Well, think of it as the ultimate comfort dessert, a rich, creamy, melt-in-your-mouth confection that’s basically a sweet, nutty dream. Unlike its fancier cousins that might involve tempering chocolate or intricate candy-making techniques, this peanut butter fudge recipe is refreshingly straightforward. It’s essentially a sweet base, usually made with sugar, butter, and milk, that’s cooked to a specific temperature, then combined with creamy peanut butter. The magic happens as it cools, transforming into that delightful, slightly dense, yet wonderfully soft texture we all adore. The name itself, “peanut butter fudge,” pretty much says it all – it’s the classic gooey goodness of fudge infused with the irresistible, comforting flavor of peanut butter. It’s simple, it’s classic, and it’s utterly delicious.
Why you’ll love this recipe?
Honestly, there are so many reasons why this particular Peanut Butter fudge recipe has earned a permanent spot in my recipe box (and my heart!). First off, let’s talk about the flavor. It’s the perfect balance of sweet and nutty. The peanut butter is front and center, rich and satisfying, with just the right amount of sweetness to make it feel like a truly indulgent treat without being cloyingly sugary. Then there’s the texture. Oh, the texture! It’s wonderfully smooth and creamy, but with that slight, characteristic chewiness that just makes you want another piece. And the best part? It’s ridiculously easy to make. Seriously, I can whip this up in under 30 minutes, and that includes the cooling time! It’s a lifesaver on busy weeknights when you need a quick dessert fix or a little something special to share. Plus, the ingredients are super budget-friendly and things you likely already have in your pantry. I’ve tested this recipe with different kinds of peanut butter – creamy, crunchy, even natural – and they all work beautifully, though I find a standard creamy one gives the smoothest result. It’s also incredibly versatile; you can easily add chocolate chips or nuts if you want to jazz it up, but honestly, it’s perfect just the way it is. It’s the kind of recipe that brings smiles to faces, from little kids to grown-ups.
How do you make peanut butter fudge?
Quick Overview
This Peanut Butter fudge recipe is all about simplicity and speed. You’ll be melting, stirring, and letting it set – that’s pretty much it! The key is getting the sugar mixture just right before adding the peanut butter, which creates that signature creamy texture. It’s a no-fuss approach that guarantees delicious results, even if you’re new to making candy. This method ensures a smooth, rich fudge that’s incredibly satisfying. It’s a foolproof way to get that classic fudge flavor and texture without any of the fuss.
Ingredients
For the Main Batter:
2 cups granulated sugar: This is the base of our fudge, providing that essential sweetness and structure. Make sure it’s regular granulated sugar for the best texture. You can usually find it at any grocery store.
1/2 cup unsalted butter: Using unsalted butter gives you control over the saltiness. I prefer butter for its rich flavor, but you could experiment with a good quality margarine if needed. Cubing it helps it melt more evenly.
1/2 cup evaporated milk: This is a bit of a secret weapon! Evaporated milk has a richer, more concentrated flavor than regular milk and it really helps with the creamy texture of the fudge. Don’t substitute with condensed milk here; it will make it too sweet and change the consistency.
1 teaspoon vanilla extract: A classic flavor enhancer that really rounds out the taste. Good quality vanilla makes a difference!
For the Filling:
1 cup creamy Peanut Butter: This is the star of the show! I usually go for a standard creamy peanut butter like Jif or Skippy. Natural peanut butter can sometimes separate or make the fudge a bit grainy, so I tend to stick with the more processed kind for this recipe. Make sure it’s at room temperature, not straight from the fridge.
For the Glaze:
Optional: A few extra tablespoons of creamy peanut butter for drizzling on top, or a drizzle of melted chocolate for an extra decadent touch. This is purely for aesthetics and extra flavor!
Step-by-Step Instructions
Step 1: Preheat & Prep Pan
First things first, let’s get our pan ready. You’ll need an 8×8 inch baking pan. Lightly grease it with butter or cooking spray, or even better, line it with parchment paper, leaving some overhang on the sides. This makes lifting the fudge out so much easier later on. I always find it’s best to do this step before you even start mixing the ingredients, just so you’re not scrambling when the hot fudge is ready!
Step 2: Mix Dry Ingredients
Grab a medium-sized, heavy-bottomed saucepan. Add your granulated sugar, butter cubes, and evaporated milk to the pan. Stir it all together gently over medium heat. We’re not trying to cook it yet, just get everything nicely combined and the butter melted.
Step 3: Mix Wet Ingredients
This step is more about combining the sugar mixture. Once the butter has melted and everything is combined, let it come to a boil. Make sure you stir it occasionally, but don’t stir constantly. We want it to reach a gentle boil.
Step 4: Combine
Once your sugar mixture is boiling, let it boil for exactly 4 minutes, stirring constantly. This is where the magic starts to happen! After the 4 minutes are up, remove the saucepan from the heat immediately. Stir in the vanilla extract. Now, add in your cup of creamy peanut butter. Stir vigorously until the peanut butter is completely melted and incorporated into the sugar mixture. You want it to be super smooth and glossy. This usually takes a good minute or two of stirring. Keep stirring until there are no streaks of peanut butter left.
Step 5: Prepare Filling
This step is actually already done in Step 4! The peanut butter itself is the “filling” that gets blended into the fudge base.
Step 6: Layer & Swirl
Pour the smooth, glossy peanut butter fudge mixture into your prepared 8×8 inch pan. Use a spatula to spread it evenly. If you’re adding optional toppings like chocolate chips or a drizzle of melted chocolate, sprinkle them over the top now while the fudge is still hot. If you’re doing a peanut butter drizzle, you might want to warm up a couple more tablespoons of peanut butter slightly to make it pourable, then drizzle it over the top in a zigzag pattern. For a swirled effect with melted chocolate, you can add dollops of melted chocolate and use a toothpick to gently swirl them in. Don’t overdo the swirling, or you’ll just end up with brown fudge!
Step 7: Bake
Actually, this recipe doesn’t require baking! That’s one of the best parts about it. It sets up as it cools.
Step 8: Cool & Glaze
Now, this is the hardest part: waiting! Let the fudge cool completely on a wire rack at room temperature. This typically takes about 2 to 3 hours. Resist the urge to put it in the fridge to speed things up, as that can sometimes make the texture a bit too hard or crumbly. Once it’s completely cooled and set, you can add your optional glaze or drizzle if you haven’t already. If you’re just having plain fudge, this step is all about patience!
Step 9: Slice & Serve
Once the fudge is firm, use the parchment paper overhang to lift it out of the pan. Place it on a cutting board. Use a sharp knife to cut it into squares. I usually aim for about 1-inch squares. Wipe the knife clean between cuts if it starts to get sticky. Serve at room temperature for the best flavor and texture.
What to Serve It With
This peanut butter fudge is so incredibly versatile, it’s not just for dessert! It’s one of those treats that fits in anywhere.
For Breakfast: Yes, you read that right! A tiny square of this fudge alongside a strong cup of coffee is my little secret indulgence on a Saturday morning. It’s like a decadent pastry but so much easier. It just hits that sweet spot before you even think about pancakes. Pair it with some fresh fruit like berries for a little balance.
For Brunch: This fudge looks surprisingly elegant cut into small, neat squares and arranged on a tiered dessert stand at a brunch buffet. It adds a touch of homemade charm that guests always appreciate. It’s a great accompaniment to other brunch favorites like quiches or scones. A nice mimosa or a specialty coffee drink pairs wonderfully.
As Dessert: This is its natural habitat! Serve a square or two after dinner with a glass of milk (a classic for a reason!) or a cup of coffee. It’s also fantastic alongside a scoop of vanilla ice cream or with a side of fresh raspberries to cut through the richness. It’s the perfect ending to any meal.
For Cozy Snacks: This is where it truly shines for me. On a rainy afternoon, curled up with a good book and a mug of tea, a small piece of this fudge is pure comfort. It’s also a fantastic pick-me-up when you’re hit with that 3 PM energy slump. My kids love it as an after-school treat, especially if I’ve managed to hide some from my husband! It’s the ultimate comfort food companion.
Top Tips for Perfecting Your Peanut Butter Fudge
After making this peanut butter fudge recipe countless times, I’ve picked up a few little tricks that I think really elevate it from good to absolutely phenomenal. These are the things that make sure you get that perfect texture and flavor every single time.
Zucchini Prep: Wait, zucchini? Oh dear, I seem to have gotten my wires crossed with another favorite recipe! My apologies! For this *peanut butter fudge*, there’s no zucchini involved. We’re keeping it purely classic and delicious.
Mixing Advice: The key to smooth fudge is all in the cooking and stirring. When you’re boiling the sugar mixture for those 4 minutes, stir *constantly* after it comes to a boil. This prevents crystallization and ensures a silky smooth texture. Once you add the peanut butter, stir until it’s *completely* melted and incorporated. If you see any streaks, keep stirring! I find using a good, sturdy whisk can help get it extra smooth.
Swirl Customization: If you’re adding a chocolate drizzle or swirl, don’t go overboard. A few artful drizzles or gentle swirls are all you need. Too much mixing will just muddy the flavors and colors. For a really striking look, melt some good quality semi-sweet chocolate chips with a tiny bit of coconut oil or butter until smooth, then drizzle it over the top while the fudge is still warm. You can even use a toothpick to drag the chocolate through the peanut butter fudge for a marbled effect.
Ingredient Swaps: While this recipe is fantastic as is, I’ve had some success with minor tweaks. If you want a slightly saltier fudge, a pinch of sea salt added with the peanut butter can be nice. For a richer flavor, a tablespoon of unsweetened cocoa powder added with the sugar can give it a chocolate-peanut butter swirl vibe. I’ve also tried adding in mini chocolate chips or chopped peanuts right at the end with the peanut butter for some texture, and that’s always a hit with the kids.
Baking Tips: Since there’s no baking involved in this recipe, I’ll focus on the cooling! Patience is your best friend here. Let the fudge cool completely at room temperature. Putting it in the fridge can make it too hard and brittle, and it won’t have that signature chewy-creamy texture. It needs time to set up naturally. Aim for at least 2-3 hours, or even longer if your kitchen is warm.
Glaze Variations: The optional drizzle is a great way to add another dimension. Besides melted chocolate, you could drizzle a bit of caramel sauce over the top, or even a contrasting flavor like white chocolate. If you don’t want any glaze, that’s perfectly fine too! A dusting of cocoa powder or powdered sugar just before serving can also look lovely.
Storing and Reheating Tips
Knowing how to store your delicious peanut butter fudge properly is key to enjoying it over several days. Thankfully, it’s pretty straightforward!
Room Temperature: This fudge holds up beautifully at room temperature for about 3-4 days, provided your kitchen isn’t excessively warm. I like to store it in an airtight container, maybe with a piece of parchment paper between layers if you’re stacking them. This keeps it from drying out and maintains that perfect chewy texture. It’s my go-to method because it means I can just grab a piece whenever the craving strikes!
Refrigerator Storage: If you live in a particularly warm climate, or if you just want it to last a little longer, storing it in the refrigerator is a good option. It will keep well for up to a week. However, be aware that refrigeration can sometimes make fudge a little firmer or slightly chalkier than when stored at room temperature. I usually let it sit out for about 10-15 minutes before eating it if it’s been chilled, just to let it soften up a bit.
Freezer Instructions: For longer storage, freezing is definitely your best bet. Wrap the fudge tightly in plastic wrap, then in a layer of aluminum foil, or place it in a freezer-safe airtight container. It should keep well for up to 2-3 months. When you’re ready to enjoy it, I highly recommend thawing it slowly. Take it out of the freezer and let it thaw in the refrigerator overnight, then bring it to room temperature for about 30 minutes before serving. This helps prevent condensation and maintains the best texture.
Glaze Timing Advice: If you’ve added a chocolate drizzle or any other glaze, it’s generally best to add it just before you plan to serve or store the fudge at room temperature. If you refrigerate or freeze fudge with a chocolate glaze, the chocolate can sometimes develop white streaks (called bloom) due to temperature changes, though it won’t affect the taste. For the best appearance, consider glazing right before serving if it’s going to be stored in the fridge or freezer.
Frequently Asked Questions
Final Thoughts
So there you have it – my go-to, absolutely foolproof peanut butter fudge recipe. I truly hope you give this a try! It’s one of those recipes that just makes people happy, and it’s so rewarding to see the look on someone’s face when they take their first bite. It’s a little taste of nostalgia, a simple pleasure, and a genuinely delicious treat that doesn’t demand hours in the kitchen. It’s perfect for bake sales, holiday goodie boxes, or just a quiet afternoon indulgence. If you love this peanut butter fudge, you might also enjoy my classic chocolate chip cookie recipe or my easy no-bake peanut butter cookies – they’re in a similar vein of simple, comforting deliciousness! I can’t wait to hear what you think. Please leave a comment below and let me know how your fudge turns out, or if you discover any fun variations!
peanut butter fudge recipe
Ingredients
Main Ingredients
- 1 tablespoon water for preparing the pan
- 1 cup unsalted butter
- 1.5 cups creamy peanut butter not natural or no-stir varieties
- 2 teaspoons vanilla extract
- 3.25 cups powdered sugar sifted
- count M&M's optional, for garnishing
Instructions
Preparation Steps
- Using the bottom of the 8x8 baking dish as a template, cut out a piece of parchment paper. This piece will be used to help smooth the peanut butter fudge and will stay in place and protect the top of the fudge while it is chilling in the refrigerator.
- Measure out enough parchment paper to hang over the sides of the pan. You will use the overhanging edges to lift the fudge out of the pan.
- Pour the tablespoon of water into the bottom of the 8x8 pan before lining the pan with the parchment paper. The water keeps the paper in place while you are spreading the fudge.
- Line the 8x8 prepared pan with the parchment paper.
- Add the unsalted butter and creamy peanut butter in a medium-sized microwave-safe bowl. Heat for 60 seconds. Carefully remove the bowl from the microwave and stir.
- Add the 2 teaspoons of vanilla extract and stir until the vanilla is incorporated.
- Slowly add the powdered sugar, 1 cup at a time, stirring with a large spoon in between adding the powdered sugar. The peanut butter mixture will become stiffer to stir; continue stirring until the powdered sugar is completely combined and no white streaks or lumps are visible.
- Pour the fudge mixture into the prepared 8x8 baking dish. Using a spatula to help evenly distribute the fudge in the pan.
- Place the pre-measured piece of parchment paper on top of the fudge. Use this to help smooth the top of the fudge. Leave this piece of parchment paper in place, and put the fudge in the refrigerator to chill for 2 hours.
- Remove the fudge from the refrigerator at the end of the 2 hours. Remove the top piece of parchment. Using a sharp kitchen knife, pre-score the size and number of the serving pieces of fudge, but do not cut the fudge until you remove it from the pan.
- Using the over-hang pieces of paper, lift out the fudge, and place it on a cutting board.
- Warm a large sharp knife under hot water. Dry the blade and, using the pre-measured score marks, slice the pieces of fudge.
- Once the pieces are cut, place 2-3 red and green M&M’s on the top of the fudge for decoration.
- Store the fudge in an airtight container. If the fudge is stored at room temperature, it will keep for 3-4 days. In the refrigerator, it will keep for 1 week.