Oh, where do I even begin with this one? Nutella French Toast. Just saying it out loud makes me feel a little giddy. This isn’t just breakfast; it’s a warm hug on a plate, a ticket back to lazy weekend mornings and the comforting smell of something utterly delicious wafting through the house. You know how some foods just *feel* like home? This is it for me. It’s that perfect blend of sweet, creamy, and a little bit decadent, all wrapped up in soft, eggy bread. I’ve tried all sorts of fancy breakfasts over the years, but whenever I’m craving something truly special, something that feels both a treat and incredibly comforting, my mind always drifts back to this simple, yet spectacular, Nutella French toast. It’s like the grown-up, slightly more sophisticated cousin of the basic French toast we all grew up with, but with that irresistible hazelnut-chocolate magic that just makes everything better. If you’ve ever thought French toast was a bit *meh*, or maybe you’re just looking for that next level, trust me, this is the one you’ve been waiting for.
What is Nutella French Toast?
So, what exactly *is* Nutella French Toast? Think of it as your classic, beloved French toast, but with a glorious, hazelnut-chocolatey twist. Instead of just dipping bread into a plain egg mixture, we’re going to infuse that eggy custard with the rich, creamy goodness of Nutella. It’s essentially a decadent spread sandwiched between slices of bread, then dipped into a specially enhanced custard and fried to golden perfection. It’s not just about spreading Nutella on top (though that’s amazing too!); it’s about weaving that chocolate-hazelnut dream into the very fabric of the French toast itself. This technique gives you a delightful, subtle swirl of Nutella throughout the bread as it cooks, melting into the custard and creating this incredibly rich flavor profile that’s just out of this world. It’s familiar, it’s comforting, and it’s unbelievably delicious – a real crowd-pleaser, that’s for sure!
Why you’ll love this recipe?
There are so many reasons why this Nutella french toast has become an absolute staple in my kitchen, and I just know you’re going to fall in love with it too. First off, the FLAVOR! Oh my goodness, the flavor. It’s that perfect balance of sweet, slightly nutty, and deeply chocolatey, without being overwhelmingly so. It’s rich, it’s comforting, and it truly tastes like a special occasion, even on a Tuesday morning. What I also adore about this recipe is its sheer SIMPLICITY. Seriously, it’s incredibly easy to whip up. If you can make regular French toast, you can absolutely nail this. The ingredient list is pretty straightforward, and the steps are foolproof, making it a lifesaver when you want something spectacular but don’t have a ton of time. Plus, it’s surprisingly COST-EFFECTIVE. We’re talking pantry staples like bread, eggs, and milk, jazzed up with a jar of Nutella. It feels indulgent without breaking the bank, which is always a win in my book! And let’s not forget its VERSATILITY. While it’s heavenly on its own, you can totally customize it. Craving more chocolate? Add some chocolate chips to the filling. Want a little crunch? Sprinkle some chopped hazelnuts on top. It’s a fantastic base for all sorts of delicious additions. Compared to other decadent breakfast options, like elaborate pancakes or pastries, this Nutella French toast is a total winner for its ease, flavor, and pure joy factor. It’s my go-to when I need a little pick-me-up or want to make breakfast feel like a real treat.
How do I make Nutella French Toast?
Quick Overview
The magic of this Nutella french toast lies in its straightforward approach. We’re going to create a simple, luscious batter infused with Nutella, then carefully assemble our French toast slices with an extra swirl of that hazelnut goodness. It’s then cooked until golden brown and slightly crisp on the outside, with a wonderfully soft, warm interior. The entire process, from start to finish, takes about 20-25 minutes, making it perfect for those busy mornings when you still want to feel like you’re having a special meal. It’s all about layering flavors and textures for that ultimate bite!
Ingredients
For the Main Batter:
4 large eggs (this is key for a rich, custardy texture!)
1 cup whole milk (you can use 2% or even almond milk, but whole milk gives the best creaminess!)
2 tablespoons granulated sugar (just a touch to balance the flavors)
1 teaspoon vanilla extract (don’t skip this, it really elevates the taste)
1/4 teaspoon ground cinnamon (optional, but it adds a lovely warmth)
Pinch of salt (enhances all the other flavors)
For the Filling:
About 1/2 cup Nutella (or your favorite chocolate-hazelnut spread). I like to have a little extra on hand for drizzling later!
4-6 slices of sturdy bread (brioche, challah, or thick-cut white bread work best. Day-old bread is even better as it soaks up the custard without getting soggy.)
For the Glaze:
1/4 cup powdered sugar
1-2 tablespoons milk (or even a splash of heavy cream for extra decadence)
1 teaspoon vanilla extract
Step-by-Step Instructions
Step 1: Preheat & Prep Pan
First things first, get your griddle or a large non-stick skillet heating up over medium heat. I like to give it a light coating of butter or a neutral oil (like vegetable or canola). You want it hot enough that the french toast sizzles nicely when it hits the pan, but not so hot that it burns before the inside is cooked through. A good medium heat is usually around 350°F (175°C). This preheating step is crucial for getting that perfect golden-brown crust.
Step 2: Mix Dry Ingredients
In a shallow dish or pie plate (one that’s wide enough to comfortably dip your bread), whisk together the eggs, milk, granulated sugar, vanilla extract, cinnamon (if using), and salt. Whisk it really well until everything is thoroughly combined and there are no streaks of egg white. You want it to be a smooth, uniform custard. This is the base that will give your bread that delicious, custardy texture.
Step 3: Mix Wet Ingredients
Oops, I think I mixed up the steps! In the *same* shallow dish or pie plate, you’re going to combine your wet ingredients: the eggs, milk, vanilla extract, and a pinch of salt. Whisk them all together until they are really well combined. This is your custard base! If you’re adding cinnamon or a bit of sugar, you’d whisk those in here too. The key is to get it smooth and evenly mixed. No watery egg whites allowed!
Step 4: Combine
This is where the magic *really* begins! Take your slices of bread and spread a generous layer of Nutella on one side of each slice. Then, take another slice of bread and top it, Nutella-side down, to create a sandwich. Don’t press too hard; you just want to create a nice, even layer of Nutella. Now, carefully dip one of these Nutella sandwiches into your egg custard. Let it soak for about 20-30 seconds per side. You want the bread to absorb the custard, but not become so saturated that it falls apart. We’re aiming for a soft, custardy interior with a slightly firmer bread base.
Step 5: Prepare Filling
While your pan is heating, let’s get the Nutella ready. You don’t really need to “prepare” the Nutella itself, but I like to have it ready to spread. If your Nutella is on the firmer side (sometimes it can get a bit solid if it’s been in a cool place), you can gently warm it up for just a few seconds in the microwave or stir it vigorously to make it easier to spread. This step is more about getting it ready for assembly.
Step 6: Layer & Swirl
This is the fun part! Take your bread slices. On one side of each slice, spread a good, generous layer of Nutella. Now, take another slice of bread and place it on top, creating a Nutella sandwich. Don’t press down too hard, you just want that delicious filling enclosed. Now, gently dip one side of your Nutella sandwich into the egg custard. Let it soak for about 20-30 seconds. Flip it over and soak the other side for another 20-30 seconds. You want the bread to be coated and slightly softened, but not completely saturated, or it will fall apart when you cook it. It’s a bit of a feel thing, but you’ll get the hang of it!
Step 7: Bake
Carefully place your custard-soaked Nutella sandwiches onto the preheated griddle or skillet. Cook for about 3-4 minutes per side, or until they are beautifully golden brown and cooked through. You might see a little bit of Nutella ooze out the sides, and that’s totally okay – it caramelizes and tastes amazing! Don’t overcrowd the pan; cook them in batches if necessary. The key is to cook them over medium heat so the inside gets nice and warm and the Nutella melts without the outside burning.
Step 8: Cool & Glaze
Once your Nutella French toast is perfectly golden and cooked, transfer it to a plate. While it’s still warm, let’s make the glaze. In a small bowl, whisk together the powdered sugar, vanilla extract, and about 1 tablespoon of milk. Keep adding milk, a tiny bit at a time, until you reach your desired drizzling consistency. It should be thick enough to coat the back of a spoon but thin enough to drizzle. Drizzle this lovely glaze generously over your warm French toast. The warmth will help it spread and become slightly glossy.
Step 9: Slice & Serve
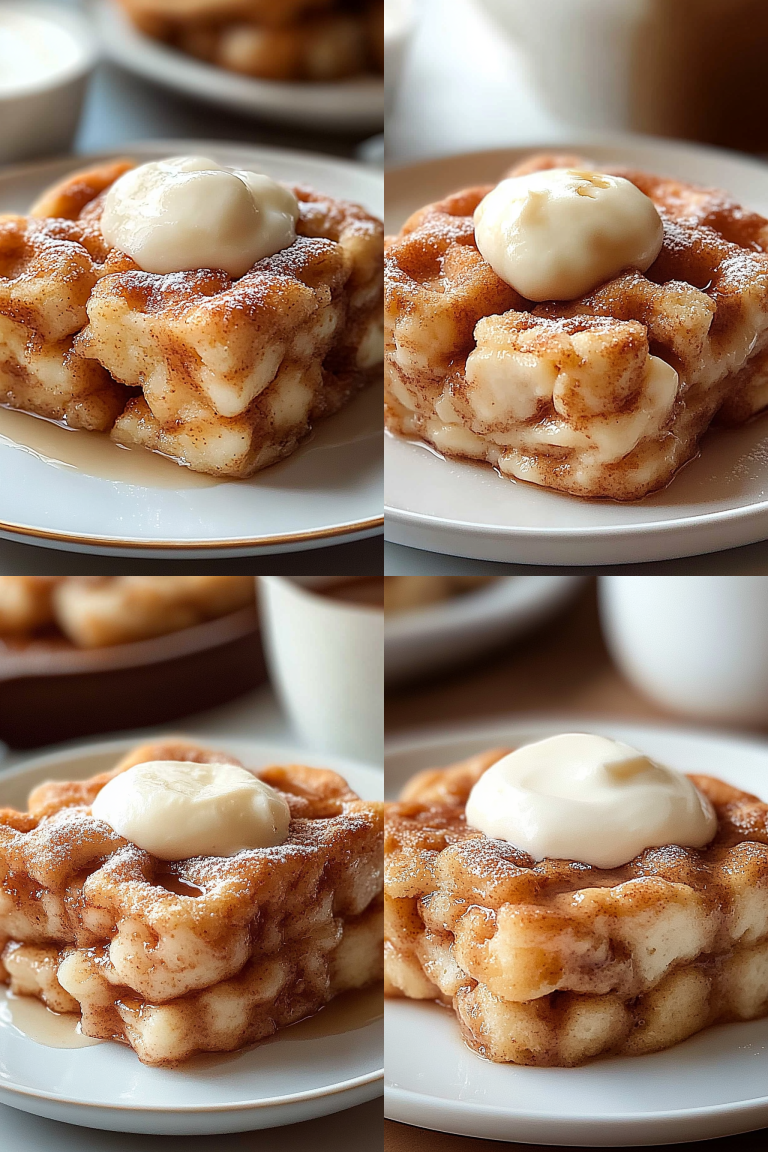
Once the glaze has set a little, carefully slice your Nutella French toast in half, either diagonally or straight across. This is the moment of truth! You’ll see that beautiful swirl of melted Nutella inside. Serve immediately while it’s warm and gooey. A dusting of powdered sugar or a few fresh berries can be a lovely addition, but honestly, it’s perfect just as it is.
What to Serve It With
This Nutella French toast is pretty spectacular on its own, but I love pairing it with a few things to make the meal feel even more complete. For a classic BREAKFAST, a good cup of strong coffee is non-negotiable for me. It cuts through the richness beautifully. Sometimes, I’ll serve it with a small bowl of fresh berries – raspberries or strawberries add a lovely tartness that complements the sweetness. For BRUNCH, I like to elevate it a bit. Think of serving it alongside some crispy bacon or savory sausage to balance out the sweetness. A mimosa or a sparkling cider feels festive and pairs wonderfully. If you’re serving this as DESSERT (and oh, you absolutely should!), it’s incredible with a scoop of vanilla bean ice cream or a dollop of whipped cream. A drizzle of extra warm Nutella or some toasted chopped hazelnuts on top makes it feel truly indulgent. And for those COZY SNACKS, when you just need a little comfort, a glass of cold milk is the ultimate pairing. My kids, bless their hearts, sometimes just want this with a little extra dusting of powdered sugar, and that’s totally fine by me! We’ve also had this at family gatherings, and it’s always a hit; I’ll often serve it with a fruit salad to add a fresh element.
Top Tips for Perfecting Your Nutella French Toast
I’ve made this Nutella French toast more times than I can count, and over the years, I’ve picked up a few little tricks that I think really make a difference. First, about the BREAD: Don’t use super fresh, soft bread. It will just disintegrate in the custard. Day-old challah or brioche is *perfect*. It has a little more structure and soaks up the custard beautifully without turning into mush. When you’re spreading the Nutella, make sure you don’t go too close to the edges, or it’ll all ooze out during cooking. Just leave a small border. For the CUSTARD MIXING, don’t be afraid to really whisk those eggs and milk together until they’re completely uniform. This ensures an even, creamy texture throughout. And for the batter, I’ve experimented with adding a touch of cream instead of some milk, and it makes it even richer, but whole milk is usually perfect. When you’re SWIRLING the Nutella into the batter itself (if you’re doing that technique), don’t overmix it. You want distinct swirls, not a muddy brown batter. A toothpick or skewer is your best friend here for gently swirling. For BAKING, patience is key! Medium heat is your friend. If it’s too high, you’ll get burnt exteriors and a raw, eggy middle. If it’s too low, it’ll be pale and greasy. Watch for that beautiful golden brown color. If your bread is thicker, you might need to lower the heat slightly and cook it a minute longer on each side. And for the GLAZE, start with less milk than you think you need. You can always add more, but you can’t take it away! A thick, drizzly glaze looks and tastes divine. If you find your glaze is too thin, just whisk in a little more powdered sugar. If it’s too thick, a tiny splash more milk or even water will do the trick.
Storing and Reheating Tips
Honestly, the best way to enjoy this Nutella French toast is fresh off the griddle. That said, life happens, and sometimes you have leftovers! If you have any remaining, you can store them at ROOM TEMPERATURE for a few hours, covered loosely with foil. However, for longer storage, I definitely recommend the REFRIGERATOR. Let the French toast cool completely, then store it in an airtight container or wrap it well in plastic wrap and then foil. It should keep well in the fridge for about 2-3 days. The texture might soften slightly, but it’s still delicious. If you want to keep it even longer, FREEZER INSTRUCTIONS are your friend. Wrap each cooled piece individually and tightly in plastic wrap, then place them in a freezer-safe bag or container. They can last in the freezer for up to 2 months. When you’re ready to reheat, the best method for me is in a toaster oven or a regular oven set to around 350°F (175°C). Place the French toast on a baking sheet and warm it through until heated and slightly crispy again. This usually takes about 5-10 minutes. If you’re reheating from frozen, it will take a bit longer. Microwaving is an option, but it tends to make the bread a bit soft and chewy, which isn’t ideal for French toast. For the glaze, I find it’s best to add it *after* reheating to prevent it from getting too sticky or melting away completely.
Frequently Asked Questions
Final Thoughts
So there you have it – my absolute favorite Nutella French toast recipe! It’s the kind of dish that instantly makes your day better, whether it’s a lazy Sunday morning or a hectic weekday you’re trying to spice up. It’s ridiculously simple, incredibly delicious, and brings out that childlike wonder with every bite. It’s proof that you don’t need fancy ingredients or hours in the kitchen to create something truly memorable. I really hope you give this a try and that it brings as much joy to your table as it does to mine. If you loved this, you might also enjoy my recipe for [link to another related recipe, e.g., Decadent Chocolate Chip Pancakes] or perhaps my guide to [link to another related recipe, e.g., The Perfect Weekend Brunch Spread]. I can’t wait to hear what you think and how your Nutella French toast turns out! Please feel free to leave a comment below with your own tips or any variations you try. Happy cooking!
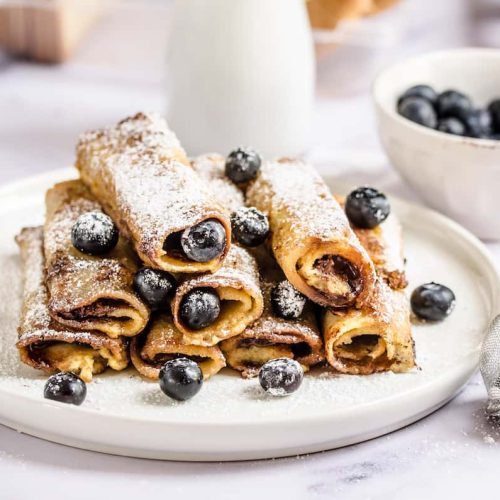
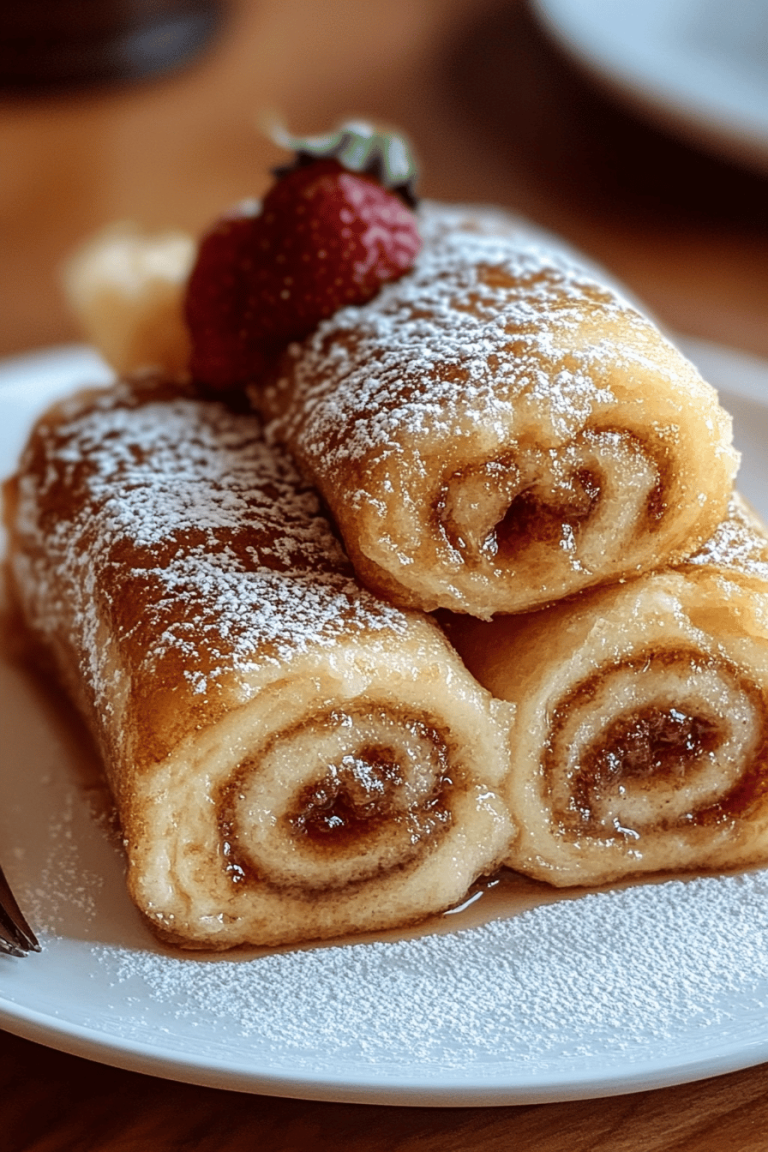
Nutella French Toast Roll-Ups
Ingredients
French Toast Roll-Ups
- 0.25 cup milk
- 0.25 cup heavy cream
- 1 large egg
- 1 teaspoon pure vanilla extract
- 12 slices sandwich bread I use Whole Wheat by Pepperidge Farms
- Nutella for spreading
- 4 tablespoons butter divided
- 0.25 cup vanilla sugar or powdered sugar for dusting
Instructions
Preparation Steps
- Make the custard. In a medium bowl whisk together the milk, heavy cream, egg, and vanilla. Set aside.
- Prepare the bread slices. Cut the crust from the bread. Flatten the bread slices with a rolling pin; make them as flat as possible.
- Roll them up. Spread Nutella on each bread slice and roll up the bread, lightly pinching the seam to secure.
- Cook. Place 2 tablespoons butter in a frying pan and melt over medium heat. Dip the rollups in the egg mixture, and place in the frying pan. Cook until golden brown, about two minutes; flip to the other side and cook for another minute or so. You will most likely have to do this in batches. Add the rest of the butter, and continue to cook until all rollups are done.
- Roll in sugar. If you have vanilla sugar, put it in a shallow dish, and once the rollups are done cooking, roll them in the sugar until covered. If you do not have vanilla sugar, dust the rollups with powdered sugar instead. Serve immediately.