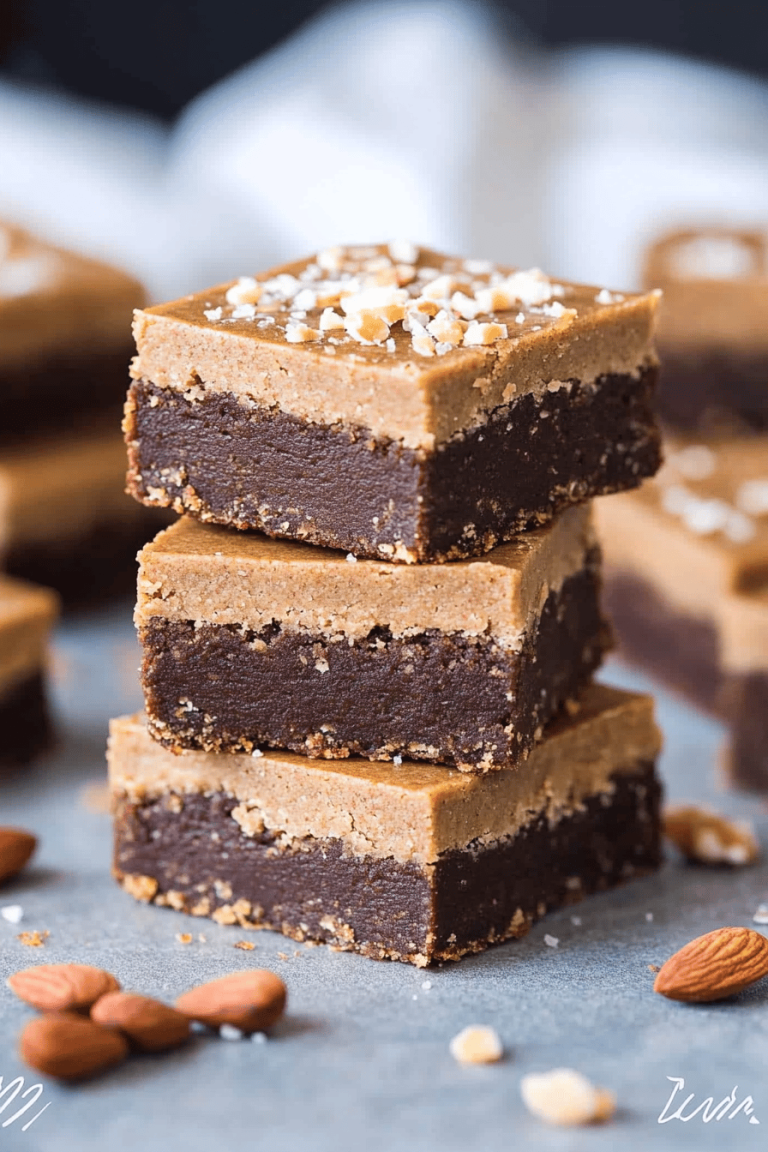
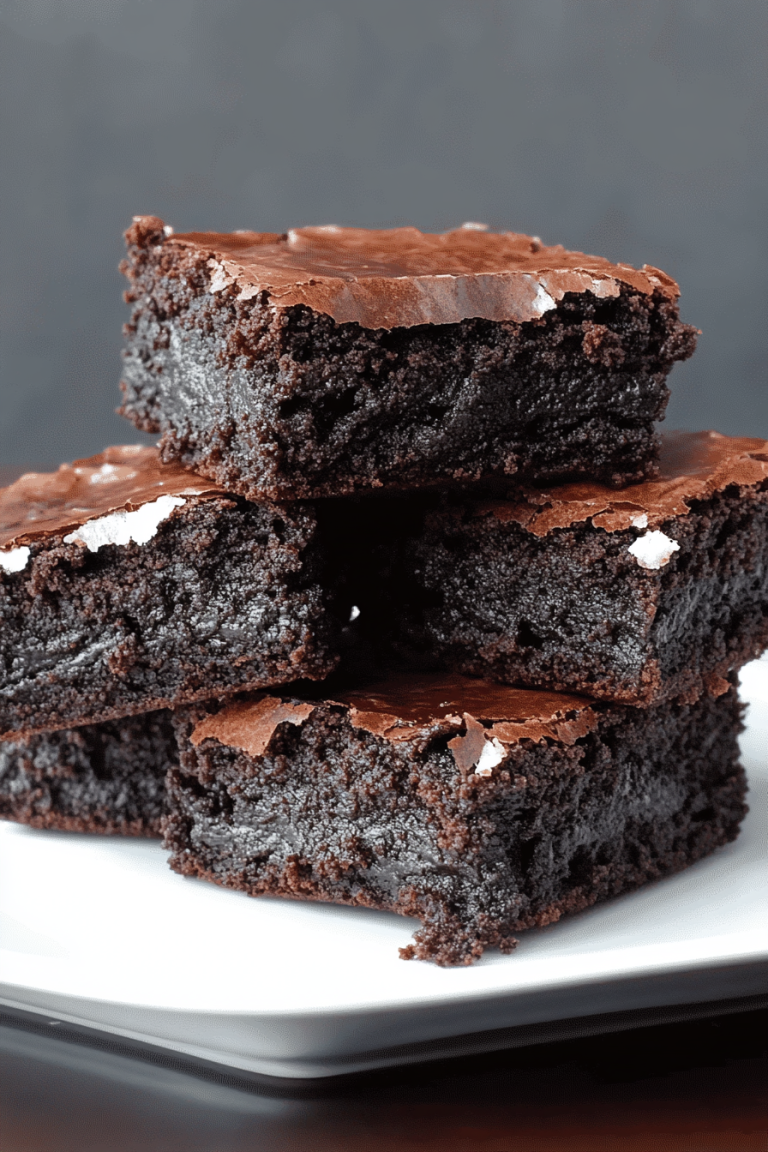
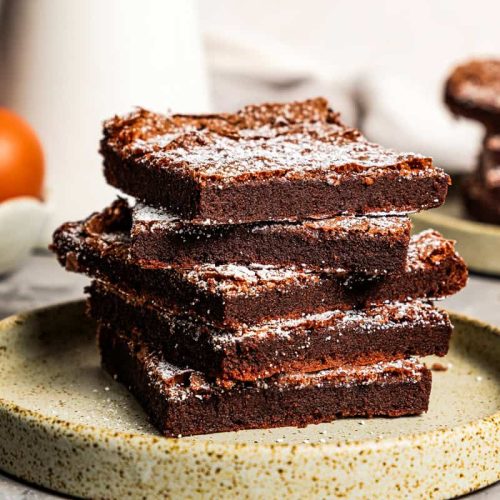
Oh, hello there! Come on in, grab a mug. I’ve been practically buzzing to share this with you. You know those days, right? The ones where you’re just *craving* something chocolatey, something rich, something that feels like a warm hug from the inside out? Well, for me, that craving always leads me straight to these Nutella brownies. They’re not just good; they’re legitimately life-changingly good. Forget those dry, crumbly pucks you sometimes get from a box mix or even some homemade recipes. These are fudgy, intensely chocolatey, and have this almost irresistible hazelnut whisper from the Nutella that just takes them to a whole new universe. I swear, the first time I made these, my husband came home from work, took one bite, and just stood there with his eyes closed, a look of pure bliss on his face. That’s how I knew I’d found *the one*. They’re kind of like a decadent brownie met its soulmate in a jar of creamy, dreamy Nutella, and the result is pure magic. If you’ve ever loved a good brownie, get ready to fall head over heels for these.
What Are Nutella Brownies?
So, what exactly makes these Nutella brownies so special? Well, think of it as your classic, beloved fudgy brownie, but with a secret weapon: Nutella! It’s not just a swirl on top (though we do that too, for good measure!), it’s actually incorporated *into* the batter, adding this incredible depth of flavor and a luscious, moist texture that’s hard to beat. It’s essentially a rich chocolate brownie base, elevated by the unmistakable nutty, chocolatey goodness of hazelnut spread. It’s like taking something already fantastic and giving it a super-powered upgrade. They’re dense, chewy on the edges, and perfectly soft in the center – everything you want in a brownie, but with that extra something special that makes people ask, “What *is* that incredible flavor?” It’s my go-to when I want a serious chocolate fix without being overly complicated, and it always delivers.
Why You’ll Love This Recipe
Honestly, where do I even begin with why you’ll absolutely adore these Nutella brownies? Let’s start with the obvious: the taste. They are just… divine. The deep, dark chocolate is perfectly balanced by the sweet, nutty hazelnut flavor from the Nutella. It’s not overpowering, just a beautiful symphony of flavors that melts in your mouth. What I really love, though, is how incredibly easy they are to whip up. I’m talking minimal fuss, maximum reward. Even on a busy weeknight, I can have these in the oven in under 15 minutes. And the ingredients? Pretty standard pantry staples, with the star being that glorious jar of Nutella. You don’t need anything fancy, which makes them super cost-efficient, a huge win in my book! Plus, they’re so versatile. They’re fantastic warm, right out of the oven with a scoop of vanilla ice cream, but they’re also perfect for packing into lunchboxes or enjoying with a cup of coffee the next day. They’re just that crowd-pleasing, no-fail recipe that always makes an impression. Compared to other brownie recipes I’ve tried, these strike that perfect balance between intense chocolate flavor and that unique hazelnut twist that just makes them unforgettable. It’s the brownie that keeps on giving!
How to Make Nutella Brownies
Quick Overview
Making these Nutella brownies is surprisingly straightforward! We’re going to start by melting some chocolate and butter together, then whisking in sugar and eggs. Next, we’ll gently fold in the dry ingredients, a good dose of Nutella, and some more chocolate chips for good measure. The key is not to overmix, which keeps them wonderfully fudgy. Then, we’ll dollop some extra Nutella on top and swirl it in for those beautiful ribbons of nutty chocolate goodness before baking them to gooey perfection. It’s a simple, satisfying process that guarantees a truly spectacular result every time.
Ingredients
For the Main Batter:
* 1 cup (2 sticks or 227g) unsalted butter, cut into cubes. Using good quality butter really makes a difference here; it’s the foundation of that rich flavor.
* 6 ounces (170g) good quality semi-sweet chocolate, chopped. I like to use a mix of chocolate chips and a chopped bar for the best melt and texture.
* 1 ½ cups (300g) granulated sugar. This gives them that perfect sweet balance.
* 3 large eggs. Make sure they’re at room temperature; it helps them incorporate better.
* 1 teaspoon pure vanilla extract. Don’t skimp on this; it enhances all the chocolatey notes.
* 1 cup (120g) all-purpose flour. Just plain old flour works beautifully.
* ½ teaspoon baking powder. This gives them just a little lift without making them cakey.
* ¼ teaspoon salt. Crucial for balancing the sweetness and bringing out the chocolate flavor.
* ½ cup (160g) creamy Nutella. The star of the show! Make sure it’s smooth and stir it a bit before measuring if it’s been sitting.
* ½ cup (90g) chocolate chips (semi-sweet or dark). These are optional but highly recommended for extra pockets of gooey chocolate!
For the Filling:
* ¼ cup (80g) creamy Nutella. This is for swirling on top, creating those irresistible nutty ribbons.
For the Glaze:
* ½ cup (90g) creamy Nutella. You can adjust this amount if you want a thinner or thicker glaze.
* 1-2 tablespoons milk or vegetable oil. This helps to thin out the Nutella for an easy drizzling consistency.
Step-by-Step Instructions
Step 1: Preheat & Prep Pan
First things first, let’s get our oven ready. Preheat it to 350°F (175°C). Now, grab an 8×8 inch baking pan. I like to line mine with parchment paper, leaving an overhang on the sides. This makes lifting the brownies out a breeze once they’re done. Lightly grease the parchment and the pan if you want extra insurance against sticking. Trust me, nobody wants their beautiful brownies stuck to the pan!
Step 2: Mix Dry Ingredients
In a medium bowl, whisk together the flour, baking powder, and salt. Give it a good whisk so everything is evenly distributed. This simple step ensures your baking powder and salt are distributed evenly, leading to consistent results in your brownies. Set this aside for now.
Step 3: Mix Wet Ingredients
In a heatproof bowl set over a saucepan of barely simmering water (a double boiler, essentially), melt the butter and chopped semi-sweet chocolate together. Stir occasionally until everything is smooth and glossy. Once melted, remove the bowl from the heat. Stir in the granulated sugar until well combined. Let it cool slightly for a few minutes – you don’t want to scramble your eggs! Then, whisk in the eggs one at a time, making sure each is fully incorporated before adding the next. Stir in the vanilla extract. The mixture should look rich and smooth.
Step 4: Combine
Now for the magic! Add the dry ingredients to the wet ingredients. Using a spatula, gently fold them together just until no dry streaks of flour remain. It’s super important not to overmix here! Overmixing can develop the gluten too much, leading to tougher brownies. We want fudgy and tender, not tough! Gently fold in the ½ cup of Nutella and the ½ cup of chocolate chips (if using). It’s okay if there are a few pockets of Nutella not fully incorporated yet; that’s part of the charm.
Step 5: Prepare Filling
Take your ¼ cup of Nutella for the filling. If it’s a little stiff, you can warm it very slightly for about 10 seconds in the microwave, or stir it vigorously in its jar to loosen it up. You want it to be dollop-able, not runny.
Step 6: Layer & Swirl
Pour about half of the brownie batter into your prepared pan and spread it out evenly. Then, dollop spoonfuls of the ¼ cup of Nutella over the top of this layer. Now, add the remaining brownie batter and spread it gently to cover the Nutella. Grab a knife or a skewer and swirl the top layer of batter and the Nutella filling together. Make figure-eights or random swirls to create beautiful marbling. Don’t overdo it; you want distinct swirls, not a uniform muddy mess!
Step 7: Bake
Pop the pan into your preheated oven. Bake for 25-35 minutes. The exact time will depend on your oven and how fudgy you like them. You’re looking for the edges to be set and a toothpick inserted near the center to come out with moist crumbs attached, but not wet batter. If it comes out completely clean, they might be slightly overbaked and drier than we want.
Step 8: Cool & Glaze
This is arguably the hardest part: waiting! Let the brownies cool completely in the pan on a wire rack. This is crucial for them to set properly and for the fudgy texture to develop. Once they’re completely cool, prepare the glaze by warming the ½ cup of Nutella gently with 1-2 tablespoons of milk or oil until it’s a drizzling consistency. Drizzle this over the cooled brownies. I like to do a zig-zag pattern.
Step 9: Slice & Serve
Once the glaze has set a bit, use the parchment paper overhang to lift the entire block of brownies out of the pan. Place it on a cutting board. For the neatest slices, use a sharp knife that’s been run under hot water and wiped dry between cuts. Slice into 9 or 16 squares, depending on how decadent you want your portions. Enjoy!
What to Serve It With
These Nutella brownies are pretty spectacular all on their own, but I love to get a little creative with how we serve them, especially for different occasions. For a leisurely breakfast or a weekend brunch, I often serve them with a fresh fruit salad – the tartness of berries or the sweetness of melon is a lovely contrast. A strong cup of coffee or a creamy cappuccino is the perfect companion. When we’re having these as a proper dessert, they’re absolutely sensational served warm (just pop a slice in the microwave for 10-15 seconds) with a generous scoop of good quality vanilla bean ice cream or even a dollop of Whipped cream. For a more elegant touch, a sprinkle of flaky sea salt on top of the glaze before it sets is a game-changer; it highlights all the chocolatey and nutty flavors. And for those cozy, no-fuss moments, I just grab a brownie (or two!) and a glass of cold milk. It’s pure comfort. My kids, bless them, are happy with just a brownie on its own, but they absolutely go wild when I serve them with a tiny drizzle of raspberry coulis on the side – it’s like a fancy restaurant treat at home!
Top Tips for Perfecting Your Nutella Brownies
I’ve made these Nutella brownies more times than I can count, and through trial and error (mostly delicious error!), I’ve picked up a few tricks that I think really help elevate them. First, when it comes to the chocolate, don’t just grab the cheapest chips. Using a good quality semi-sweet chocolate, and ideally chopping a chocolate bar, makes a noticeable difference in the richness and depth of flavor. It melts so much smoother! For the Nutella, make sure it’s stirred well before measuring. If it’s been sitting for a while, the oil can separate, and you want that creamy consistency integrated into the batter. Don’t be afraid to get a little generous with the Nutella swirl on top; those ribbons of pure hazelnut bliss are what make these brownies truly special. When you’re mixing the wet and dry ingredients, remember my mantra: ‘When in doubt, under-mix.’ Seriously, overmixing is the fastest way to tough brownies. Just fold until you don’t see any dry flour. It’s better to have a few tiny streaks of flour than to have overworked the batter. For baking, ovens can be so different! Keep an eye on them. The edges should look set, but the center should still look a little gooey. They continue to bake as they cool, so pulling them out when they seem *slightly* underdone is key to that perfect fudgy center. And for the glaze, if your Nutella seems too stiff, add your milk or oil a tiny bit at a time. You want it pourable, not gloppy. I’ve found that using a skewer to swirl the Nutella into the batter before baking is the best way to get those gorgeous patterns. Just run it through the batter a few times, making swirls, but don’t keep swirling endlessly, or you’ll muddy the colors. And a little secret? A sprinkle of flaky sea salt on top of the glaze just before it sets? Pure genius. It cuts through the sweetness and makes the chocolate and hazelnut flavors pop even more. Experiment with it!
Storing and Reheating Tips
So, you’ve made these incredible Nutella brownies (or maybe you’ve been gifted some!) and you want to keep them tasting their best. I’ve got you covered. Storing these beauties is pretty simple. At room temperature, they’ll stay wonderfully moist and fudgy for about 2-3 days. I usually keep them in an airtight container, and I don’t cut them until I’m ready to serve them. If you need them to last a bit longer, the refrigerator is your friend. They’ll stay good in an airtight container in the fridge for up to a week. The texture might firm up a little from the cold, but that’s easily fixed. For reheating, if they’ve been in the fridge and you want that just-baked gooeyness back, I highly recommend a quick zap in the microwave. A single brownie square usually only needs about 10-15 seconds on low power. Be careful not to overheat, or they can become tough. If you’re planning ahead for bake sales or just want to have them on hand for a future craving, these freeze like a dream! You can wrap individual brownies tightly in plastic wrap, then place them in a freezer-safe bag or container. They’ll last in the freezer for up to 2-3 months. To thaw, just unwrap them and let them come to room temperature, or give them that quick microwave reheat. If you’ve already glazed them, they’ll store just fine in the fridge or freezer. For freezing, I sometimes prefer to freeze them *before* glazing, then glaze them once they’ve thawed. That way, the glaze stays freshest. But honestly, either way works!
Frequently Asked Questions
Final Thoughts
Honestly, I can’t think of a single reason why you wouldn’t try these Nutella brownies. They’re the perfect storm of rich chocolate, creamy hazelnut, and that irresistible fudgy texture. They’re easy enough for a spontaneous baking session but impressive enough to serve to guests. They’re a testament to how simple ingredients can come together to create something truly magical. If you’re a chocolate lover, or a Nutella enthusiast, or just someone who appreciates a darn good brownie, you’ve got to give these a go. I promise, they won’t disappoint. If you’re looking for more chocolatey adventures, you might also enjoy my recipes for [link to another chocolate recipe] or perhaps some easy [link to cookie recipe] for a lighter treat. But seriously, these Nutella brownies are special. Give them a bake, and let me know what you think! I can’t wait to hear how yours turn out, and I’d absolutely love to see your swirling creations in the comments below. Happy baking!
Nutella Brownies (2 Ingredients)
Ingredients
Main Ingredients
- 4 large eggs at room temperature
- 1 cup Nutella
Optional Topping
- powdered sugar for dusting
Instructions
Preparation Steps
- Preheat the oven to 350ºF (175°C) and line an 8x8 inch brownie pan with parchment paper.
- Place the eggs in a mixer's bowl and beat for 5 to 8 minutes, or until the eggs have tripled in size and are pale yellow. (If using a handheld mixer, this may take up to 10 minutes on high speed.)
- Warm the Nutella in the microwave for about 60 seconds until it is smooth and runny. Remove and stir well.
- Slowly pour a thin stream of the warm Nutella into the whipped eggs while continuously beating on low speed until the mixture is just combined. Do not overmix.
- Transfer the batter gently into the prepared brownie pan.
- Bake for 30 to 35 minutes, or until a toothpick inserted near the center comes out with moist crumbs attached (not wet batter).
- Remove from the oven and let the brownies cool completely in the pan before attempting to cut.
- Dust with powdered sugar (optional), cut into 9 squares, and serve.