You know, sometimes the simplest things bring back the biggest floods of happy memories. For me, that’s often food. And if there’s one treat that instantly transports me back to summer afternoons, sticky fingers, and pure, unadulterated joy, it’s a good old-fashioned Krispie treat. But imagine taking that nostalgic goodness and giving it a sophisticated, utterly delightful twist – that’s exactly what these Neapolitan Krispie Treats are. They capture the essence of that beloved ice cream flavor, all in a chewy, gooey bar. Honestly, I was a little skeptical at first. Could we really capture that perfect swirl of chocolate, vanilla, and strawberry in a no-bake treat? The answer is a resounding YES. These aren’t just a fun riff on a classic; they’re a genuinely addictive confection that even my pickiest eaters devour. If you thought Krispie treats were just for kids’ parties, prepare to be amazed. They’re surprisingly easy and taste like a dream!
What are Neapolitan Krispie treats?
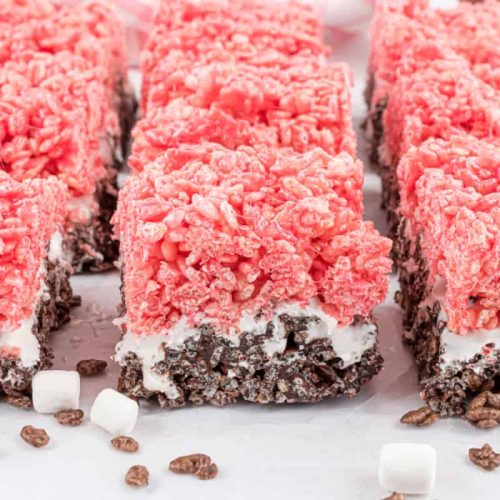
So, what exactly are Neapolitan Krispie Treats? Think of them as a delightful mashup of your favorite childhood cereal bars and the iconic Neapolitan ice cream. You know, the one with the three distinct layers: creamy vanilla, rich chocolate, and sweet strawberry. We’re taking that flavor profile and infusing it into the chewy, crispy goodness that we all know and love. It’s essentially a classic rice krispie treat recipe, but we’re dividing the mixture and coloring/flavoring each third to mimic those three glorious ice cream flavors. Then, we gently swirl them together before they set, creating beautiful, marbled patterns. It’s not a complicated process at all; it just takes a little bit of dividing and conquering with the ingredients. The result is a visually stunning treat that’s as fun to look at as it is to eat, and the flavors are surprisingly well-balanced.
Why you’ll love this recipe?
I love this recipe. There are so many reasons why I keep coming back to it.flavor is just out of this world. It genuinely tastes like Neapolitan ice cream, but with that delightful chewy texture that’s so satisfying. The combination of vanilla, chocolate, and strawberry is a classic for a reason, and it works beautifully here. You get a little bit of everything in every bite! Second, the simplicity is a huge draw for me. On those nights when I need a quick dessert but don’t have hours to bake, these Neapolitan Krispie Treats are an absolute lifesaver. They come together in less than 20 minutes (plus cooling time, of course!). Plus, they are incredibly cost-efficient. You likely already have most of the pantry staples on hand, and the ingredients are super affordable, making it a budget-friendly indulgenceversatility. While they’re perfect on their own, you can also cut them into fun shapes for holidays or celebrations. They’re also fantastic for bake sales because they travel so well. Honestly, compared to making a layered cake or even some other no-bake desserts, these Neapolitan Krispie Treats win hands down for ease, speed, and sheer deliciousness. They’re a guaranteed crowd-pleaser for all ages!
How to Make Neapolitan Krispie Treats
Quick Overview
Making these Neapolitan Krispie Treats is a joyful process that’s surprisingly straightforward. The main idea is to prepare a classic Krispie treat base, then divide it into three portions. Each portion gets its own signature flavor – vanilla, chocolate, and strawberry – before being layered and swirled together in the pan. The magic happens when you gently marble the colors, creating a beautiful, mosaic-like effect. It’s a simple technique that yields a stunning result, proving that you don’t need to be a master baker to create something truly special. They’re ready to set in minutes and are perfect for any occasion!
Ingredients
For the Main Batter:
- 1/4 cup (4 tablespoons) unsalted butter
- 1 package (10 ounces) marshmallows (about 40 large marshmallows or 4 cups mini marshmallows)
- 6 cups crispy rice cereal
For the Filling (coloring and flavoring):
- 1 teaspoon vanilla extract (divided)
- 1-2 tablespoons unsweetened cocoa powder (for chocolate)
- 1-2 tablespoons strawberry powder or pink/red food coloring (for strawberry)
Step-by-Step Instructions
Step 1: Preheat & Prep Pan
First things first, grab a 9×13 inch baking pan. Lightly grease it with butter or cooking spray, or line it with parchment paper, leaving some overhang on the sides for easy lifting later. This step is crucial to prevent any sticking. I usually do this while my butter is melting to save time. Make sure you get into all the corners!
Step 2: Mix Dry Ingredients
In a very large bowl (seriously, grab the biggest one you have!), measure out your 6 cups of crispy rice cereal. Set it aside. This is where we’ll combine everything later, and you need plenty of room to toss the cereal without making a mess.
Step 3: Mix Wet Ingredients
Now, in a large saucepan over low heat, melt the 1/4 cup of unsalted butter. Once it’s mostly melted, add your marshmallows. Stir gently and continuously. You want them to melt slowly and evenly without scorching. Keep stirring until the marshmallows are completely smooth and creamy. This usually takes about 5-7 minutes. Once they’re perfectly melted, remove the pan from the heat immediately. Stir in 1/3 teaspoon of vanilla extract into the marshmallow mixture. This is our base for all three flavors!
Step 4: Combine
Pour the hot marshmallow mixture over the cereal in your large bowl. Now comes the fun part: using a sturdy spatula or your hands (lightly greased or buttered so they don’t stick!), gently toss and fold everything together until the cereal is completely coated in the marshmallow goo. Work quickly but gently so you don’t crush the cereal too much. You want them to be crispy, not mushy!
Step 5: Prepare Filling (Divide & Flavor)
Now, here’s where the Neapolitan magic happens. Divide the coated cereal mixture as evenly as possible into three separate bowls. This is where I try to be a bit of a perfectionist to ensure equal amounts of each flavor. Now, for each bowl:
For the Vanilla: Stir in the remaining 2/3 teaspoon of vanilla extract.
For the Chocolate: In a small bowl, mix 1-2 tablespoons of unsweetened cocoa powder with a tiny splash of water or milk to create a smooth paste. Then, fold this paste into one of the cereal portions. You can add more cocoa for a deeper flavor, but I find 1.5 tablespoons is usually perfect.
For the Strawberry: You can use 1-2 tablespoons of strawberry powder (which you can often find in baking aisles or health food stores) or a few drops of pink/red food coloring. Stir it in until you get a lovely pink hue. If using powder, you might want to mix it with a tiny bit of water to distribute evenly. Be careful not to add too much liquid, or it could make things sticky.
Step 6: Layer & Swirl
Now, grab your prepared pan. Start by dropping spoonfuls of each colored mixture randomly into the pan. Don’t overthink it! You want distinct patches of color. Once you have dollops of all three flavors distributed, use your lightly greased hands or a spatula to gently press the mixture into the pan, about 1/2 inch thick. Don’t press too hard, or you’ll lose the marbled effect. Then, take a butter knife or a skewer and gently swirl the colors together. Make a few passes, creating ribbons of pink, brown, and white. Stop when you like the look of it – over-swirling can make it all blend into one color.
Step 7: Bake
This recipe actually doesn’t require baking! You just need to let them set. So, skip the oven and proceed to the next step.
Step 8: Cool & Glaze
Let the treats cool completely in the pan at room temperature for at least 1 hour. Resist the urge to cut them too soon, or they might fall apart! Once they’re firm and cooled, you can use the parchment paper overhang to lift the entire slab out of the pan. If you didn’t use parchment, you can carefully loosen the edges with a knife. At this point, you could drizzle them with a simple glaze if you like, but they’re delicious just as they are. If you *do* want a glaze, you could mix powdered sugar with a touch of milk or vanilla until pourable. Drizzle it over the top for an extra touch of sweetness and elegance.
Step 9: Slice & Serve
Once fully cooled and set, use a sharp knife (lightly oiled or buttered helps!) to cut the treats into squares or rectangles. I usually aim for about 2-inch squares. Serve them at room temperature for the best texture. The visual appeal of the swirls is really what makes them special, so arrange them nicely on a platter!
What to Serve It With
These Neapolitan Krispie Treats are so versatile, they fit into almost any occasion! For a simple weekday breakfast, they’re a fun treat alongside a steaming mug of coffee or a glass of cold milk. The kids will absolutely go wild for them! For a more elegant brunch spread, I like to cut them into smaller, bite-sized squares and arrange them on a tiered stand. They look so festive! Pair them with fresh berries and a mimosa for a delightful touch. As a delightful dessert, they’re perfect after a family dinner. I sometimes serve them with a scoop of actual vanilla ice cream (just for fun!) or a drizzle of chocolate sauce. For those quiet, cozy snacks moments, when you’re curled up with a good book or catching up with a friend, these are the ultimate comfort food. They’re just so satisfying and require zero fuss. My family has a tradition of making these whenever we watch a movie night at home; they disappear faster than popcorn!
Top Tips for Perfecting Your Neapolitan Krispie Treats
After making these more times than I can count, I’ve picked up a few tricks that really help ensure perfection every time. For the cereal itself, make sure you’re using fresh, crisp rice cereal. Stale cereal makes for sad, chewy treats, and nobody wants that! When you’re melting the marshmallows, low and slow is key. If you rush it, you can end up with a burnt, rubbery texture. And a pro tip I learned after one too many sticky messes: lightly butter or spray your hands and spatulas when you’re pressing and swirling the mixture. It makes all the difference. For the coloring and flavoring, don’t be afraid to adjust the amounts to your preference. If you love chocolate, add a little more cocoa! If you’re a strawberry fanatic, boost that flavor. Just be mindful not to add too much liquid, as it can affect the final texture. When it comes to swirling, less is often more. You want distinct ribbons of color, not a muddy mess. A few gentle passes with a knife are all you need. I’ve also experimented with using different types of marshmallows, and while standard ones work great, the mini marshmallows melt a bit faster. For ingredient swaps, if you can’t find strawberry powder, a good quality strawberry extract can work, but use it sparingly as it’s potent. For the cocoa, Dutch-processed cocoa gives a richer, smoother flavor. If you’re feeling adventurous, a pinch of sea salt in the marshmallow mixture can really enhance all the flavors!
Storing and Reheating Tips
These Neapolitan Krispie Treats are best enjoyed fresh, but they do store quite well. For the best texture, I recommend keeping them at room temperature. Store them in an airtight container, making sure to separate layers with parchment paper if you’re stacking them. They’ll stay delicious and chewy for about 2-3 days. If you need to store them for longer, the refrigerator is your friend. Place them in an airtight container, again with parchment paper between layers. They’ll keep well for up to a week. However, refrigerating can sometimes make them a bit firmer, so if you pull them from the fridge, let them sit out for about 15-20 minutes before serving to soften up. For even longer storage, you can freeze them! Wrap individual treats tightly in plastic wrap, then place them in a freezer-safe bag or container. They can be frozen for up to 2 months. To thaw, simply transfer them to the refrigerator overnight or let them come to room temperature on the counter for a couple of hours. And a note on the glaze: if you’re planning to store them for more than a day, I’d recommend adding the glaze *after* they’ve been stored, or right before serving, as it can sometimes get a little sticky over time. Honestly, though, they rarely last long enough in my house to worry about that!
Frequently Asked Questions
Final Thoughts
I really hope you give these Neapolitan Krispie Treats a try. They’re more than just a sweet snack; they’re a little slice of happiness that brings back the simple joys of childhood while offering a sophisticated flavor twist. They are so incredibly easy to whip up, making them perfect for spontaneous cravings or when you need a quick, impressive treat for guests. The visual appeal alone makes them a winner, and the taste is just divine – a perfect harmony of vanilla, chocolate, and strawberry in every chewy bite. If you love this recipe, you might also enjoy my classic Chocolate Chip Cookie Bars or my decadent Fudgy Brownies. They share that same spirit of comforting, homemade goodness. I can’t wait to hear how yours turn out, so please leave a comment below and tell me all about your Neapolitan Krispie Treat adventures! Happy baking (or no-baking, as the case may be)!
Neapolitan Krispie Treats
Ingredients
For the Chocolate Layer
- 0.25 cup unsalted butter
- 10 ounce mini marshmallows 1 bag
- 0.25 cup unsweetened baking cocoa
- 5.5 cup Cocoa Krispies cereal
For the Marshmallow Layer
- 0.25 cup unsalted butter softened
- 1 cup powdered sugar
- 7 ounce marshmallow cream 1 jar
- 2 teaspoons milk
For the Strawberry Layer
- 0.25 cup unsalted butter
- 10 ounce mini marshmallows 1 bag
- 0.3 ounce sugar-free strawberry gelatin mix 1 package
- 5.5 cup Rice Krispies cereal
Instructions
For the Chocolate Layer
- Line a 13x9 inch baking dish with foil, extending up the sides. Grease the foil with about 1 tablespoon of butter or cooking spray. Set aside.
- In a large saucepan, melt 0.25 cup unsalted butter over medium heat. Add 10 ounces mini marshmallows and stir constantly until completely smooth. Remove from heat and stir in 0.25 cup unsweetened baking cocoa until combined.
- Fold in 5.5 cups Cocoa Krispies cereal and mix until fully combined. Carefully spread the mixture evenly into the bottom of the prepared baking dish, pressing very gently. Set aside to cool slightly.
For the Marshmallow Layer
- In a large mixing bowl, beat 0.25 cup softened unsalted butter with 1 cup powdered sugar, 7 ounces marshmallow cream, and 2 teaspoons milk.
- Beat for about 3 minutes until the mixture is smooth and fluffy. Carefully spread this marshmallow layer evenly over the chocolate layer in the baking dish. Set aside.
For the Strawberry Layer
- In a large saucepan, melt another 0.25 cup unsalted butter over medium heat. Add another 10 ounces mini marshmallows and stir constantly until melted and smooth. Remove from heat.
- Mix in 0.3 ounce sugar-free strawberry gelatin powder until it's fully combined and the mixture is uniformly pink. Fold in 5.5 cups Rice Krispies cereal.
- Spread this strawberry mixture gently over the marshmallow layer. Cover the baking dish with plastic wrap and allow the treats to set at room temperature for at least one hour.
- Once set, use the foil to lift the entire slab of treats from the pan. Cut into desired pieces (squares or bars).