There’s something about a banana split that instantly whisks me back to carefree childhood afternoons—those long summer days when my siblings and I would rush to the local ice cream parlor, the bell on the door jingling with every burst of laughter. The combination of sweet bananas, cold creamy ice cream, and all those decadent toppings was basically the highlight of growing up. This recipe for a banana split captures all that joy but with a cozy homemade vibe I adore. It’s surprisingly simple, so you can whip it up anytime those late-night dessert cravings hit, without the fuss of making a full-blown cake or pie. Honestly, my kids ask for it more than any other treat around here! If you’re a fan of classic sundaes but want something that’s both quick and puts a smile on everyone’s face, you’ll love this homemade banana split recipe.
What is banana split?
Think of a banana split as the ultimate ice cream sundae with a cheeky twist — it’s essentially a banana sliced lengthwise with scoops of ice cream nestled perfectly between the halves. Then comes the fun part: layers of toppings like whipped cream, nuts, chocolate syrup, and cherries that turn it from simple to spectacular. The “split” in the name actually refers to splitting the banana down the middle, making room for those ice cream scoops to shine front and center. It’s a dessert that’s as flexible as it is satisfying—originally popularized in soda fountains back in the early 1900s, it quickly became a beloved classic across America, hailed for its incredible contrast of fruity freshness with rich, creamy indulgence. You don’t have to be a pastry chef to nail it; it’s a family favorite that’s pretty much foolproof to customize and enjoy.
Why you’ll love this recipe?
What I love most about this banana split recipe is honestly how effortlessly it hits all the right notes without needing hours in the kitchen. The flavor is a joyful mix of fresh bananas with the sweet, creamy ice cream—you get that perfect balance of textures and tastes in every single bite. It’s really hard to beat the contrast between the cold ice cream and the warmth of the banana, especially when smothered in homemade or good-quality chocolate syrup. And hey, I’m not shy about saying it’s budget-friendly too; you’re basically just picking up bananas and some ice cream—two ingredients you probably already have or can grab on any grocery run.
But it’s also the versatility that wins me over. You can dress it up or down depending on your mood—my family goes wild for chopped nuts and rainbow sprinkles, while I often add a drizzle of caramel or a handful of fresh berries for a little refresher. It’s like a canvas for your dessert dreams. I’ve even swapped in healthier ice cream alternatives or added a scoop of Greek yogurt to keep it lighter but still indulgent. Compared to other desserts like heavy cakes or mousses, this banana split is a delightfully easy way to bring everyone around the table for a sweet little celebration, no matter the occasion.
How do you make banana split?
Quick Overview
If you’ve ever enjoyed a banana split from your favorite ice cream shop, you already know how heavenly it is—this homemade version cuts out the wait without skimping on that nostalgic magic. The cool part? It only takes a few minutes and minimal filling, so you get that irresistible mix of creamy, chewy, and crunchy textures posthaste. With a few simple steps—prepping your bananas, scooping your favorite ice cream, and layering on your toppings—you’ll have a sundae that feels festive and looks picture-perfect. Trust me, the hardest part is waiting for everyone to stop gawking long enough to dig in!
Ingredients
For the Banana Split:
- 2 ripe but firm bananas (not mushy!) – they hold the shape better this way
- 3 scoops of your favorite ice cream (vanilla, chocolate, and strawberry are classic)
For the Toppings:
- Whipped cream (homemade or store-bought if you’re in a rush)
- Chocolate syrup – I love a drizzle of dark chocolate for richness
- Chopped nuts like walnuts or peanuts – for that delightful crunch
- Maraschino cherries – the must-have final pop of color and sweetness
- Optional extras: rainbow sprinkles, sliced strawberries, caramel sauce
Step-by-Step Instructions
Step 1: Prep Your Bananas
Start by peeling your bananas and slicing them lengthwise. Make sure to cut gently so the banana halves look neat and hold their shape nicely on your serving dish. This is your sundae’s foundation, so take your time to get these babies just right.
Step 2: Scoop the Ice Cream
Next, grab three generous scoops of your favorite ice cream flavors. I like to stick with the classic trio—vanilla, chocolate, and strawberry—because they play so well with the banana’s natural sweetness. If you’re feeling extra adventurous, swap in a flavor or two like coffee or mint chip, but make sure it’s something you love biting into.
Step 3: Assemble the Base
Place the banana halves side by side in a long dish or on a big plate, then nestle the ice cream scoops snugly between them. The goal is to create those perfect “boats” for all your delicious toppings. The bananas should hold the scoops without tipping over, so don’t overcrowd—spread everything out a bit to keep it balanced.
Step 4: Add the Toppings
Now for the fun part! Dollop generous clouds of whipped cream on each ice cream scoop. Drizzle chocolate syrup like you’re an artist painting your masterpiece. Sprinkle nuts over the top for bite and texture, and pop a bright red cherry on each mound of whipped cream. If you want to jazz it up, throw on some sprinkles or a light drizzle of caramel here.
Step 5: Serve Immediately
Banana splits are best enjoyed fresh before the bananas brown or the ice cream melts too much. Serve it up with a long spoon and watch it disappear in minutes—trust me, it always becomes the highlight of any gathering.
What to Serve It With
For Breakfast: Try this with a cup of strong black coffee or a creamy cappuccino—the warm bitterness is such a lovely contrast to the sweet banana and cold ice cream. I sometimes add a sprinkle of cinnamon on top for a cozy morning twist.
For Brunch: Plate it elegantly with some fresh berries and a drizzle of local honey on the side. Pair it with sparkling water infused with lemon or a light white wine for a feel-good treat that’s a touch fancy but not over the top.
As Dessert: This banana split makes a fantastic after-dinner sweet that’s playful yet satisfying. Serve with a scoop of espresso ice cream or a small glass of dessert wine, and you’ll have dinner guests buzzing about your thoughtful but simple finishing touch.
For Cozy Snacks: When you want a little something indulgent mid-afternoon, this banana split comes to the rescue—especially during colder months when the rich chocolate and whipped cream pair beautifully with a mug of hot cocoa or chai tea. It’s a comfy hug in dessert form that melts away any kitchen stress.
Top Tips for Perfecting Your Banana Split
Choose Ripe but Firm Bananas: If the bananas get too soft, they’re hard to slice neatly and won’t hold the ice cream as well. I’ve learned this the hard way after serving a collapsed split that looked more like a mess than a dessert.
Don’t Overpack Your Plate: It’s tempting to pile on every topping, but a little restraint actually makes each bite more enjoyable. Aim for balance—you want every spoonful to have a bit of banana, ice cream, cream, and toppings.
Swirl it Your Way: When drizzling chocolate or caramel, try zigzag or circular motions for visual appeal. I sometimes dip the spoon in the syrup mid-pour to get an artistic drip effect—bonus points if you clean up the edges afterward.
Experiment with Ice Cream Flavors: I once swapped vanilla with a rich dulce de leche, and it was a game-changer. Don’t be afraid to try new combos that fit your taste buds—even seasonal flavors like pumpkin or gingerbread work surprisingly well.
Keep Ingredients Cold: If you’re prepping for guests, chill your serving plates ahead so the ice cream doesn’t melt too quickly. This little trick helps keep the banana split looking fresh longer.
Make Your Own Whipped Cream: If you have the time, homemade whipped cream tastes infinitely better and whips up quickly with a bit of sugar and vanilla. It’s creamier and has a lovely lightness that store-bought just can’t quite match.
Over the years, I’ve learned that the magic of a banana split is in the layering—don’t rush it and enjoy the assembly like a mini celebration. My kids actually ask for seconds after I perfect the topping placement, so you’ll know when you’ve hit the sweet spot!
Storing and Reheating Tips
Room Temperature: This dessert is best enjoyed fresh because bananas brown quickly, and ice cream melts, but if you have leftovers, cover them with plastic wrap and enjoy within 1-2 hours to keep the bananas from darkening and the toppings fresh.
Refrigerator Storage: If you want to keep parts of it for later, store bananas separately wrapped tightly with plastic wrap or in an airtight container and ice cream in the freezer. The assembled banana split won’t hold up well in the fridge because of melting ice cream.
Freezer Instructions: It’s tricky to freeze a fully assembled banana split because bananas get mushy and ice cream hardens too much. However, you can freeze the ice cream scoops on a tray first before assembly to speed things up later. Let them thaw a bit before serving.
Glaze Timing Advice: If you use chocolate syrup or caramel, add these right before serving to prevent sogginess. Whipped cream can weep quickly, so dollop it on last-minute if you’re prepping ahead.
Frequently Asked Questions
Final Thoughts
There’s just something so deeply comforting about a banana split—the way the cold ice cream melts against the sweetness of the banana and the crunchy toppings is pure joy on a plate. This version brings that timeless favorite right into your kitchen without any fancy fuss, just honest-to-goodness ingredients you’ll want to make again and again. I love how it instantly brightens the mood no matter the occasion, and my family can’t get enough of it. Dive into this recipe and I promise it’ll become your go-to “happy dessert” just like it is in my house. Don’t forget to share how yours turns out, or any fun twists you put on it—I’m always here to swap stories over a sweet treat. Happy making and even happier eating!
banana split
Ingredients
Main Ingredients
- 2.25 cups vanilla wafer crumbs
- 10 tablespoons salted butter, melted
- 3 tablespoons sugar
- 24 ounces cream cheese, room temperature
- 1 cup sugar
- 3 tablespoons all purpose flour
- 0.25 cup sour cream, room temperature
- 2 teaspoons banana extract
- 1 cup mashed banana (about 2 medium bananas)
- 4 large eggs, room temperature
- 1.5 cups heavy whipping cream, cold for whipped cream scoops
- 6 tablespoons powdered sugar for whipped cream scoops
- 6 tablespoons natural unsweetened cocoa for chocolate whipped cream
- 0.75 teaspoon vanilla extract for whipped cream scoops
- 0.75 cup freeze dried strawberries (powdered, 5-6 tbsp) for strawberry whipped cream
- 1.5 cups heavy whipping cream, cold for vanilla whipped cream swirls
- 3 cups fresh pineapple, sliced for topping
- 1 cup fresh strawberries for topping
- 0.5 cup cherries for topping
- 0.25 cup chopped nuts for topping
- 2 bananas sliced bananas for topping
- 0.5 cup chocolate sauce for drizzling
Instructions
Preparation Steps
- Preheat oven to 325°F (163°C). Line a 9-inch springform pan with parchment and grease the sides.
- Combine vanilla wafer crumbs, melted butter, and sugar. Press mixture into bottom and sides of springform pan.
- Bake crust for 10 minutes. Remove and cool.
- Lower oven temperature to 300°F (148°C). Beat cream cheese, sugar, and flour on low speed until smooth and combined. Scrape bowl.
- Mix in sour cream and banana extract until combined.
- Add mashed bananas and mix on low speed until mixed.
- Add eggs one at a time, mixing slowly after each addition and scraping bowl as necessary.
- Pour batter into crust-lined pan.
- Place springform pan in a larger pan and add warm water halfway up outside of the springform pan.
- Bake for 1 hour 10 minutes until center is set but slightly jiggly.
- Turn off oven and leave door closed for 30 minutes. Then crack the door open and let cool for another 30 minutes.
- Remove cheesecake from oven and water bath. Chill in refrigerator 5-6 hours or overnight.
- Whip cream with powdered sugar and flavorings separately for vanilla, chocolate, and strawberry whipped cream scoops. Freeze until firm.
- Once cheesecake is chilled, soften whipped creams 15-20 minutes at room temperature for easier scooping.
- Remove cheesecake from pan and place on serving plate.
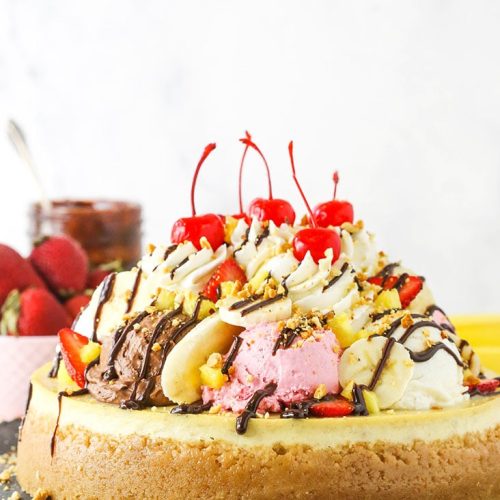
- Use ice cream scoop to place alternating flavored whipped cream scoops on top.
- Make fresh vanilla whipped cream with cold heavy cream, powdered sugar, and vanilla extract. Pipe swirls on top.
- Decorate cheesecake with sliced bananas, pineapple, strawberries, cherries, nuts, and drizzle chocolate sauce.
- Serve immediately or refrigerate and add fresh banana slices just before serving to avoid browning.