Oh, where do I even begin with this recipe? It’s more than just a homemade candy bar; it’s a little ticket back to my childhood, to those rainy afternoons spent in Grandma’s kitchen, the air thick with the sweet scent of melting chocolate and caramel. If you’ve ever craved that perfect, satisfying crunch followed by a chewy, gooey center, and then that smooth, rich chocolate coating, then you’re in for a treat. This isn’t just a dessert; it’s an experience. Forget those expensive store-bought bars that always seem to be missing *something*. This homemade candy bar recipe captures that magical, melt-in-your-mouth goodness, but with a personal touch that makes it extra special. It’s surprisingly simple, too, which is always a win in my book, especially when life gets a bit hectic. It feels like a big indulgence, but it’s made with ingredients you probably already have, and the effort is so worth the incredible result. This truly is my go-to when I need a serious sweet fix or want to impress friends without spending hours slaving away.
What is this dreamy homemade candy bar?
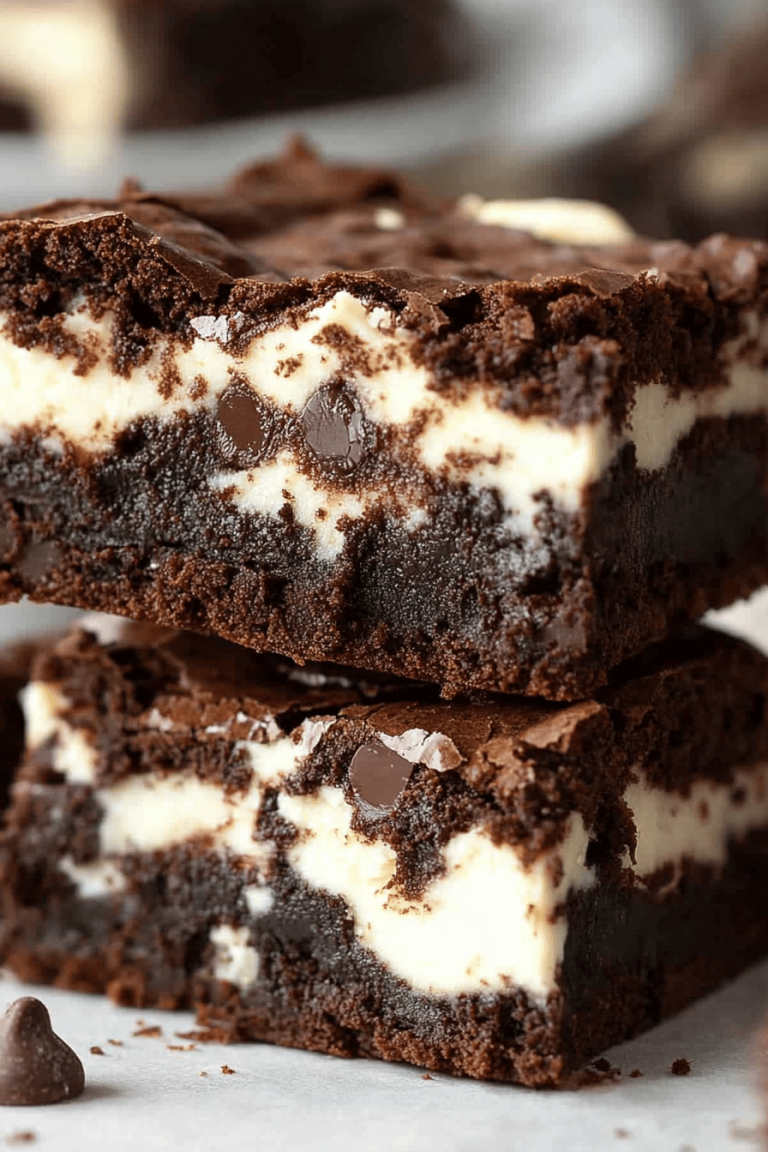
So, what exactly *is* this magnificent homemade candy bar? Think of it as your ultimate customizable sweet. At its heart, it’s a delightful combination of textures and flavors that just sing together. We’re talking about a base that’s got a delightful, slightly crisp yet wonderfully chewy texture, often reminiscent of a nougat or a dense cookie, all enveloped in a luscious layer of smooth, dreamy chocolate. Some versions might have a caramel drizzle, others a sprinkle of sea salt, or perhaps a nutty crunch. My version leans into a rich, buttery toffee-like center with a hint of vanilla and that satisfying snap when you bite into it. It’s essentially the best parts of your favorite candy bars, all rolled into one glorious, homemade creation. It’s like taking all the deliciousness you remember from childhood treats and making it even better, because you know exactly what’s gone into it. It’s comfort food at its finest, and it’s so much more satisfying knowing you’ve crafted it with your own two hands.
Why you’ll love this recipe?
Honestly, there are so many reasons why this homemade candy bar recipe has become a staple in my kitchen. First off, the *flavor*. It’s just phenomenal. The combination of the rich, buttery caramel-like center, the hint of salt that really makes the sweetness pop, and the smooth chocolate coating is pure bliss. It’s that perfect balance of sweet, salty, and a touch of richness that keeps you going back for just one more bite (or maybe two!).
Then there’s the **simplicity**. I know, I know, “homemade candy bar” might sound intimidating, but trust me on this one. I’ve streamlined the process so that even if you’re a beginner in the candy-making world, you can totally nail this. There are no fancy techniques or hard-to-find ingredients. It’s all about careful mixing and a little patience, and the results are utterly spectacular. It’s a lifesaver on busy nights when the sweet craving hits hard and you don’t want to fire up the oven for a whole cake.
And let’s talk about **cost-efficiency**. When you compare the cost of buying a box of fancy candy bars versus making this batch yourself, the savings are pretty significant. You get way more bang for your buck, and honestly, the homemade taste is far superior. You’re using good quality ingredients, and the sheer quantity you can make is impressive.
What I *personally* love most about this recipe is its **versatility**. While I have my favorite way to make it (which I’ll share!), you can easily tweak it. Want to add some chopped nuts for extra crunch? Go for it! A sprinkle of flaky sea salt on top before the chocolate sets? Absolutely divine. You could even experiment with different types of chocolate for the coating – dark, milk, or White Chocolate all work beautifully. It’s a recipe that grows with you and your cravings. It’s also perfect for gifting! Wrapped up in little cellophane bags, these homemade candy bars are always a huge hit at parties or as thank-you gifts. They feel so thoughtful and special.
How do I make homemade candy bars?
Quick Overview
This recipe breaks down into a few key stages: creating a rich, chewy caramel-like center, preparing it for cutting, and then coating it all in glorious chocolate. We’ll start by melting and simmering simple ingredients to form the base, then letting it cool slightly so it’s manageable. Once it’s firm enough to handle, we’ll cut it into bars, and then comes the fun part: dipping them in smooth, melted chocolate. It’s a straightforward process that yields incredible results, and I’ll guide you through every step to ensure your homemade candy bar is absolutely perfect.
Ingredients
For the Chewy Center:
This is where all the magic happens! You’ll need:
- 2 cups granulated sugar: This forms the sweet backbone of our candy bar. Make sure it’s regular granulated sugar for the best caramelization.
- 1 cup corn syrup: This little secret weapon prevents crystallization and gives us that wonderfully smooth, chewy texture.
- 3/4 cup evaporated milk: Evaporated milk is key here because it’s concentrated and adds a rich, creamy depth without adding too much liquid. Don’t substitute with regular milk!
- 1/2 cup unsalted butter, cut into cubes: Good quality butter makes a world of difference in flavor.
- 1 teaspoon vanilla extract: Pure vanilla extract is non-negotiable for that authentic, warm flavor.
- 1/2 teaspoon salt: This is crucial for balancing the sweetness and enhancing all the other flavors. Don’t skip it!
For the Chocolate Coating:
For that irresistible outer layer:
- 2 cups semi-sweet chocolate chips: I love semi-sweet for its balanced flavor, but you can use milk or dark chocolate chips if that’s your preference.
- 1 tablespoon vegetable shortening or coconut oil: This helps the chocolate melt smoothly and creates a nice, glossy finish that hardens beautifully.
Optional Add-ins/Toppings:
Get creative here!
- 1/2 cup chopped roasted peanuts, almonds, or pecans: For a nutty crunch.
- Flaky sea salt: A sprinkle on top before the chocolate sets is pure heaven.
Step-by-Step Instructions
Step 1: Prepare Your Pan
First things first, grab an 8×8 inch baking pan. You want to line it really well with parchment paper, letting the paper hang over the sides a bit – this makes it super easy to lift the whole slab of candy out later. A good spray of non-stick cooking spray underneath the parchment can also help keep it from shifting while you work. Set this aside. This prep work makes everything else so much smoother.
Step 2: Combine the Base Ingredients
In a large, heavy-bottomed saucepan (this is important to prevent scorching!), combine the granulated sugar, corn syrup, evaporated milk, and cubed butter. Place this over medium heat. Stir constantly with a wooden spoon or heatproof spatula until the sugar is dissolved and the butter is melted. Keep stirring!
Step 3: Cook the Mixture
Once everything is combined and simmering gently, stop stirring for a bit, but keep an eye on it. You want to let it cook undisturbed until it reaches the soft-ball stage. This is typically around 240-245°F (115-118°C) on a candy thermometer. If you don’t have a thermometer, you can test it by dropping a tiny bit of the mixture into a glass of ice-cold water. It should form a soft, pliable ball that you can easily squish with your fingers. This part takes patience, usually around 15-20 minutes. Don’t rush it!
Step 4: Add Flavorings and Pour
As soon as it reaches the soft-ball stage, remove the saucepan from the heat. Stir in the vanilla extract and salt. Be careful, it will bubble up a bit! Now, carefully pour this glorious, hot mixture into your prepared parchment-lined baking pan. Don’t scrape the bottom of the pan too much; just pour what flows easily. Let it sit undisturbed for about 10-15 minutes. You’ll see it start to firm up.
Step 5: Incorporate Optional Add-ins (if using)
If you’re adding nuts, now’s the time to gently fold them into the slightly cooled mixture. Spread it evenly in the pan. Don’t overwork it; just a gentle press to ensure they’re somewhat distributed. If you’re using flaky sea salt, you’ll add that later, on top of the chocolate coating.
Step 6: Cool and Cut
Now, this is the hardest part: waiting! Let the mixture cool completely in the pan, at least 2-3 hours, or even better, overnight. You want it firm enough to cut cleanly. Once fully cooled and firm, use the overhanging parchment paper to lift the whole slab out of the pan onto a cutting board. Use a sharp knife to cut it into your desired candy bar shapes – I usually go for about 1-inch by 3-inch rectangles, but you do you!
Step 7: Prepare the Chocolate Coating
While your candy bars are cooling, or just before you’re ready to dip them, prepare your chocolate. In a heatproof bowl, combine the chocolate chips and the vegetable shortening (or coconut oil). You can melt this using a double boiler (a bowl set over a pot of simmering water, making sure the bottom of the bowl doesn’t touch the water) or in the microwave. If microwaving, heat in 30-second intervals, stirring well after each, until almost completely melted. Stir until smooth and glossy. You want it fluid enough to coat easily.
Step 8: Dip and Decorate
Take each cut candy bar and dip it into the melted chocolate, using a fork or a dipping tool to help coat it completely. Let any excess chocolate drip back into the bowl. Place the coated bars on a clean sheet of parchment paper. If you’re using flaky sea salt, sprinkle it on top of the chocolate *immediately* after dipping, while the chocolate is still wet. Work relatively quickly so the chocolate doesn’t start to set in the bowl.
Step 9: Chill and Enjoy!
Once all your bars are dipped and decorated, transfer the parchment paper to a baking sheet and place them in the refrigerator for about 30 minutes to an hour, or until the chocolate coating is completely firm. Once hardened, they’re ready to be devoured! This is the moment of truth, and I promise, it’s so satisfying to see (and taste!) your perfect homemade candy bar.
What to Serve It With
These homemade candy bars are stars on their own, but they also play beautifully with other things, depending on the occasion. They’re seriously versatile!
For Breakfast: While technically a treat, a small piece can be a delightful addition to a more wholesome breakfast. I love having one with a strong, black coffee when I want a little indulgence to kickstart my day. It feels like a special treat without being overwhelmingly heavy first thing. Sometimes, I even crumble a small piece over plain Greek Yogurt for a little sweet crunch and flavor boost.
For Brunch: These are fantastic on a brunch buffet! Arrange them artfully on a platter alongside fresh fruit, mini muffins, or quiches. They add a touch of sweet decadence that people really appreciate. A chilled glass of sparkling cider or a mimosa pairs wonderfully with the sweetness of the candy bar.
As Dessert: This is perhaps their most natural habitat. Serve a homemade candy bar alongside a scoop of vanilla bean ice cream, or maybe a small portion of rich Chocolate Cake for a double dose of chocolatey goodness. They also make a wonderful accompaniment to a cheese board if you’re feeling adventurous – the sweet and salty combo can be surprisingly delightful with certain cheeses.
For Cozy Snacks: My kids ask for these all the time when they need an after-school treat. They’re perfect with a tall glass of cold milk. They’re also wonderful for a late-night craving when you just need something sweet to satisfy that itch without having to bake a whole pie. They hit the spot every single time. I’ve even shared them with friends who popped over unexpectedly, and they always disappear surprisingly fast!
Top Tips for Perfecting Your Homemade Candy Bar
I’ve made this recipe more times than I can count, and over the years, I’ve picked up a few tricks that really make a difference. These aren’t hard rules, but little nudges that will help ensure your homemade candy bar turns out exceptionally well.
About the Candy Mixture: The biggest tip I can give you is to use a good quality, heavy-bottomed saucepan. This distributes heat evenly and drastically reduces the chance of scorching your sugar mixture, which is the number one way to ruin a batch. Stirring is important, especially at the beginning and end, but when it’s cooking to temperature, resist the urge to stir constantly unless the recipe specifies. Over-stirring can sometimes lead to a grainy texture. Also, be precise with your candy thermometer; hitting that soft-ball stage is crucial for the right chewy consistency.
Cooling is Key: Don’t be tempted to cut the candy while it’s still warm or even slightly soft. It needs to be thoroughly cool and firm. I know waiting is hard, but if you cut it too soon, it will be sticky and gooey, and you won’t get those clean edges. Letting it cool completely, often overnight, is the secret to easy slicing and perfect bar shapes.
Chocolate Coating Perfection: When melting your chocolate, patience is your best friend. Whether you use a double boiler or the microwave, melt it slowly and stir frequently. If you overheat chocolate, it can seize up and become lumpy and unusable. Adding that little bit of shortening or coconut oil isn’t just for shine; it helps temper the chocolate so it hardens beautifully and has a good snap. If your chocolate starts to get too thick while you’re dipping, you can gently warm it again for a few seconds.
Ingredient Swaps and Variations: While this recipe is fantastic as is, feel free to experiment! If you’re not a fan of peanuts, try chopped almonds or pecans for a different nutty flavor. For a more decadent bar, use good quality dark chocolate chips for the coating. You could even add a pinch of espresso powder to the chocolate for a mocha twist. If you find the mixture a little too sweet, a pinch more salt in the center mixture or a good sprinkle of flaky sea salt on top can help balance it out.
Cutting Technique: A sharp, clean knife is essential for cutting. I often find wiping the knife with a damp cloth between cuts helps prevent sticking and ensures neat edges. If the candy is very firm, a little heat on the knife (briefly dipped in hot water and wiped dry) can also help it glide through.
Storage Smart: If you’re not coating them in chocolate, they can get a bit sticky. The chocolate coating acts as a bit of a barrier, but proper storage is still important to keep them fresh and prevent them from sticking to each other. I always lay them out in a single layer in an airtight container with parchment paper between layers.
Storing and Reheating Tips
Once you’ve made these glorious homemade candy bars, you’ll want them to stay delicious for as long as possible! Luckily, they store quite well.
Room Temperature: If you’ve coated them in chocolate, they can be stored at room temperature for up to a week, provided your kitchen isn’t too warm. The key is an airtight container. I like to put them in a container with parchment paper between layers to prevent them from sticking to each other. They maintain their texture and flavor beautifully this way. Just make sure they’re fully set before storing.
Refrigerator Storage: For longer storage, or if you live in a warm climate, the refrigerator is your best friend. They’ll easily last for 2-3 weeks in an airtight container in the fridge. The chocolate coating will be firmer, which can be quite nice! Just be aware that condensation can sometimes form when you take them out, so let them sit at room temperature for about 10-15 minutes before enjoying if you prefer a softer bite.
Freezer Instructions: Yes, you can freeze these! For the best quality, I recommend wrapping each bar individually in plastic wrap, then placing them in a freezer-safe bag or airtight container. They can last for up to 2-3 months in the freezer. To thaw, simply transfer the frozen bars to the refrigerator overnight, then let them come to room temperature for about 30 minutes before eating. This prevents any sogginess.
Glaze Timing Advice: If you’re storing them for a longer period, it’s best to add any decorative toppings like flaky sea salt right before serving, especially if you’ve frozen them, as moisture can affect them. The chocolate coating itself holds up well in all storage methods.
Frequently Asked Questions
Final Thoughts
Making this homemade candy bar recipe truly feels like a little act of love. It’s proof that you don’t need a fancy bakery or expensive ingredients to create something truly magical and satisfying. The way the caramel-like center yields to a satisfying chew, and then that smooth chocolate shell gives way – it’s just pure joy in every bite. I hope you’ll give this recipe a try. It’s one of those recipes that’s so rewarding, and I guarantee you’ll be amazed at how simple yet incredible it is. It’s the perfect solution for satisfying that sweet craving, a wonderful treat to share with loved ones, or even a thoughtful homemade gift that’s made with heart. If you love this recipe, you might also enjoy my recipe for [Link to another relevant recipe, e.g., Salted Caramel Brownies] or my [Link to another relevant recipe, e.g., No-Bake peanut butter cookies] for more easy, delightful treats. I can’t wait to hear how yours turn out! Don’t forget to leave a comment below with your favorite variations or how your family enjoyed them. Happy baking (or rather, candy making)!

Copycat Kit Kat Bites
Ingredients
Main Ingredients
- 0.75 cup unsalted butter
- 0.75 cup heavy cream
- 1.5 cup granulated sugar
- 25 regular sized marshmallows
- 12 ounce milk chocolate morsels
- 1 ounce unsweetened baking chocolate
- 4.5 cup rice krispies cereal
- 11 ounce butterscotch morsels If you don't like peanut butter, swap out the peanut butter morsels for more butterscotch morsels or vice versa.
- 1 cup peanut butter morsels Swap out for more butterscotch morsels if avoiding peanut butter.
Instructions
Preparation Steps
- In a large mixing bowl, add marshmallows, milk chocolate morsels and baking chocolate. Set aside.
- In a large pot, bring to a boil the sugar, cream and butter (over medium high heat). Once boiling, continue to boil for 4 minutes, stirring constantly. Remove from heat. Pour hot mixture over marshmallows and chocolate. Using an electric mixer, beat until chocolate has melted and mixture is smooth (about 2 minutes).
- Melt butterscotch and peanut butter morsels together in microwave bowl for one minute. Stir and heat at 30 second intervals until fully melted. (Microwave in 15-20 second intervals, stirring after each increment, to prevent seizing.)
- In a large bowl, combine rice cereal, melted butterscotch and about 1/3 of the chocolate mixture. Mix completely.
- In a parchment paper lined 13x9 baking dish, pour 1/3 of chocolate mixture onto bottom, spreading with a knife until bottom of dish is covered. Top with cereal mixture. Press firmly. Pour remaining 1/3 of chocolate mixture over cereal, spreading with a knife.
- Allow to set up in refrigerator, about 1-2 hours. Remove and cut into bite sized pieces. ENJOY!